How to factory reset your iPhone, iPad, or iPod touch

Make sure to back up your device so that you can restore your data later.
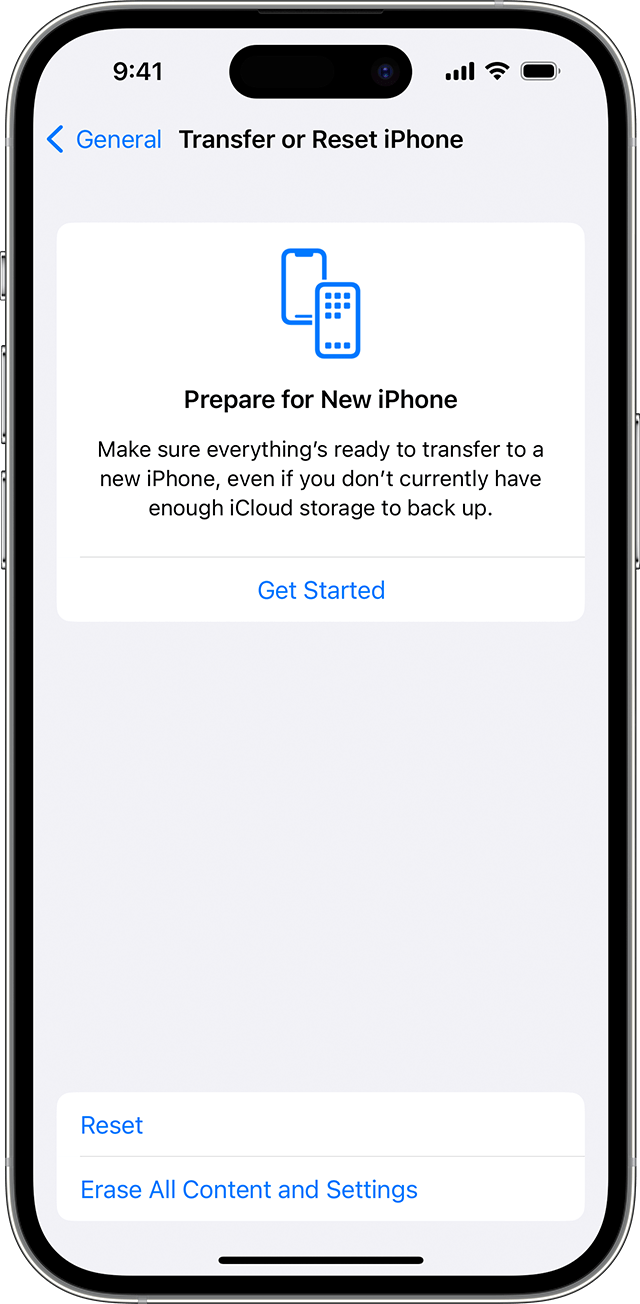
  • Tap Settings > General > Transfer or Reset [Device]
  • Tap Erase All Content and Settings.
Tap Erase All Content and Settings

If asked, enter your passcode or Apple Account password. Forgot your passcode or Apple Account password?

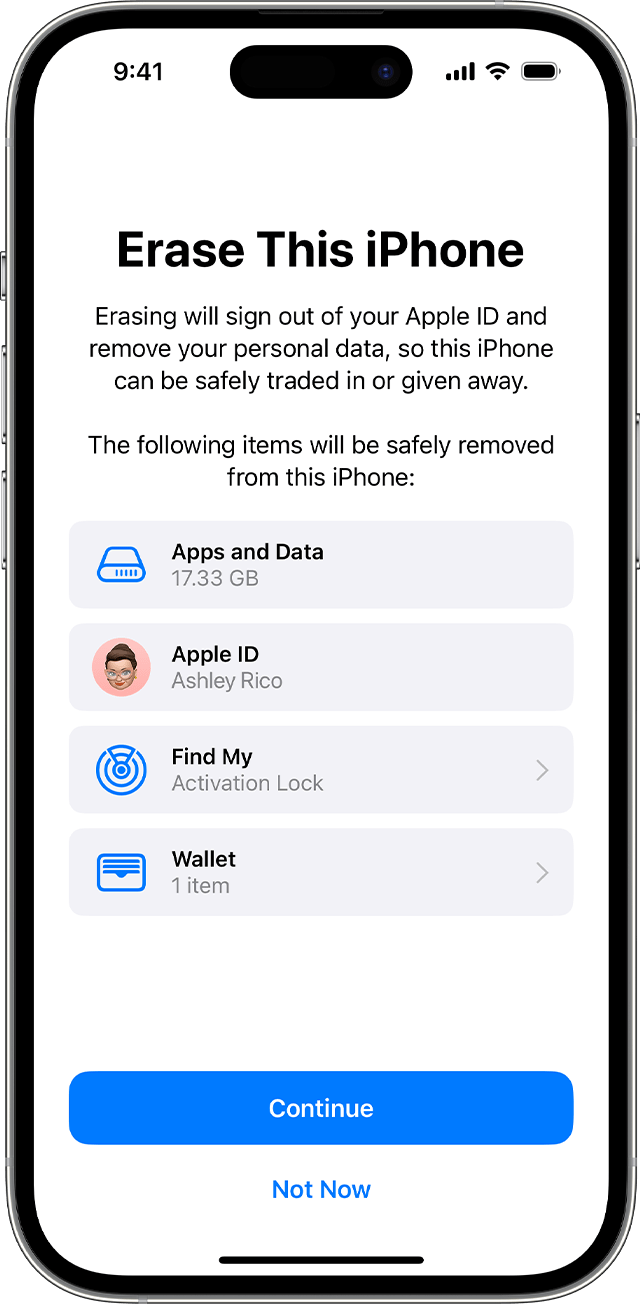
Confirm that you want to erase your device

If you have an eSIM, you can choose to erase your eSIM or keep it. If you erase your eSIM, you need to contact your carrier to reactivate your cellular plan.

Confirm that you want to erase your device

Wait for your device to erase

It might take a few minutes to completely erase your data.

If you can’t erase your iPhone, iPad, or iPod touch

  • Learn what to do if you don’t remember your passcode for your iPhone, iPad, or iPod touch, or your device is disabled.

  • If you forget your Screen Time passcode, you can reset it. Restoring your device using a backup won’t remove the Screen Time passcode.

[mai mult...]

How to check if Windows Firewall is blocking an App

The most obvious sign will be a Windows Security alert notifying you that the firewall is blocking some features of the app and giving you the option to allow it access.

If this doesn’t pop up, look for the following signs that the firewall is interfering with the app:

  • An in-app error message that tells you the firewall is blocking some of its features.
  • Connection errors and time-outs.
  • The app does not connect to the internet.
  • Features dependent on network access not working.

The easiest way to see if an app is being blocked by the firewall is to check its list of allowed apps. It shows the apps it lets through or blocks on networks that are public (e.g., coffee shop or library Wi-Fi) or private (e.g., home or office Wi-Fi).

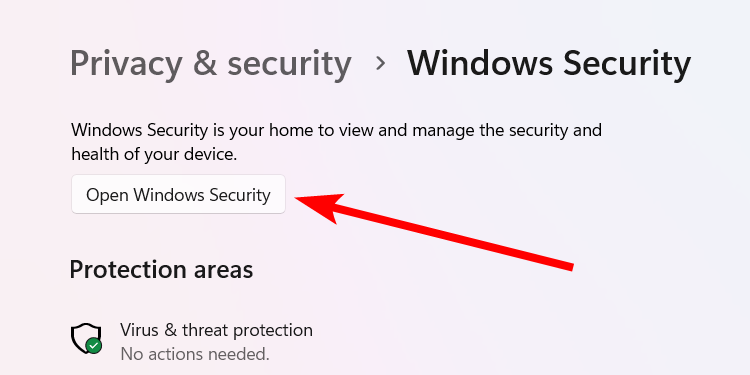
To do that, press Win + i to open the Settings app, go to Privacy & Security > Windows Security, and click the “Open Windows Security” button.

Opening Windows Security in Windows 11.

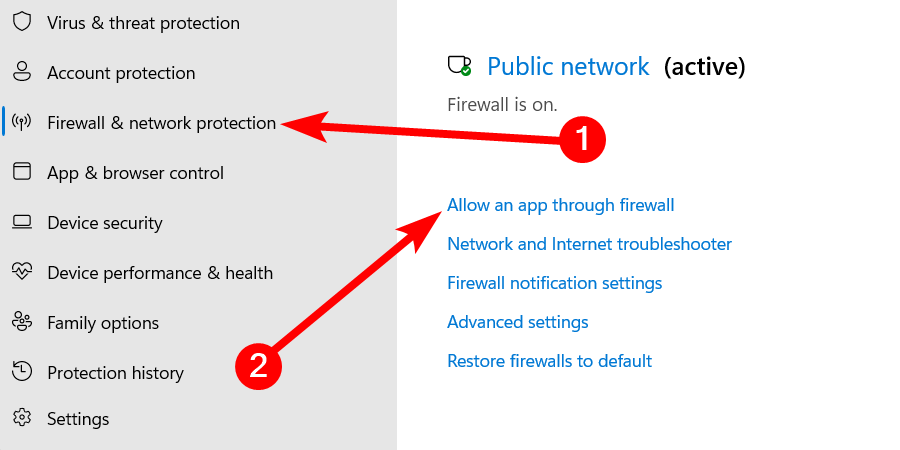
In Windows Security, select “Firewall & Network Protection” in the left sidebar and click the “Allow an App Through Firewall” link in the right panel.

Opening the Allowed Apps window for the firewall in Windows 11.

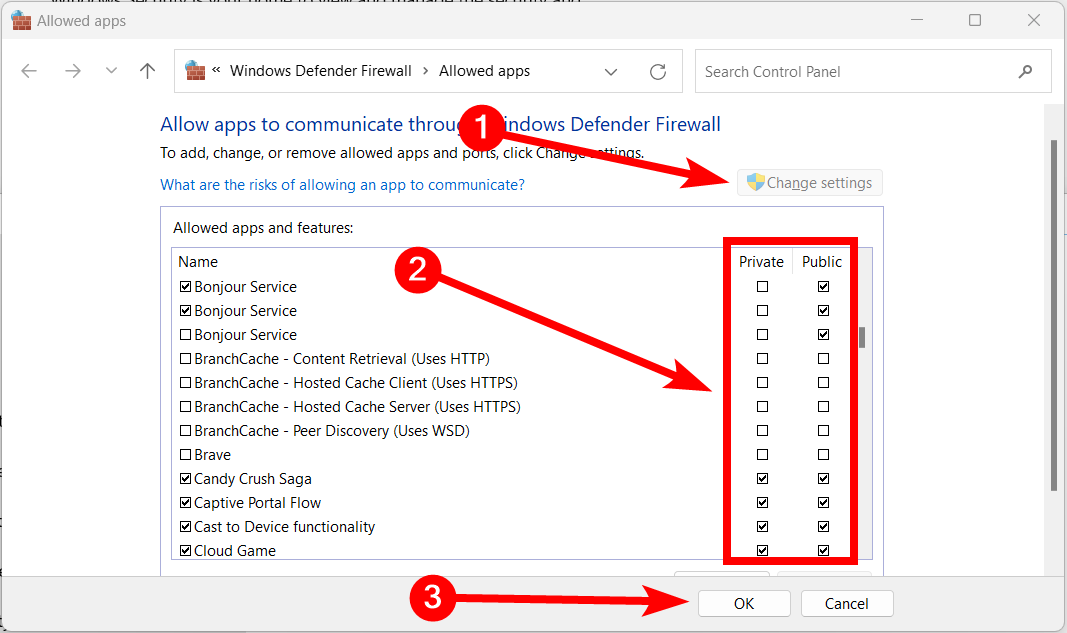
Find the app you think the firewall is blocking and check the checkboxes in the Private and Public columns next to it. If one of them is unchecked, it means that the app is being blocked on that network.

To let the app through the firewall, click the “Change Settings” button (you might need to ask for administrative privileges if you don’t have them). Then, tick its checkbox on the network you’re connected to (Public or Private) and click the “OK” button to apply the changes.

Unblocking an app in the Allowed Apps list in the Windows firewall.

You can also try opening a port on Windows Firewall to prevent it from interfering with certain apps.Once an app is unblocked, the firewall won’t interrupt it when it uses its network features, especially those that require internet access. However, this poses a potential security risk since malicious entities can now access the app.

Always make sure any app you allow through the firewall is trusted and secure to prevent malicious entities from using it to exploit your system. If you’re unsure about an app, don’t let it through or install it. Furthermore, enable Smart App Control and tweak Windows Security features to make your computer more secure.

[mai mult...]

How to reset your Android phone to factory settings

Restoring your Samsung® or Google® phone to its factory settings helps protect your personal information when you do the following:

  • Sell your phone.
  • Trade it in for a new device.
  • Give your phone to a friend or family member.
  • Need to troubleshoot performance issues, such as a frozen device or forgotten passcode. Our experts only recommend this as a last resort, after you’ve tried everything else.

A factory reset deletes nearly all data on your Android phone, giving it a clean slate. That’s why it’s important to make sure you’re prepared to take such a big step. It does more than reset your device settings and accessibility settings, here’s what a factory reset deletes from your phone:

  • Contacts
  • Photos and videos
  • Music
  • Passwords and files
  • Accounts
  • Messages

Before you restore your Android to factory settings, there are important steps to take to make sure you don’t lose your existing data.

  1. Back up your Android phone. The first thing you should do is back up your phone. Uploading it to a service like Google Drive™, or one offered by your phone carrier, will ensure you don’t lose everything during a factory reset.
  2. Plug your Android phone in and connect to Wi-Fi. The backup process can be time-consuming, so you’ll want the power boost. It’s also best to save your files over a secure Wi-Fi connection so you don’t use up a lot of mobile data during the transfer.
  3. Know your login info to restore data after resetting your Android. Before you reset your phone, make sure you know your login information. A Google Account username and password are required to restore data on an Android device—you can typically find your Google Account in Settings.
  4. Unpair your Android device. Be sure to unpair or disconnect Bluetooth® devices like your smartwatch or wireless headphones.
  5. Sign out of all accounts. Protect your privacy by signing out of all your apps, services, and email accounts and also delete any cards you have saved in your mobile wallet. You should also turn off Find My Device—check out our guide to learn how.
  6. Remove your SIM card. Check out our guide to removing your SIM card from your Android device for easy-to-follow steps.
  7. Sign out of your Android phone. After backing up your data and completing the checklist above, don’t forget to sign out of your Android phone too. Although a factory reset removes all the information stored on the device, this will ensure no one can access your account after you sell or trade in your phone for another one.

You can usually perform a factory reset in Settings, but it can take up to an hour to complete. Make sure your phone is plugged in while you’re going through the factory reset process.

To reset a Samsung Galaxy phone:

  1. Open the Settings app, then tap General management > Reset
  2. Tap Factory data reset > Reset.

To reset other Android devices:

  1. Open the Settings app, then search “Reset”
  2. Tap Erase all data (factory reset) in the results
  3. Tap Erase all data (factory reset) on the Reset options screen, then tap Erase all data and enter your password or PIN to confirm your decision.

To reset a locked Samsung phone (Samsung Galaxy S8 and newer):

  1. Turn off the phone if it doesn’t require a PIN to do so. You may have to wait until it runs out of battery and turns off on its own.
  2. Press and hold the Bixby®, Power, and Volume Up buttons simultaneously until your phone vibrates and the Samsung logo appears.
  3. When the Recovery menu appears, press the Volume buttons to select Delete all user data or Wipe data/factory reset. Then press the Power button to make your selection.
  4. Use the Volume buttons again to confirm “Yes” or “Factory data reset,” then press the Power button to select it.
  5. Once your phone processes the factory reset, you may see the message “Data wipe complete” at the bottom of your screen. Press the Power button one last time to select the option “Reboot device.”

Your Samsung phone will reset and power back on automatically when it’s time to set it up.

To reset a locked Google Pixel:

  1. Turn off your phone
  2. Press and hold the Volume Down and Power buttons until you see the Android logo
  3. Press the Volume buttons to choose the Recovery Mode menu option, then press the Power button to select it
  4. Use the Volume buttons to choose the Wipe data/Factory reset option, then press the Power button to select it
  5. Use the Volume and Power buttons to choose and select Factory data reset
  6. Your phone will display a message telling you the data wipe is complete. Select Reboot system now to restart your phone.
[mai mult...]

Fix it microphone problems

If you are having trouble with your microphone features, or with the microphone on your headset or webcam, the following information can help you troubleshoot and resolve issues.

Make sure apps have access to the microphone

Microphone settings

If your microphone isn’t detected after updating Windows 10, you may need to give your apps permission to use it.

  • To let apps access the microphone, select Start  ,then select Settings  > Privacy  > Microphone.  Select Change, then turn on Allow apps to access your microphone.
  • After allowing access to the microphone, you can choose which Microsoft Store apps can access these features under Choose which Microsoft Store apps can access your microphone, and give access to non-Microsoft-Store desktop apps by ensuring that the switch beneath Allow desktop apps to access your microphone is set to On.
  • If your camera contains a microphone, you might also need to give your apps permission to use your camera.  If so, select Start > Settings > Privacy > Camera and make sure camera access for this device is on, and that allowing apps to access your camera is set to On.

Others can’t hear me

Try the following solutions:

  • If your headset has a Mute button, make sure it isn’t active.
  • Make sure that your microphone or headset is connected correctly to your computer. If your headset is a wireless Bluetooth device, make sure your Bluetooth device is paired and connected by following the steps at Pair a Bluetooth device in Windows.
  • Make sure that your microphone or headset is the system default recording device. Here’s how to do this in Windows 10:
    1. Select Start , then select Settings  > System > Sound .
    2. In Input, ensure your microphone is selected in Choose your input device.
    3. To test your microphone, speak into it and check Test your microphone to make sure Windows is hearing you.Sound settings
  • Run the Recording Audio Troubleshooter. Select Settings > Update & Security > Troubleshoot > Additional troubleshooters. Select the Recording Audio troubleshooter.

Windows isn’t detecting the headset, camera, or microphone

If the previous troubleshooting steps do not resolve the problem and Windows is not even detecting your microphone, try reinstalling your audio drivers:

  1. ​​​​​​​​​​​​​​​​​​​Right-click the Start button and select Device Manager
  2. Expand the Sound, video and game controllers section
  3. Look for any audio devices or drivers. Right-click the audio device and select Uninstall device. Make sure to check the box that says Delete the driver software for this device and then select Uninstall. Repeat this process for any other audio devices.
  4. Restart your computer.  Windows will attempt to reinstall your audio devices and drivers automatically.  If it does not, right-click the Start button and select Device Manager. Right-click the Sound, video and game controllers section and select Scan for hardware changes.
  5. Update your drivers.  Once your computer restarts, go back to Device Manager.  Expand the Sound, video and game controllers section. Right-click your audio driver and select Update driver.

The microphone volume is too low or does not appear to be working at all

Try the following solutions:

  • Make sure that the microphone or headset is connected correctly to your computer.
  • Make sure that the microphone is positioned correctly.
  • Increase the volume of your microphone. Here’s how to do this in Windows 10:
    1. Select Start  , then select Settings  > System > Sound .
    2. In Input, ensure your microphone is selected under Choose your input device, then select Device Properties.
    3. On the Levels tab of the Microphone Properties window, adjust the Microphone and Microphone Boost sliders as needed, then select OK.
    4. Speak into your microphone while checking under Test your microphone to make sure your settings work. If you see the line moving from left to right, your microphone is working. If you see no change, the microphone is not picking up sound.

Others cannot hear me in Skype calls

Skype settings

Make sure that your microphone or headset is the Skype default recording device. Here’s how:

  1. If Skype is not open, select Start , then Skype  to open it
  2. In the upper right corner of the Contacts List in Skype, select More , then Settings
  3. In Audio & Video, under Microphone, make sure your microphone or headset is selected
  4. Under Speakers, make sure your preferred speaker or headset is selected.
[mai mult...]

How to install Windows on a Steam Deck OLED

The easiest way to install and run Windows on your Steam Deck OLED is by way of a bootable microSD card. You could wipe the drive and install Windows directly on your Steam Deck’s internal SSD but going for the “fresh start” approach effectively forces you to start from scratch. This complicates the ability to reinstall SteamOS at a later date.

Using an SD card for Windows gives you the freedom to change your mind and switch back to SteamOS to overcome performance issues that are impeding your game of choice. As with any major changes to an operating system, make sure to back up your files and games before proceeding.

To kick off the installation, enable the SteamOS Beta and update your BIOS to version 3.6.9 or later. To do this, press the “Steam” button then navigate to Settings > System > Beta Participation and select “Beta” from the System Update Channel list. You’ll be invited to restart your device, after which a new update will be ready for you. Install it and you’re good to go.

Prepare Your SD Card

The first step to creating a bootable microSD card is acquiring the Windows 11 ISO. On your PC, download the Windows 11 or Windows 10 installation media and ISO straight from Microsoft’s website. Both versions of Windows are supported on the Steam Deck, and the installation process is essentially identical.

Download and Open Rufus

Now that you have the ISO, you’ll use the free, open-source wonder Rufus to actually prepare your card. Visit the official Rufus website on your PC and download the latest version of the executable file. Once downloaded, open the executable to run Rufus.

Insert your microSD Card

Insert your microSD card into your PC’s card reader. It should be recognized by your computer, but make sure to format it if prompted.

Launch Rufus, and you should see the application’s main window open. Rufus automatically detects connected USB devices or memory cards. In the “Device” drop-down, ensure your microSD card is selected as the target device. Be careful to select the correct device, as the process will format the selected card.

Boot Selection

In the “Boot Selection” section, click on the dropdown and select “Disk or ISO image (Please select)”. After this, click the “Select” button next to the menu and locate your downloaded Windows ISO file from your system. Once found, click “Open” to load the ISO file into Rufus.

Now select “Windows To Go” from the “Image Option” menu.

Rufus Creating Boot Disc Windows 11 Iso

Partition Scheme and File System

Rufus will automatically set the “Partition Scheme” to GPT and “Target System” to UEFI (non-CSM), which is necessary for compatibility with modern systems like the Steam Deck. The “File System” should be left as NTFS (default for Windows installations).

Now is also the time to rename your microSD card by using the “Volume Label” field if you wish.

Windows user experience Settings

Once you click the Start button, Rufus will prompt you with Windows User Experience settings. If you prefer to manually configure regional settings or use an online Microsoft account, you can leave the relevant options unchecked. However, for privacy and convenience, enabling these options is recommended.

Finalize Install

After confirming your settings, you will be met with a final warning message that all data on your microSD card will be deleted. You’ve already gone this far, click “OK” to proceed. Rufus will now install Windows on your microSD card.

Copy Windows Drivers to your SD Card

With your new operating system resting calmly on your SD card, you’re ready to acquire the drivers needed to make software run smoothly on your Steam Deck. Valve’s Steam Deck: Windows Resources page has all the required files. Download the required drivers to your Windows 11 desktop and unzip the files.

Open up the root folder on your microSD and create a new folder. Now you can just select the folders containing the drivers and drag them into the folder you just generated for later use. Your freshly prepared boot disc is ready to bring the Windows 11 PC experience to your Steam Deck.

Showing Steam Deck's Boot Selection Menu and available boot options. Pick the option that includes your MicroSD card with Windows To Go

First, power off your Steam Deck completely. Now Insert the SD card into the Steam Deck’s microSD card slot. Hold the “Volume Down” button and press the “Power” button, then release both buttons once you hear a sound.

You’ll be taken to the boot selection menu. Select your SD card and press “A” to set up Windows.

Once inside Windows, you can return your screen to its rightful horizontal position. Right-click and head to Desktop > Display Settings > Scale & Layout > Display Orientation > Switch to Landscape to fix the screen layout.

With Windows installed and booting on your OLED Steam Deck, it’s time to set up those essential drivers we left snug in the root directory of your SD card. Navigate to the folder and proceed to install each driver.

Install the APU Driver

Find the “setup.exe” file in the folder for the APU driver and run it to install.

Install the SD Card Reader Driver

Go to the “BayHub_SD_STOR_install” folder and run the “setup.exe” executable.

Install the Wi-Fi Driver

Navigate to the Wi-Fi driver folder, right-click the “qcwlan64.inf “file, and choose “Install.”

Bluetooth Driver

For Bluetooth, right-click “qcbtuart.inf” in the Bluetooth driver folder and select “Install”. Keep in mind, if this doesn’t work, you may not have remembered to update the BIOS for your OLED Steam Deck.

Audio Drivers

You will need to install three different drivers for full audio functionality: “cs35l41.inf”, “NAU88L21.inf”, “amdi2scodec.inf”. For each driver, right-click, then select “Install.”

Once all drivers are installed, Windows will function on your OLED Steam like the desktop you dragged to your buddy’s basement to get in some matches of Counter Strike in 2001.

Reverting to SteamOS

Since you made the wise decision to install Windows 11 on a bootable SD, it’s a breeze to return to SteamOS if you so choose.

First, power off your Steam Deck completely. Hold the “Volume Down button and press the “Power” button. Release both buttons once you hear a sound. You’ll be taken to the boot selection menu.

Select your Steam Deck’s SSD and press “A” to boot back into the intended OS.

If you are still hellbent on nuking the Steam Deck’s SSD in order to go “full Windows” on your handheld, it’s a similar process with just a few tweaks. Grab a USB drive that can hold at least 32GB of data and connect it to your Windows PC. Download the ISO from Microsoft’s website in the same fashion as previously mentioned, run Rufus, and choose your memory stick of choice in the “Device” window.

You will still choose “Disk or ISO Image (Please select)” from the “Boot Selection” menu, click the “Select” button next to it, and open the Windows ISO file. Since you are installing the operating system directly onto the hard drive, select “Standard Windows Installation” from the “Image Option” drop-down.

Windows 11 Full Install via Rufus

When greeted by the “Windows User Experience” window, make sure the box next to “Remove requirement for “4GB+ RAM, Secure Boot, and TPM 2.0” is checked and proceed to finalize the installation.

Optimal Rufus Settings for Windows 11 Install

Once you have finished setting up your USB, create a folder in the root and download the drivers, and you are ready for installation.

Power off your Steam Deck completely and insert your flash drive into the Steam Deck’s USB port. Hold the “Volume Down” button and press the “Power” button. Release both buttons once you hear a sound. You’ll be taken to the boot selection menu.

Select your USB drive and press “A” to start the Windows 11 installation process. Go through the setup and select “Custom: Install Windows Only” when prompted. When asked where to install Windows 11, delete all partitions and create a new one.

[mai mult...]