How to Make Your Google Home Quieter at Night

The night has come; you’re winding down. “Hey Google, turn off all the lights” you whisper, and then regret sets in as your Google Home yells confirmation, waking everyone up. Here’s how to make Google speak quietly at night.

You may have experienced this more times than you care to admit. Everyone is asleep, and you’re ready for bed too. You tell your Google Home or Nest Hub to turn off the lights, and it yells, seemingly at the top of its digital lungs, a confirmation that it will turn off the lights. It doesn’t have to be this way.

You can either turn on Night Mode for each Google Home or Nest Hub device you own to make them speak softer and dim the lights or use grouping to prevent the devices from speaking altogether.

Enable Night Mode for a Quiet Night

Night Mode option in Google Home app.

If you need your Google Homes to speak softly during certain hours, Night Mode is the feature for you. You can set Night Mode to turn on and off automatically with a schedule, adjust the maximum volume, and even the maximum brightness of your Google Home’s built-in LEDs.

The downside is, you have to enable and configure Night Mode for every Google Home device you own. So if you miss one, you’ll find out the hard way the next time you use it and expect a quiet response. To turn on Night Mode, open the Google Home app, then tap on the Google Home device you want to adjust. Then tap the gear in the top right corner.

Google Home device dialog with arrow pointing towards settings gear.

Scroll down and tap on Night Mode.

Google Home Device settings dialog with box around Night mode option.

Toggle Night Mode on, and then choose the settings you’d like, including the volume slider. Don’t forget to tap each day you want Night Mode to work for (you can leave it off on weekends for instance). Google Home devices, which have LED lights on top of the speaker, will have an additional LED dimming slider. Nest Hub devices won’t have this option.

Night mode settings dialog, showing a daily schedule from 10pm to 6pm.

Group Devices in Rooms for a Quiet Chime

Google home kitchen room group, showing light and nest hub display.

Another way to avoid a loud response is to group (called Rooms) your Google Home or Nest Hub device in the same room as your lights. When you tell a Google Home to turn off lights in the same room as the voice assistant, it will chime softly instead of replying with a wordy verbal confirmation.

Plus, when a Google Home is in the same room as smart light (for instance the living room), you can say, “Hey Google, turn off the lights” instead of “turn off the living room lights.” It saves you a few words, so you benefit all around. If your Google Home or smart lights aren’t already in groups, open your Google Home app and select the device you want to add to a room. Then tap on the “Add to a room” option.

Magic mirror device with box around "add to a room" option.

Then follow the prompts to choose the room you’d like to add the device too. Do this for all your smart devices and Google Homes. You’ll benefit right away from both quieter chimes and easier to use voice commands.

[mai mult...]

5 Ways to Run Windows Software on a Mac

Macs have a thriving ecosystem of software, but some programs still only support Windows. Whether you want to use business software or play Windows PC games, there are many ways to run Windows programs on your Mac.

Some of these methods are similar to the ways you can install Windows software on Linux or run Windows programs on a Chromebook. Virtual machines, dual-booting, the Wine compatibility layer, and remote desktop solutions are all included here.

Virtual Machines

install-windows-in-virtual-machine-on-a-mac

We recommend using a virtual machine program, ideally Parallels or VMWare Fusion, to run Windows applications on a Mac without rebooting. For maximum performance, which is particularly necessary for gaming, we recommend dual-booting Windows with Boot Camp instead.

A virtual machine is one of the best ways to run Windows desktop software. They allow you to install Windows and other operating systems in a window on your Mac desktop. Windows will think it’s running on a real computer, but it’s actually running inside a piece of software on your Mac.

You don’t have to use your Windows program in the virtual machine window, either—many virtual machine programs allow you to break Windows programs out of your virtual machine window so they can appear on your Mac desktop. However, they’re still running inside the virtual machine in the background.

You’ll need a Windows license to install Windows in a virtual machine. If you already have a product key, you can download Windows installation media for free and install it in a virtual machine program.

RELATED: How to Seamlessly Run Windows Programs on Your Mac with Parallels

Popular virtual machine programs for Mac include Parallels and VMware Fusion. Each of these is a paid program, so you’ll have to buy both a Windows license and a copy of your virtual machine program of choice. You can also use the completely free and open-source VirtualBox for Mac, but its 3D graphics support and Mac operating system integration aren’t as good. Parallels and VMWare Fusion both offer free trials, so you can try all these programs and decide which is best for you.

Note: We don’t often recommend paid software, but in the case of Parallels Desktop, it’s something we use at How-To Geek every single day for testing software and running Windows. The integration with macOS is amazingly well done, and the speed blows away VirtualBox. In the long run, the price is well worth it.

There’s one big downside to virtual machines: 3D graphics performance isn’t amazing, so this isn’t the best way to run Windows games on your Mac. Yes, it can work—especially with older games—but you won’t get the best performance, even in an ideal situation. Many games, especially newer ones, will be unplayable. That’s where the next option comes into play.

Boot Camp

select-default-operating-system-with-boot-camp-on-mac

RELATED: How to Install Windows on a Mac With Boot Camp

Apple’s Boot Camp allows you to install Windows alongside macOS on your Mac. Only one operating system can be running at a time, so you’ll have to restart your Mac to switch between macOS and Windows. If you’ve ever dual-booted Linux on your Windows PC, it’s just like that.

Installing Windows as a real operating system on your Mac is the best idea if you want to play Windows games or use demanding applications that need all the performance they can get. When you install Windows on your Mac, you’ll be able to use Windows and Windows applications with the maximum possible performance. Your Mac will perform as well as a Windows PC with the same specifications.

The downside here is that you can’t run macOS applications and Windows applications side-by-side at the same time. If you just want to run a Windows desktop application alongside your Mac applications, a virtual machine will probably be ideal. On the other hand, if you want to play the latest Windows games on your Mac, Boot Camp will be ideal.

As with virtual machines, you’ll need a Windows license to install Windows on your Mac.

Wine

how-to-install-wine-on-a-mac

RELATED: How to Run Windows Programs on a Mac With Wine

Wine originated on Linux. It’s a compatibility layer that allows Windows applications to run on other operating systems. Essentially, Wine is an attempt to rewrite the Windows code that applications depend on so they can run on other operating systems. This means that Wine is nowhere near perfect. It won’t run every Windows application, and will have bugs with many of them. The Wine AppDB can give you some idea of which applications are supported, although it focuses on Linux support.

Nevertheless, Wine is one way to try running Windows applications on a Mac. Because it doesn’t require you actually use Windows, you don’t need a Windows license to use Wine. It’s completely free. Just download Wine or WineBottler for macOS and see how well it works for your application.

CrossOver Mac

install-windows-programs-on-a-mac-with-crossover-mac

CodeWeavers’ CrossOver Mac is a paid application that will run Windows programs on Mac. It uses the open-source Wine code to accomplish this, but CrossOver provides a nice graphical interface and focuses on officially supporting popular programs. If an officially supported program doesn’t work, you can contact CodeWeavers and expect them to make it work for you. CodeWeavers contributes their improvements back to the open-source Wine project, so paying for CrossOver Mac also helps the Wine project itself.

CrossOver offers a free trial it you want to try it out first. You can also view a list of which programs run well on CrossOver before buying. While CrossOver focuses on compatibility, it’s still based on Wine, and won’t work with everything.

Most people will probably be happiest going for a virtual machine program and a Windows license. With CrossOver, you don’t need to run a Windows virtual machine—but, if you do run a Windows virtual machine, you’ll be able to run almost any Windows program with less risk of bugs. CrossOver does theoretically allow you to run Windows PC games on a Mac with better performance than you’d get in a virtual machine, but you’ll risk running into bugs and unsupported programs. Boot Camp may still be a better solution for that.

Remote Desktop

run-windows-programs-remotely-on-a-mac

RELATED: How to Access Windows Remote Desktop Over the Internet

If you already have a Windows system, you could skip running Windows software on your Mac completely and use remote desktop software to access the Windows machine from your Mac’s desktop. Organizations with business software that runs on Windows can host Windows servers and make their applications available to Macs, Chromebooks, Linux PCs, iPads, Android tablet, and other devices. If you’re just a home user who also has a Windows PC, you could configure that Windows PC for remote access and connect to it whenever you need a Windows application. Bear in mind that this isn’t ideal for visually intensive applications like PC games.

If you’re a Chrome user, you can even use Chrome Remote Desktop to connect to a Windows PC running Chrome from your Mac running Chrome. All these tricks obviously require more work than simply installing a Windows program on a Windows PC. If you have a Mac, you should focus on using Mac software when possible. Windows programs won’t be as integrated or work as well.

You may have to buy a Windows license for your Mac to get the best compatibility, whether you’re using a virtual machine or installing Windows in Boot Camp. Wine and CrossOver are nice ideas, but they aren’t perfect.

[mai mult...]

How to Clear Discord Cache Files on Windows

To clear the Discord cache files on your Windows PC, you have to delete the files manually. You’ll find them in the Discord AppData folder. To open it in Windows File Explorer, type the following in the file path box:

%appdata%\discord

"%appdata%\discord" in the path file box in Windows File Explorer.

In your Discord AppData directory, locate the “Cache,” “Code Cache,” and “GPUCache” folders. You can safely right-click each of these, and then click “Delete.”

Right-click the "Cache," "Code Cache," and "GPUCache" folders, and then click "Delete."

You’ll need to empty the Recycle Bin afterward to ensure the files are fully deleted. To do so, just double-click the Recycle Bin icon on your desktop, then click “Empty Recycle Bin.”

Click "Empty Recycle Bin."

[mai mult...]

How to Enable and Customize Subtitles on Disney+

How to Customize Subtitles on Disney+

It’s possible to customize the subtitles shown on Disney+ videos, allowing you to change the font, color, and overall design of the closed captions. This is only possible if you’re playing Disney+ content in your web browser, however. At the time of writing, you can’t customize the subtitles shown in the Disney+ mobile app, or in the Disney+ app on other platforms.

To do this, begin playing a movie or TV show on the Disney+ website. During playback, hover over the video content with your mouse to display the playback controls and then select the “Language Controls” icon in the top-right corner (shaped like a keyboard).

To access Disney+ subtitles, press the language settings icon (shaped like a keyboard) in the top-right corner of the playback window.

This will bring up the audio and subtitles options. To customize your subtitles, click the “Settings Gear” icon on the right-hand side.

Press the settings cog icon in the audio and subtitles menu to customize your Disney+ subtitles.

This will bring up the “Subtitle Styling” menu. From here, you can select a new font from the “Font” drop-down menu.

Any changes you make can be previewed at the top of the menu.

Select a font for your Disney+ subtitles from the "Font" drop-down menu.

You can also set font color, sizing, and opacity settings from the options provided.

Choose your font color, opacity, and sizing from the available options.

Further changes, including the ability to set a font border, background color and opacity, and window color and opacity are also available.

Change these settings to suit your own tastes and requirements.

Select font edging, background and window color, and background and window opacity values from the options provided.

If you want to reset your subtitles to the default Disney+ style, click the “Reset To Default” button at the bottom of the menu.

To reset your Disney Plus subtitle settings, scroll to the bottom of the "Subtitle Styling" menu and click the "Reset To Default" button.

Any changes you make to your subtitles will be applied automatically.

[mai mult...]

How to Get Custom Themes on Windows 10 (with Stardock Curtains)

WhatIs Stardock Curtains?

Curtains is a software utility that allows you to customize Windows 10’s appearance with styles that change the look of window borders, interface buttons, and the taskbar with different themes. For example, you can make Windows 10 look a lot like other operating systems, such as Windows XP or OS/2, or you can install a completely novel theme that suits your taste.

A selection of styles available in Stardock Curtains

As of this writing, Curtains is commercial software that costs $9.99, but Stardock also offers a free 30-day trial that allows you to give it a test drive. It’s also included with Stardock’s more expensive Object Desktop suite, which offers other useful utilities like Fences for organizing your desktop icons.

We’ve been fans of Stardock’s utilities for years. The company’s utilities are great if you want to spend a bit of money for a more customizable tweakable Windows desktop.

What You Can Do with Stardock Curtains

If you want a change from Windows 10’s default look and feel, Curtains is a very easy-to-use reliable way to make your desktop look new (or old!).

Curtains packs a great deal of novelty factor, because it can make Windows 10 superficially resemble obsolete operating systems like Windows XP, IBM OS/2, Amiga Workbench, classic Mac OS, and more.

Stardock Curtains IBM OS/2 Style

Each style often comes with an in-theme desktop wallpaper. For example, the Windows XP style includes a “green hills” photo similar to the one that shipped with XP and also a Windows XP logo.

Stardock Curtains Windows XP Theme

There’s also a really neat monochrome Macintosh style, which rings lots of nostalgia bells for anyone who grew up with a classic Mac.

Stardock Curtains Classic Macintosh Style

With the full version of the Curtains software, you can download styles created by others or create custom styles yourself and share them with others online. Very neat.

Stardock Curtains Style Editor

How Do I Get it?

If you’re interested, download Curtains from Stardock’s website and install it. It’s very intuitive and easy to use, and it works with Chrome and Edge as well as many other standard Windows apps. You’ll have a 30-day trial at first, but you can purchase it at any time.

[mai mult...]

How to Install Google Assistant on Samsung Galaxy Smartwatches

Samsung Galaxy smartwatches are a great option for people with Android phones, but they don’t have Google Assistant, which can be a deal-breaker. Here’s how to get Google Assistant up and running on your Samsung wearable.

Bixby is the personal assistant that ships on Samsung smartwatches. While it’s a capable companion, you might prefer the Google Assistant. Thanks to an app called “GAssist,” it’s possible to use the Assistant on most Samsung watches. The process is a bit lengthy but you’ll only have to do it once.

GAssist is compatible with Samsung Galaxy watches running Tizen 4.0+. You can check the version your device is running by going to Settings > About Watch > Software > Tizen Version on your watch.

Select "Settings,""About Watch," "Software" and then select "Tizen Version."

Install the GAssist Watch and Phone Apps

Open the Galaxy Wearable app on your Android smartphone, navigate to the Galaxy Store, and then search for “GAssist.”

Type "GAssist" in the Search box in the Galaxy Store.

Select “GAssist.Net” by developer Kamil Kierski, and then tap “Install.”

Tap "Install."

Tap “Accept and Download” in the popup.

Tap "Accept and Download."

Navigate to the Google Play Store on your Android smartphone. Search for “GAssist,” and then select “GAssist.Net Companion” by cybernetic87.

Select "GAssist.Net Companion."

Download the app by tapping “Install.”

Tap "Install."

Once both apps are installed, you’ll need to get a “key” for Google Assistant from the Google Cloud Platform.

Get a “Key” for Google Assistant

On your computer, open a browser and go to the Google Cloud Platform. Accept the terms of service if prompted, and then click “Select a Project” at the top.

Click "Select a Project" on the Google Cloud Platform.

Click “New Project” in the pop-up window.

Click "New Project."

Give the project a name, and then click “Create.”

Click "Create."

Click the hamburger menu at the top left to open the sidebar, and then select “APIs and Services.”

Click the hamburger menu, and then select "APIs and Services."

Click the project you just created.

Click your project.

Click “Enable APIs and Services” at the top.

Click "Enable APIs and Services."

In the search bar, type “Google Assistant.”

Type "Google Assistant" in the Search bar.

Results will appear as you type. Click the “Google Assistant API” option.

Click the "Google Assistant API" option when it appears.

Click “Enable.”

Click "Enable."

On the next page, click “Create Credentials.”

Click "Create Credentials."

In the “Which API Are You Using?” drop-down menu, select “Google Assistant API.”

Select "Google Assistant API" in the "Which API Are You Using?" drop-down menu.

Click the “Where Will You Be Calling the API From?” drop-down menu, and then select “Android.”

Select "Android" from the "Where Will You Be Calling the API From?" drop-down menu.

Select “User Data” under “What Data Will You Be Accessing?” Then, click “What Credentials Do I Need?”

Select "User Data," and then click "What Credentials Do I Need?"

Click “Set Up Consent Screen” in the popup. This might open a new tab in your browser.

Click "Set Up Consent Screen."

If the next screen asks you to choose a “User Type,” select the one that matches your use case, and then click “Create.”

Select a "User Type," and then click "Create."

Type a name in the “Application Name” text box, and then click “Save” at the bottom of the page.

Type a name in the "Application Name" text box, and then click "Save."

If you’re not automatically redirected, select the “Credentials” tab in the sidebar, and then click “Create Credentials” at the top.

Select "Credentials," and then click "Create Credentials."

Select “OAuth Client ID” from the list.

Select "OAuth Client ID."

In the “Application Type” drop-down menu, click “Other” or “TVs and Limited Input Devices.” Type a name or use the default, and then click “Create.”

Click "Other" or "TVs and Limited Input Devices" under "Application Type," type a name, and then click "Create."

Return to the “Credentials” tab and click the Download icon next to the “OAuth Client ID” you just created.

Click the Download icon.

Now, you need to move the downloaded JSON file to your Android smartphone. Plug your phone into your computer to access its internal storage.

Open the file manager (or Finder on Mac) and select your smartphone. Copy the downloaded JSON file to the “Download” folder on your smartphone and rename it “secrets.json.”

Rename the file "secrets.json" after you copy it to your phone.

Finish the Setup on Your Phone

Next, open the GAssist app on your smartphone and tap “Browse.”

Tap "Browse."

Navigate to the “Download” folder and select “secrets.json.”

Select "secrets.json" in the "Download" folder.

You should see “File Loaded Successfully;” tap “Next.”

Tap "Next."

Select “Authenticate” to grant GAssist access to your Google account.

Select "Authenticate."

Select the account you use with Google Assistant.

Select your Google account.

Tap “Allow” to grant GAssist permission to use Google Assistant on your account.

Tap "Allow."

Confirm on the next screen by tapping “Allow” again.

 Tap "Allow."

Copy the authentication code using the on-screen button, and then go back to the GAssist app.

Tap the layered square icon to copy the authentication code.

Paste the code in the text box, and then tap “OK.”

Paste the authentication code, and then tap "OK."

You should now see three green checkmarks. Tap “Done” to proceed.

Tap "Done."

Use Google Assistant on Your Samsung Watch

Open the GAssist app on your Samsung Galaxy smartwatch and allow GAssist to access the microphone and storage.

Grant GAssist access to storage and the microphone on your watch.

Tap “Listen” to speak to Google Assistant and it will respond to your command. If your wearable has a speaker, you’ll hear the response out loud. Tap “Stop” to end the response.

Tap "Stop."

To make Google Assistant easy to launch, we recommend you set it as the double-press Home key shortcut.

To do so, go to Settings > Double Press Home Key > GAssistNet on your Samsung Galaxy watch.

Select "Settings," select "Double Press Home Key," and then select "GAssistNet."

Now, you can quickly launch Google Assistant from anywhere by double-pressing the Home key.

[mai mult...]

How to connect a stadia controller to an android device via wi-fi

Start by opening the Google Stadia app on your Android handset. From the “Home” tab, tap the controller icon.

Open the Stadia app and then tap the controller icon

Your device will start looking for an available Stadia controller.

Your Android smartphone will start looking for an available Stadia controller

It’s now time to turn on your controller. Start by pressing and holding the Stadia button for one second until the controller vibrates and the backlight starts to pulse.

Press and hold the Stadia button
Google

The controller should appear in the Stadia app after several moments. If your smartphone stops searching after not finding any controllers, tap the “Refresh” button.

Your device should see the controller after several seconds. Tap the "Refresh" button if needed

If you’re still having connection issues, try toggling your phone’s Bluetooth setting off and on or even rebooting the entire device. Once your Stadia controller shows up as “Ready To Link” in the app, press the four controller buttons that are shown on-screen. The controller will vibrate twice once the two devices are connected. The Stadia app will also show that the controller is linked.

The Stadia controller is now linked to your handset

When you’re done playing and want to turn off your controller, press and hold the Stadia button for three to five seconds. The controller will vibrate once and disconnect from your Android smartphone.

Press and hold the Stadia button

You will need to repeat the linking process every time you want to game untethered. Google does not store previous connections and will not automatically link the controller to your Android device in the future.

[mai mult...]

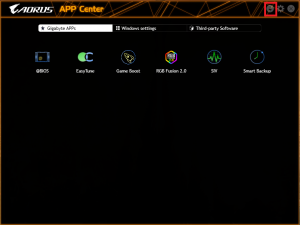
Cum sa instalam aplicatii de system sau aplicatii third party cu ajutorul APP Center

  1. Deschideti aplicatia APP Center.
  2. Apasati pe butonul din dreapta sus care are o sageata indreptata in jos.
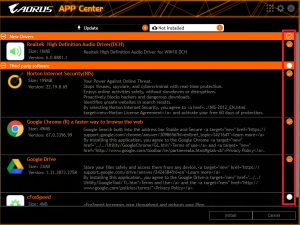
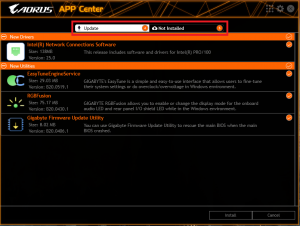
  3. Daca deja aveti aplicati instalate in APP Center ar fi bine sa verificati si tab-ul Update pentru a nu face update la ceva la care nu doriti. Daca nu aveti nimic instalat in tab-ul Not Installed, veti gasi diferite aplicatii pe care le puteti selecta si instala:
[mai mult...]