Social
Cum se actualizeaza software-ul pe un TV Bravia utilizand un stick USB ?
[mai mult...]Actualizare de firmware pentru TV sony Bravia
[mai mult...]How to enable Desktop Background Image
Start by enabling the “show desktop background image” option. Here are the steps for enabling the desktop wallpaper:
- Press Win + I to open the System Settings.
- Click the Ease of Access option from the menu items.
- Next, click the Display option on the left-hand side pane.
- Locate the Show desktop background image button and then switch it on.
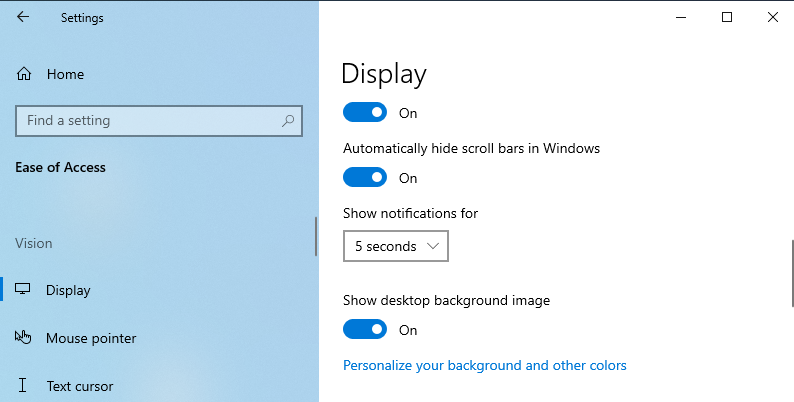
5. Restart your device to save these new changes.
Configure the Display Settings via the Ease of Access Center
You can also resolve the “black desktop background display” issue by configuring the Ease of Access settings. Here’s how:
- Press Win + R to open the Run command dialog box.
- Type Control Panel and click Enter.
- Next, click the View by drop-down menu and select Small icons.
- Select the Ease of Access Center from the menu items.
- Scroll down and click the Make the computer easier to see option (below the Explore all settings option.)
- Next, scroll down and uncheck the Turn off all unnecessary animations and the Remove Background images options.
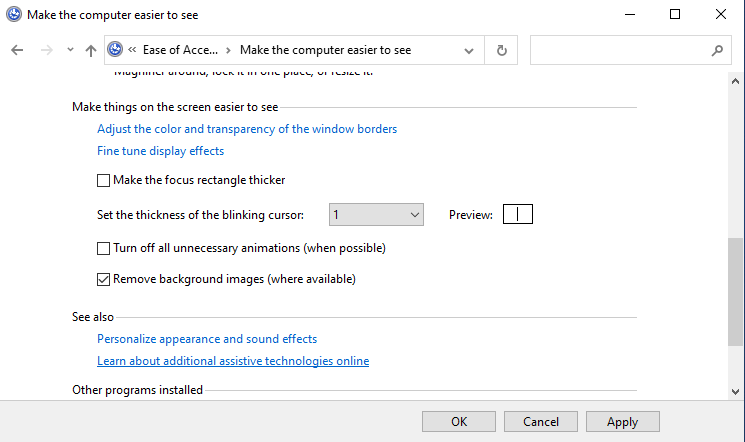
Click Apply, click OK, and then restart the device to save these changes.
[mai mult...]How to fix Windows Spotlight Image
Windows Spotlight works best when it’s dynamically changing. If it gets stuck in a location, here’s how to get it traveling again. Now many apps can keep your Windows lock screen looking fresh as perfectly as Windows Spotlight. Once it is enabled, it is hard to go back to the traditional way of setting a lock screen wallpaper.
But like so many other Windows features, Spotlight is not perfect and may stop working. Let’s take a look at the possible reasons why Windows Spotlight stops working and look at some fixes to resolve the issue. Windows Spotlight is a service built into Windows 10 that fetches new pictures from Bing and displays them on the lock screen. The images rotate every few days and feature location information as well.
In addition to images, Windows Spotlight also shows ads on occasion. Unfortunately, if you don’t want to see ads with Windows Spotlight images, you are out of luck. There is no way to disable ads without disabling Windows Spotlight altogether.
- Common Causes For Windows Spotlight Errors
Windows Spotlight occasionally stops working. While there is no concrete reason for this, common causes include:
- No Internet connection, since Spotlight needs a connection to download images.
- Windows updates sometimes break Windows Spotlight, and you may need to restart the service manually.
- Images used by the Windows Spotlight feature can also get corrupted, resulting in Windows Spotlight errors. In this case, you can clean the Spotlight images folder and let the service populate it once again.
- Windows Spotlight setting files can also get corrupted requiring you to reset the service.
1. Restart Windows Spotlight
The simplest fix to try when Windows Spotlight is not working is to restart the service.
- Navigate to Windows Settings by pressing Win + I.
- Click on Personalization and then hit Lock screen located in the left-hand panel.
- Under Background, open the dropdown menu and choose Picture or Slideshow.

- Close the Settings app and restart your computer.
Re-enable Windows Spotlight by retracing the above steps and enabling Spotlight instead of Picture and Slideshow. Now, test if the fix has worked by locking your computer and seeing if you get new backgrounds on the lock screen. If Spotlight still doesn’t work, try deleting the assets.
2. Manually Delete Spotlight Assets
Manually deleting Spotlight assets requires you to navigate to the folder where Spotlight’s assets are stored.
- Hit the Windows keys, type Run, and choose the appropriate option.
- When the Run dialogue box appears, paste “%USERPROFILE%/AppData\Local\Packages\Microsoft.Windows.ContentDeliveryManager_cw5n1h2txyewy\LocalState\Assets” and click Ok.

- After the folder opens, press Ctrl + A to select all files, and hit the Delete key to remove all the files.
Finally, enable the Spotlight feature if you’ve disabled it, and restart your computer. See if the feature has been fixed. If not, then try manually resetting Windows Spotlight.
3. Manually Reset Windows Spotlight Settings
To manually reset Windows Spotlight:
- Press the Windows key, type Run, and choose the appropriate option to open the Run dialogue box.
- Paste “%USERPROFILE%/AppData\Local\Packages\Microsoft.Windows.ContentDeliveryManager_cw5n1h2txyewy\Settings” path into the dialogue box and press Ok. This will open the Settings folder.
- You’ll find two files settings.dat and roaming.lock in the Settings folder. Rename these files to settings.dat.bak and roaming.lock.bak respectively, by right-clicking on each file and pressing Rename.
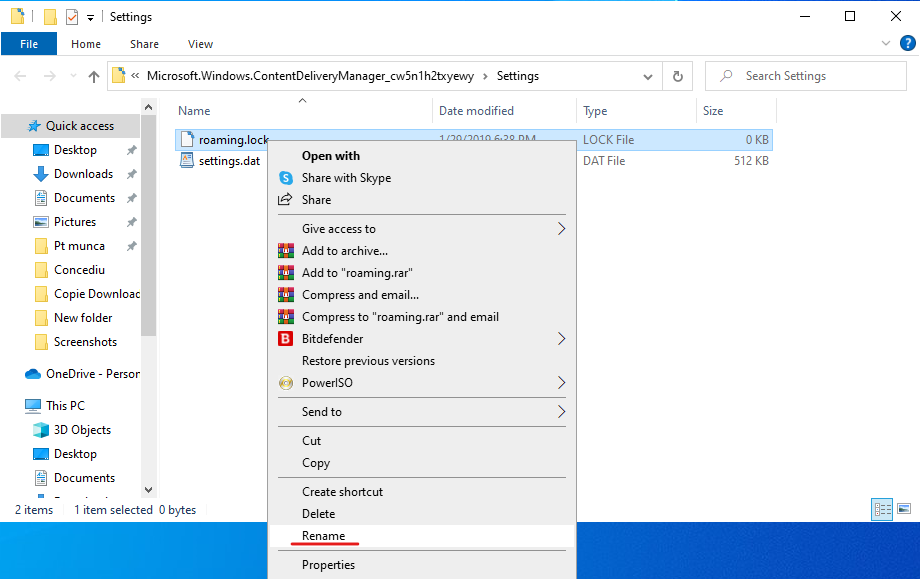
- Close the folder and restart your computer.
Hopefully, Windows Spotlight will start working now. If Spotlight still doesn’t work, you may need to install a fresh copy of Windows.
[mai mult...]How to fix the Windows Registry Editor When It Won’t Respond
The registry is handy for fixing problems, but sometimes it has issues for itself. Here’s how to fix an unresponsive registry editor on Windows.The Registry Editor is a reliable tool that you can always use for tweaking Windows system settings. But then it’s quite frustrating when this tool suddenly becomes unresponsive.
If the Registry Editor on your device is failing, you’re likely seeing an error message that reads, “The Registry editor has stopped working.” In some instances, the error message might read, “Registry editing has been disabled by your administrator.”
1. Enable the Registry Editor Using the Local Group Policy Editor
The Registry Editor might be unresponsive simply because it’s disabled in the system settings. One of the best ways to enable this tool is by using the Local Group Policy Editor (LGPE.) However, you should note that the Local Group Policy Editor is only available on the Windows Pro, Enterprise, and Education editions.
Now, here’s how you can enable the Registry Editor via the LGPE:
- Press Win + R to launch the Run command dialog box.
- Type gpedit.msc and press OK to open the Local Group Policy Editor.
- Navigate to User Configuration > Administrative Templates > System.
- Double-click the Prevent access to registry editing tools option on the right-hand side panel.
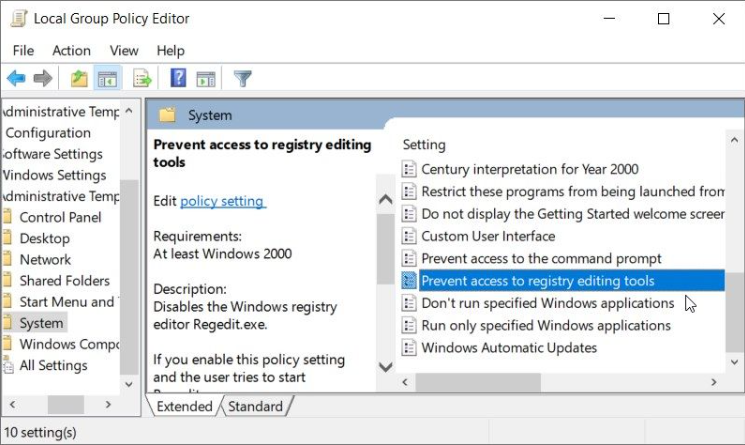
In the next window, select the Disabled or Not configured option. Finally, click Apply, click OK, and then restart your device to save these changes.
2. Enable the Registry Editor Manually Using a Registry Key
You might run into issues while trying to enable the Registry Editor via the LGPE—especially if the LGPE also has its own issues. In such an instance, we’ll explore how you can use a simple Registry key to repair an unresponsive Registry Editor.
- To get started, press Win + R to open the Run command dialog box.
- Type CMD and press Ctrl + Shift + Enter to open an elevated Command Prompt.
- Type the following command and press Enter to enable the Registry Editor: REG add HKCUSoftwareMicrosoftWindowsCurrentVersionPoliciesSystem/ vDisableRegistryTools /t REG_DWORD /d 0 /f
- When the process is complete, close the Command Prompt and restart your device.
3. Get Rid of Corrupted System Files
he Registry Editor often fails and won’t load if your PC has bugs and corrupted system files. So, you could resolve the problem by taking care of those unwanted system files. An easy way out is to use the DISM and SFC tools. These are some of Windows’ incredible features that help repair or replace corrupted system files.
Now, let’s start by checking out how you can run the DISM tool:
- Type Command Prompt in the Start Menu search bar.
- Right-click on the Command Prompt option and select Run as administrator.
- Type the following command and press Enter to run a DISM scan: DISM /Online /Cleanup-Image /ScanHealth
Wait for this scan to complete. From there, type the following command and then press Enter: DISM /Online /Cleanup-Image /RestoreHealth
Wait a couple of minutes for the process to complete. From there, restart your device to apply the fixes. Next, run the SFC tool by applying these easy steps:
- Open the Command Prompt by following the previous steps.
- Type the following command and press Enter to run an SFC scan: sfc /scannow
Finally, close the Command Prompt and restart your device.
4. Restore Your Device to Its Previous State
Registry Editor issues are sometimes caused by the way you’ve configured some system settings. However, if you’ve configured some settings unknowingly, then it becomes hard to resolve this problem. Simply put, you won’t know which settings to tweak to fix the Registry.
Now, that’s where the System Restore tool comes in. This feature helps get rid of issues by restoring your device to its previous state.
So, here’s how you can use the System Restore tool to fix an unresponsive Registry Editor:
- Type Win + S to open the Start Menu search bar.
- Type Create a Restore Point and then select the Best match.
- Click the System Protection tab, select System Restore, and then press Next.
- Select the Show more restore points option in the pop-up window.
- Choose a restore point and then click Next. Finally, click Finish and follow the on-screen steps.
5. Restore Windows to Its Factory Settings
By now, the Registry Editor issue should be resolved. But if the tool is still unresponsive, then you could consider restoring your device to its factory settings. Before you apply this method, back up your data first just in case things don’t go accordingly. Now, here’s how you can restore Windows to its factory settings:
- Press Win + I to open the System Settings.
- Select Update & Security from the menu items.
- Next, select Recovery on the left-hand side.
- Locate the Reset this PC option on the right and then click the Get started button below it. Finally, follow the on-screen steps to finalize the process.
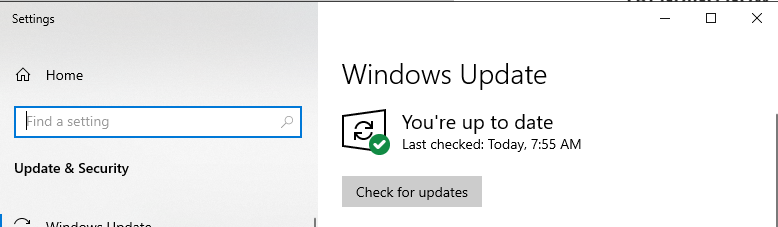
6. Install the Latest Windows Updates
As a last resort, you could consider updating your device to resolve the Registry Editor issue. Installing the latest Windows updates will tackle system bugs that might be interfering with the Registry Editor.
Now, here’s how you can install the latest Windows updates:
- Type Settings in the Start Menu search bar and select the Best match.
- Select Update & Security and then click Windows Update on the left-hand side.
- Finally, click the Check for updates button on the right and follow the on-screen steps.