Social

how to enable/disable core isolation in windows 10/11

Turn On or Off Core Isolation Memory Integrity in Windows Security
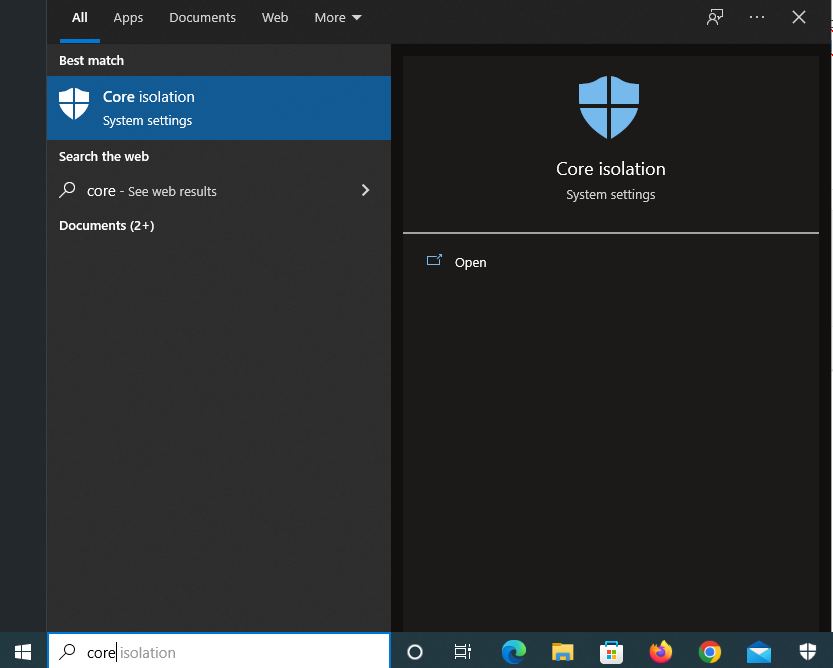
  1. Open Windows Security. (or you can type directly in windows search bar: core isolation)
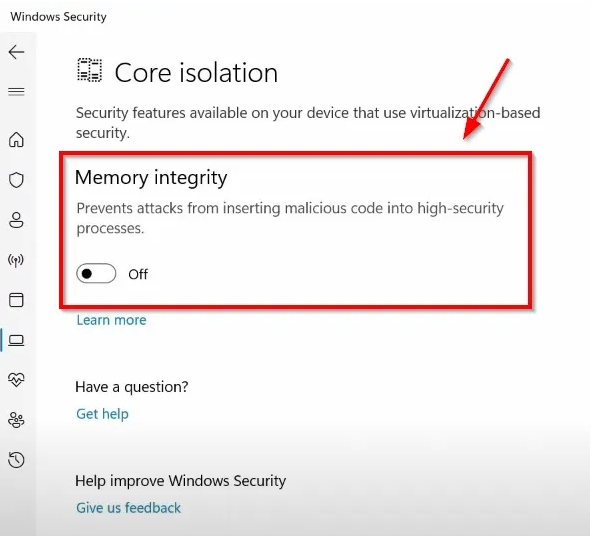
  2. Click/tap on Device security on the left side, and click/tap on the Core isolation details link on the right side.
  3. Turn on (default) or off Memory integrity for what you want.
  4. After you change the settings you must do a system reboot.

If Memory Integrity Can’t be Enabled or Disabled or Greyed Out then Follow the Second Method.

Solution 2: Using Registry Editor

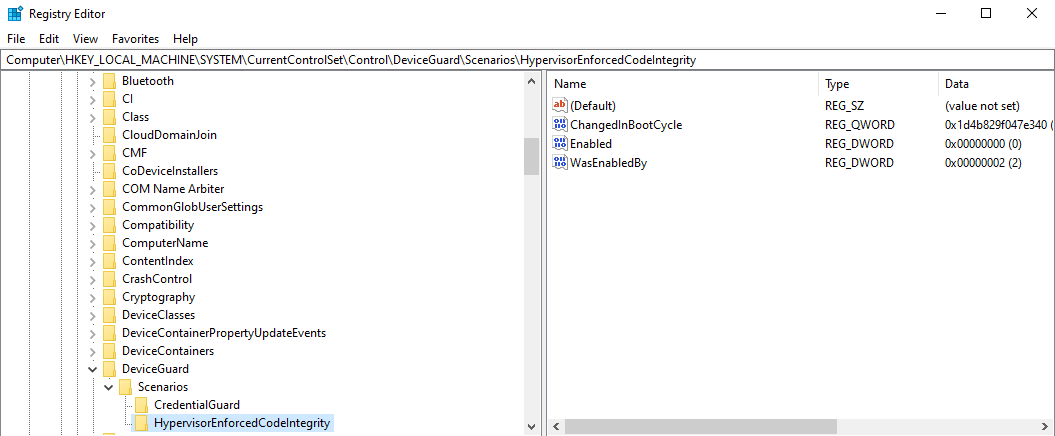
To disable Core Isolation/Memory Integrity, run regedit and navigate to the following locations and make the necessary changes:

Computer\HKEY_LOCAL_MACHINE\SYSTEM\CurrentControlSet\Control\DeviceGuard\Scenarios\CredentialGuard REG_DWORD should be 0.

Computer\HKEY_LOCAL_MACHINE\SYSTEM\CurrentControlSet\Control\DeviceGuard\Scenarios\HypervisorEnforcedCodeIntegrity REG_DWORD should be 0

if you do not see the above keys/values, then go to Computer\HKEY_LOCAL_MACHINE\SOFTWARE\Policies\Microsoft\Windows Defender and confirm there are no similar keys like HypervisorEnforcedCodeIntegrity or CredentialGuard

After you changed the value from 1 to 0 system will need a reboot to apply the changes.

[mai mult...]

Mydoom a destructive computer worm

MyDoom was named by Craig Schmugar, an employee of computer security firm McAfee and one of the earliest discoverers of the worm. Schmugar chose the name after noticing the text “mydom” within a line of the program’s code. He noted: “It was evident early on that this would be very big. I thought having ‘doom’ in the name would be appropriate.”

[mai mult...]

How to manage Search Indexing

You have three options when it comes to Windows Search Indexing:

  1. Remove folders from indexation to reduce the scan time
  2. Disable content indexation
  3. Disable Windows Search indexing completely
  • Remove folders from indexation

It may be enough sometimes to limit the folders that you want Windows Search to index. Windows Search indexes some folders, like Downloads, Documents or Desktop by default. If you are a heavy downloader, the downloads folder may be full of files and folders all the time. Additionally, file and folders may get deleted regularly as well which means that indexing has a lot of work to do to process that folder.

Tip: It is a good idea to limit indexation to folders that you want Windows Search to index. If you work with a lot of documents and use Windows Search to find them, you may want to keep the Documents folder but remove others that you don’t require.

  • Indexing Options

You manage the indexing locations in the Indexing Options. To load the configuration, tap on the Windows-key, type indexing options, and select the result of the same name.

The Indexing Options window lists all folders that are included or excluded from indexation. It furthermore highlights the number of items that are in the index currently, and the status of indexing.

Select Modify at the bottom to manage the indexing locations. This opens a dual-pane window that lists all available locations in the top pane, and all folders selected for indexation at the bottom.

Tip: Make sure you click on the “show all locations” button to reveal locations that may not be shown by default.

You add new locations by checking boxes in front of items in the top pane, and remove existing ones by removing the checkmarks from the boxes. Since you may not want to navigate the top folder structure to locate all indexed locations, you may click on a location in the lower pane to jump straight to it. This allows you to remove it with just two clicks.

When you remove a location from Windows Search indexing, Windows Search won’t scan it anymore when it runs scans for changes in those locations.

You may also exclude subfolders from indexation. This is useful if you want some locations of a folder to be indexed but not others. Using exclude options may further help reduce the load of indexation when Windows Search indexing runs.

Check the Advanced options once you are done. Make sure that the options “index encrypted files” and “treat similar words with diacritics as different words” are not selected.

You may delete and recreate the index on the page as well, and change the location of the index. The latter may be useful if the computer’s main drive is slower than another drive connected to the device.

  • Disable content indexation

Another thing that you may want to check is whether Windows Search is allowed to index file content and not only file properties on select drives. It takes more time obviously to scan the content of files as well, and if you don’t need that, you may want to make sure that this is not done on the Windows machine in question.

You need to repeat the following steps for any drive of the Windows 10 PC:

  1. Open File Explorer.
  2. Right-click on the drive, e.g. Local Disk (c:), and select properties from the context menu.
  3. Go to the General tab if it does not open automatically.
  4. Remove the checkmark from “Allow files on this drive to have contents indexed in addition to file properties”.
  5. Confirm the Attribute changes by selecting “apply changes to drive, subfolders and files, and click ok.

The process may take a while before it completes. It can run for minutes and even longer than that depending on the size of the drive. You may get an access denied error. I suggest you select “ignore all” when that happens to tell Windows that it should ignore any future access denied error automatically.

  • Disable Windows Search Indexing completely

The final option that you have is to disable Windows Search indexing completely. This prevents any indexation processes and should improve the situation on all devices that are affected by high load or performance issues that are caused by Windows Search indexing.

  1. Tap on the Windows-key, type services.msc, and tap on the Enter-key. This opens the Windows Services Manager.
  2. Locate Windows Search when the services listing opens. The services are sorted automatically, so jump to the bottom to find it more quickly.
  3. Right-click on Windows Search and select properties from the menu.
  4. Switch the startup type to “disabled”.
  5. Select “stop” under service status to block the service from running in that session.
  6. Click apply and then ok.

You may still run searches, but without indexing. This means that searches may take longer to complete.

[mai mult...]

Find Out List of All Open Ports in Linux

In computer networking, and more definitely in software terms, a port is a logical entity which acts as a endpoint of communication to identify a given application or process on an Linux operating system. It is a 16-bit number (0 to 65535) which differentiates one application from another on end systems.

The two most popular Internet transport protocols, Transmission Control Protocol (TCP) and the User Datagram Protocol (UDP) and other less known protocols use port numbers for communication sessions (source and destination port numbers in conjunction with the source and destination IP addresses).

In addition, a combination of an IP address, port and protocol such as TCP/UDP is known as a socket, and every service must have a unique socket.

Below are the different categories of ports:

  1. 0-1023 – the Well Known Ports, also referred to as System Ports.
  2. 1024-49151 – the Registered Ports, also known as User Ports.
  3. 49152-65535 – the Dynamic Ports, also referred to as the Private Ports.

You can view a list of different applications and port/protocol combination in /etc/services file in Linux using cat command:

$ cat /etc/services 
OR
$ cat /etc/services | less
Network Services and Ports
# /etc/services:
# $Id: services,v 1.48 2009/11/11 14:32:31 ovasik Exp $
#
# Network services, Internet style
# IANA services version: last updated 2009-11-10
#
# Note that it is presently the policy of IANA to assign a single well-known
# port number for both TCP and UDP; hence, most entries here have two entries
# even if the protocol doesn't support UDP operations.
# Updated from RFC 1700, ``Assigned Numbers'' (October 1994).  Not all ports
# are included, only the more common ones.
#
# The latest IANA port assignments can be gotten from
#       http://www.iana.org/assignments/port-numbers
# The Well Known Ports are those from 0 through 1023.
# The Registered Ports are those from 1024 through 49151
# The Dynamic and/or Private Ports are those from 49152 through 65535
#
# Each line describes one service, and is of the form:
#
# service-name  port/protocol  [aliases ...]   [# comment]

tcpmux          1/tcp                           # TCP port service multiplexer
tcpmux          1/udp                           # TCP port service multiplexer
rje             5/tcp                           # Remote Job Entry
rje             5/udp                           # Remote Job Entry
echo            7/tcp
echo            7/udp
discard         9/tcp           sink null
discard         9/udp           sink null
systat          11/tcp          users
systat          11/udp          users
daytime         13/tcp
daytime         13/udp
qotd            17/tcp          quote
qotd            17/udp          quote
msp             18/tcp                          # message send protocol
msp             18/udp                          # message send protocol
chargen         19/tcp          ttytst source
chargen         19/udp          ttytst source
ftp-data        20/tcp
ftp-data        20/udp
# 21 is registered to ftp, but also used by fsp
ftp             21/tcp
ftp             21/udp          fsp fspd
ssh             22/tcp                          # The Secure Shell (SSH) Protocol
ssh             22/udp                          # The Secure Shell (SSH) Protocol
telnet          23/tcp
telnet          23/udp

To list all open ports or currently running ports including TCP and UDP in Linux, we will use netstat, is a powerful tool for monitoring network connections and statistics.

List All Network Ports Using Netstat Command
$ netstat -lntu

Proto Recv-Q Send-Q Local Address               Foreign Address             State      
tcp        0      0 0.0.0.0:22                  0.0.0.0:*                   LISTEN      
tcp        0      0 0.0.0.0:3306                0.0.0.0:*                   LISTEN      
tcp        0      0 0.0.0.0:25                  0.0.0.0:*                   LISTEN      
tcp        0      0 :::22                       :::*                        LISTEN      
tcp        0      0 :::80                       :::*                        LISTEN      
tcp        0      0 :::25                       :::*                        LISTEN      
udp        0      0 0.0.0.0:68                  0.0.0.0:*                               

Where,

  1. -l – prints only listening sockets
  2. -n – shows port number
  3. -t – enables listing of tcp ports
  4. -u – enables listing of udp ports

You can also use ss command, a well known useful utility for examining sockets in a Linux system. Run the command below to list all your open TCP and UCP ports:

List All Network Ports Using ss Command
$ ss -lntu

Netid State      Recv-Q Send-Q               Local Address:Port       Peer Address:Port 
udp   UNCONN     0      0                    *:68                     *:*     
tcp   LISTEN     0      128                  :::22                    :::*     
tcp   LISTEN     0      128                  *:22                     *:*     
tcp   LISTEN     0      50                   *:3306                   *:*     
tcp   LISTEN     0      128                  :::80                    ::*     
tcp   LISTEN     0      100                  :::25                    :::*     
tcp   LISTEN     0      100                  *:25  
[mai mult...]

Find Out Which Process Listening on a Particular Port

1. Using netstat Command

netstat (network statistics) command is used to display information concerning network connections, routing tables, interface stats, and beyond. It is available on all Unix-like operating systems including Linux and also on Windows OS.

In case you do not have it installed by default, use the following command to install it.

$ sudo apt-get install net-tools    [On Debian/Ubuntu & Mint] 
$ sudo dnf install net-tools        [On CentOS/RHEL/Fedora and Rocky Linux/AlmaLinux]
$ pacman -S netstat-nat             [On Arch Linux]
$ emerge sys-apps/net-tools         [On Gentoo]
$ sudo dnf install net-tools        [On Fedora]
$ sudo zypper install net-tools     [On openSUSE]

Once installed, you can use it with the grep command to find the process or service listening on a particular port in Linux as follows (specify the port).

$ netstat -ltnp | grep -w ':80' 
Check Port Using netstat Command

In the above command, the flags.

  • l – tells netstat to only show listening sockets.
  • t – tells it to display tcp connections.
  • n – instructs it to show numerical addresses.
  • p – enables showing of the process ID and the process name.
  • grep -w – shows matching of exact string (:80).

Note: The netstat command is deprecated and replaced by the modern ss command in Linux.

2. Using lsof Command

lsof command (List Open Files) is used to list all open files on a Linux system.

To install it on your system, type the command below.

$ sudo apt-get install lsof     [On Debian, Ubuntu and Mint]
$ sudo yum install lsof         [On RHEL/CentOS/Fedora and Rocky Linux/AlmaLinux]
$ sudo emerge -a sys-apps/lsof  [On Gentoo Linux]
$ sudo pacman -S lsof           [On Arch Linux]
$ sudo zypper install lsof      [On OpenSUSE]    

To find the process/service listening on a particular port, type (specify the port).

$ lsof -i :80
Find Port Using lsof Command
3. Using fuser Command

fuser command shows the PIDs of processes using the specified files or file systems in Linux.

You can install it as follows:

$ sudo apt-get install psmisc     [On Debian, Ubuntu and Mint]
$ sudo yum install psmisc         [On RHEL/CentOS/Fedora and Rocky Linux/AlmaLinux]
$ sudo emerge -a sys-apps/psmisc  [On Gentoo Linux]
$ sudo pacman -S psmisc           [On Arch Linux]
$ sudo zypper install psmisc      [On OpenSUSE]    

You can find the process/service listening on a particular port by running the command below (specify the port).

$ fuser 80/tcp

Then find the process name using PID number with the ps command like so.

$ ps -p 2053 -o comm=
$ ps -p 2381 -o comm=
[mai mult...]

How to delete a service in Windows

1.Deleting Services Using Windows Registry

All services are listed in the Windows Registry. If a service’s Registry key is removed, it will be deleted from the system. This method is a lot faster usually. Here is how it is done:

  • Use the hotkey Windows-r to open a run box, enter regedit in the box and press enter. Some users may see a UAC prompt that they need to accept.
  • The window displays folders on the left side, and subfolders or parameters on the right. Locate the following Registry key by following the folder structure on the left.

                  HKEY_LOCAL_MACHINE\SYSTEM\CurrentControlSet\services

  1. A click on services lists all available Windows Services as subfolders of that key. Please note that the service’s Service Name is used as the folder name which means that you may need to open the Services listing once again to identify the right services.
  2. I suggest you back up the key first before you start deleting services. Left-click on the services folder and select File > Export to backup the key. Type in a file name and save it to the hard drive.

You can import the backed-up key again by selecting File > Import and the file that you have previously exported.

Locate the service that you want to delete in the listing. A left-click selects the service and displays its parameters on the right pane. To remove a service press delete on the keyboard, or right-click the service and select delete from the context menu.

To summarize this method:

  • Open the Windows Registry
  • Navigate to the key HKEY_LOCAL_MACHINE\SYSTEM\CurrentControlSet\services
  • Backup the services key
  • Identify the service that you want to delete
  • Left-click on that service and press delete on the keyboard
2.Removing Services from the Command Line

This is probably the most complex yet the most effective solution. You may need to open an elevated command prompt first, depending on the version of Windows. You can try and open the command line normally with the hotkey Windows-r, typing cmd, and pressing Enter.

If you face an issue with the command and get an “access denied” error that you need administrative privileges you need to click on the Windows start button, select Programs (or All Programs), then Accessories. Locate Command Prompt, right-click the item in the start menu, and select Run as Administrator from the context menu. This may trigger a UAC prompt under Vista, Windows 7, or 10 that needs to be accepted.
The command prompt displays Administrator: Command Prompt if the operation was successful.

Windows 7 and Vista users who have the search box enabled in the start menu can enter cmd instead in the box to open the elevated command prompt with Ctrl-Shift-Enter.

Windows Services are deleted with the command sc delete followed by the name of the service. Since it is likely that you do not know the name you need to open the Windows Services listing. This is done with the keys Windows-r, typing services.msc and Enter on the keyboard.

What you need is the service name, not the display name that is shown in the main listing. The names may be identical sometimes. Double-click the service that you want to delete to see both names. Apple Mobile Device is for instance the service name and display name of the service. Microsoft on the other hand often uses short cryptic service names and longer display names. The Bitlocker Drive Encryption Service (display name) is listed with the service name BDESVC.

The name may have implications on the command. Let’s say we want to delete the Apple Mobile Device service, a leftover piece after uninstalling iTunes. The command to do that on the command line is sc delete “Apple Mobile Device”.

Notice the quotation marks around the service’s name? A space is generally seen as a new command or parameter, which means that it is necessary to use quotation marks if names or commands make use of spaces to basically tell the program that they are all part of a word or phrase. Take a look at the screenshot below to see what happens if the command is issued without quotation marks, and then with.

To summarize: To delete services from the command line, do the following:

  1. Open an elevated command prompt.
  2. Open the Windows Services management listing.
  3. Identify the service name and not the display name by double-clicking on a service.
  4. Run the command, make sure you use quotation marks if the name contains spaces.
  5. The message [SC] DeleteService SUCCESS indicates that the service has been successfully removed from the operating system.
[mai mult...]