Social

Netfilx error codes

What Is Netflix Code TVQ ST 145?
Netflix error code TVQ ST 145 is part of a group of error codes relating to network connectivity issues. Other error codes in this series include TVQ-ST-103, TVQ-ST-131, TVQ-ST-148, TVQ-RTE-1, and TVQ-ST-106.

You’ll usually see these error codes present with a message such as:

“Netflix has encountered an error.”
“Unable to connect to Netflix.”

[mai mult...]

How to Fix It When Roku Keeps Buffering

Why Does the Roku Keep Buffering?
Roku buffering is usually caused by a slow internet connection, overheating, or an out-of-date operating system. Media apps that automatically switch to high-resolution videos while on a slow connection that can’t handle larger files can also cause buffering.

[mai mult...]

How to enable the Group Policy Editor on Windows 11 Home

Microsoft ships a useful tool called the Group Policy Editor, commonly known as Gpedit.msc or just GPEDIT, with the Pro version of its Windows operating system. It is handy for enabling or disabling functions of various elements in the OS, by changing Registry values, but in a more user-friendly way. Unfortunately, Home Edition users don’t get access to this nifty tweaking utility. But, there is a way to enable the Group Policy Editor on Windows 11 Home.

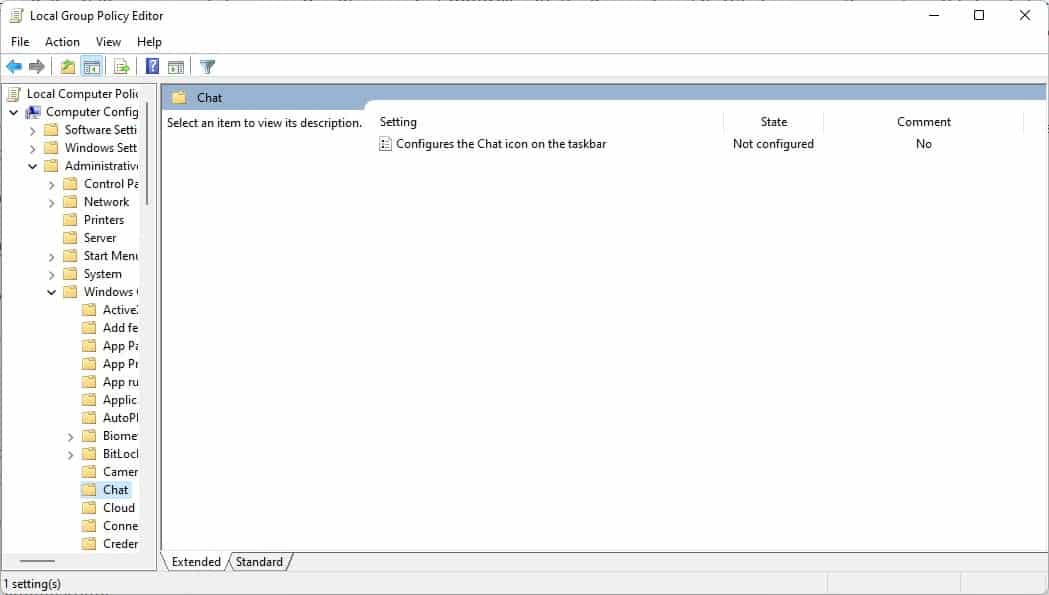
Group Policy Editor in Windows 11
Let me remind you that simply enabling the utility only lets you access the GPEDIT console’s interface, it does not apply the changes for the policy settings (at least not for the ones I tried to modify). It is still worth a shot though, especially for the price of free, and the GUI definitely works.

Note: If you have Windows 11 Pro, don’t bother with this, as you will already have the fully-functional version of the tool.

How to enable the Group Policy Editor on Windows 11 Home

1. Download the ZIP archive from our website, extract it to a folder, and you will get a BAT file.

Or, copy the code below and paste it in Notepad. Save the file with the .BAT extension like Script.BAT or GPEDIT.BAT, the name doesn’t matter.

@echo off
pushd “%~dp0″

dir /b %SystemRoot%\servicing\Packages\Microsoft-Windows-GroupPolicy-ClientExtensions-Package~3*.mum >List.txt
dir /b %SystemRoot%\servicing\Packages\Microsoft-Windows-GroupPolicy-ClientTools-Package~3*.mum >>List.txt

for /f %%i in (‘findstr /i . List.txt 2^>nul’) do dism /online /norestart /add-package:”%SystemRoot%\servicing\Packages\%%i”
pause

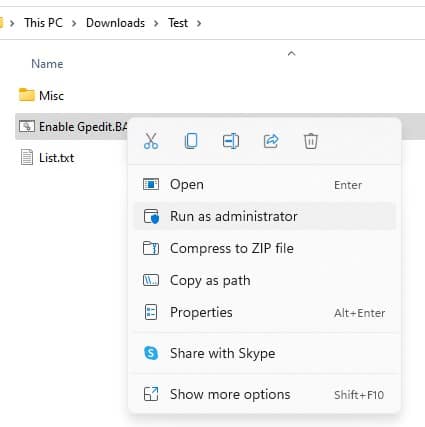
2. Right-click on the BAT file and run it as administrator.

gpedit enable with a bat file

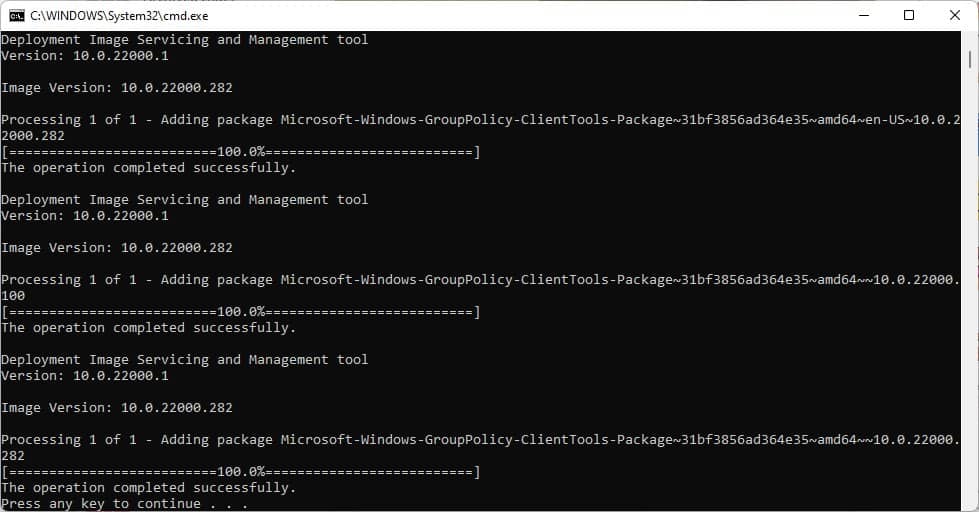
3. A command-prompt window should open. This is the DISM command, which installs the relevant packages to enable GPEDIT on your computer. Wait for the process to be completed, it may take a few seconds. You’ll know when it’s done, when you see a message that says “Press any key to continue”.

How to enable the Group Policy Editor on Windows 11 Home

4. Tap any key and the command window should close.

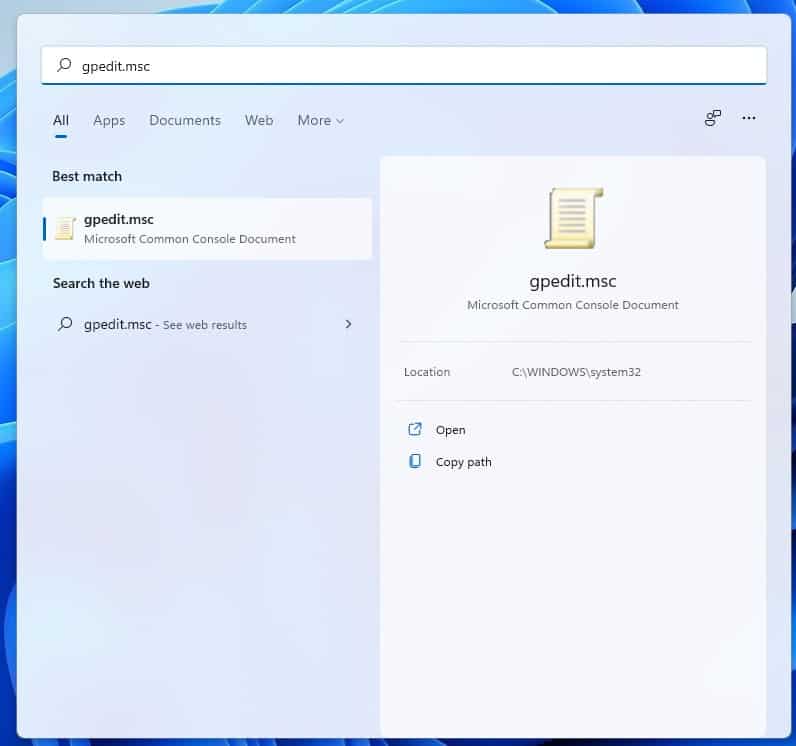
5. Click the Start button and type Gpedit.msc, and you should see the tool appear in the result click on it (or use the Run command with Win + R, followed by Gpedit.msc), and you will be able to access the Group Policy Editor.

GPEDIT in Windows 11

You don’t need to reboot the computer for the utility to show up, you may want to turn off the system and turn it on again. If you try to modify a policy, but it doesn’t appear to take effect, don’t be surprised. As I mentioned earlier, it’s a bit of a hit-and-miss, the tool seems to work sometimes. There is no known workaround to enable the functionality in Windows 11 Home or Windows 10 Home, besides upgrading your operating system to the Pro version, of course.

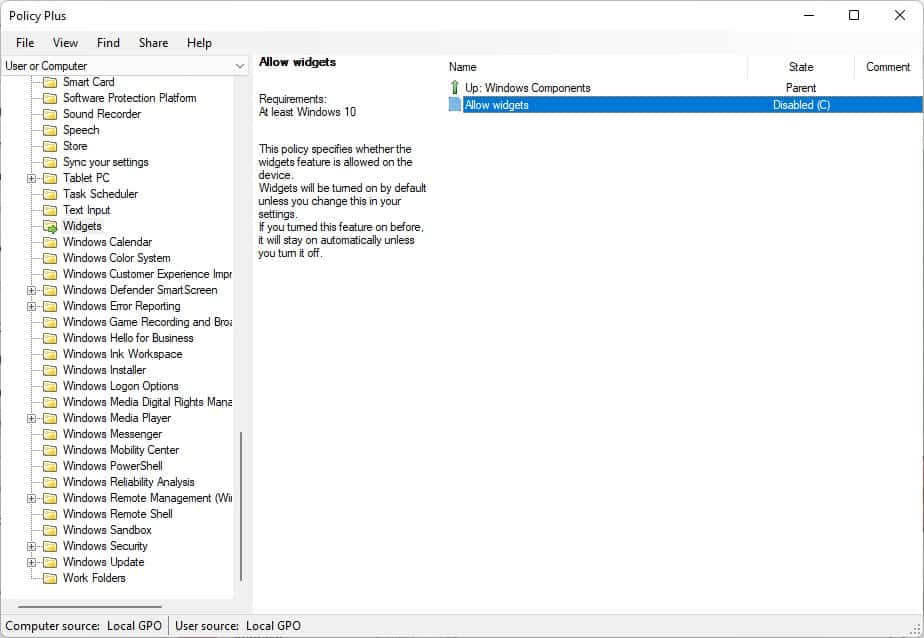
I recommend using the third-party program, Policy Plus, to make changes to the operating system. It is essentially the same as the Group Policy Editor, but with a slightly better interface.

Policy Plus in Windows 11

Please be aware that some antivirus programs detect it as a threat (I observed 4 detections on VirusTotal), these are not from major AVs, and I’m fairly certain these are false-positives.

[mai mult...]

How to Automatically Save Screenshots in Windows 10

Are you tired of taking screenshots and pasting it in your Microsoft Paint software and then save them? There’s a much easier way to do it in Windows 10. You can automatically save the screenshots you take with a very simple technique.

The traditional way of taking screenshots is quite tedious. First you press the “Print Screen” key on your Keyboard then you paste the image in a photo editing software. In most cases people use the built-in Paint app to do it.

To take screenshots in Windows 8 or 10 and automatically save them as files, follow these steps:

  1. Press the Window + PrintScreen key on your keyboard.
  2. The screen will fade for a second which will indicate that the screen has been captured successfully.
  3. Browse to the “Pictures” folder in your Windows Explorer window. You will see a folder named “Screenshots” inside.
  4. All your screen images will be available as image files in that folder.

That’s it. The all you need to do to make that happen. The procedure involves pressing a key combination only, but it makes life much easier. If you want to capture multiple screens, simply keep pressing the key combination and all of the screens will be saved as image files in that folder.

This technique works for both Windows 8 and Windows 10.

[mai mult...]

How to Block Ads on your Smart TV in Router

Ads can be very annoying. Especially on Smart TVs like the Samsung, LG, Roku and Sony some ads can be overwhelming. It’s not a nice feeling when you just brought in a new TV and turned it ON for the first time. You would not expect to see Ads immediately.

Worry not. We are going to share a couple of ways to block ads on your Smart TV. With those controls, you will be able to completely block the ads on your TV, even the in-app ads. Sounds cool right?

Here are the 2 ways to block ads on your Samsung, LG, Sony and Roku Smart TVs:

  • Filtering specific Ad URLs to your Home Internet Router
  • Installing BlockADA app for Android (Works on Android TVs only)

Now we will discuss each method in detail and explain all the steps required to effectively block all the annoying ads:

 Blocking Ads with your Home Internet Router

This method requires you to access your Home Internet Router’s settings and configure the Website black-listing or Parental control settings to block some specific Ads URLs.

Step-1: Access your Router’s configuration page

The first step is to access the configuration of your Home router. For this step you will need the URL address of the Router and Login / Password information.

Block websites with Content filter

The most common Router configuration URLs for some popular brands are:

  • LinkSys Router: http://192.168.1.1
  • Netgear / D-Link Router: http://192.168.0.1
  • ASUS Router: http://192.168.50.1/
  • Belkin Router: http://192.168.2.1
  • AT&T Router: http://192.168.1.254
  • Comcast Router: http://10.0.0.1

If you have a router that is not listed above, you can Google it like this “Router-brand login URL”.

When you open the page, you will be asked to login with the Administrative user and password. If you don’t remember your password you will need to contact your Internet Service Provider.

Step-2: Filter / Block specific Ad URLs

Now we will look into the procedure of blocking ads on each of the Brands Smart TVs:

For Samsung:

For Samsung you need to block the following URLs:

config.samsungads.com
gpm.samsungqbe.com
log-config.samsungacr.com
samsung.com
samsungacr.com
samsungads.com
samsungotn.net
www.samsung.net/ads
ads.samsung.com

Some of these URLs are for older TV models so you can put all of these in the Web filter to make sure that you’re fully covered.

For LG:

To disable ads that appear on your LG TV’s “My Content” tab, you need to put these links into the web filter:

ngfts.lge.com
us.ad.lgsmartad.com
lgad.cjpowercast.com
edgesuite.net
us.info.lgsmartad.com

For Sony:

For Sony Smart TVs you need to follow a different procedure which is actually easier than the ones we’ve discussed. Follow these steps:

  1. Go into Settings
  2. Find “Android TV Core services”
  3. Roll back all Updates on it. It will give you a warning that you’re rolling back to the initial version. Just Skip it.
  4. Return to the Home Screen and click on the minus ‘-‘ sign on the far left corner of the row to remove the Sponsored channel.
  5. Go back to “Apps” in Settings and look for Android TV Core services. Now Force stop it and disable it.

For Roku:

For Roku TVs here’s an easy way to remove the Interactive pop-up ads that display during commercials on Live TV:

  1. Go to Settings > Privacy > Smart TV experience
  2. Disable the “Use Info from TV inputs” option

You can also remove all other kinds of Ads on Roku Smart TVs by blocking the following URLs:

amoeba.web.roku.com
assets.sr.roku.com
cloudservices.roku.com
prod.mobile.roku.com
wwwimg.roku.com

Of course you can also disable ads from tv settings.

Go to Settings > Privacy and look for the option Use information From TV Inputs. Turn the option off to disable the ads.

[mai mult...]

How to use Microsoft’s Windows File Recovery Tool

Here’s a great news for Windows 10 users: Microsoft released a  free built-in Windows File recovery app which is available in the Microsoft Store. With the recovery tool, you will be able to recover lost files that cannot be recovered from the Recycle Bin.

This feature has been introduced only for the Windows 10 version 2004 or newer. So, if your Windows OS is not updated, you need to update it now to get it.

Windows File Recovery is a command-line based application that can be downloaded directly from Microsoft store. This tool works for all types of local storage devices including internal drivesexternal drives and USB storage devices.

Here are the different use cases when the app can be of use:

  • If you have accidentally deleted an important file
  • You have deleted a file with the shift+D switch that removes it from Recycle Bin as well
  • Hard drive has been wiped clean
  • Windows or Hard Drive has corrupted data
The Three Modes of Windows File Recovery

Windows supports different types of File systems belonging to different types of storage devices. Here’s a quick summary of the different file systems support by Windows:

File Systems OS and Device Types
FAT and exFAT USB drives, Flash drives, SD Cards (Less than 4 GB)
ReFS Windows Servers and Windows Workstations (Pro)
NTFS Internal HDD, SDD, External Drives, USB and SD Cards having Greater than 4 GB storage capacity

The tool supports three modes of operation. Here’s a brief description for all three modes:

  1. Default Mode: Default mode uses the Master File Table (MFT) to locate the lost files. It works best for files that were deleted recently. It only support the NTFS file system.
  2. Segment Mode: This mode does not require MFT, it only requires segments of data. It works best for situations when the data was deleted a while ago or after the disk was formatted. It also works for recovering data from corrupt drives.
  3. Signature Mode: Signature mode works for both types of partitions, i-e FAT, ReFS, exFAT and NTFS. This mode only works for large files and searches for specific file types. Data from external storage devices and USB devices can only be recovered with Signature mode.

Here are the different types of data that can be recovered with this tool (audio, video, photos, documents, archives):

  • wma, wmv, asf
  • jpg, jpeg, jpe, jif, jfif, jfi
  • mp3
  • mpeg, mpg, mp4, m4v, m4a, m4r, m4b, mov, 3gp, qt
  • png
  • pdf
  • zip
  • xlsx, pptx, docx, odp, ods, ott, otg, otc, ots, otf, oth

Steps to Recover Deleted Files in Windows 10

Here’s how you can use the new Windows File Recovery tool to recover the deleted data:

Download the Free Windows File Recovery app from Microsoft Store for free.
Microsoft's free Windows File Recovery Tool

  1. Once you’ve downloaded and installed the app, it will be accessible in your Windows OS. To run it, type “Windows File Recovery” in the Search box. Click on the program that shows up.
  2. If you receive a prompt that asks you to allow the program to make changes to your PC, click ‘Yes’.
  3. In the command-line recovery prompt, enter the following command:
    winfr source-drive-letter: destination-drive-letter: [/switches]
    When you’re recovering files from the Operating system drive (usually C:), use the /n switch to specify user folders and files.

Now we will see how to use the three modes to recover files from your PC:

Default Mode

Let’s assume that you want to recover a file named “SampleDocument.docx” from your C: drive to your Recovery drive E:

winfr C: E: /n \Users\<username>\Documents\SampleDocument.docx

Now let’s say, you want to recover .png and .jpg images from your “Photos” folder to the recovery folder on E: drive:

winfr C: E: /n \Users\<username>\Photos\*.JPG /n \Users\<username>\Pictures\*.PNG

If you need to recover a complete folder from C: drive to the recovery folder on E: drive:

winfr C: E: /n \Users\<username>\Documents\

Always remember to put the backslash ‘\’ at the end of the folder name.

Segment Mode (/r)

Segment mode uses the /r switch to recover files.

For example, if you need to recover MS Word files and PDF files from your C: drive to E: drive:

winfr C: E: /r /n *.pdf /n *.docx

If you need to recover a specific file that has the word “statement” in the file name:

winfr C: E: /r /n *statement*

Signature Mode (/x)

It is always advisable that you check the supported extension groups before using the Signature mode to recover files. To do that, here’s the command:

winfr /#

Now let’s assume you want to recover PNG and JPEG photos from your C: drive to the recovery folder on E: drive:

winfr C: E: /x /y:JPEG,PNG

To recover .zip files from your C: drive to the recovery folder on E: drive:

winfr C: E:\RecoveryTest /x /y:ZIP

These are the basic commands you need to know for recovering lost files on your PC. Of course there are advanced command as well that give you more detailed recovery options. However, the ones explained above are sufficient in most cases.

One more thing that is very important to note is that you can increase or decreases the chances of recovering files on your Computer. The maximum chances are when you haven’t created too many files after deleting the ones you want to recover. When you delete a file, the space is marked as free space. If you put another file on that free space, the chances of recovering the old file decrease. Try not to over-write the free space if possible.

[mai mult...]