Social

Best Spam Filters To Block Unwanted Emails

Email security has become a major concern for organizations due to the increasing number of advanced threats, phishing, and ransomware attacks. Taking email security lightly can be especially devastating to IT services providers due to the large scale of their operations with sometimes thousands of devices managed. According to McKinsey and Company, threats from inside the company accounts for around 43% of data breaches. Here is where powerful, enterprise-grade email filters play a critical role.

The first line of defense

Email or spam filter tools are physical servers installed at the organization’s network as the first line of defense to target threats before they land into a recipient’s inbox. These tools filter all incoming messages before they enter the end user’s account. Email filtering is a process that monitors inbound and outbound emails for spam, malware, or any suspicious content before reaching a mail server. Employing filtering tools helps MSPs and organization’s IT teams to improve regulatory compliance, business continuity, and employee security.

Depending on the use case, spam filters vary greatly in terms of the level of security they provide, scalability, ease of deployment, and additional features to meet the customer’s needs. Outlined below are some the best spam filter tools to give you an idea of what’s possible today and help you make an informed choice.

N-able Mail Assure

N-able™ (formerly SolarWinds® MSP) Mail Assure is an email security solution that helps keep an organization’s network safe and secure from malware, phishing, and spam. It enables managed services providers (MSPs) and enterprises to block the emails that threaten an organization’s assets and critical information. The tool provides email security through advanced analytical features such as an intelligent protection and filtering engine, robust encryption, archiving, and more. To finetune filtering capabilities, Mail Assure has a proprietary engine that is fed continuous data from 23 million inboxes to recognize new threat patterns. Other aspects worth mentioning include:

  • A multitenant web interface for end-users
  • Built-in 24/7 email continuity to improve business productivity
  • Quarantine reports providing clear visibility of the email flow
  • Seamless integration with Microsoft 365
  • Long-term email archiving and storage options
SpamExperts

SpamExperts is a powerful security solution for ISPs and web hosts to strengthen email protection. The tool provides advanced inbound and outbound email filtering options to eliminate and block emerging threats. It not only protects the organization’s network but also saves resources and costs.

The tool offers a first-level incoming filter defense that runs at the frontline of the email infrastructure. With its clear and multilevel view of email flow, end users can track or block unwanted messages, as well as store useful emails to ensure business continuity even during outages and downtime. Users can choose various deployment methods to discover its advanced analytical features.

Barracuda Essentials

Barracuda is a spam filtering solution that protects your business from email-borne cyber threats. It is one of the most comprehensive security platforms for organizations to block threats and protect businesses from volumetric malware, spam, targeted spear-phishing attacks, and ransomware. The tool blocks advanced threats with the help of its inbound filtering features. It quickly filters every message before it gets delivered into end users’ dashboards. It uses spam scoring, URL link protection, virus scanning, reputation checks, and more to provide high-level protection.

Barracuda Advanced Threat Protection uses multiple layered analytic engines that perform functions like static analysis, behavioral analytics, CPU-emulation sandboxing, and more. It also offers outbound filtering, cloud-to-cloud backup, tamper-proof archiving, and automatic incident response. With its advanced layers of protection, encryption, and data loss protection features, the tool eliminates issues like data leaks—thereby helping organizations to stay compliant and productive.

Proofpoint Essentials

Proofpoint® offers a service to filter an organization’s inbound and outbound email traffic. Methods are used to scan messages and block content that includes malware, spam, viruses, suspicious links, and others. The tool can also be used for appliance-based email filtering that allows organizations to secure their critical data.

Another way to utilize this tool is when organizations move their applications and services to cloud deployment. Cloud deployment of this tool is more effective than appliance-based filtering as it requires less management and offers real time automatic updates. Additionally, it also defends an organization’s network against spam risks and other email-borne cyber threats.

Mimecast Email Security with Threat Protection

Mimecast’s secure email gateway is a cloud-based solution that protects organizations from inbound malware, spam, spear-phishing, and zero-day attacks. It combines with multiple policies, applications, and detection engines to secure business-critical emails. It can also perform outbound scanning of all emails. This technique detects malicious content to block threats and prevent the loss of sensitive or confidential information.

The tool includes end-to-end encryption, DLP, and content control for scanning full emails with attachments. An advanced feature of the tool is BYO threat intelligence that automatically ingests existing security data to Mimecast® tenants to streamline response processes, increase threat detection efficacy, maximize ROI, and more.

Trend Micro Email Security

Trend Micro is an email threat detection tool that tracks and blocks advanced threats faster and better. It offers layered protection against ransomware, malware, and others using dynamic sandbox analysis for files and URLs, and machine learning to help filter unknown malware. The advanced services of Trend Micro Email Security give continuous and updated protection against advanced targeted attacks with enterprise-grade security features such as:

  • Longer mail tracking search window
  • Sandbox analysis
  • Email continuity
  • URL time-of-click
  • Artificial intelligence (AI)-based fraud/BEC detection
  • DLP and encryption
  • File-password extraction
  • End-user quarantine
  • Connected Threat Defense
  • Sender analysis and authentication by SPF, DKIM, and DMARC
Conclusion

Choosing the best solution for real-time protection against email-borne threats can be difficult with so many options available on the market. The tools highlighted above are the best cloud-based spam or email filtering tools that offer advanced capabilities to fight malware, ransomware, and other emerging threats. It is best to discover their features and evaluate the functionality using their free trials.

[mai mult...]

Cu ce a fost înlocuită cartela de pontaj în telemuncă?

În momentul în care interacţiunea directă dintre colegi s-a transformat într-o chestiune de domeniul trecutului, nevoia unei soluţii care să îmbunătăţească nivelul de colaborare şi să digitalizeze viaţa la birou a devenit cât se poate de clară. Discuţiile s-au mutat, pe Zoom, iar odată cu această tranziţie a fost nevoie de o modalitate mai bună de organizare a muncii, la care s-au gândit şi fondatorii Elysian Software.

[mai mult...]

WooCommerce vs. Magento. Care platforma de eCommerce este mai buna?

Cumparaturile online reprezentau la finele anului 2020 aproximativ 25% din totalul vanzarilor cu amanuntul din intreaga lume. Numarul tot mai mare de platforme si instrumente de comert electronic usureaza munca antreprenorilor care au o afacere online, ajutandu-i sa-si construiasca o prezenta pe aceasta piata globala aflata in dezvoltare. WooCommerce si Magento sunt doua dintre cele mai cunoscute platforme pentru construirea de magazine online insa cele doua functioneaza in moduri diferite.

Probabil v-ati intrebat deja: Care este platforma potrivita pentru magazinul dvs. online? Raspunsul nu este simplu, insa in general alegerea platformei pentru magazinul dvs. online depinde in general de abilitatile dvs. tehnice si de planurile pentru viitorul dvs. proiect de comert electronic.

[mai mult...]

How To Organize Your Messy Windows Desktop

The desktop is a convenient place to store files and program shortcuts, but it can get messy fast. Here’s how to tidy your desktop up so you can quickly find everything you’re looking for—and make sure it stays nice and organized.

Hide All Your Desktop Icons

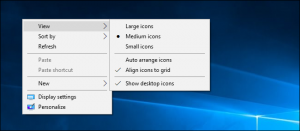
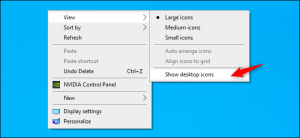
If you don’t use your desktop much, but programs keep dropping shortcuts on it, here’s a quick solution: Hide everything to get a perfectly clean desktop. To toggle desktop icons on or off, right-click your desktop and select View > Show Desktop Icons. Your desktop will appear empty.

To see your desktop icons again, click the “Show Desktop Icons” option again. Or, you can open a File Explorer or Windows Explorer window and click the “Desktop” folder to view the contents of your desktop in a standard file browser window. That’s the nuclear option, of course. If you like storing files and program shortcuts on your desktop, you won’t want to hide them all.

Quickly Sort Your Desktop Icons

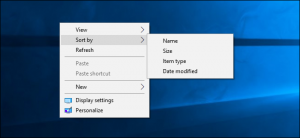
For a quick organization, you can right-click your desktop and select an option in the “Sort By” menu. For example, select “Name” to sort files alphabetically or “Date Modified” to sort them chronologically. This makes it easier to find what you’re looking for if your desktop is very messy.

You can also use the options under the “View” menu to choose the size of your desktop icons and decide whether they’re aligned to a grid. If you uncheck “Auto Arrange Icons,” you can drag and drop icons anywhere you want. If this option is enabled, icons will always be grouped, one after the other.

These options can be helpful, but they’re no substitute for truly taming the clutter.

Organize Your Files and Shortcuts Into Folders

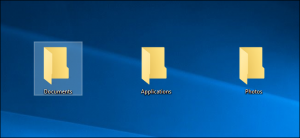
Consider using folders to keep your desktop organized. To create a folder, right-click the desktop, select New > Folder, and give the folder a name. Drag and drop items from your desktop into the folder. You can double-click a folder on your desktop to open it, so it takes a few more clicks to open your files—but they’re still easy to find.

For example, you could have separate folders for your photos and documents, or keep files related to a single project in their own folder. And yes, you can drag and drop program shortcuts into folders, too. If you’d like to clean up your desktop quickly, you can select everything on your desktop and then drag and drop them into a folder. You can then move items back onto your desktop as you need them.

Use the Desktop as a Temporary Working Area

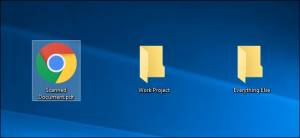
The desktop works well as a workspace, giving you a convenient place to store files with which you’re working currently. For example, you might store spreadsheets you’re working on, documents you’ve scanned, photos you’ve just taken, or things you’ve just downloaded on your desktop.

To keep the desktop useful for this task and prevent it from getting too cluttered, try only storing files on your desktop for as long as you need them. When you’re finished with a project or task, move the associated files to another folder like your main Documents or Photos folder—or even dump them in a folder on your desktop. In other words, treat the desktop like you should treat a physical desktop or counter—place things on it while you’re using it, and clear them away afterward rather than letting them pile up.

Put Shortcuts in Your Start Menu and Taskbar

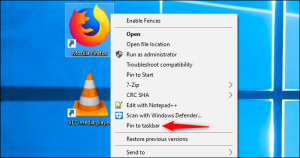
Programs often add shortcuts to your desktop when you install them, which makes your desktop get more and more cluttered over time. Try placing program shortcuts elsewhere, such as on your taskbar or in your Start menu. To pin a program shortcut to your taskbar, right-click it and select “Pin to Taskbar.” It will always appear as an icon on your taskbar, and you can drag the icon to the left or right to position it.

To get more space for icons on your taskbar, you can remove some things to free up space. For example, to hide the Cortana search box on Windows 10, right-click your taskbar and select Cortana > Hidden. You can also click Cortana > Show Cortana Icon, which will make Cortana be a standard taskbar icon instead of a large search box.

You can also place shortcuts in your Start menu. To do so, right-click a shortcut and select “Pin to Start.” On Windows 10, it will appear as a tile at the right side of your Start menu. On Windows 7, it will appear as a shortcut at the left side of your start menu. You can also pin apps right from the Start menu—either right-click a shortcut in the all apps list in the Start menu and select “Pin to Start,” or drag the icon to the pinned apps area.

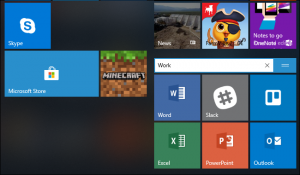
On Windows 10, you can drag and drop pinned application shortcuts in your Start menu to organize them into groups, and click the header at the top of the group to give it a name. For example, you could create a “Work” group with shortcuts to applications you use for work or a “Games” group that contains shortcuts for your games.

Also, if you’re using Windows 10, you can unpin all those pinned apps Microsoft put there to make the Start menu your own. Feel free to unpin any shortcuts you don’t use.

After you’ve moved all the shortcuts you want to your taskbar and Start menu, you can delete them from your desktop like you’d delete any file—or move them to a folder. If you accidentally delete a shortcut and want it back on your desktop, open your Start menu and find the shortcut in the list of all your installed applications. Drag and drop the shortcut to your desktop.

[mai mult...]

How to Create a Shortcut to an Application

To do this the easy way, open Windows 10’s Start menu. Look for the application you want to use by scrolling through the Apps list at the left side of the menu. If it’s in the tiles list at the right side of the menu, you can also drag it from there.

Once you’ve found it, drag and drop the application’s shortcut from your Start menu to your desktop. You’ll see the word “Link” appear when you’re hovering over the desktop. Release the mouse button to create a link to the program, also known as a desktop shortcut.

Note that you can’t search for the application by name in the Start menu. Windows 10 won’t let you drag and drop anything from the search results. It should, but it doesn’t.

How to Create a Shortcut to a File or Folder

To create a desktop shortcut to a file, first, locate the file somewhere in File Explorer. Hold down the Alt key on your keyboard and then drag and drop the file or folder to your desktop. The words “Create Link in Desktop” will appear. Release the mouse button to create the link.

Holding down Alt is necessary. If you don’t hold down Alt, Windows will show the words “Move to Desktop,” and it will move the folder or file to your desktop rather than simply creating a link.

How to Create a Shortcut to a Website

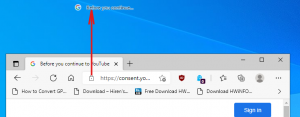
In Google Chrome or Mozilla Firefox and Microsoft Edge, you can quickly create desktop shortcuts to websites. With a web page open, drag and drop the icon to the left of the address bar—it’s generally a padlock or an “i” in a circle—to the desktop.

Working With Your Shortcuts

Whatever type of shortcut you create, you can right-click it afterward, select “Rename,” and change the name to whatever you like. You can use all the above methods to create shortcuts in other folders, too. Want to create a shortcut to a website or application in your Downloads folder? Go right ahead! Just drag and drop it to your desired location instead of the desktop.

ADVERTISEMENT

If you don’t see any shortcuts on your desktop, they may be hidden. Right-click the desktop and select View > Show Desktop Icons to unhide them.

You can also choose the size of your desktop icons from here—large, medium, or small. For more size options, position your mouse cursor over the desktop, hold down the Ctrl key, and scroll up and down with your mouse wheel.

[mai mult...]

How to Freely Move Pictures in Microsoft Word

By default, you can’t freely move pictures (by drag-and-drop) to any position in a Microsoft Word document without also placing them somewhere in the text. But with a small change, you can drag images anywhere.

Make a Picture Freely Move in a Word Document

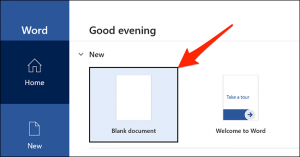
Using the method below, you can move a picture anywhere you want in your Word document—outside of the normal flow of text. You can even place the picture on top of an existing block of text if you want. We’ll use a blank document to do this. Start by opening Microsoft Word on your Windows or Mac computer. On Word’s first screen, select “Blank Document” to create a new document.

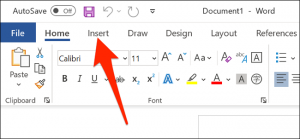
In Word’s editing window that opens, click the “Insert” tab at the top.

In the “Insert” tab under the “Illustrations” section, click Pictures > This Device. This lets you add a picture from your computer.

Use the “File Explorer” window that opens to navigate to the folder containing your picture. Double-click the picture to add it to your Word document.

Back on Word’s editing screen, right-click the image that you just added and select Wrap Text > In Front of Text from the menu.

Your picture is now freely movable. Drag and drop it anywhere you want in your document.

Make All Future Pictures Freely Move in a Word Document

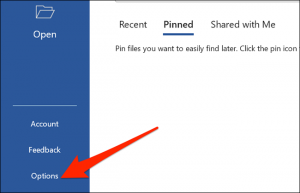
If you’d like to make all of your future pictures freely move in your Word documents, you can modify an option in Word’s settings menu. To do so, first, open Microsoft Word on your Windows or Mac computer. On Word’s main screen in the lower-left corner, click “Options.”

Note: If you’re on Word’s document editing screen instead, click “File” at the top to see the “Options” option.

In the “Word Options” window, select “Advanced” in the sidebar on the left.

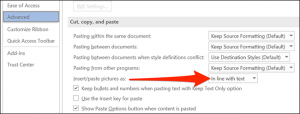
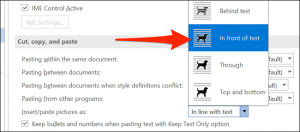
Scroll down the right pane to the “Cut, Copy, and Paste” section. In this section, find the “Insert/Paste Pictures As” option and click the drop-down menu next to it.

Select “In Front of Text” in the drop-down menu.

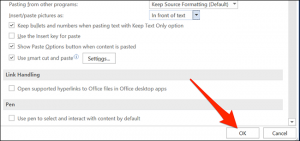
Click “OK” at the bottom of the “Word Options” window to close the window.

And that’s it. From now on, Word will allow you to freely move pictures on top of text in your documents.

[mai mult...]