Social

How to Set an Out of Office Message in Gmail

When you’re out of the office, your work emails should be left firmly behind. To give you a break, you can set up out of office messages in Gmail to let people know you’re away. Here’s how.

Set an Out of Office Message in Gmail Online

The easiest way to set an out of office message in Gmail is to do so from your Windows PC or Mac. You’ll need to be signed in to your Google account to be able to do this. Head to the Gmail website and click the “Settings” gear icon in the top-right corner to begin. From the “Quick Settings” menu that appears, select the “See All Settings” option.

This will take you to the Gmail settings area for your account. Scroll down to the bottom of the “General” tab until you see the “Vacation Responder” options. In certain locales, such as the U.K., this area is named “Out-Of-Office AutoReply” instead, which is what you’ll see in the screenshots shown below. This is because the U.K. doesn’t typically use the term “vacation” to refer to breaks away.

The settings remain the same for all locales, however.

Out-of-office messages work by automatically replying to emails you receive, alerting them to the fact that you are unavailable to respond. You can set the date range that you’ll be “out of office” or “on vacation” and away from your emails in the “First Day” and “Last Day” date boxes.

You’ll need to enable the “Last Day” checkbox if you want to enable an end date. Otherwise, Gmail will continue to send out of office messages until you disable it manually.

Once the date range is set, you’ll need to set the message you want to send automatically. Provide a subject title for the email in the “Subject” box and then type a message in the “Message” box. This text box is a good place to indicate how long you’ll be away from the office, for instance.

Provide a subject and out of office/vacation responder message in the "Subject" and "Message" boxes.

If you want to limit out of office replies to your Gmail contacts only, check the “Only send a response to people in my contacts” checkbox. This checkbox will stop you from replying automatically to people you might not know or automated emails, for instance.

Press the "Only send a response to people in my contacts" checkbox to limit the number of messages being sent.

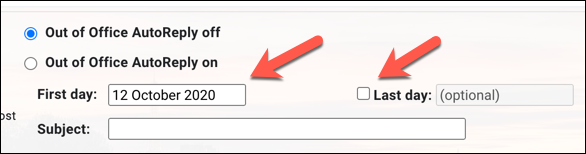
Once you’re ready to save and apply the out of office message, select the “Vacation Responder On” radio button or the “Out of Office AutoReply On” radio button, depending on your location. If this radio button is enabled and you’re happy with your out of office message, click the “Save Changes” button at the bottom of the screen.

Click the "Vacation Responder On" or "Out of Office AutoReply On" (depending on your locale) to switch your out of office message on, then press the "Save Changes" option.

This will activate the out of office message you’ve set from 12 a.m. on the date you specified. If you set a “Last Day” value, the message will stop being sent at 11:59 p.m. on that date.

Set an Out of Office Message in Gmail on Mobile Devices

You can also set an out of office message in the Gmail app on your Android, iPhone, or iPad device. These steps will work on all mobile platforms. To start, open the “Gmail” app on your phone or tablet. Once opened, tap the “hamburger” menu icon in the top-left corner of the app.

Tap the hamburger menu icon in the top-left of the Gmail app.

Scroll down to the bottom of the list and then tap the “Settings” option.

Tap the "Settings" option at the bottom of the Gmail menu.

In the “Settings” menu, tap the Google account you wish to add a Gmail out of office message to.

Choose your account in the Gmail settings account list

Your Gmail account settings menu will have options that are specific to your account, including out-of-office messages. To add an out of office message, tap the “Vacation Responder” or “Out Of Office AutoReply” option, depending on your locale.

Tap the "Vacation Responder" or "Out of Office AutoReply" option

You’ll need to set your out-of-office message settings next. Tap the “Vacation Responder” or “Out of Office AutoReply” slider to allow you to modify the message settings.

Tap the "Vacation Responder" or "Out of Office AutoReply" slider to enable it.

Just like the Gmail out-of-office message settings in your desktop browser, you’ll need to set how long you wish the message to be active from (and to) using the “First Day” and “Last Day” drop-down options.

If you don’t wish to have an end date, set the “Last Day” option to “None” instead. You’ll also need to add a subject and message to send to users. If you only want to send messages to your contacts, tap the “Send to my contacts only” checkbox.

Set the date, subject, and message settings for your Gmail out of office message in the boxes provided, and tap "Send to my contacts only" to limit messages to contacts.

To save and apply the message, tap the “Done” option in the top-right corner.

Tap "Done" to save the Gmail out of office message

This will enable your out of office message from 12 a.m. on the date specified in the “First Day” options. If you set an end date, the messages will stop at 11:59 a.m. on that day.

[mai mult...]

How to Use Cloud Gaming to Play Xbox Games on Your Android Phone

Your Game Pass Ultimate subscription allows you to download a variety of free games to your Xbox One, Xbox Series X/S, or even your PC, but it also allows you to use cloud gaming to play a variety of Xbox games on your Android phone. This service was originally known as Project xCloud while it was in beta, but the xCloud name was retired when Microsoft rolled cloud streaming into Game Pass Ultimate.

[mai mult...]

How to Use Microsoft’s “Windows File Recovery” on Windows 10

Microsoft’s Windows File Recovery is an official tool for recovering deleted files from hard disks, SD cards, USB drives, and other storage media. Here’s an in-depth, step-by-step guide on using this command-line utility.

Microsoft’s Windows File Recovery tool doesn’t have a graphical interface—it’s only a command-line utility. We’ll show you how to use it, but it’s a more hands-on process than you might expect from an official Microsoft utility available in Windows 10’s Store.

This tool requires you’ve installed Windows 10’s May 2020 Update or a newer version of Windows 10. It doesn’t run on older versions of Windows. Whether Microsoft’s tool can actually find and recover a file you’ve deleted depends on the drive. Deleted files aren’t removed from hard drives immediately, but they often are removed from solid-state drives immediately. If you’ve written a lot of data to a device like an SD card since you’ve deleted the file, it’s likely that the file’s data may have been overwritten.

Even if you manage to recover a file, you may only get some of the file’s data—the file may be corrupted. You can only get whatever data is still on the drive. There are no guarantees here, and that’s why backups are so important. The utility also has multiple modes intended for different situations and file systems. We’ll explain which you should use and how to use them.

How to Install Windows File Recovery

To get started, install the Windows File Recovery tool from the Microsoft Store to get started. You can open the Store and search for “Windows File Recovery” or just click that link to open the Store. Once it’s installed, open your Start menu and search for “File Recovery.” Launch the “Windows File Recovery” shortcut once and click “Yes” to the UAC prompt.

You’ll see a Command Prompt window with Administrator access. This is where you’ll run the File Recovery commands.

You can use other command-line environments like the Windows Terminal and PowerShell, but be sure to launch them with Administrator access. (In the Start menu, right-click the one you want to use and select “Run as Administrator.”)

How to Recover Deleted Files on Windows 10

To use this tool, you will run the winfr command, specifying the drive you want to search for the deleted file, the destination you want to save it to, and the various switches that control what the tool searches for and how it searches. You must save the deleted file to a different drive.

Here’s the basic format:

winfr source-drive: destination-drive: /switches

After running the command, the tool will automatically create a directory named “Recovery_[date and time]” on the destination drive you specify.

Which Mode Should You Use?

Before you continue, you should determine the “mode” you want to scan for the deleted file. There are three modes, Default, Segment, and Signature. Default is the fastest mode, while Segment is similar but slower and more thorough. Signature mode can search for files by type—it supports ASF, JPEG, MP3, MPEG, PDF, PNG, and ZIP files. (Searching for “ZIP” files will also find Office documents stored in formats like DOCX, XLSX, and PPTX.)

You’ll need to know what file system the drive you’ll be scanning is formatted with. To find this, open File Explorer, right-click the drive under This PC, and select “Properties.” You’ll see the file system displayed on the “General” tab.

Here’s when you should use the different modes:

  • Are you trying to find a file you recently deleted on a drive formatted with NTFS, which is the default Windows 10 file system? Use Default mode.
  • If you’re scanning an NTFS drive in another situation—for example, if you deleted the file a while ago, you formatted the drive, or you’re dealing with a corrupt drive—try Segment mode first and then try Signature mode afterward.
  • Are you trying to find a file stored on a FAT, exFAT, or ReFS drive? Use Signature mode. The Default and Segment modes only work on NTFS file systems.

If you’re in doubt, just start with Default mode. You can then try Segment and then Signature if Default mode doesn’t work.

How to Recover a File in Default Mode

To use the default mode, you use /n followed by a search path:

  • To search for a file named document.docx, you’d use /n document.docx . You can also specify a full path to the file, such as /n \Users\Bob\Documents\document.docx
  • To search for all files that were in the Documents folder if your username is Bob, you’d use /n \Users\Bob\Documents .
  • To search with a wildcard, use a *. For example /n \Users\Bob\Documents\*.docx will find all DOCX files there were in the Documents folder.

Let’s put that all together now. To search for all DOCX files on drive C: and copy them to drive D:, you’d run the following command:

winfr C: D: /n *.docx

You will have to type “y” to continue.

As we mentioned above, you’ll find the recovered files in a directory named “Recovery_[date and time]” on the destination drive you specified in the command line.

To find all files with a word in their name, use wildcards. So, to find all documents with “project” anywhere in their name, you’d run:

winfr C: D: /n *project*

You can specify multiple searches with multiple /n switches. So, to find all Word, Excel, and PowerPoint files, you’d run the following:

winfr C: D: /n *.docx /n *.xlsx /n *.pptx

To search for a specific file named important_document.pdf that was in the \Users\Bob\Documents folder on drive C:—and then save it to drive D:—you’d use:

winfr C: D: /n \Users\Bob\Documents\important_document.pdf
How to Recover a File in Segment Mode

Segment mode works almost exactly like Default mode. To use segment mode, which examines file record segments, you use /r in addition to /n . In other words, you can construct Segment mode recovery commands in the same way you construct Default mode commands—just add the /r .

For example, to recover all deleted MP3 files from your C: drive and save them to your D: drive, you’d run:

winfr C: D: /r /n *.mp3

So, if a Default mode search doesn’t find what you’re looking for, add the /r and try again.

How to Recover a File in Signature Mode

Signature mode works a bit differently. It examines file types, so it can only find deleted files of certain file types. To use Signature mode, you use /x to specify Signature mode and /y: to list the file type groups you’d like to search for.

Here’s a list of supported file types and the groups they’re sorted into, taken from Microsoft’s documentation:

  • ASF: wma, wmv, asf
  • JPEG: jpg, jpeg, jpe, jif, jfif, jfi
  • MP3: mp3
  • MPEG: mpeg, mp4, mpg, m4a, m4v, m4b, m4r, mov, 3gp, qt
  • PDF: pdf
  • PNG: png
  • ZIP: zip, docx, xlsx, pptx, odt, ods, odp, odg, odi, odf, odc, odm, ott, otg, otp, ots, otc, oti, otf, oth

Note that the “ZIP” group includes ZIP files in addition to Microsoft Office and OpenDocument documents.

You can pull up this list at any time by running the following command:

winfr /#

Let’s say you want to search drive E: for images in JPEG format and save them to drive D:. You’d run the following command:

winfr E: D: /x /y:JPEG

You can specify multiple file groups by separating them with a space. So, if you want to find JPEG files, PDFs, and Word documents, you’d run:

winfr E: D: /x /y:JPEG,PDF,ZIP

More information is available on Microsoft’s official winfr documentation page. You’ll find a detailed list of all winfr ‘s command-line options on that page, too.

For a refresher on the basics, just run winfr or winfr /? .

There are also additional advanced options you can see by running winfr /! .

[mai mult...]

How to Create Conditional Formulas in Adobe Acrobat

There are several ways to create complex calculations in a clean elegant PDF file. Here’s how to integrate conditional formulas into your next document.

Conditional Formulas in Acrobat

We’ve previously covered the basics of automatic calculations in Adobe Acrobat. Conditional formulas let you go beyond the basics, creating more complex formulas in a PDF.

If you use formulas in Excel or Google Sheets, you likely already know what conditional formulas are. Also called logical formulas, they display a particular value or activate a calculation if a certain condition is met, such as if a number is negative or if a score is above the passing grade. Some of the most common conditional formulas in excel include the standard “IF,” as well as “SUMIF,” and COUNTIF.” There is also conditional formatting, where changes to the format are made if a cell meets a certain condition.

Using calculated fields, these kinds of formulas can also be applied in Adobe PDFs. You can display a number, text, or run a calculation based on the results of another input box. You can also use them in conjunction with other calculated fields. Conditional formulas are useful for many types of PDF forms, such as:

  • Financial Documents: For example, if the principal determines someone’s interest rate, a conditional formula can be used to display the corresponding price based on the amount they input.
  • Tests and Exams: You can make an assessment that automatically shows either “pass” or “fail” at the end based on the test taker’s total score.
  • Sales: If you’re using this for transactions, you can make a box that recommends products depending on a prospective buyer’s answers to specific questions.

Take note that while calculated fields can only be made in Adobe Acrobat, the actual calculations will display in any PDF reader.

Creating Simple Conditional Statements

Adobe Acrobat’s custom calculated fields use javascript as a programming language. Fortunately, you don’t need to know how to program in javascript to create a simple conditional field; you just need a basic pattern to follow.

In the following example, we’ll be using this simple company order form. This currently has seven fields: one for quantities of each of the five products, the total quantity, and the total price.

A conditional statement in Adobe javascript follows this basic syntax:

var variable name = this.getField("name of field").value;
if( variable name condition) event.value = true result
else event.value = false result

The first line defines the value that will be used for your conditional formula. In this particular case, we used the “this.getField” to obtain the value of one of the other fields in the document. On the second line, we define the condition. Similar to excel, we specify the condition as being greater than, less than, or equal to a particular value.

Lastly, we define the results. The true result is the value that will be displayed if the condition is met. On the next line, we use “else” to generate the false result, which is the value that will be displayed if the condition is not met.

To put this into practice, we’ve created a calculated field called “Bulk Order.”  To enter a custom calculated script, right-click the chosen field in Acrobat, and select “Properties.” From here, go to “Calculate > Custom Calculation Script > Edit.”

This field will determine whether or not an order counts as bulk. The box will display “Yes” if the total quantity is greater than 20 items, and “No” if it is less than 20. Considering these conditions, we have the formula:

var TQ = this.getField("Total Quantity").value;
if( TQ > 20) event.value = "Yes"
else event.value = "No"

In the image above, you can see that we set the variable name to “TQ,” and pulled the value of TQ from the field “Total Quantity.” Take note that these fields are case-sensitive. Then, we set our condition, which is that TQ must be greater than 20. If it meets this condition, it will display “Yes.” Otherwise, the box will generate “No.”

If we ordered a total of 11 Lightning Cables and 10 Battery Banks, for example, we’d have a total of 21 items. It would then be considered a bulk order, and generate the following result:

Multiple Conditions

There are cases where you may want to have multiple conditions met instead of just one. Fortunately, there is a way to create a conditional field that generates values based on multiple conditions.

Let’s say that in your store, all orders that reach at least 20 products and have a total price of 150 are eligible for a discount of 10%. The final amount would appear in a field called “Total With Discount.” In that case, we’d have to specify two variables and two conditions. We would have the following field:

var Price = this.getField("Initial Price").value;
var TQ = this.getField("Total Quantity").value;
if( Price > 150 && TQ > 20 ) event.value = Price*0.9;
else event.value = Price;

As you can see, we defined two variables on two separate lines. You will also have to use the “&&” notation to combine the two different conditions. Take note that the final value is also a calculation that takes into account the discount.

Therefore, if we use the same total as the example above, we’d generate the following result:

Calculation Orders

One important consideration you should make is the calculation order. Unlike Excel, which renders calculations simultaneously, Acrobat relies on the user to determine which formulas come first.

To set the calculation order, go to the “Edit Form” sidebar and navigate to More > Set Field Calculation Order. In the above example, because the formulas for Bulk Order and Total With Discount are both reliant on Total Quantity and Total Price, we want to make sure that TQ and TP are calculated first.

Make sure to review the calculation order before publishing your form. It’s a good idea to try a few sample inputs on your form to make sure everything is working correctly.


[mai mult...]

Opera adds the Play Music sidebar to Opera Browser for Spotify, Youtube and Apple

Opera Software released a new Developer version of its Opera web browser. The new version introduces support for music playback from the browser’s sidebar. Opera Developer is the cutting-edge development version of the browser. Features are introduced in the browser first before they land in Beta and Stable versions.

If you do like to play music in your browser, you may have noticed that it usually involves juggling between different windows, e.g. different browser tabs in a single browser, or, in the case of a dedicated desktop music player, between different program windows.

Some browsers introduced global media controls, e.g. Firefox and Chrome, to control playback in that browser without switching windows. While that is useful to some, it still requires accessing the music service’s interface for some operations, e.g. searching for music, playing a different playlist, or adding new songs to the existing playlist.

The Opera browser implementation is controlled via an icon in the browser’s sidebar. A click on it display the supported services — currently Apple Music, Spotify, and YouTube Music — that you may access from the sidebar. You can resize the interface and pin it if you want to make it stick to the screen.

A click on a service opens its startpage. What happens next depends on that service, as you may need to sign-in to an account to start using it. A click on YouTube Music displays the service’s startpage and options to play one of the listed playlists, e.g. top 100 charts, or to search for music

A click on the play button starts playback right away. Some services may display ads to free users, and these are played even if you have enabled Opera’s built-in adblocker.

Music playback continues even if the sidebar interface is hidden; Opera indicates playback by changing the icon of the player. If a site is opened that plays music or audio as well, music playback is paused automatically by the player to avoid that multiple sounds play at the same time in the browser. Playback is resumed once all other audio stops playing in the browser.

Opera users may customize the sidebar; they may hide any service that they don’t use to avoid clicking on these unintentionally. Click on the three dots at the bottom of the sidebar and toggle the options to hide them in the interface. You can also hide the entire sidebar if you don’t use it.

Installation links:

[mai mult...]