Social

How to delete WhatsApp messages that you sent

WhatsApp added a new feature to its messaging applications that you may use to delete messages that you sent already using the client.

Messages that you sent up until now could not not be deleted by you after the fact. There was no grace period to undo the sending, and it seems that users requested such a feature which works similarly to how email providers like Gmail provide undo options for a short period of time after sending messages.

This changes with the new deleting messages for everyone functionality that is implemented in the most recent versions of the WhatsApp client for Android, iOS and Windows Phone.

Deleting WhatsApp messages

The new feature has requirements that need to be met.

  1. Messages can only be deleted remotely (read: for everyone), if seven minutes have not passed since they were sent.
  2. Sender and recipients need to use the most recent version of the WhatsApp client.

WhatsApp won’t notify you if the deleting of the message is not successful. It may still be deleted on the device that you are using, but it may not have been deleted on the recipients device. Also, recipients may still see the message before it is deleted.

So, how do you delete messages that you sent using WhatsApp?

The process is simple:

  1. Open the chat and scroll to the message that you want deleted.
  2. Long-tap on the message that you want to delete.
  3. Optional: you may tap on additional messages to mark them as well and delete them in one go.
  4. Tap on the trashcan icon in the interface.
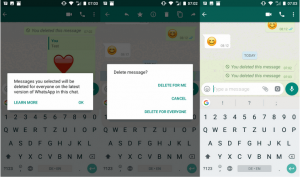
  5. Select the “delete for everyone” option to have WhatsApp delete the selected message locally and remotely.

Deleted messages are marked as such in the conversation history along with the time they were deleted. There is no option to restore deleted messages however.

[mai mult...]

How to show a clear logon background on Windows 10

How to show a clear logon background on Windows 10

When you sign-in to a Windows 10 device you may notice a rather odd behavior. The background image is displayed just fine when you start the device but as soon as you interact with the screen, it is blurred. The following guide helps you restore a clear logon background.

Microsoft probably thought it a good idea to put the focus on the sign-in form and the few icons that it displays on the screen. The change was introduced in Windows 10 version 1903 and is active by default in all recent versions of Microsoft’s operating system.

Windows 10 provides administrators with several options when it comes to disabling the lockscreen blur. The following guide walks you through all available options.

This is probably the easiest option as it requires no changes to the Windows Registry or Group Policy.

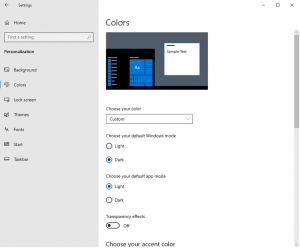
  1. Open the Windows 10 Start Menu and select Settings, or use the keyboard shortcut Windows-I to open the Settings application directly.
  2. Go to Personalization > Colors
  3. Toggle the option “Transparency effects” so that its value is “Off”.

Note that this turns off all transparency effects on the system. Undo this by setting the value of Transparency effects to On.

Microsoft added an option to the Group Policy that provides a narrower solution as it is designed to show a clear background.

Note that the Group Policy Editor is not part of Home versions of Windows 10.

  1. Use the keyboard shortcut Windows-R to open the run box.
  2. Type gpedit.msc and select OK to start the Group Policy Editor.
  3. Go to Computer Configuration > Administrative Templates > System > Logon.
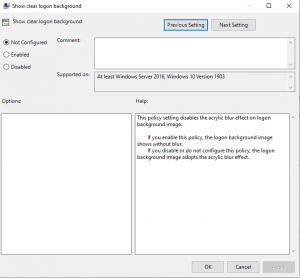
  4. Double-click on “Show clear logon background”.
  5. Change the status of the policy to “Enabled” and click ok.

The policy’s description:

This policy setting disables the acrylic blur effect on logon background image. If you enable this policy, the logon background image shows without blur. If you disable or do not configure this policy, the logon background image adopts the acrylic blur effect.

Undo this by setting the policy to Disabled or Not Configured.

You can also edit the Windows 10 Registry to force the system to display a clear background on the lockscreen. The option is useful to Home users as they cannot use the Group Policy to do that.

  1. Use the keyboard shortcut Windows-R to open the run box.
  2. Type regedit.exe and select OK to start the Registry Editor.
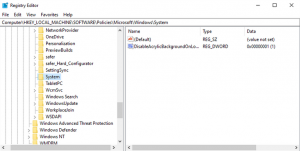
  3. Go to Computer\HKEY_LOCAL_MACHINE\SOFTWARE\Policies\Microsoft\Windows\System.
    1. If any of the keys do not exist, e.g. System, right-click on the previous key, e.g. Windows in the case of system and select New > Key to create it.
  4. Right-click on System and select New > Dword (32-bit) Value.
  5. Name it DisableAcrylicBackgroundOnLogon.
  6. Double-click on the newly created Dword and set its value to 1.
  7. Restart the computer.

Undo this by setting the value of the Dword DisableAcrylicBackgroundOnLogon to 0, or by deleting the Dword.

Closing Words

All three options work but you may favor the second and third options as they change the lockscreen behavior only while the first disables all transparency effects on the system.

[mai mult...]

How to check whether your Chrome on Android is 32-bit or 64-bit

How to check whether your Chrome on Android is 32-bit or 64-bit

Google plans to migrate installations of the company’s Chrome web browser on Android from 32-bit to 64-bit in the near future. While the migration is limited to devices running Android 10 or newer, it should have a positive effect on the performance of the browser and security. Chrome users on Android may wonder whether their version of the web browser is a 32-bit or a 64-bit application to find out whether their version of Chrome has been migrated already.

Good news is that the process of finding out is relatively easy. All you need to do is load chrome://version in the mobile browser’s address bar to get information about the architecture and related information. Check the first line of the output on the page to find out whether the installed version of Chrome is 32-bit or 64-bit. The browser has been upgraded to the 64-bit version already if you see 64-bit listed in that line; if it still states 32-bit, you are still using a 32-bit version and need to wait for the migration to happen on the device.

The following screenshot shows a 32-bit version of Google Chrome Stable, currently at version 83, and a 64-bit version of Google Chrome Dev, currently at version 85, running on the same device.

Google Play, the official store for Android applications on most devices, does not provide options to download 32-bit or 64-bit versions of applications. There is no official option to migrate manually to the 64-bit version of Chrome if the 32-bit version is still installed or offered. Third-party sites that provide downloads for Android APK files may offer 64-bit versions of Google Chrome that users with Android 10 or newer versions of the operating system may install. While that may make sense in some cases, it is safer to wait for the official rollout of the feature.

[mai mult...]

Firefox add-on behind lets you download any image that is behind the cursor

It is sometimes difficult to download certain elements from websites. Some sites use code that actively prevents the use of save options of the browser that is being used; many use Javascript for that, others try to force you to sign-up for an account before some functionality becomes available. The new Firefox add-on behind! has been designed as a workaround. It allows you to display and then download any image that is behind the cursor, even on sites that try to prevent this from happening.

All you need to do is install the extension in the browser, right-click on the image that you want to display fully or download, and select the behind! option of the right-click context menu. The extension opens a new tab and loads the selected image in that tab.

The extension may display multiple versions of the image on the opening page; this is the case if the site uses multiple versions, e.g. a small resolution one that it displays on the page and a larger one that it links to. You can look at the images and use built-in functionality to zoom the content or to save it. To save one of the images, right-click on the image and select the “save image as” option of the context menu to do so.

The developer of the extension lists a number of cases where the extension may help users. It can reveal:

  • Background images
  • Images under layers of nonsense (e.g. clickable surfaces designed to hide the image from you)
  • Embedded images / base64-encoded image chunks
  • Alternative resolutions
  • Vector images (even when they are inlined)
  • Images in shadow DOM

The extension has no options at the time of writing. It worked really well on all tested websites but a set of options would certainly make it more useful or flexible. An option to select the target action when selecting the behind! option comes into mind, e.g. to open the image in a foreground tab instead of  a background tab, or to download all images or the smallest/largest right away.

Other than that, it is a great extension for Firefox users who sometimes or often encounter sites that somehow block them from displaying or downloading images.

[mai mult...]