Situatie
A Word document that is difficult to navigate is pretty much useless, even if it’s full of amazing content. That’s why you should take some time to ensure people (including you!) can easily find their way around your work without losing patience.
Tip: Whenever you’re formatting or editing a Word file, press Ctrl+Shift+8 to turn on the non-printing characters (and use the same keyboard shortcut to hide them again). This will make seeing the document’s layout much easier.
Solutie
1.Add Page and Section Breaks
One way to make your Word document more navigable is by breaking different parts of your work into clearly defined Sections. This means that when one chapter ends, there’s usually a clear space before the next one starts.
There are two types of breaks in Microsoft Word: Page Breaks and Section Breaks:
To add one of these breaks, head to the “Layout” tab on the ribbon, and click “Breaks.” While other types of breaks are available, Page Breaks and Next Page Section Breaks are the best options for breaking up your Word document, thus making it easier to navigate.

2.Use Heading Styles

When you do, you can see that it displays and allows you to click to jump between different headers you’ve added to your Word document, saving you from having to endure the tediousness of endless scrolling.
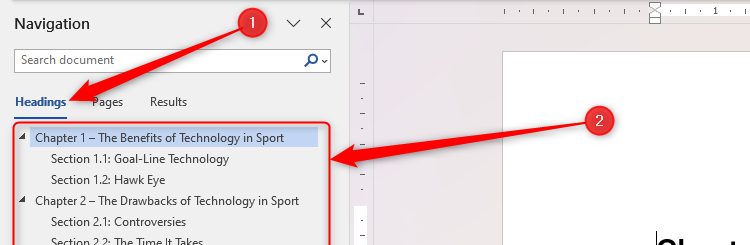
As a result, using Word’s Heading Style tool makes navigating your Word document much easier, which is especially useful if it has many pages.
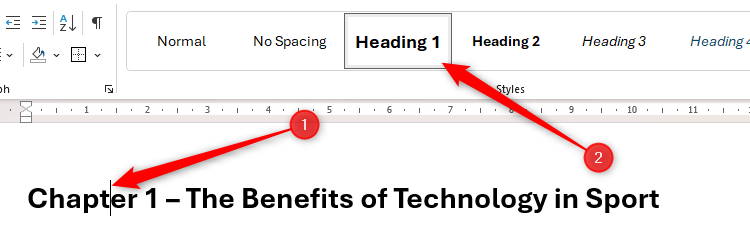
To access the Style Gallery, open the “Home” tab on the ribbon. If you’ve already used Styles in your Word document, they’ll be on display here. If you haven’t, you’ll see Word default Styles, some of which are Heading Styles.

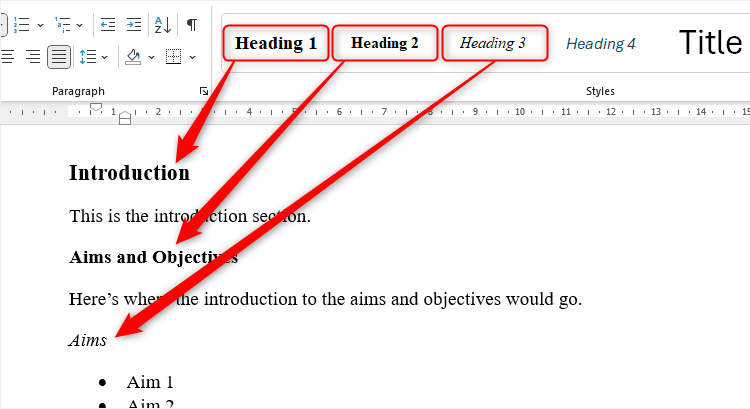
Then, to apply a Heading Style to a header in your document, place your cursor anywhere within that header, and click the relevant Heading Style. Heading 1 is for level-1 headers, like chapter titles, and each subsequent Heading is a sublevel down, usually used for subheadings within chapters.
Now, the text you just restyled appears as a heading in the Navigation Pane, just like a contents page in a textbook. Handily, you can click these headers to jump to different sections at any time. In fact, all text assigned to Headings 2, 3, 4, and so on also appears in the Navigation Pane.
To reformat a Heading Style, right-click the relevant Style in the Style Gallery, and click “Modify.” Then, click the “Format” drop-down button at the bottom of the dialog box to choose which elements of the Heading you want to adjust.
3.Insert Page Numbers
Whether you’re typing a letter, an academic dissertation, or minutes for your weekly office meeting, adding page numbers to your Word document is a surefire way to make navigating it much easier. What’s more, page numbers become particularly useful when you add a contents table, and we’ll look at this in more detail shortly.
Adding Page Numbers to a One-Section Document
To add page numbers to a Microsoft Word document that hasn’t been divided into more than one Section, click “Page Numbers” in the Insert tab on the ribbon, and hover over the option that best suits where you want them to appear on your pages.
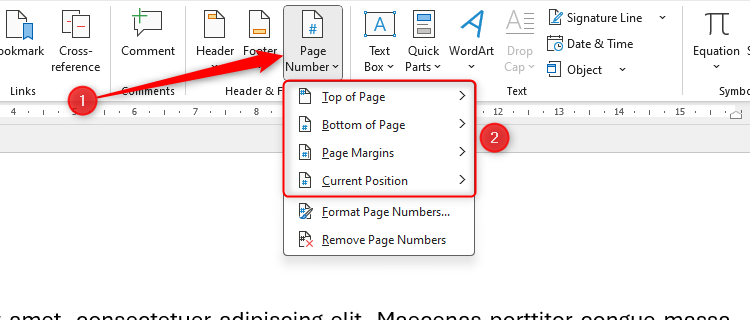
Then, select a page number style from the options that appear.
Each existing page will now adopt the page number style you added, as will any new pages you add.
First, if you don’t want the first page to be numbered, click “Different First Page” in the Header And Footer tab.

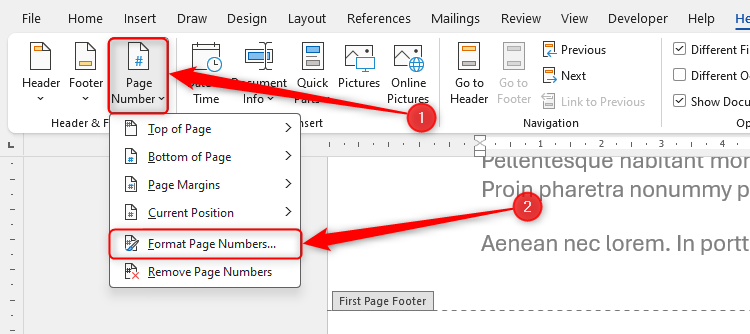
Then, with this option checked, if you want the numbering on the second page to start with 1, click “Page Number,” then “Format Page Numbers”
Now, in the dialog box, check “Start At,” and change the number to “0”
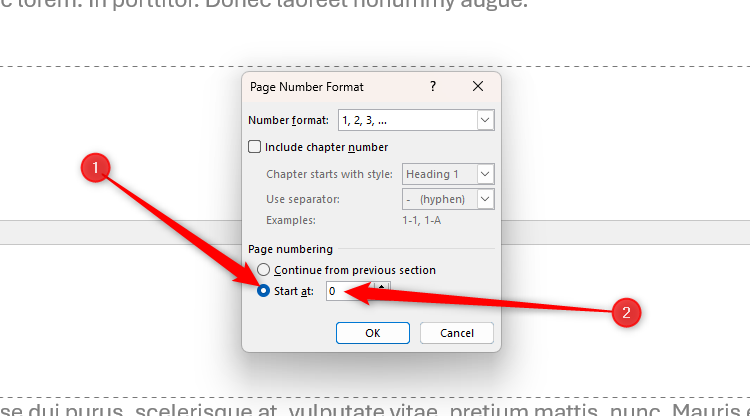
While you have this dialog box open, you can change the type of number that appears by clicking the drop-down arrow next to “Number Format”
Adding Page Numbers to a Multi-Section Document
If you have more than one Section in your Word document, you can use different page numbers or formats for each. For example, you might use Roman numerals (i, ii, iii, etc.) for your introduction’s page numbers, and Arabic numbers (1, 2, 3, etc.) for the main body.
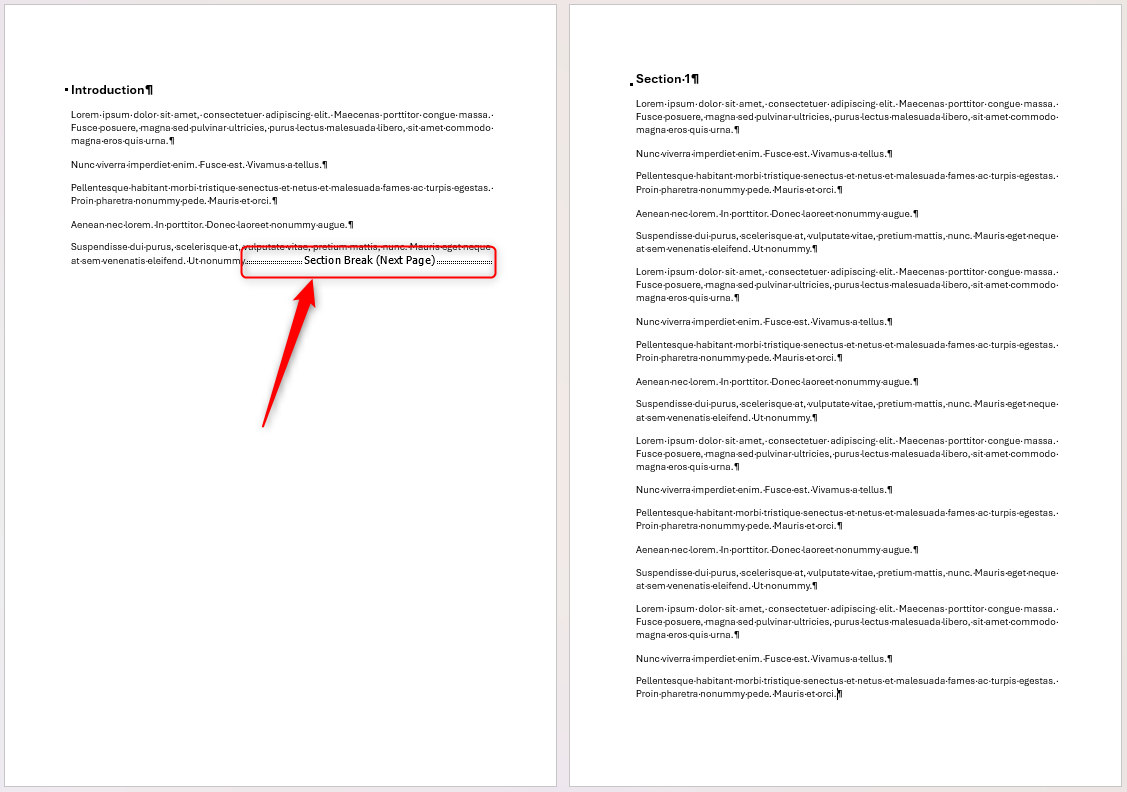
To add a Section Break that separates the main body from the introduction, place your cursor at the end of the introduction, and click “Breaks” in the Layout tab on the ribbon. Then, click “Next Page”.
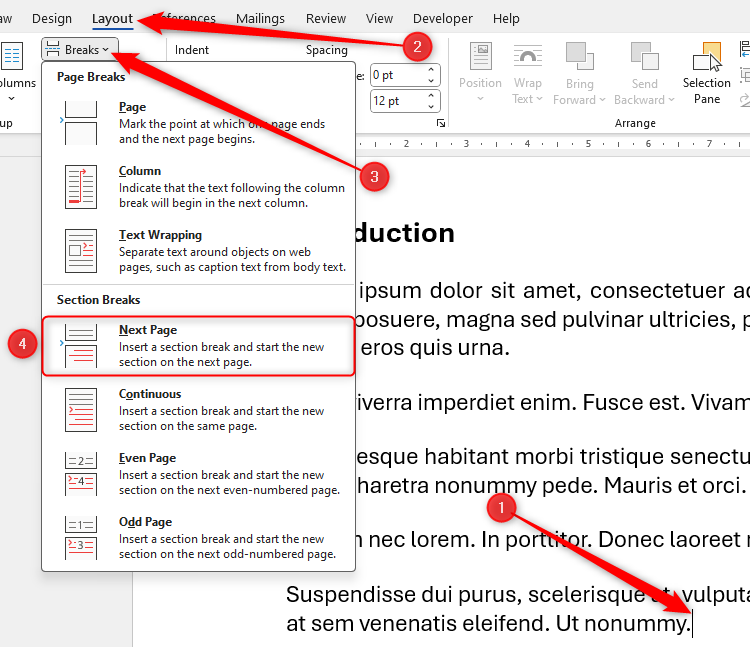
Now, there’s a hard break between the two parts of your document.
Double-click the page footer of Section 2 (the main body), and click “Link To Previous” in the Header And Footer tab to deselect it. Doing this tells Word that you want the main body’s page numbers in the footer to be separate from the introduction’s page numbers.

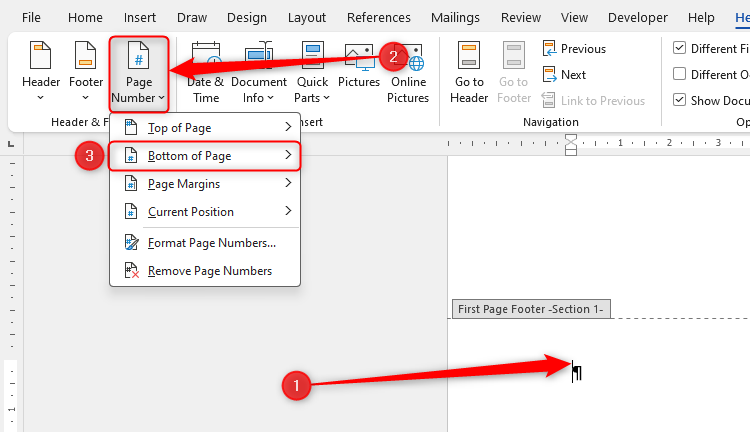
Then, with your document’s footers still activated, place your cursor in the footer of Section 1 (the introduction), and click Page Number > Bottom Of Page to choose a style.
Next, click Page Number > Format Page Numbers, and in the dialog box, change the Number Format field to “i, ii, iii” (Roman numerals), for example. Then, click “OK”
Finally, place your cursor in the footer of Section 2, and follow the same steps, but this time, leave the Number Format at “1, 2, 3…”
If you want the page numbering for Section 2 to restart at page 1, change the Start At option in the Page Number dialog box to “1.”
Now, you have different page numbering systems in different Sections of your Word document, making distinguishing between the two much easier than before.

4.Create a Table of Contents
Regardless of your document’s length, adding a contents table helps direct the reader to exactly where they need to be. Aside from their navigational benefits, contents tables can also be easily updated to reflect any page numbering changes you make.
By default, Word generates contents tables using the first three built-in Heading Styles (see the earlier section for more about Heading Styles). So, before you create the contents table, apply Heading Styles to the headers in your document by selecting the relevant text, and clicking “Heading 1,” “Heading 2,” and so on in the Style Gallery.
Adding page numbers to your document will make your table of contents easier to read. See the section above for instructions on how to do this.
Now, to add a table of contents, place your cursor where you want it to be, and click “Table Of Contents” in the References tab on the ribbon.
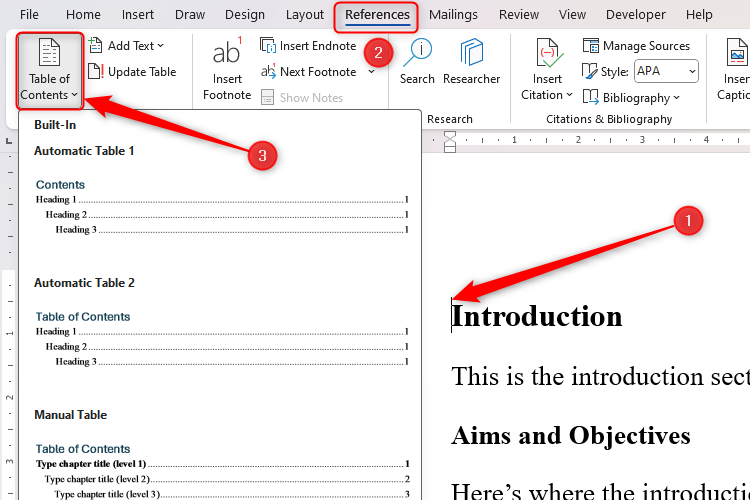
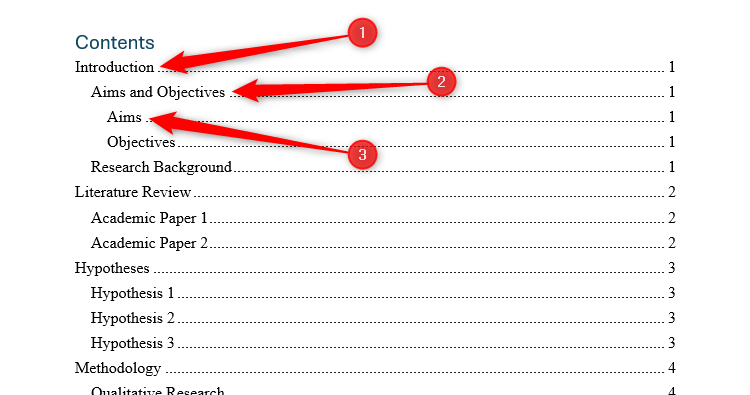
In the example below, I selected “Automatic Table 1.” This automatically includes the titles in the three Heading Styles I have used, with each level indented to show its relative hierarchy.
On the other hand, click “Custom Table Of Contents” in the drop-down menu if you want your table of contents to go deeper than the top three Heading Styles, or if you want to customize how it appears on the page. This option also gives you the choice of adding hyperlinks to your table of contents, making it even more useful.
Only choose “Manual Table” if you want to make more refined adjustments to your table of contents, like shortening the chapter titles. Generally speaking, I wouldn’t recommend using the manual table of contents, as it doesn’t automatically change if you later add more sections or subsections to your document.
As well as using a table of contents to make your Word document easier to negotiate, if you have diagrams and illustrations, you can also add a table of figures.
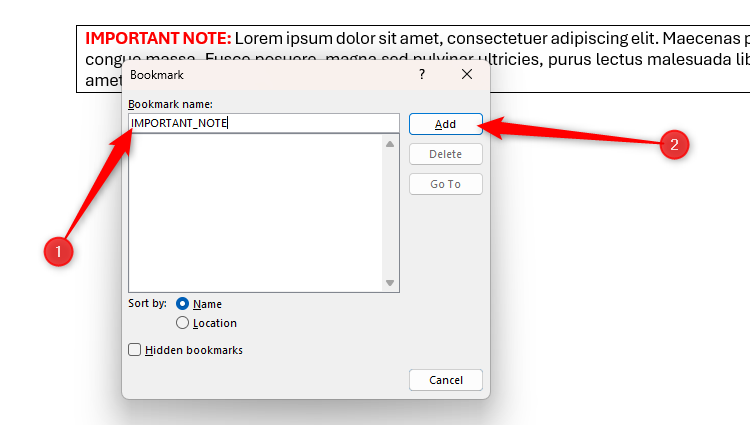
5.Add Bookmarks and Hyperlinks
Microsoft Word lets you add hyperlinks to your document that you can click to jump to other areas of the same file.
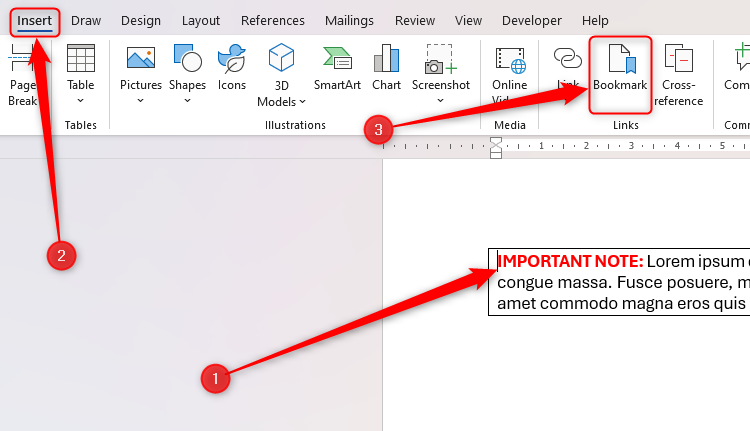
Then, give the bookmark a name, and click “Add”
Now, select the text elsewhere in your document that will be linked to this bookmark, right-click the selected text, and click “Link.” Alternatively, if you prefer to use Microsoft Word’s keyboard shortcuts, press Ctrl+K.


Now, the text you selected will be hyperlinked to the bookmark you created, indicated by the text changing color and being underlined. To test this link, press Ctrl and click it.

Repeat this process to add hyperlinks to an unlimited number of bookmarks in your Word document.
Leave A Comment?