Activating Dark Mode-Windows 11

Dark mode switches your interface to a darker background with lighter text, creating a more comfortable viewing experience. While this feature has been available for years on devices such as the iPhone and Android smartphones, Microsoft has now incorporated it into Windows 11 as well. The operating system provides users with extensive customization options for adjusting the appearance of the dark theme to match their preferences. To turn on dark mode, simply access the appropriate settings in Windows 11.
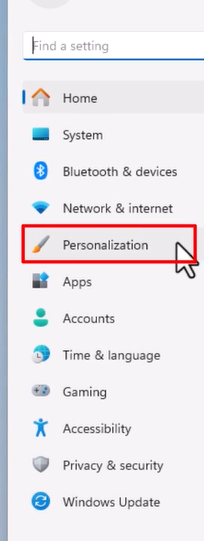
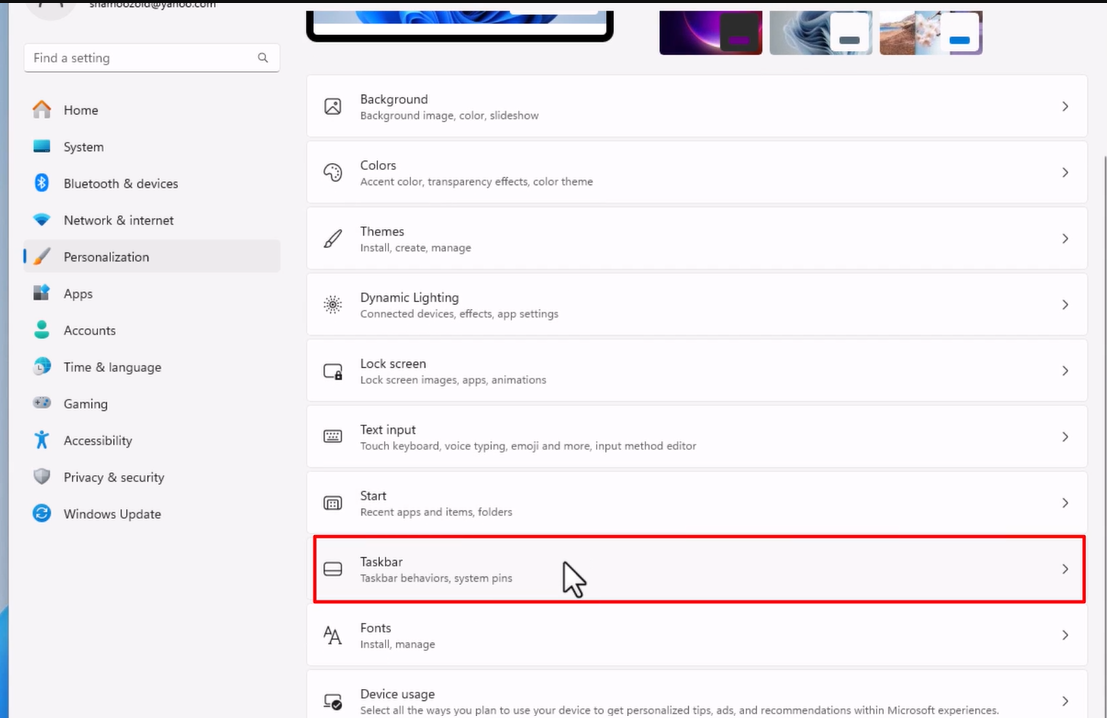
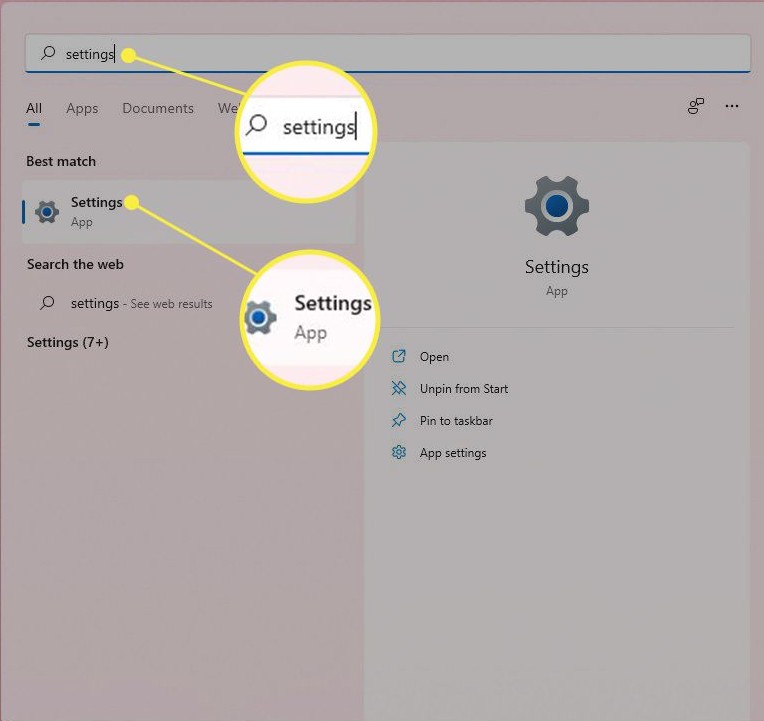
  1. Start->Settings

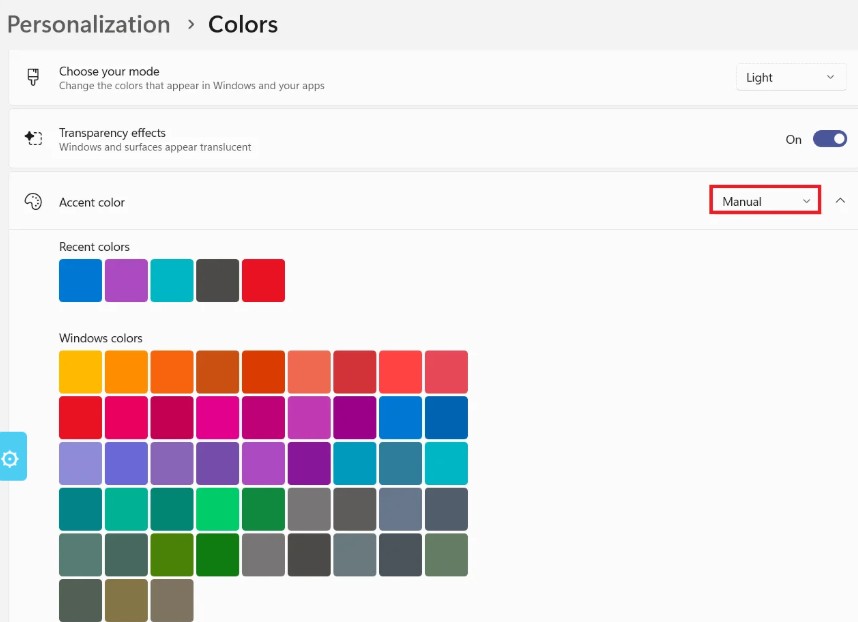
2. Personalization->Colors

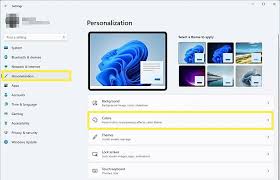
3. Then select the option (light, dark or custom)

[mai mult...]

How to remove a Microsoft account from Windows 11

Having a Microsoft account connected to Windows 10 or Windows 11 provides a smoother, more integrated experience across all the devices where you are signed in. It also allows you to download apps from the Microsoft Store and access other Microsoft services.

However, if you decide that you no longer want to use a Microsoft account on Windows 11, you can remove it after setting up a local account. Let’s explore a few ways to delete your Microsoft account from Windows 11.

  1. Type Settings in the search box and open the Settings app
  2. Select Account > Family & other users

3. Click the drop-down arrow next to the Microsoft account you want to remove. Then, select the “Remove” button under Account and Data.

4. Click on Delete account and data
5. In the confirmation window, click “Delete account and data” to finish deleting the account and all associated data.
[mai mult...]

How to remove write protection from USB

1.Pentru a elimina protecția de scriere a stickului USB, vom folosi o metodă rapidă prin Command Prompt, folosind comenzi DiskPart:

Dupa aceasta metoda se va incerca formatarea disk-ului.

2.  A doua varianta este cea in care putem folosi un Tool (ex: MiniTool Partition Wizard)

Se va selecta Format Partition->click pe Apply.

[mai mult...]

Problem of Missing Wi-Fi Networks in Windows 11

Sometimes, Windows 11 may not show any available Wi-Fi networks, even if they are nearby. This issue can be caused by incorrect settings, corrupted drivers, or temporary system problems, but there are several step-by-step methods to fix it.

  • Begin by restarting the background service related to wireless internet connectivity in Windows 11. This action is highly effective at resolving technical problems behind Wi-Fi issues.
  • Press Windows + R to open Run
  • Type services.msc and press Enter
  • Scroll down the list of services, right-click WLAN AutoConfig, and select Restart. If the option appears grayed out, choose Start

Additionally, check if WLAN AutoConfig is configured to run automatically at system startup. To do that, double-click the service and ensure the Startup type drop-down is set to Automatic.

1.Restart Your PC

A system reboot plays a crucial role in clearing out numerous issues caused by unfinalized updates, obsolete temporary data, driver cache corruption, etc. Furthermore, a restart also addresses problems caused by Fast Startup.

If you haven’t already, open the Start menu and select Power > Restart (or Update and restart if you see it as an available option).

2. Enable the Wi-Fi Adapter

An inactive Wi-Fi adapter is a common reason preventing Windows 11’s Wi-Fi options from showing up. Use the Network Connections Control Panel applet to check and enable it. Here’s how:

  1. Open a Run box, type ncpa.cpl, and select OK
  2. Right-click the Wi-Fi adapter setting if it’s grayed out
  3. Select Enable

Important: If you use a laptop device, it may have a physical switch—e.g., above the keyboard or the casing’s front or side—that you must turn on to activate the Wi-Fi adapter inside.

3. Check the Group Policy Editor

If you use the Pro edition of Windows 11, the Wi-Fi icon on the system tray and Quick Settings pane may not appear due to a specific policy setting. To check and disable it:

  1. Press Windows + R, type gpedit.msc, and select OK
  2. Navigate to User Configuration > Administrative Templates > Start Menu and Taskbar on the Group Policy Editor’s sidebar
  3. Right-click the Remove the network icon policy setting and choose Properties.
  4. Select Disabled
  5. Select Apply > OK.

Note: If Wi-Fi is missing only from Windows 11’s Quick Settings pane (a.k.a. Action Center in Windows 10), you can get it back quickly—just select the pencil-shaped Edit quick settings icon, select Add, and pick Wi-Fi.

4. Run Network Adapter Troubleshooter

Windows 11 has a built-in troubleshooting utility that automatically scans and fixes issues with network adapters. To run it:

  1. Right-click the Start menu and select Settings
  2. Go to System > Troubleshoot
  3. Select Other troubleshooters
  4. Select Run next to Network Adapter
  5. Follow the on-screen instructions to fix Wi-Fi issues the troubleshooter detects

5. Update Wi-Fi Drivers and Windows

Next, visit your laptop/motherboard manufacturer’s website (HP, Dell, Acer, etc.), search for newer updates for your network adapter (you can find the model name via the Network Connections applet), and download and run the executable driver file.

Since your computer doesn’t have Wi-Fi connectivity to the internet, you must either:

  • Set up a wired Ethernet connection.
  • Tether your phone over USB.
  • Download the driver file on another PC and transfer it via USB.

While you’re at it, we recommend you update Windows 11 to its latest version—go to Settings > Windows Update and select Check for updates. You can also use the Microsoft Update Catalog to download Windows updates on a device with internet access, copy them to a flash drive, and install the files offline.

6. Reinstall the Network Adapter Drivers

If the missing Wi-Fi problem in Windows 11 persists, remove and re-add the network adapter to rule out issues that stem from driver corruption. To do that:

  1. Right-click the Start button and select Device Manager
  2. Expand Network adapters
  3. Right-click the Wi-Fi adapter and select Uninstall device.
  4. Check the box next to Attempt to remove the driver for this device and select Uninstall.
  5. Restart your computer.
  6. Re-open the Device Manager and select Action > Scan for hardware changes on the menu bar.
[mai mult...]

Clasificarea hard disk-urilor Western Digital

Care este diferenta intre culorile HDD-urilor Western Digital ?

1. WD Blue este cel mai cunoscut si folosit hard disk, utilizat in pc-urile normale, home user. Din punct de vedere tehnic, nu este foarte rapid, dar este suficient pentru utilizarea zilnica, mai ales ca este accesibil ca preț.

2. WD Black este utilizat pentru performanta si este potrivit pentru jocuri, editare video si aplicatii care folosesc fisiere mari.

3. WD Red este folosit mai mult in sistemele NAS, deoarece accentul este pus pe funcționare continuă și nu pe viteză. (back-up automat, rulare continuă a hdd-ului, share-uit catre mai multe persoane)

4. WD Purple acesta este destinat folosirii camerelor de supraveghere si este optimizat pentru scriere constantă de date.

5. WD Gold este destinat serverelor, fiind un HDD foarte rezistent și fiabil. Se foloseste mai ales în centrele de date și în firme.

6. WD Green este o serie mai veche, orientată către economisirea energiei. Ulterior a fost retrasă pentru că era lentă și WD a mutat ideea de economic în alte game. (La WD Blue, WD Red si la WD Green SSD).

Prin urmare, hard disk-urile Western Digital sunt diferite tocmai pentru a avea scopuri diferite. Pentru uz normal este suficient WD Blue, cel Black este pentru performanță, iar restul sunt utilizate pentru lucruri mai specifice.

[mai mult...]

Create Windows to go_Windows 11

Pentru a putea crea un windows portabil, trebuie descarcat Rufus si fisierul ISO:

-Selectam Windows to go


Apoi selectam versiunea de Windows dorita si in functie de preferinte, bifam urmatoarele optiuni:

Explicatie:

1. Împiedică instalările „Windows To Go”  să acceseze discurile interne ale calculatorului;

2. Elimină obligația de a crea sau folosi un cont Microsoft online;

3. Creează automat un cont local;

4. Setează automat limba, ora și opțiunile regionale la aceleași valori ca utilizatorul curent;

5. Dezactivează colectarea de date și sare peste întrebările de confidențialitate.

[mai mult...]

Excel blocat_vizualizare Read Only

Pentru a nu ne lovi de aceasta problema trebuie sa urmam pasii:

1.Windows+Run-> tastam mmc, apoi din optiunea File, selectam Add/Remove Snap-in

2. Din Shared Folders putem selecta local computer pentru a administra fisierele blocate pe propriul PC sau Another computer daca avem mai multe PC-uri pe care le administram.

3. Din aceasta sectiune se pot inchide fisierele care raman blocate in read only.

[mai mult...]

Windows 10_extend updates for 1 year

Pentru a prelungi perioada de valabilitate a Windows-ului, trebuie sa urmam pasii:

  1. Trebuie sa fim logati cu un cont de gmail pentru a primi un cod de acces prin intermediul acestuia.
  2. In sectiunea Setari->Windows Updates->Enroll Now

3. Add device

4. Add device->se selecteaza prima optiune->Backup your PC settings.

[mai mult...]