Situatie
The Status bar at the bottom of the Outlook client contains a lot of information. However, you can use a simple context menu to customize it, and either add or remove different values and shortcuts. Here’s how to configure it.
Solutie
Status bars are often an unloved, ignored part of a software app. This is a shame because they’re often the only part of an app that’s always visible. This is what makes them the ideal place for information and shortcuts.
The Outlook client shows both information and shortcuts in the status bar. You can also choose what’s shown there. By default, the number of read and unread messages, information about the mail server connection, reading pane toggles, and zoom information all appear in the status bar.
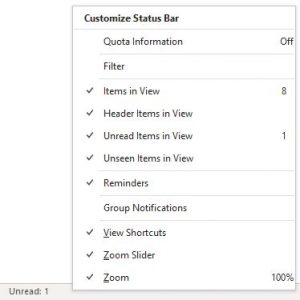
To customize the status bar, right-click it to open the “Customize Status Bar” menu.
This menu is simple to use; click any item within it to toggle between visible (with a checkmark) and invisible (without a checkmark). The options are as follows:
“Quota Information”: The amount of space currently available in your mailbox. This will only display information for a Microsoft email account. Outlook can’t determine the mailbox size for a non-Microsoft email account (like Gmail).
“Filter”: Whether a filter is applied in the current view.
“Items in View”: The total number of items in the current view of the folder.
“Header Items in View”: The total number of header items in the current view of the folder. Header items are rare these days. When hard drives were smaller, it was common to limit Outlook to downloading only email headers. The person could then decide whether she wanted to manually download the entire email.
“Unread Items in View”: The number of unread items in the current view of the folder. This is primarily useful in the Inbox.
“Unseen Items in View”: Usually this will be zero. However, if you’re looking at a shared mailbox, you might see a figure here. Unseen items are emails that someone else has marked as private.
“Reminders”: Any items with a reminder that hasn’t been snoozed or dismissed.
“Group Notifications”: The number of notifications from an Office 365 group. This is only used if you’re a member of an Office 365 (O365) group, which are primarily used in organizations.
“View Shortcuts”: Two buttons that let you switch between showing and not showing the pinned “To-Do” pane. This is particularly useful on smaller displays when you want a little more screen space while you read your emails.
“Zoom Slider”: You can increase or decrease the level of zoom in the email you’re reading.
“Zoom”: The actual percentage of current zoom (the standard is 100 percent).
You can toggle as many of these options on and off as you’d like. Every option, from “Filter” down to “Group Notifications,” applies to the folder you’re viewing. “View Shortcuts,” “Zoom Slider,” and “Zoom” apply to Outlook as a whole.
If a filter is applied to the current view, the “Items in View” and “Unread Items in View” might not display. This is because the filter hides some of the emails. It’s particularly common if you’re using the IMAP protocol to access your emails because that often uses a “Hide Deleted Emails” filter. To show the “Items In View” and “Unread Items In View” values, you can change the view to remove the filter.


Leave A Comment?