Follow Us

Soluții pentru problemele tale IT

Home /Virtualizare/Vmware ESXi/Configurare Servicii pentru ESXi/How to configure an ESXi 6.5 host
Home /Virtualizare/Vmware ESXi/How to configure an ESXi 6.5 host
Home /Virtualizare /How to configure an ESXi 6.5 host

How to configure an ESXi 6.5 host

  • Data 26/02/2018
  • Autor Gabriel Paraschiv
  • Categorie Configurare Servicii pentru ESXi, Virtualizare, Vmware ESXi
  • -19
  • 6299
Configurare noua (How To)

Situatie

Depending on how you’ll connect a storage device to the host, you should have a server with at least two network cards: the first one for the management network and the second one for the storage network. I assume that you’re using either shared storage such as iSCSI storage array or network attached storage (NAS).

Solutie

Pasi de urmat

Log in to the system first. You’ll need to be at the console.

 
Next, navigate with the down arrow key to select the “Configure Management Network” menu. Hit Enter to access the menu.

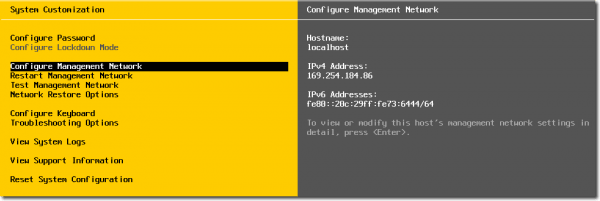
Check the network cards that the installer recognizes. Sometimes when you’re installing on non-certified hardware, the installer may have problems recognizing some network cards, so be aware of that.

Hit Enter to go one level deeper and see the network adapters, VLAN settings and the other network configuration options.

The next submenu allows you to connect or disconnect the network adapters you wish to use.

Let’s hit the Esc key to go back and configure our network settings.

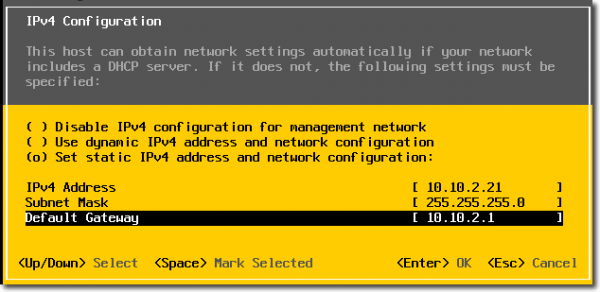
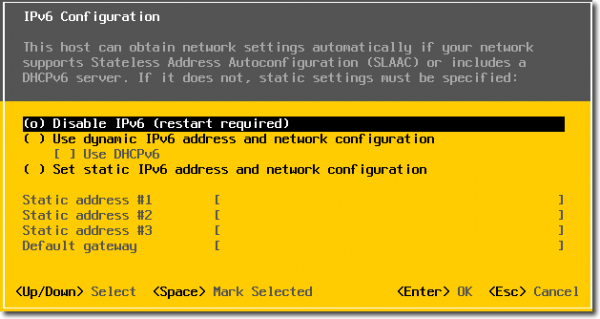
Hit the Enter key to validate the selection. This will return us to the previous menu, one level higher. Use the arrow key to go down one step and disable the IPv6 configuration completely. Use the up arrow and Space keys to uncheck the selection.

Again, validate by hitting the Enter key to go one level higher. Then use the down arrow key again to move to the next menu: domain name server (DNS) configuration.

Quick note: You should create your forward and reverse DNS records on your DNS server before configuring the DNS here.

Hit Enter once more. We’re almost done.

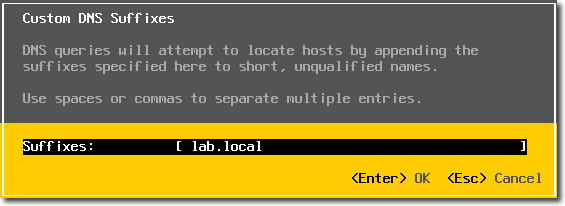
Enter any suffixes required for your DNS. You’ll get a prompt to reboot, which will validate the configuration. Note that there is only single reboot necessary! And this is only because we disabled the IPv6 configuration. This means that if you left the IPv6 in place, you wouldn’t need to reboot ESXi 6.5, not even once.

That’s all.

Tip solutie

Permanent
Etichetare: allowsaskitaskit.roConfigure Management Networkdisable the IPv6DNSESXi 6.5 hostHow to configure an ESXi 6.5 hostiSCSILog in to the system firstNetwork Settingsrecognizesthe Enter keyVLAN settings

Voteaza

Up Down
(58 din 135 persoane apreciaza acest articol)
Share
Tweet
Share

Despre Autor

Gabriel Paraschiv

Solutii Asemanatoare

  • How to Release Ownership of an ocfs2 Repository Force in Oracle VM 8
  • Marire disk din Hyper-V -5
  • Remote Desktop Connection – An authentication error has occurred -6
  • Cum vedem starea fizica a placii de retea ESXI (SSH) -29
  • Cum vezi default gateway pe ESXI (SSH) -12
  • Cum sa vezi tabela ARP in ESXI (SSH) -18

Leave A Comment? × Cancel Reply

30228

Soluții Disponibile

0 Articole

In ultima saptamana

Cele mai recente soluții

  • How to uninstall KB5063878 to fix SSD disappearing issue on Windows 11
    • 6
    • 2 days ago
  • How to reset settings to defaults on Chrome
    • 4
    • 01/09/2025
  • How to enable G-Sync on Windows 11
    • 3
    • 01/09/2025
  • Optimizarea Ollama: cum obții performanță maximă din modelele AI pe PC-ul tău
    • 16
    • 1 week ago
  • Instalare și configurare Ollama pe Linux și Windows
    • 14
    • 27/08/2025
© Askit.ro, 2014 - 2025. All rights reserved. Done by Class IT
Share
Tweet
Share