Situatie
Solutie
Turn Off Fast Startup
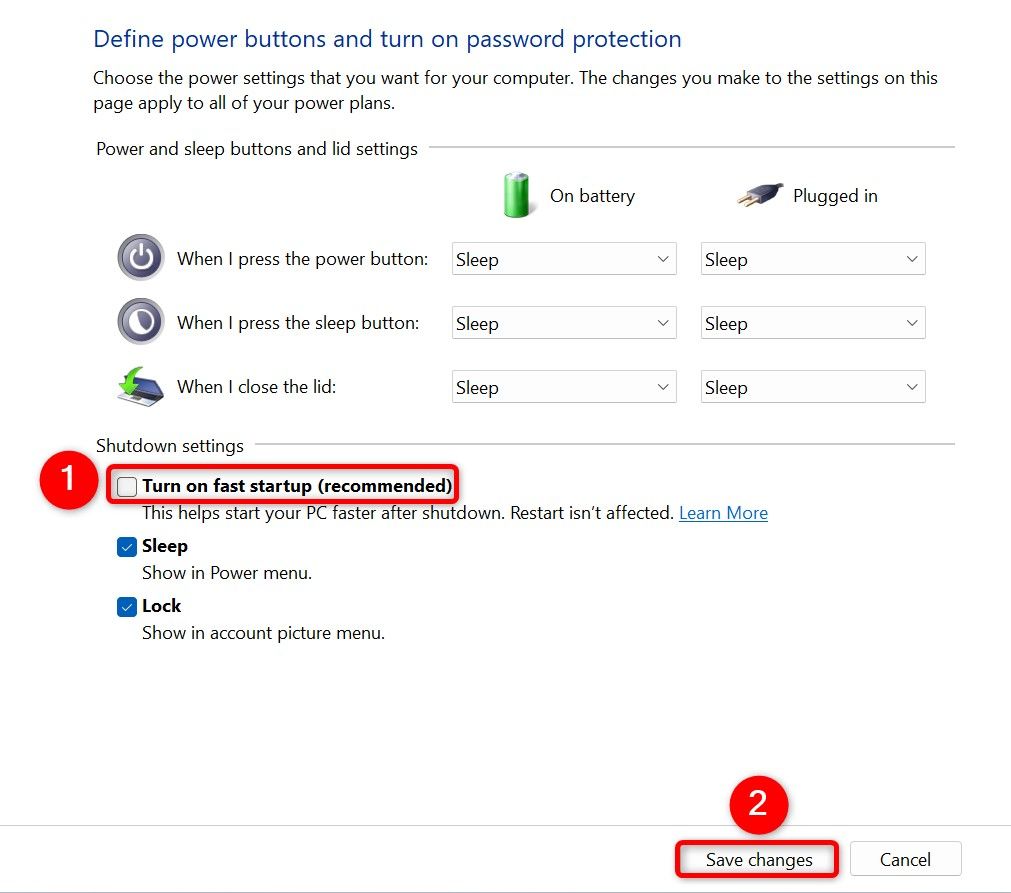
Fast startup is a built-in Windows feature that helps boot your system faster. Since it changes how your system shuts down, it’s worth toggling off this feature to possibly fix the freezing issue.
- To do that, launch Windows Search, type Control Panel, and open the utility. In Control Panel, navigate to System and Security > Power Options.
- From the left sidebar, select “Choose What the Power Buttons Do.” On the following screen, at the top, click “Change Settings That Are Currently Unavailable.” Then, turn off the “Turn On Fast Startup (Recommended)” option and choose “Save Changes”.
Disconnect Connected Devices
If you’ve connected a new hardware device to your PC, that device might be causing the problem. Sometimes, certain devices don’t work well with certain Windows versions, leading to weird, nondescript problems.
Get around that by disconnecting any newly connected devices from your machine. You really only need a mouse and a keyboard connected to your computer. If your machine doesn’t freeze after you’ve disconnected the connected devices, those devices are likely the culprit. Reach out to those devices’ manufacturers to see what you can do, or consult the manual you received with those devices.
Disable Startup Apps
One reason your system freezes at startup is malfunctioning startup app. There are apps that automatically launch when you turn on your computer. In this case, turn off all startup apps and then enable one app at a time to find the culprit.
Open Task Manager by right-clicking the Windows taskbar and choosing “Task Manager.” In the utility’s left sidebar, click “Startup Apps.” On the right pane, right-click each app whose Status column says “Enabled” and choose “Disable.”
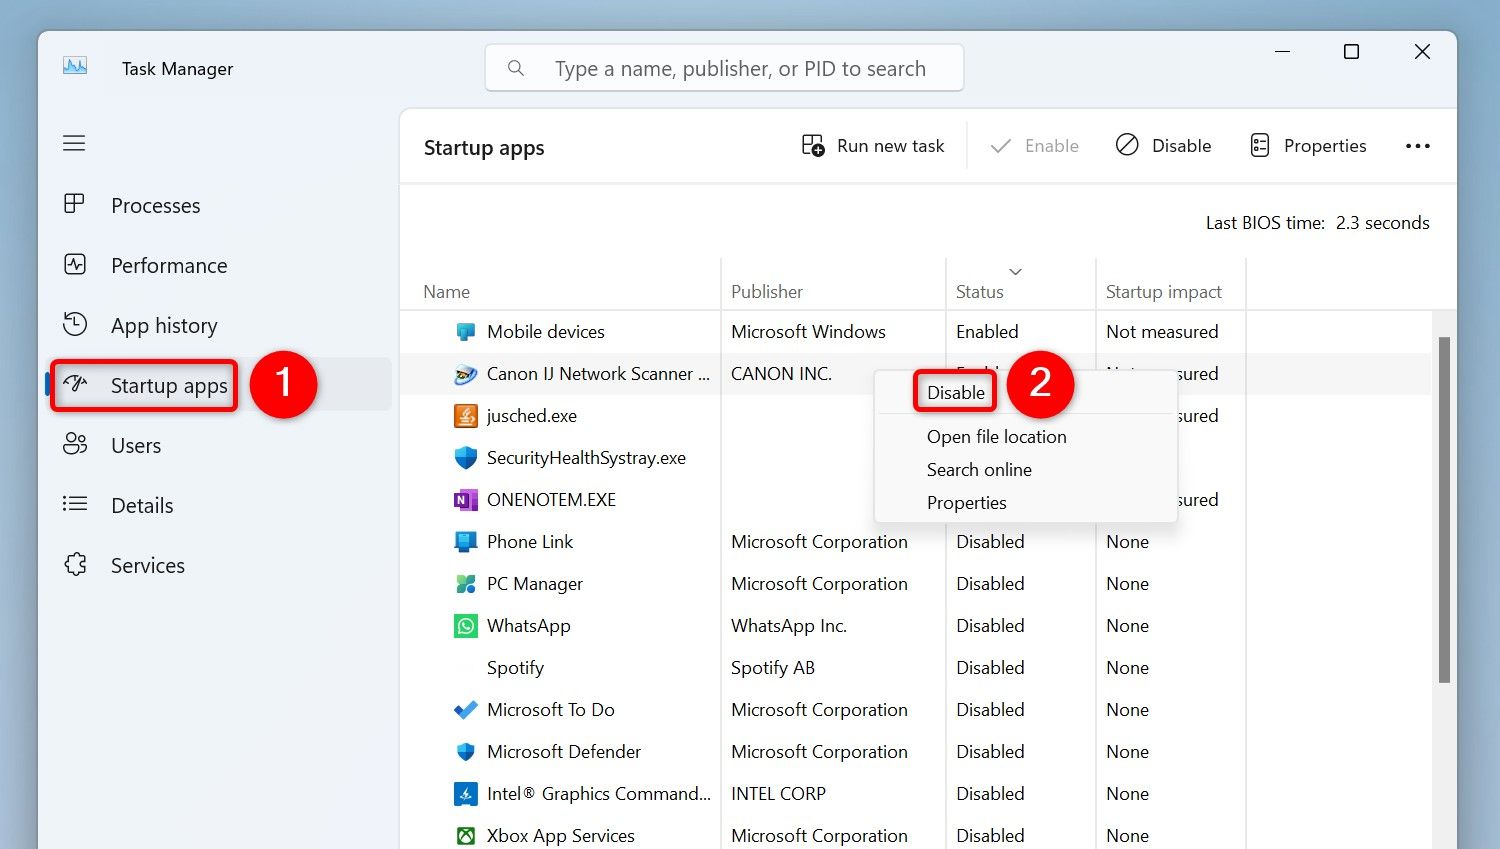
Close Task Manager and restart your Windows 11 PC. If the problem doesn’t persist, enable one startup program at a time to find the problematic app. Then, update or uninstall that app from your Windows 11 system.
Update Graphics Card Drivers
Your system loads the graphics card drivers as soon as you turn on your computer. These drivers might be faulty, causing the system to freeze up. You can fix that by updating the drivers. You have a few different ways to update your graphics card drivers.
Method 1: Using Device Manager
You can use the Device Manager utility to automatically find and install the latest graphics card drivers. To do that, open Windows Search, type Device Manager, and launch the utility.
In Device Manager, expand “Display Adapters,” right-click your graphics card, and choose “Update Driver.”
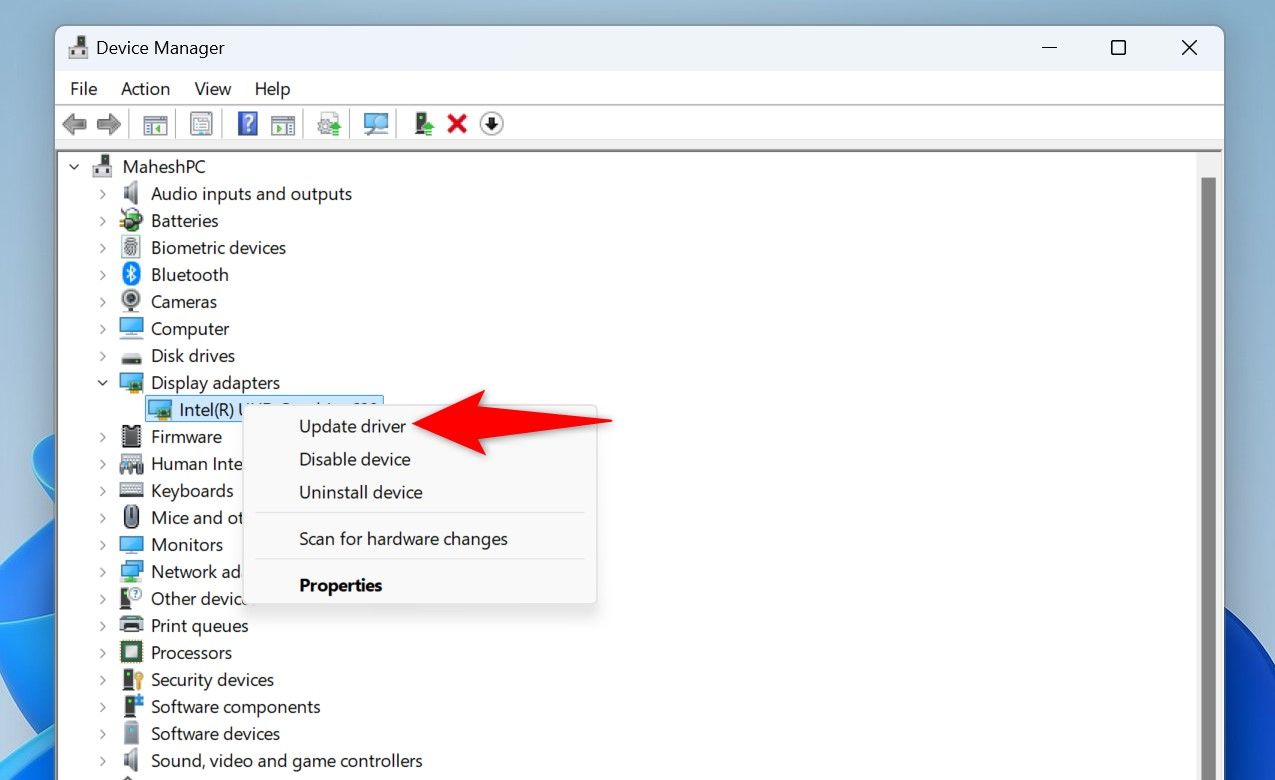
Select “Search Automatically for Drivers” and allow the utility to find and install the latest drivers.
Method 2: Using the NVIDIA Website
If you’re using an NVIDIA graphics card on your PC, you can manually download and install the latest drivers from the manufacturer’s website.
Launch your favorite web browser and head to the NVIDIA Drivers site. In the “Manual Driver Search” section, either type your graphics card’s model number or use the drop-down menus to find and select your specific graphics card model. Then, click “Find”.
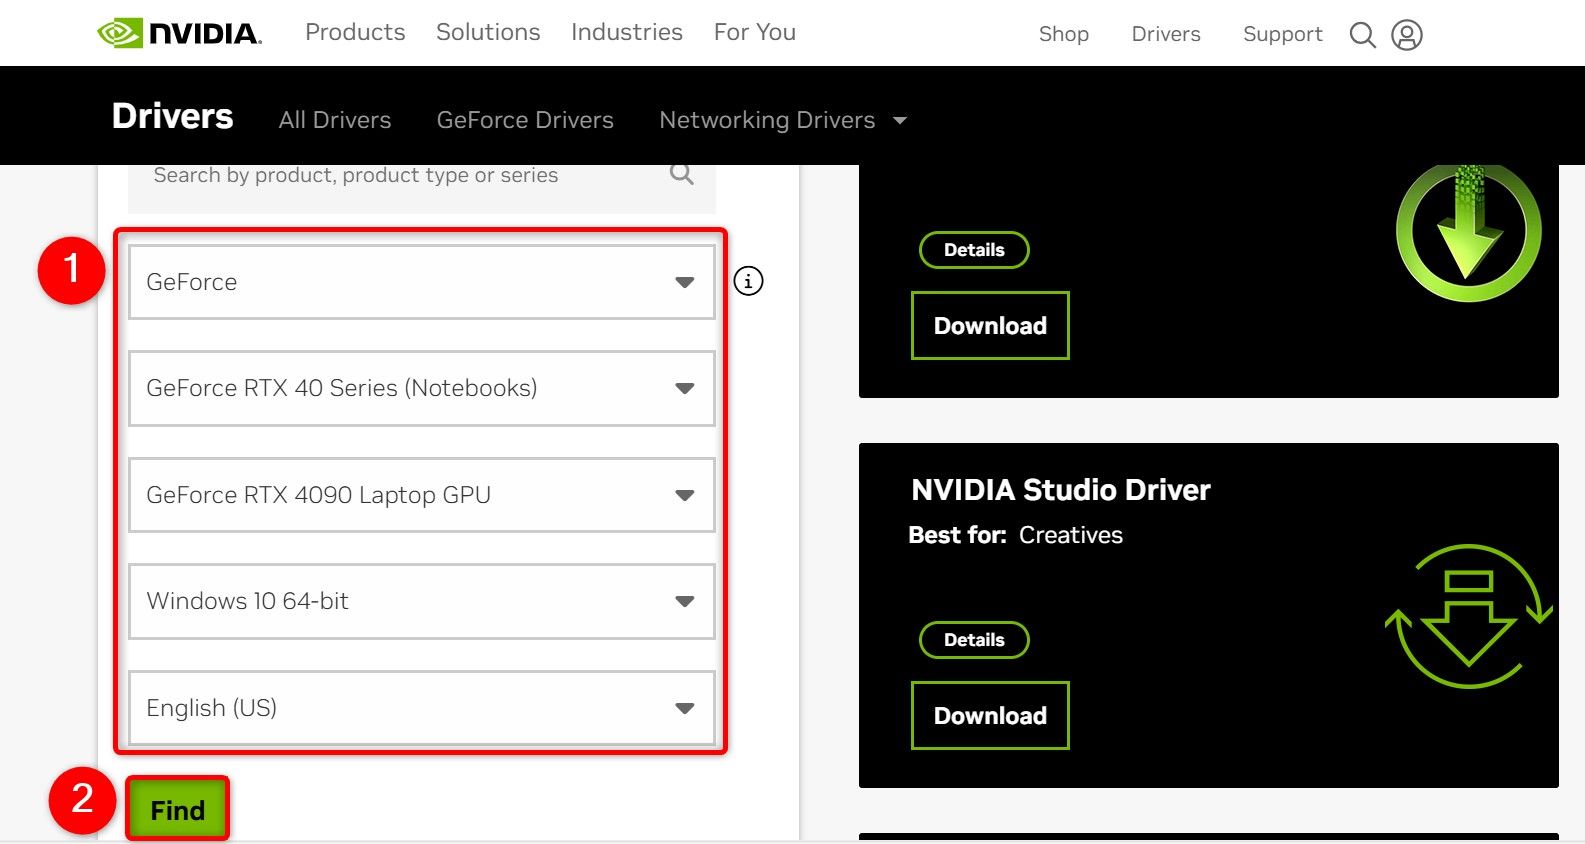
On the following page, next to the correct driver, click “View.” Choose “Download” to save the driver file to your PC. Then, run the downloaded file and install the latest drivers.
Method 3: Using the AMD Website
If you use an AMD graphics card with your PC, download and install the latest drivers from the AMD website as follows.
Open your favorite web browser and access the AMD Drivers site. Select “Graphics,” choose your graphics card model, and click “Submit.”
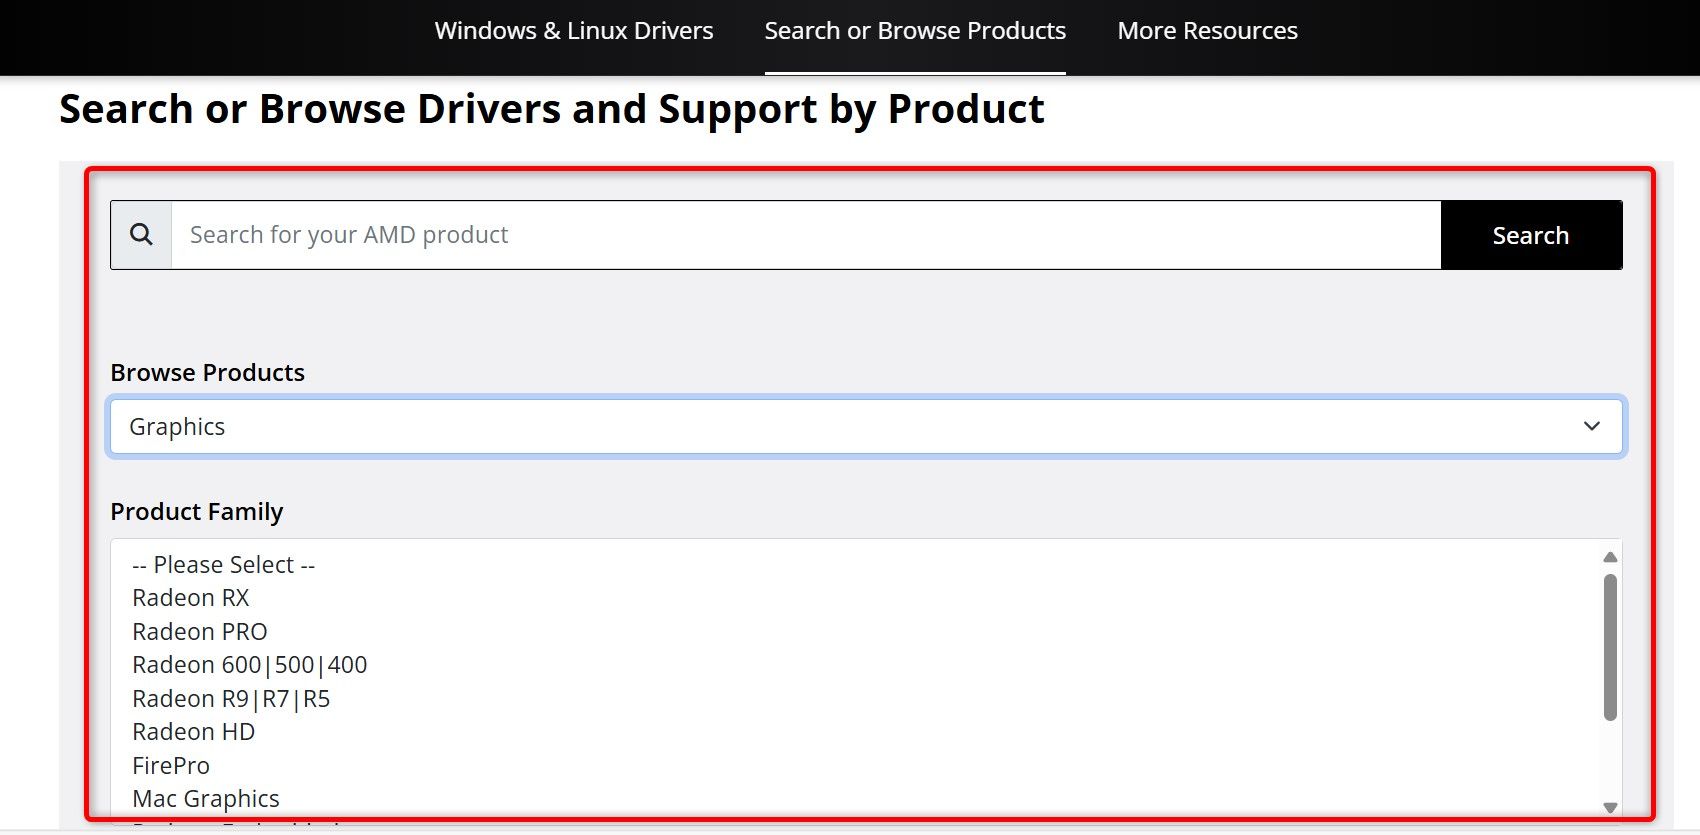
Expand the section for the correct driver package, select “Download,” and run the downloaded file to update the drivers.
Update or Roll Back a Windows Update
If your PC started freezing up after updating Windows, the recent update might be the culprit. In this case, roll back the update to fix the issue. Or, if you haven’t updated your PC in a long time, install the latest updates to fix any existing bugs.
Roll Back an Update
Launch Settings by pressing Windows+i. From the left sidebar, select “Windows Update.” On the right pane, choose “Update History.” Scroll to the bottom and select “Uninstall Updates”.
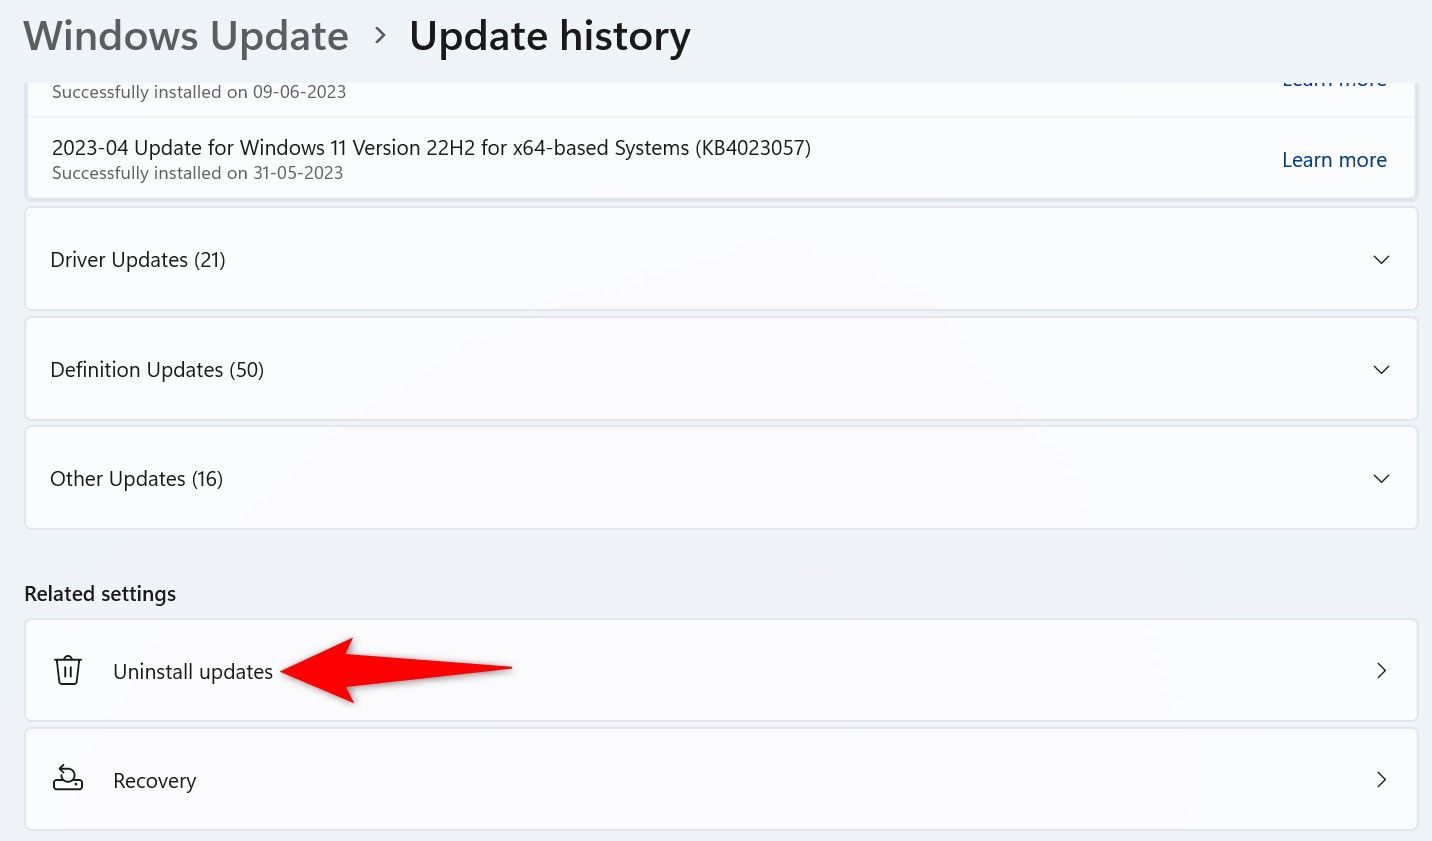
Next to the most recent Windows update, click “Uninstall”
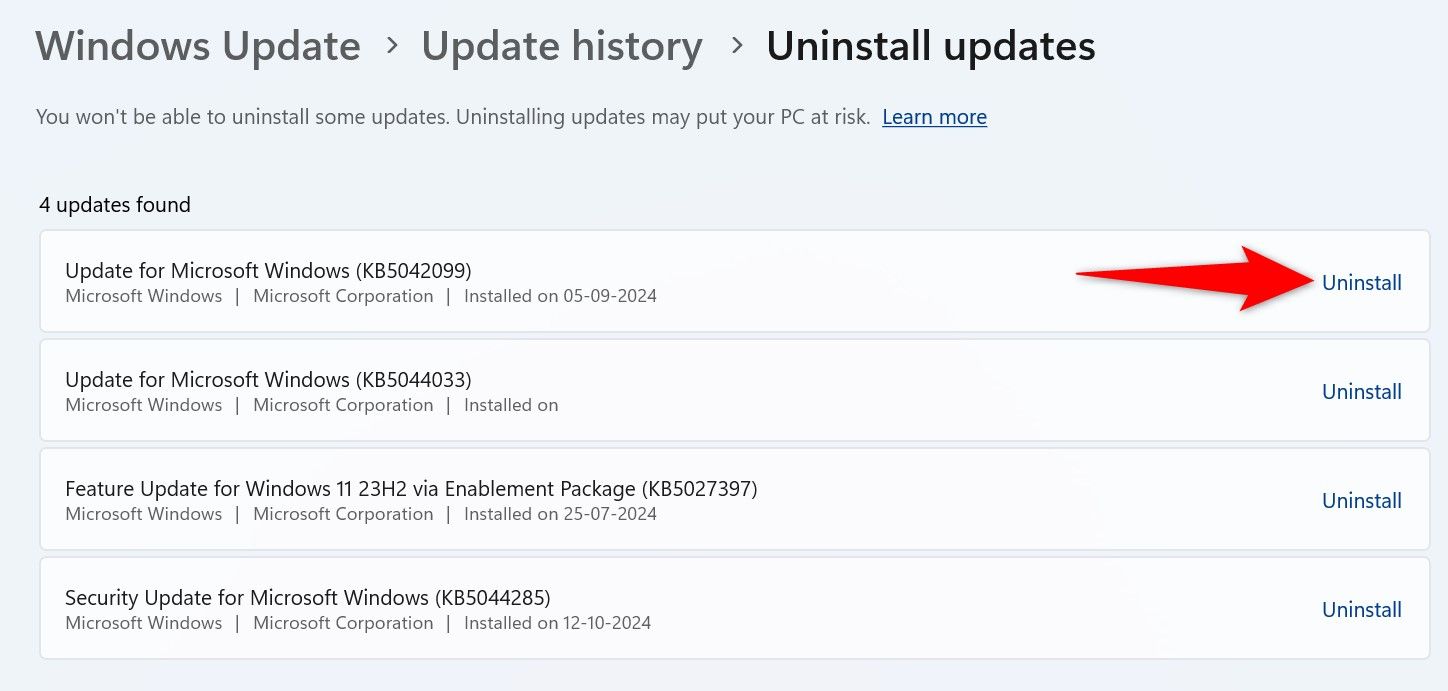
Follow the on-screen instructions to roll back the update. If the issue with the update is widespread, Microsoft will acknowledge it and push a new update to fix the problem.
Update Windows
Open Settings by pressing Windows+i. From the left sidebar, choose “Windows Update.” On the right pane, select “Check for Updates.”
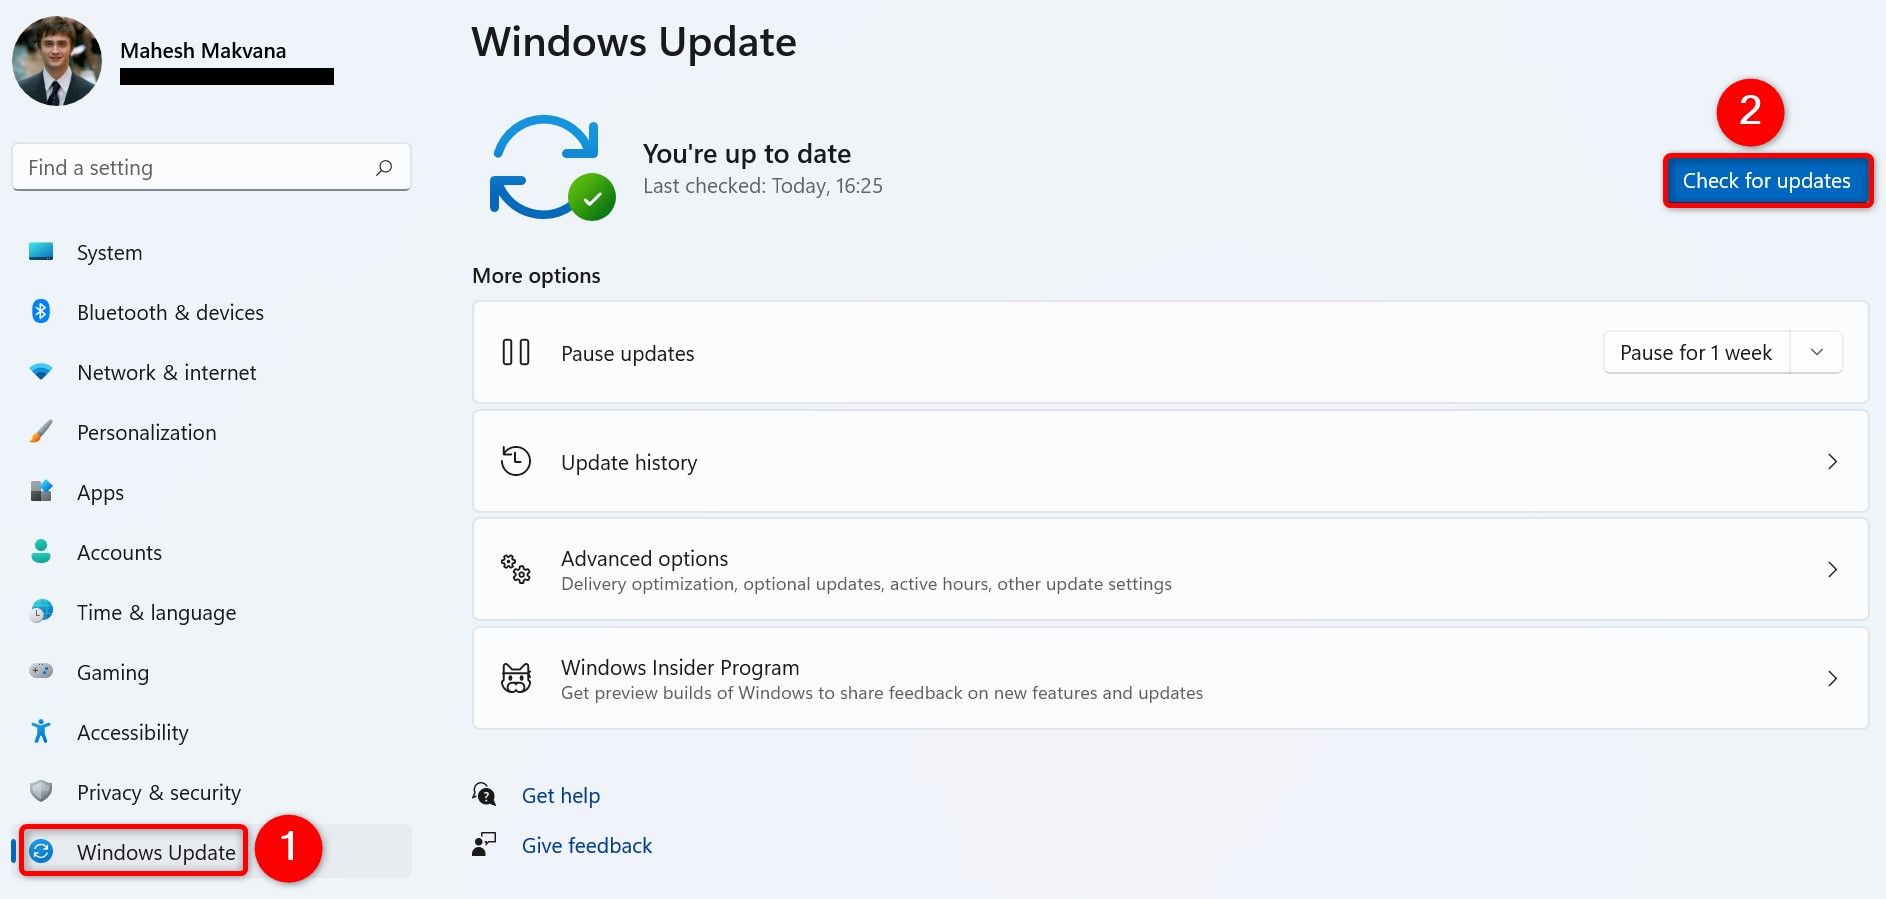
Download and install the available updates.
Use System Restore
If you made a change to your Windows system and your system started freezing up after that, roll back the change using System Restore. This utility allows you to undo any changes you’ve made to your system.
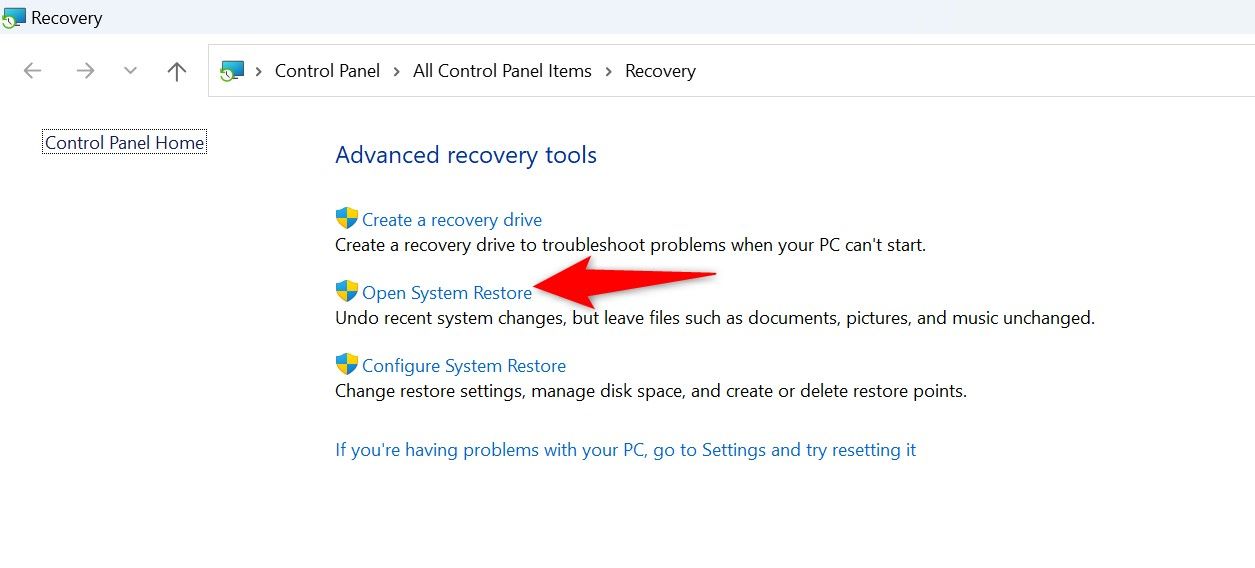
To do that, open Windows Search, type Recovery, and select the item with that name. On the following page, choose “Open System Restore.”
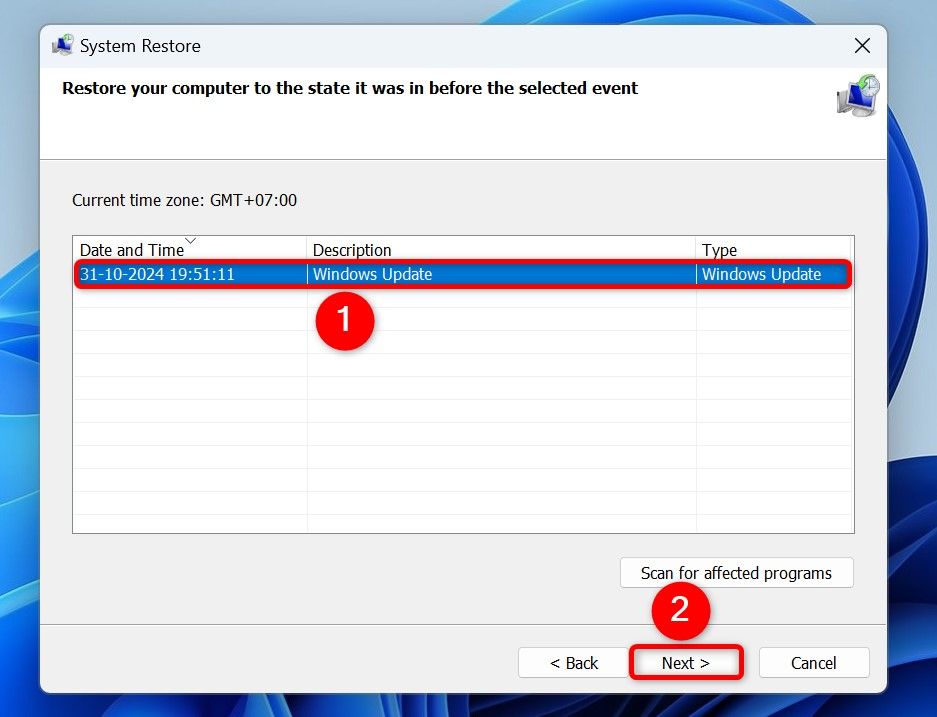
Select “Next,” choose the most recent restore point on the list, click “Next,” and choose “Finish”.

Leave A Comment?