Situatie
Solutie
Before Microsoft added Focus Cell to Excel, I would click the row number or column letter to ensure I was reading or adding data to the correct cell. The Focus Cell feature essentially does this for you, highlighting both the row and the column of the active cell at the same time.
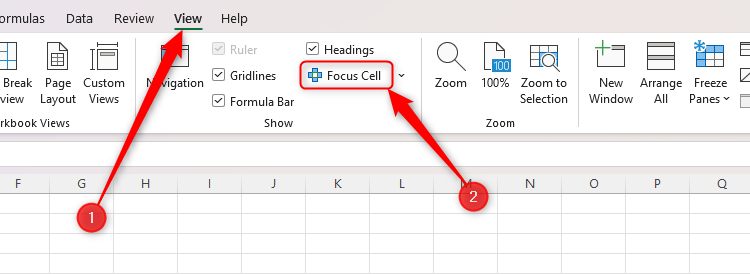
This feature is deactivated by default. So, to turn it on, open the “View” tab on the ribbon, and click “Focus Cell” in the Show group.
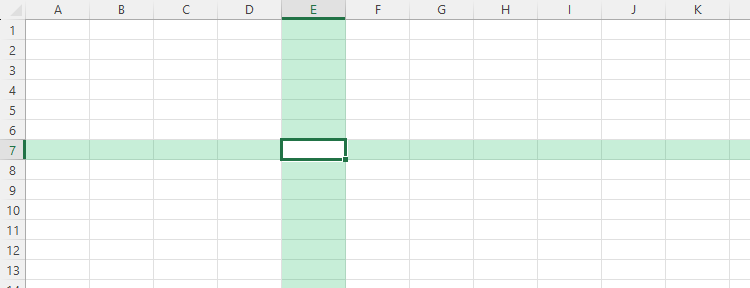
The feature becomes visible as soon as you click this button. Notice how the active cell retains the cell’s color (in my case, its default color), while the remaining cells down the column and across the rows adopt the guiding color.
Once you’ve turned this feature on, it will remain active in any new workbook you create or open on your computer. You can turn it off again by clicking the same icon.
How to change Focus Cell Color
By default, Focus Cell highlights the active row and column in a greeny-blue color. However, if you’ve used green or blue text, cell fill, or borders, this can cause confusion. As a result, you can change the Focus Cell color to a shade you tend not to use in your spreadsheets.
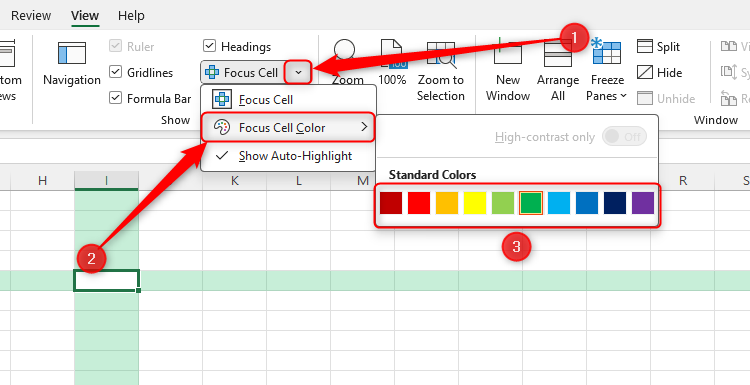
Click the “Focus Cell” drop-down in the View tab, and hover over “Focus Cell Color.” Then, select one of the colors available in the palette shown.
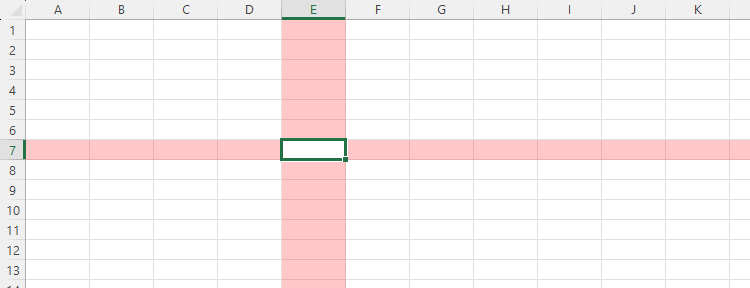
The Focus Cell color is a fainter shade of whichever color you select, so that you can still read the data in the colored cells. Here, I’ve selected red, and you can see that the bands are pinky-red.
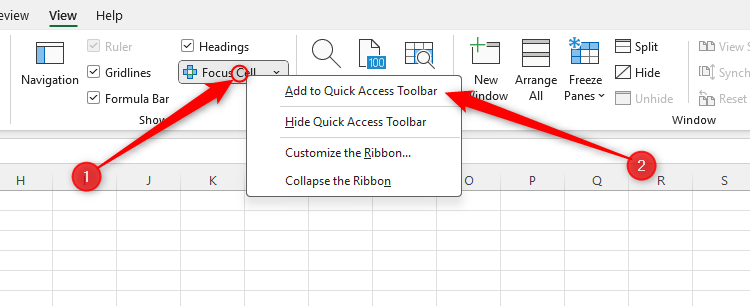
While Focus Cell is handy for reading and amending spreadsheets containing large volumes of data, you might find it a less necessary tool on smaller worksheets. So, if you work on a wide variety of spreadsheets containing varying volumes of data, it can be handy to have the option to turn Focus Cell on and off in an instant, which is why you should add the tool to your Quick Access Toolbar (QAT)
To do this, right-click “Focus Cell” in the View tab on the ribbon, and click “Add To Quick Access Toolbar”.
The Focus Cell icon will then appear at the top of your Excel window.
![]()
If it doesn’t, it’s because you don’t have the QAT enabled. To change this, right-click any tab on the ribbon, and click “Show Quick Access Toolbar”.

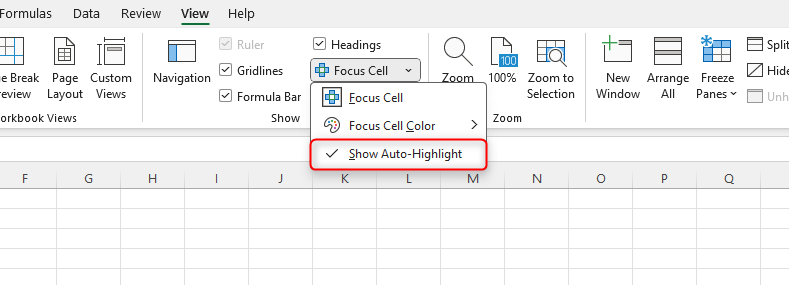
If you use Excel’s Find And Replace tool to identify a value in a dense spreadsheet, it can sometimes be difficult to see which cell contains the value you’re looking for. To address this, check “Show Auto-Highlight,” the final option in the Focus Cell drop-down menu.
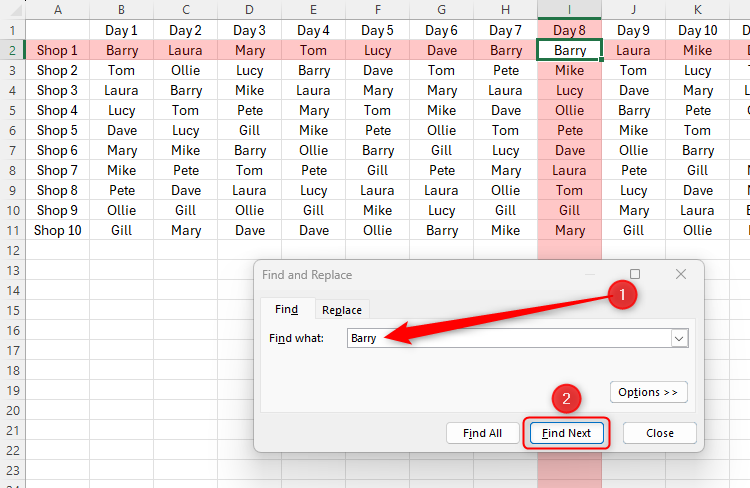
After launching the Find (Ctrl+F) and Find And Replace (Ctrl+H) dialog box, type the value you’re searching for in the “Find What” field. Then, when you click “Find Next,” Excel uses the Focus Cell temporary formatting to emphasize the cells matching your criteria. In my case, I’m looking to see where Barry is working on any given day.
This tool is ideal if you don’t wish to use Focus Cell but want Excel to highlight the relevant cells when using Find or Find And Replace. If you have Focus Cell activated, Excel will apply this temporary formatting regardless of whether or not you’ve checked Show Auto-Highlight.
Despite the benefits of this tool, there are some caveats you should be aware of before you put it to use.
First, if you’re displaying two or more windows simultaneously, with Excel in one and another program in another, as soon as you click away from your Excel window, the Focus Cell highlighting disappears. The same issue applies if you’re using two or more Excel windows at once—Focus Cell only displays on the active window. This is an inconvenient drawback from a data-entry perspective.
Second, you can only choose from ten standard colors when changing the Focus Cell colors. What’s more, since there’s no gray or black, there aren’t any neutral Focus Cell colors available.
Another way to ensure you’re reading and editing large spreadsheets accurately is using Excel’s Freeze Panes tool, which keeps certain rows and columns on screen when you scroll down and across. Using Freeze Panes and Focus Cell simultaneously guarantees you won’t enter data into the wrong cell.
Leave A Comment?