Situatie
Solutie
Scheduling and snoozing emails are essential for managing your and others’ workload. For example, you might be typing an email at 11 PM, but you don’t want to disturb the person late at night, so you might schedule it to be sent at 8 AM the following morning. Similarly, you might be overwhelmed by too many emails in your inbox, so you can snooze an email for it to temporarily disappear and then reappear later on.
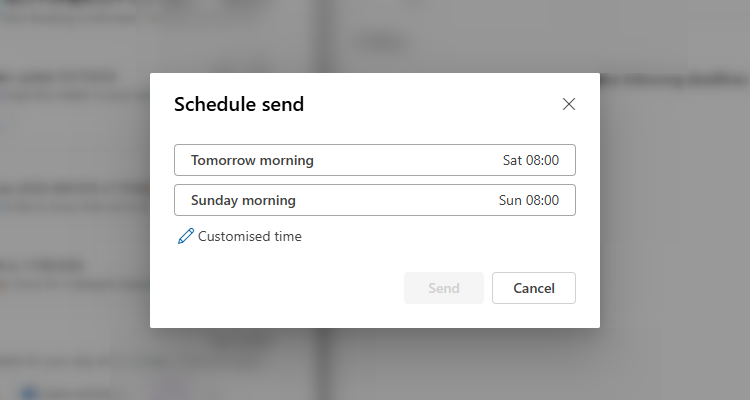
Although you could schedule email sending in classic Outlook, the process was much more complex, requiring an additional window and a generally cumbersome process. However, the new Outlook has adopted Gmail’s approach of adding a drop-down to the Send button to make this process much more straightforward.
You can then choose a default or customized date and time to send the email, before clicking “Send” to complete the process.
Snoozing Emails
Snoozing emails was only previously available on Outlook for the web or mobile, so it’s a timely addition to the new Windows desktop app.
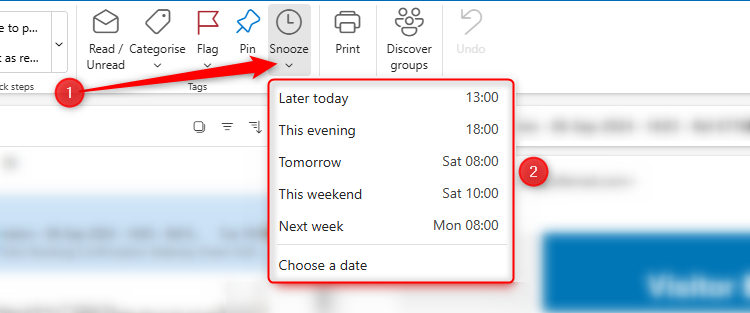
As well as using the Snooze tool to get an email out of your way until a later time or date, you can also Snooze important emails so that they reappear in your inbox as an unread reminder at a defined point.
Select the email in question, and click “Snooze” in the Home tab. From there, you can choose a preset time for the email to reappear as an unread email in your inbox, or set your own parameters.
Sweep Emails
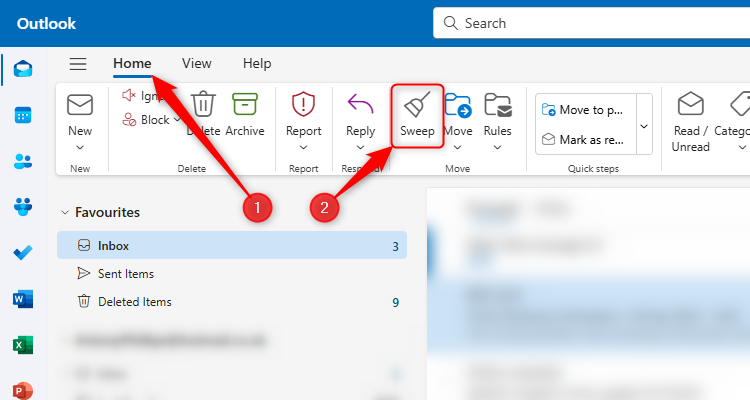
Using the Sweep tool is similar to creating email Rules. However, where Rules apply to future emails as they arrive, Sweep affects all emails, including those you’ve already received, so they’re a great way to tidy up your inbox.
To use Sweep, first select an email. The Sweep actions you’re about to create will apply to all emails that come from the same email address as the selected message. Once you’ve selected an appropriate email, click “Sweep” in the Home tab.
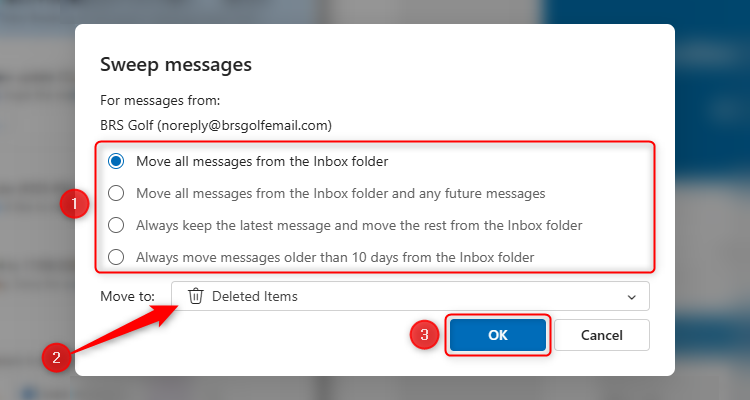
You can then see and choose from the self-explanatory options in the Sweep Messages dialog box that appears. Note that you don’t have to move the selected messages to the Deleted folder—use the drop-down option to choose a different folder.
Email categories have been around for a while, but they’ve been significantly upgraded in the new Outlook for Windows.
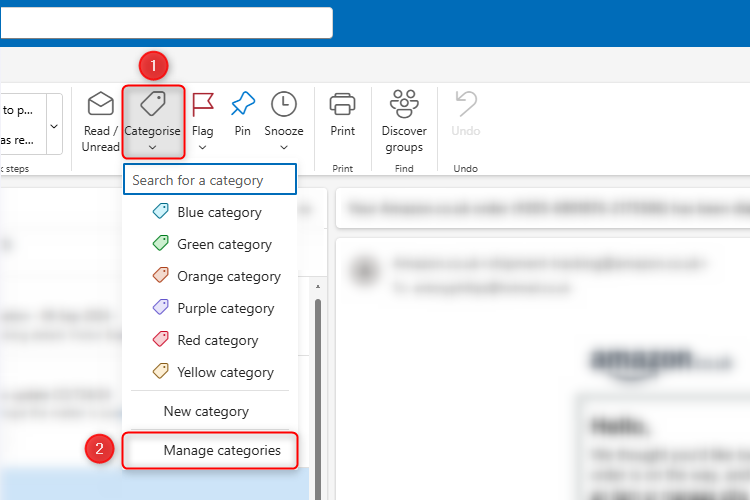
To create, edit, and delete categories, click “Categorize” in the Home tab, and then select “Manage Categories.”
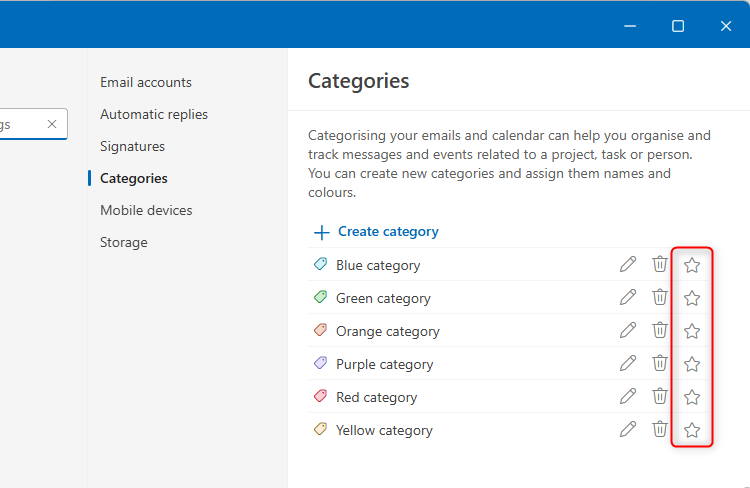
You can then change the Category names, choose a different label color, or remove Categories you no longer need. While you’re there, click the star next to a Category to add it to your Favorites in the Navigation Pane for quick and easy access.
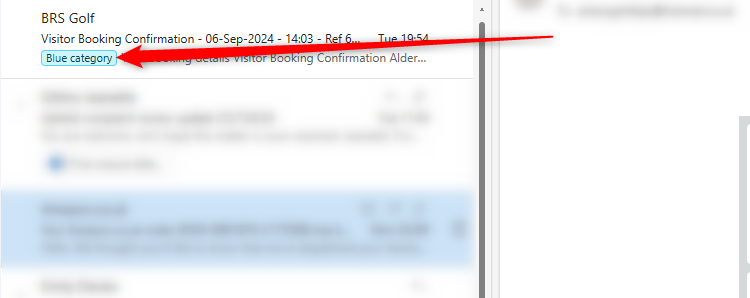
Once you’ve created and managed your Categories, right-click an email and select “Categorize” to assign it to a pre-defined category. The best addition to the Categorize tool in the new Outlook is that the category color appears on the email preview in the Message Pane.
Click a category already assigned to an email to see all other emails in that category.
Pin Important Emails
Whether you use your inbox as a makeshift to-do list or prefer an inbox-zero strategy, pinning your emails moves them to the top of whichever folder they’re in. That includes your inbox folder, or any other folder in your Navigation Pane.
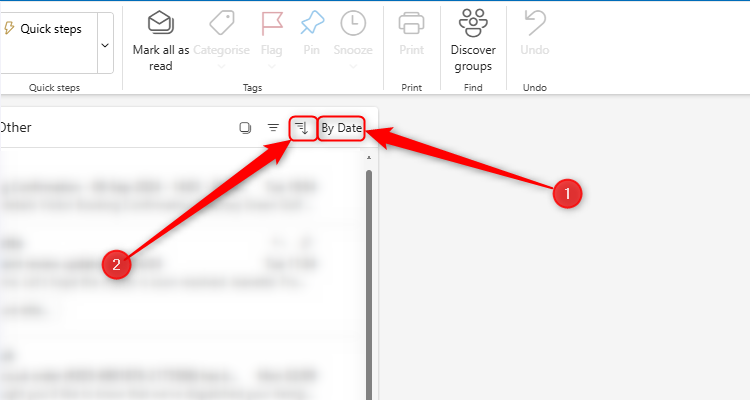
Before you can pin an email, you’ll need to make sure the folder is organized in date order, with the most recent at the top. To do this, open the relevant folder, choose “By Date” in the Sort By menu, and ensure “Newest On Top” is activated.
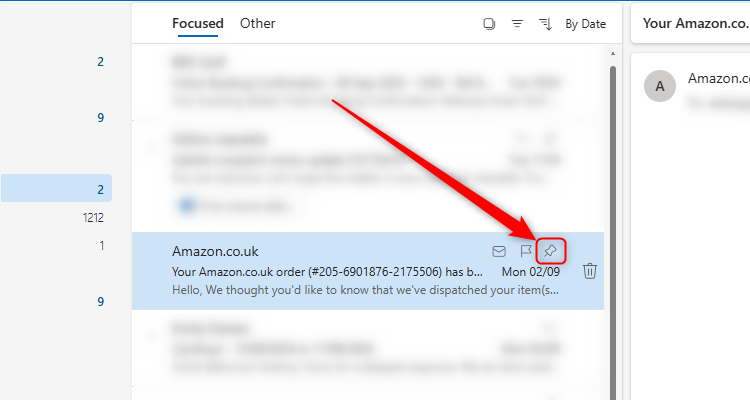
Then, with the relevant folder still open, click the drawing pin icon that appears when you hover over the priority message. To unpin the email, click the same icon again.
This feature—available in Outlook for the web, but not classic Outlook—means you can keep your folders more organized, and stay on top of your important tasks. Pinning an email is different to flagging an email, which adds the item to your Flagged Emails list in Microsoft To Do .
Automate Repeated Actions With Quick Steps
Outlook’s Quick Steps—which lets you perform numerous actions on an email with a single click—has been around for a while in previous Outlook versions, but the process of creating and managing the steps is a lot easier and quicker in the new Outlook app, and you can do more things in one go.
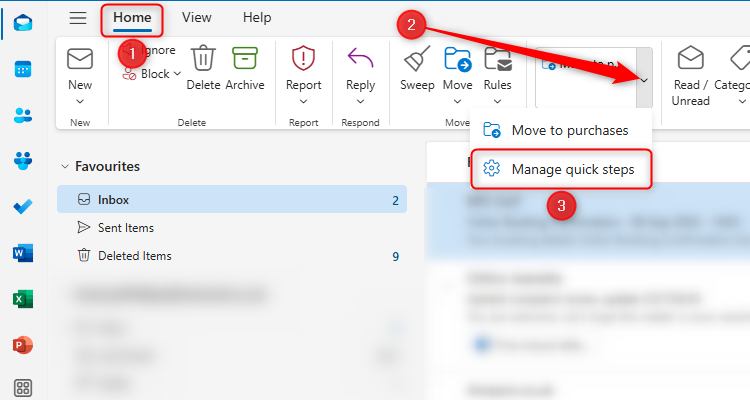
Click the “Quick Steps” down arrow in the Home tab, and choose “Manage Quick Steps”
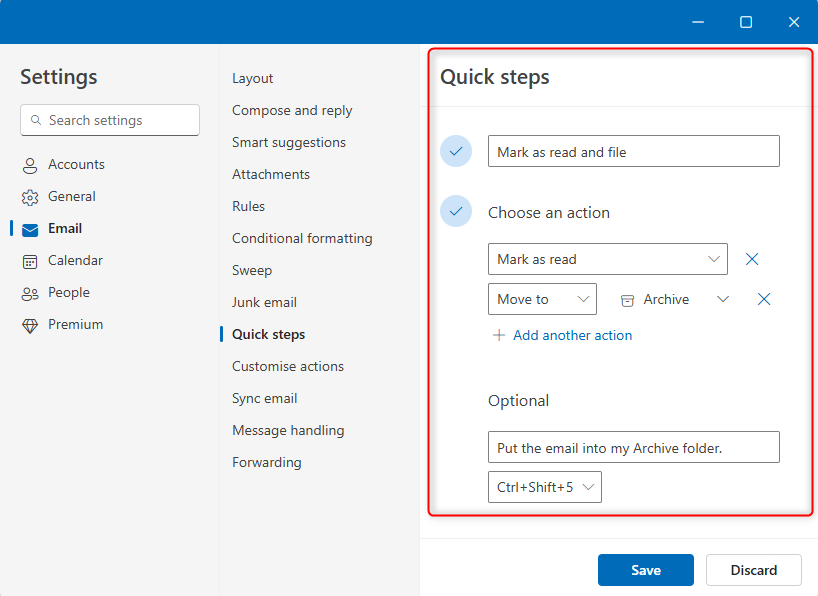
Then, click “New Quick Step,” and see the available options for automating certain tasks. In this example, I’ve created steps to mark an email as “read,” and move it to my Archive folder. I’ve also assigned a keyboard shortcut to make the process even quicker.
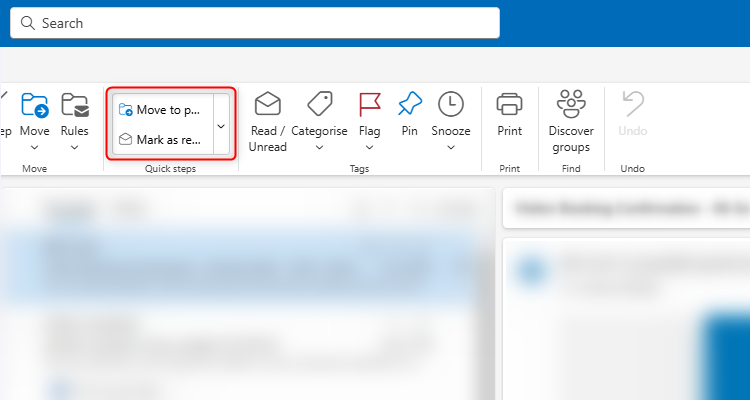
When you click “Save,” the new Quick Step will appear in the Quick Steps box in the Home tab, which you can click to apply to the selected email.
Easily Set and Manage Calendar Events
Creating and customizing events in classic Outlook’s calendar was quite a lengthy process—you had to double-click the date, then click on different buttons on the ribbon to add invitees or link the event to a Teams meeting.
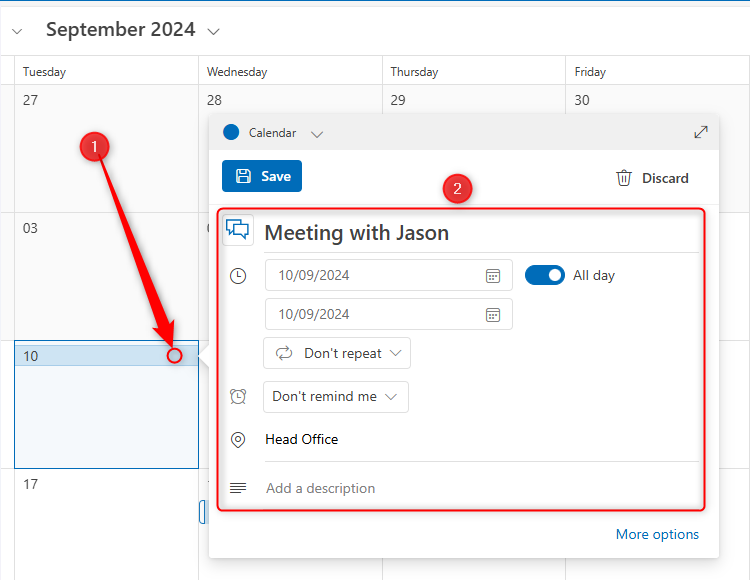
In the new Outlook calendar, single-click the date, and a floating window will appear, where you can input the details.
Yes, you might have to click “More Options” to add extras to your event, but the subsequent window is much more navigable in the new Outlook than the classic Outlook, with only five tabs rather than 12.
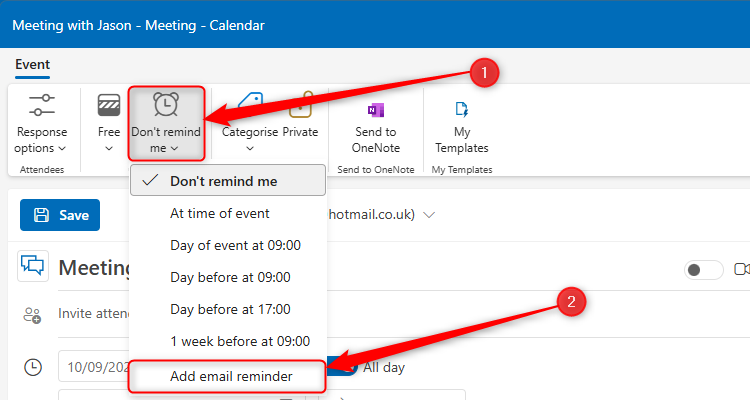
Also, you can’t set up an email reminder for an event in the classic Outlook, but you can in the new Outlook. Click the relevant date, then click More Options > Don’t Remind Me > Add Email Reminder.
Double-click a date in the calendar to jump straight to the More Options window.
The benefits don’t end there. Here are some other useful additions to the new Outlook for Windows:
- Simplified layout: Since the new Outlook is designed on the streamlined Outlook for the web, the new desktop app has a more simplified design with a refined ribbon. This means that you’re faced with a more straightforward interface, particularly handy if all you want to do is read, organize, and send emails through the app. What’s more, you can further condense the app’s layout with Cozy and Compact options through the Layout drop-down in the View tab.
- Account consolidation: If you’d prefer to have all your email accounts from different providers in one place, the new Outlook lets you do this. Click Settings > Accounts > Email Accounts > Add Account to add an Outlook, Gmail, Yahoo, or iCloud email account. You can also manage your Microsoft 365 school or work emails in the new Outlook Windows desktop app.
- Microsoft 365 integration: The new Outlook integrates with the recent additions to the Microsoft 365 suite of apps, including Loop and Viva.


Leave A Comment?