Situatie
Microsoft 365’s AutoSave feature can be a lifesaver if things suddenly go wrong, as it automatically uploads your file to the OneDrive cloud as you work.
Solutie
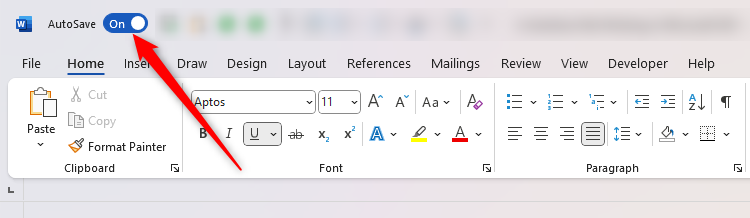
You might have already taken this step, as it’s probably how you realized that AutoSave isn’t working. To check whether AutoSave is activated in a PowerPoint, Excel, or Word file, look at the AutoSave toggle in the Quick Access Toolbar (QAT). If it says “Off,” click it to turn it on.
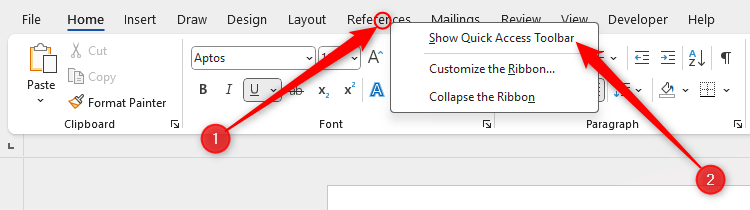
If you can’t see this button, right-click any tab, and click “Show Quick Access Toolbar”
If you still can’t see the AutoSave button, with the QAT on display, click the “Customize Quick Access Toolbar” down arrow, and make sure “Automatically Save” is checked.
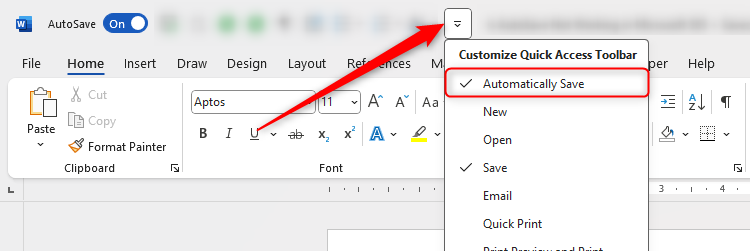
When you “OK,” this option will be set for the active file and all future files in that Microsoft 365 program.
Save the File Manually
The word “AutoSave” is actually quite misleading, as you have to save the file manually before AutoSave kicks in.
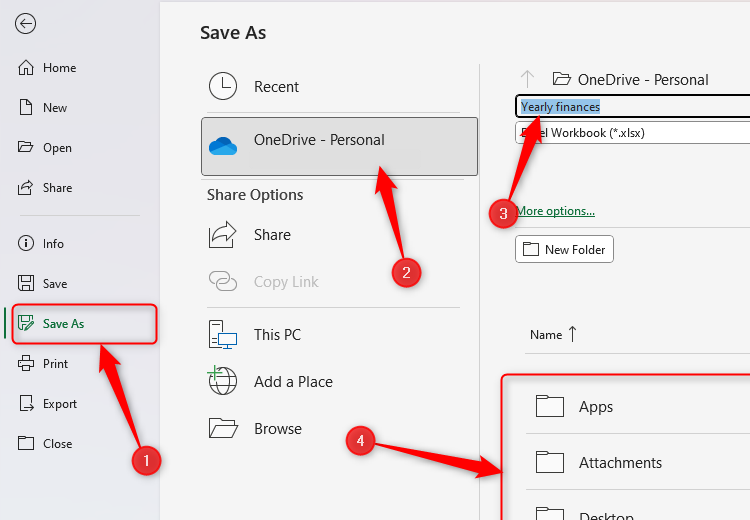
If you haven’t yet done this for a file you’re currently editing, press F12 to launch the Save As dialog box, name the document, and save it to a sub-folder of the OneDrive folder, which you can locate by finding the blue cloud icon.
Alternatively, to be 100% sure that the file is saved in a cloud-enabled folder, click File, and in the Save As menu, click the “OneDrive” option. Then, name your file, choose an appropriate folder, and click “Save.”
Change the AutoSave Frequency
There’s nothing worse than losing some of your hard work to a sudden app crash or the dreaded blue screen of death. AutoSave is meant to be your safety net in these situations, but you might still find that you lose, say, the last five minutes’ worth of work.
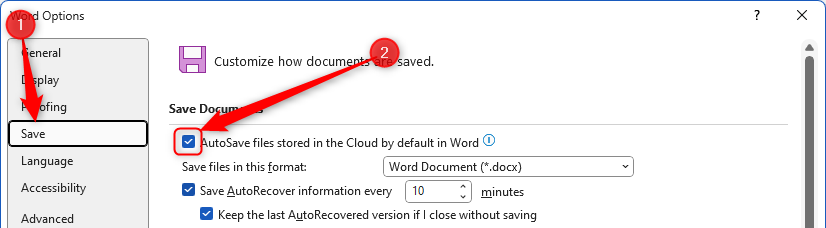
To adjust this, click File > Options, and in the Save tab, change “10 minutes” to a smaller interval.
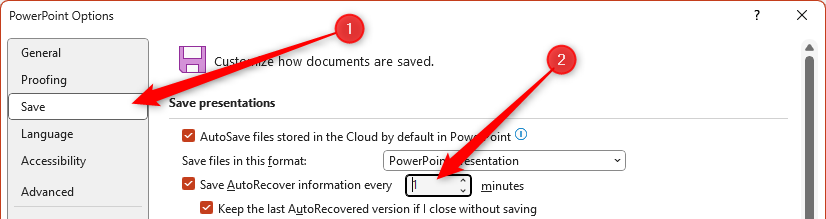
This change will take effect as soon as you click “OK”.
Check the File Format
If your Excel, Word, or PowerPoint file is in an older file format with the “.xls,” “.doc,” or “.ppt” extension, you won’t be able to save it with AutoSave. This might be the case if you’re working on a file someone shared with you, for example.
Press F12 to launch the Save As dialog box, and in the Save As Type drop-down menu, click “Excel Workbook,” “Word Document,” or “PowerPoint Presentation,” depending on the app you’re using.

Now, after naming your file and clicking “Save,” you’ll have two copies of the file, but only the duplicate you just created with the modernized file format will save automatically as you work.
AutoSave won’t work if OneDrive is full. In this scenario, you’ll see an alert at the top of the Excel, Word, or PowerPoint’s app’s workspace. You’ll also see one when OneDrive is nearly full.
You can then see the OneDrive storage capacity and current usage in the bottom-left corner of the OneDrive Settings window.
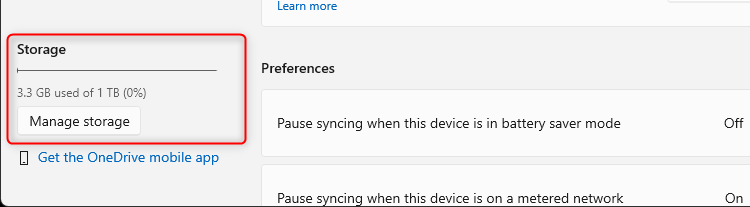
If you need to free up some space, click “Manage Storage”.
Leave A Comment?