
Using the Command Prompt to turn off your Windows 10 PC provides more options and flexibility than merely using the shutdown option from the Start menu or pressing the power button on your PC. Here’s how it’s done.
[mai mult...]How to Use the uniq Command on Linux
The Linux uniq command whips through your text files looking for unique or duplicate lines. In this guide, we cover its versatility and features, as well as how you can make the most of this nifty utility.
How to Check Which GPU Is Installed on Linux
How to Create a Swap File on Linux
Swap Files vs. Swap Partitions
There are several scenarios where you might want to increase existing or add new swap space to your Linux computer.
- Perhaps your swap space is frequently running at maximum or close to maximum.
- It’s easy to click the wrong option during the installation process and to decline adding swap to your system inadvertently.
- Maybe you previously decided that you had so much random access memory (RAM) you didn’t need any swap, and you’ve changed your mind.
- Sometimes you inherit the administration of a system that has no swap, for reasons you’ll never be able to discover.
How to Change User Data With chfn and usermod on Linux
If you use a Linux or Unix-like computer, you’ll have a user account. The name given to the account is your user account name. This is the name you use to log in with. It’s also (by default) the name of your login group and the name of your home directory. They all use the same identifier.
There is another set of information that can be stored for each user account. Real-world data such as the person’s full name, their office number, and their work telephone number, for example, can be defined and attached to them. Indeed, completely arbitrary snippets of information can be tagged to user accounts.
In practical terms, this will be more useful for system administrators looking after computers that have many user accounts configured on them. But even for the single-user Linux computer, it’s always interesting to know what’s going on beneath the hood.
[mai mult...]Cum printam o lista de e-mailuri dintr-un folder Outlook
It’s simple to print a single email, but what about a list of emails showing information like who sent them and when? Here’s how to print a list of emails from Outlook, including all of the visible information.
First, you’ll need to make all of the emails you want to print visible in the same folder. There are several ways to do this, including moving all of the emails to the same folder, but the simplest way is to perform a search using the Search box just under the ribbon.

If you’re looking for specific criteria—emails sent by a particular person, including specific words, or sent in a specific time frame—then you’re better off building a dynamic search folder. This lets you build search queries that range from the very simple to the very complex. Search folders are easy to use if you’ve never made one before.
Either way, once you have the list of emails you want to print, the next step is to make sure all of the right information is displayed. After all, if the critical information is who the emails were sent to, but that’s not shown in the folder, the list is pretty useless. Luckily changing the visible columns is quick and easy, so head to this article to find out how.
Once you’ve added or removed whichever columns you want, you’re ready to print. When you print this list, it will be in the order that is displayed in your folder, so don’t forget to order them the way you want.
To print a list of all the emails in your folder, click “File” in the top left of Outlook.

Next, in the menu on the left-hand side, click “Print.”

By default, printing is set to “Memo Style,” which means the currently selected email will be the only one printed. Change this to “Table Style.”

On the right-hand side, you’ll see the preview. This preview should now be displaying the list of emails with all of the columns you want to be printed out. You can click the preview to make it bigger if it’s a bit small.

Check that everything looks right. If it’s not, click the Back arrow in the top left above the menu to go back into Outlook and change the visible columns and column widths to how you want them to look.
Once the preview looks correct, choose your printer (we’re using Windows’ built-in Print to PDF functionality) and then click “Print.”

You will now have a print-out of the list of emails in the folder, complete with all the column information.
[mai mult...]How to Customize Gmail on the Web
Gmail is an enormously popular email provider with an easy-to-use web interface. However, not all preferences and screen sizes work well with the default settings. Here’s how to customize the Gmail interface.
Expand or Collapse the Sidebar
The Gmail sidebar—the area on the left that shows you the Inbox, Sent Items, Drafts, and so on— takes up a lot of screen space on a smaller device.
To change or collapse the sidebar, click the hamburger menu at the top left of the app.

The sidebar contracts, so you just see the icons.

Click the hamburger icon to see the full sidebar again.
Choose What to Display in the Sidebar
The sidebar includes things you’ll definitely use (like the Inbox), but it also shows items you might rarely or never use (like “Important” or “All Mail”).
At the bottom of the sidebar, you see “More,” which, by default, is contracted and hides things you rarely use. You can drag and drop things from the sidebar onto the “More” listing to hide them.

You can also drag and drop into the sidebar any labels under “More” that you use regularly, so they’re always visible. You can also drag and drop to reorder the labels.
Hide (or Move) the Google Hangouts Chat Window
If you don’t use Google Hangouts for chats or phone calls, you can hide the chat window under the sidebar.

To do so, click or tap the Settings cog at the top right of the app, and then select “Settings.”

Click or tap “Chat,” select the “Chat Off” option, and then click or tap “Save Changes.”

Gmail reloads without the chat window. If you ever want to turn it back on, go back to Settings > Chat and select the “Chat On” option.
If you use Google Hangouts but don’t want the chat window at the bottom of the sidebar, you can display it on the right side of the app instead.
To do so, click or tap the Settings cog at the top right of the app and select “Settings.”
Click or tap “Advanced” and scroll down to the “Right-Side Chat” option. Click or tap “Enable,” and then click or tap “Save Changes.”

Gmail reloads with the chat window on the right side of the interface.

Change the Display Density of Emails
By default, Gmail displays your emails with a generous amount of space between them, including an icon that identifies the type of attachment. If you want to make your email display more compact, click or tap the Settings cog at the top right of the window and select “Display Density.”

The “Choose a View” menu opens, and you can choose “Default,” “Comfortable,” or “Compact.”

The “Default” view shows the icon for attachments, while “Comfortable” does not. In “Compact” view, you also won’t see the attachment icon, but it also minimizes the white space between emails. Select the density option you want, and then click or tap “OK.”
You can return to this menu any time to change the density setting.
Show Only the Subject Line
By default, Gmail shows the subject of an email and a few words from the body.

You can change this to see only the subject of the email for a cleaner viewing experience.
To do so, click or tap the Settings cog at the top right, and then select “Settings.”
Click or tap “General,” scroll down to the “Snippets” section, and then select “No Snippets.” Click or tap “Save Changes.”

Gmail will now show the subject lines but nothing from the body of your emails.

Enable the Hidden Email Preview Pane
Just like Outlook, Gmail has a preview pane, but it’s not enabled by default. We’ve covered this in more detail before, but to quickly turn on the Preview pane, click or tap the Settings cog at the top right and select “Settings.”
Click or tap “Advanced” and scroll down to the “Preview Pane” option. Click or tap the “Enable” option, and then click or tap “Save Changes.”

Gmail now displays either a vertical (as shown below) or horizontal preview pane.

Again, for more configuration options in the preview pane, check out our previous article.
Change the Mail Action Icons to Text
When you select an email in Gmail, the mail actions display as icons.
![]()
If you hover your cursor over these icons, a tip appears. However, if you’d prefer simple text instead of having to remember what the icons mean, you can remove them.
To do so, click or tap the Settings cog at the top right, and then select “Settings.”
Click or tap “General” and scroll down to the “Button Labels” section. Select the “Text” option, scroll to the bottom of the page, and then click or tap “Save Changes.”

When you return to the email interface, the actions appear as text.

This option can be particularly useful for someone who’s not tech-savvy and might struggle to figure out what the icons mean.
Change the Number of Displayed Emails
By default, Gmail shows you 50 emails at a time. This made sense when it launched back in 2004 because most people probably didn’t have great internet speeds; it’s still ideal if you have a slower connection.

However, if you have the bandwidth to show more (as most of us do), you can change this value.
Click or tap the Settings cog at the top right, and then select “Settings.”
Click or tap “General” and scroll down to the “Maximum Page” section. Click or tap the drop-down menu and change it to “100” (the maximum allowed). Scroll to the bottom of the page and click or tap “Save Changes.”

Gmail will now display 100 emails per page.

Color-Code Your Labels
We’ve covered labels in-depth previously, but one simple change that can make a big difference is color-coding your labels.
To do this, hover over a label, and then click or tap the three dots on the right. Click or tap “Label Color,” and then select the color you want to use.

The labels applied to your email will now be color-coded, making it much easier to see things at a glance.

Choose Your Tabs
Across the top of your Inbox, you see tabs, such as “Primary,” “Social,” and “Promotions.” To choose which of these are visible, click or tap the Settings cog at the top right. Next, select “Configure Inbox.”

In the panel that appears, choose which tabs you want visible (you can’t deselect Primary), and then click or tap “Save.”

The tabs across the top of your Inbox will change to those you selected. To see any tabs you haven’t selected, click “Categories” in the sidebar.

Change Gmail’s Theme
Black text on a white background isn’t everyone’s favorite color scheme. If you want to change it, click or tap the Settings cog at the top right, and then select “Themes.”

Click or tap a theme, and Gmail shows it behind the Themes panel as a preview.

Once you’ve chosen the theme you want, you can use the options (available for some themes) at the bottom to finesse it a bit, and then click or tap “Save.”

Those are some of the ways you can change the Gmail interface to suit your preferences.
[mai mult...]How to Downgrade Your Android Phone to a Previous Version
Not everyone appreciates the changes when new Android versions hit devices. If you want to switch back, it’s sometimes possible to downgrade your Android device to a previous version. Here’s how you do it.
Before we begin, it’s important to mention the risks. Downgrading your Android phone isn’t generally supported, it isn’t an easy process, and it will almost certainly result in you losing data on your device. Make sure you back up your phone before you begin.
Additionally, this process might void your device’s warranty or potentially brick it, making your phone nothing more than e-waste. As such, we do NOT recommend that you continue unless you have experience modifying your device’s firmware and completely understand the risks involved.
Before Flashing Your Phone
How easy it is for you to downgrade your Android phone depends on the manufacturer. Some manufacturers make it extremely easy for users to “flash” firmware images onto their devices while others make it nearly impossible.
The typical process for flashing requires you to unlock your bootloader first. Not all Android phones allow this, so you’ll check for yourself whether your device manufacturer offers an official method for unlocking the bootloader, or whether you’ll need to find an alternative method.
Keep in mind that unlocking your bootloader will wipe your device’s internal storage. Make sure you have backed up your phone or else your data will be lost forever.
RELATED: How to Unlock Your Android Phone’s Bootloader, the Official Way
With the bootloader unlocked, you can then flash your device to an older version of Android. Be warned, as unlocking your bootloader will probably invalidate your warranty.
The easiest devices to flash, by far, are phones in the Google Pixel series. Google provides factory images for Pixel devices, with different builds for Android 9 and 10. You’ll need the Android SDK installed—with the Fastboot and Android Debug Bridge (ADB) tools—to flash Google Pixel devices.
It’s a mixed bag for other device manufacturers, however. Unless the manufacturer provides them, you’ll need to locate firmware images suitable for your device. The XDA-Developers forum is a good place to find suitable downgraded firmware images for your particular Android phone, but search your manufacturer’s website for official firmware images, too.
Flashing non-Google devices is possible with the Fastboot method, although third-party tools do exist for other manufacturers of Android devices like Samsung.
Manually Flashing Using Fastboot and ADB
The only “official” method for downgrading your Android device is the Fastboot method. While not every manufacturer encourages it, the Fastboot tool is available from Google for you to use and should work with official firmware images from almost all Android manufacturers.
To proceed, you just need to be able to unlock your bootloader and have a suitable firmware image for your device and carrier. Make sure USB debugging is enabled on your Android device before you begin.
RELATED: How to Access Developer Options and Enable USB Debugging on Android
If you’ve found a suitable firmware image, your bootloader is unlocked, and you have the Android SDK installed, connect your Android phone to your PC. While the steps below are for Windows 10 users, the ADB and Fastboot commands should work in a similar way on macOS and Linux.
Open the file explorer and head to the saved location of your Android SDK installation. Make sure the Android image files you need to flash are here, too. These usually come as a ZIP file with multiple IMG files held within. Unzip the contents to this location.
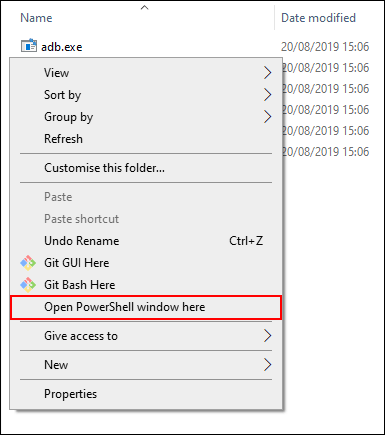
In the folder, hold the shift key on your keyboard, right-click inside the window, and click the “Open PowerShell Window Here” button. On macOS or Linux, navigate to this folder using the Terminal application.
Type adb devices in the Windows PowerShell window to make sure your Android device is detected. If it is, type adb reboot bootloader to restart your device and boot into the Android bootloader menu.
If the ADB commands don’t work, type .\adb instead.

Most manufacturer firmware comes with a “flash-all” script that flashes all the relevant image files to your device. Once your device is in the bootloader mode, type flash-all to start the flashing process.
If the flash-all script doesn’t work, you will need to manually flash the individual items in the folder. Type the following commands into Windows PowerShell (or Terminal) hitting the Enter key between each step:
-
fastboot flash bootloader <bootloader name>.img -
fastboot reboot-bootloader -
fastboot flash radio <radio file name>.img -
fastboot reboot-bootloader -
fastboot flash -w update <image file name>.zip
Once this process is complete, your phone should restart. If the flashing process was successful, your device will now be running the downgraded firmware image.
Using Third-Party Flashing Tools
Thanks to the work of volunteer developers, third-party flashing tools are available. These manufacturer-specific firmware flashing tools offer you an alternative method to flashing your firmware without using the Fastboot method.
If your device doesn’t have a third-party tool, it’s best to use the Fastboot method listed above.
Samsung devices can make use of Odin to downgrade their phones. This is one of the best-known flashing tools outside of the official Fastboot method
.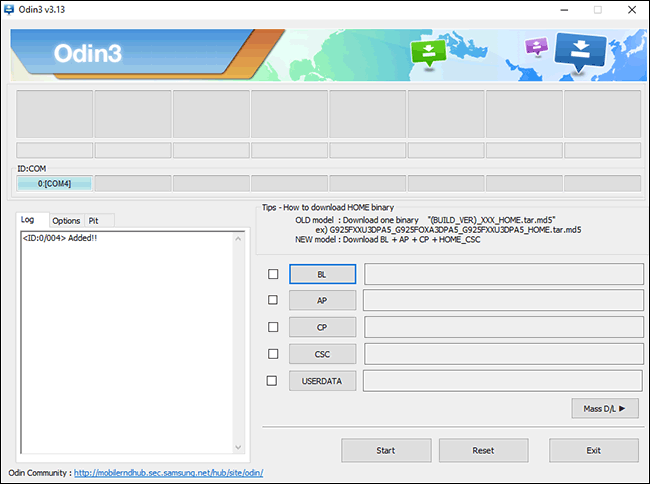
The Odin interface is not the most beginner-friendly, but it will allow you to flash onto some Samsung devices, including the latest unlocked Galaxy phones.
Keep in mind that some cellular carriers lock down the bootloader on devices sold through its stores. These network operators can be reluctant to allow users to unlock their phones unless the handset is completely paid for.
Additional tools are available for other manufacturers. This post at XDA developers lists various flashing tools for Motorola devices, including the recommended RSD Lite. Huawei device owners can use the Huawei Recovery Updater (HuRuUpdater) instead.
We can’t stress this enough: These tools aren’t guaranteed to work, and they don’t come with approval from manufacturers. Whether you use a third-party tool or the Fastboot method, the risk of bricking your device remains the same.
Again, before you begin, make sure you’ve backed up your phone before you make any attempt to flash your device as your phone will be wiped during the flashing process.
READ NEXT
[mai mult...]
How to Check Your Printed Document History in Windows 10
Checking the history of a printer to see what was printed can be somewhat difficult to monitor. As your toner level doesn’t convey how much the accessory has been used, you’ll need to enable logging within Windows 10. Here’s how.
Enable Logging for Recently Printed Documents
By default, your printed document history will be wiped after each document has finished printing. You can change this setting to enable you to see a list of your recently printed documents from the print queue for your printer.
You’ll need to change this setting for each printer you have installed.
Access Your Print Queue
To access your print queue, right-click the Windows Start menu button and select the “Settings” option. From here, click Devices > Printers & Scanners.
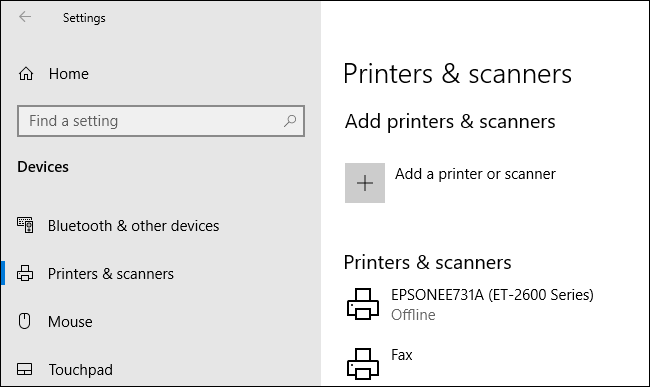
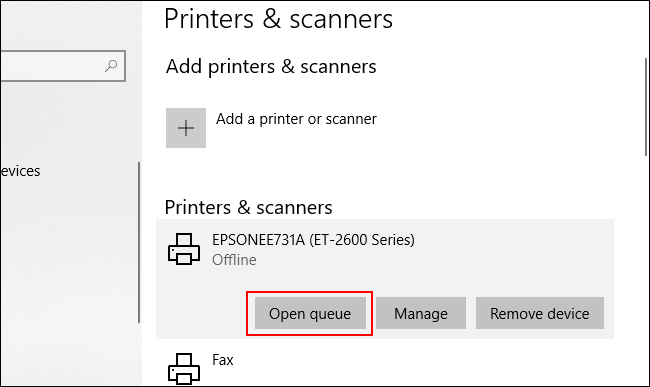
Find your printer in the “Printers & Scanners” list, click on it, and then click “Open Queue” to open the print queue.
Your printer queue with current and queued printed items will be listed. Documents you’ve previously printed will not be shown, which is why you’ll need to enable logging.
Enable Printer History
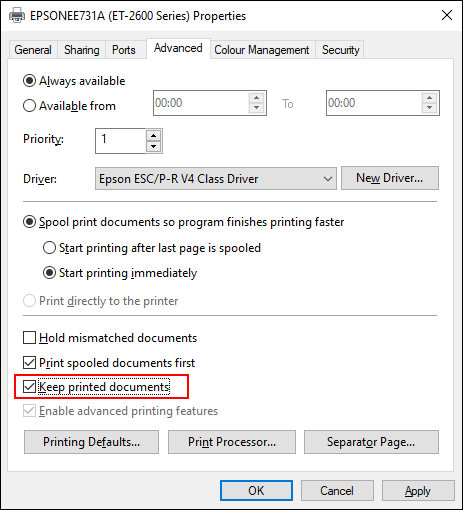
In the print queue window for your printer, click Printer > Properties. Alternatively, select your printer and click “Manage” in the “Printers & Scanners” settings menu.

In your printer properties, click on the “Advanced” tab and then select the “Keep Printed Documents” checkbox.
Click “OK” to save your settings.
Once your document history is enabled, your documents will no longer disappear from your print queue after the printing process has completed.
[mai mult...]How to Add or Remove Rows and Columns in Google Sheets
How to Add Rows or Columns
Fire up your browser and head to the Google Sheets home page. Open a spreadsheet in which you want to insert a few rows or columns.

Next, click on a cell where you want to insert a column or row next to. After, select “Insert” from the toolbar.

From the Insert menu, you’ll see a few options for inserting rows and columns into your spreadsheet. You can insert rows above or below and columns to the left or right of the selected cell.

If you want to insert more than one row or column at a time, highlight as many cells as you want to add. For example, highlight two vertical cells to insert two rows or highlight two horizontal cells to insert columns.

You can insert rows and columns from the right-click context menu as well. Highlight the cell you want to insert them next to, right-click the selection, and then choose “Insert Rows” or “Insert Columns.”

When removing rows and columns in Google Sheets, you can use these shortcuts if you’d prefer to keep your fingers on your keyboard the whole time. Highlight the cells from the row or column you want to remove, and then press the keyboard shortcut for the command you want to execute.
Again, because Google wants to be difficult, here are the browser-specific keyboard shortcuts for Windows, Linux, and Chrome OS:
- Alt+E, then D (Chrome) or Alt+Shift+E, then D (Other browsers): Delete rows.
- Alt+E, then E (Chrome) or Alt+Shift+E, then E (Other browsers): Delete columns.
If you use macOS, you can use the following keyboard shortcuts to remove rows or columns:
- Ctrl+Option+E, then D: Delete rows.
- Ctrl+Option+E, then E: Delete columns.