What is TronScript and what is good for?

TronScript as the name implies is a script that will get badly-running Windows system back on its feet. You can download it here, but before that, you may need to disable the windows firewall or other anty viruses that you have. Why? Because the downloaded folder contains tools that temper with telemetry data.

Windows telemetry data includes basic system diagnostics information, logs of how frequently you use features and applications, system files, and likely more metrics that have yet to be disclosed. Fortunately, Microsoft allows users to set the amount of data they wish to share, on certain windows operating systems can’t be turned off.

You want to open the downloaded folder and run the tron with admin rights.

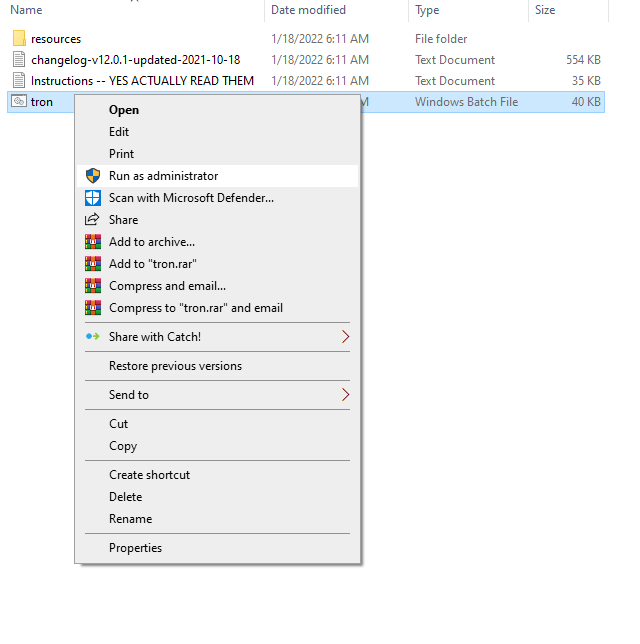
Click on More info then on Run anyway.

Now you need to type “I AGREE” all caps.

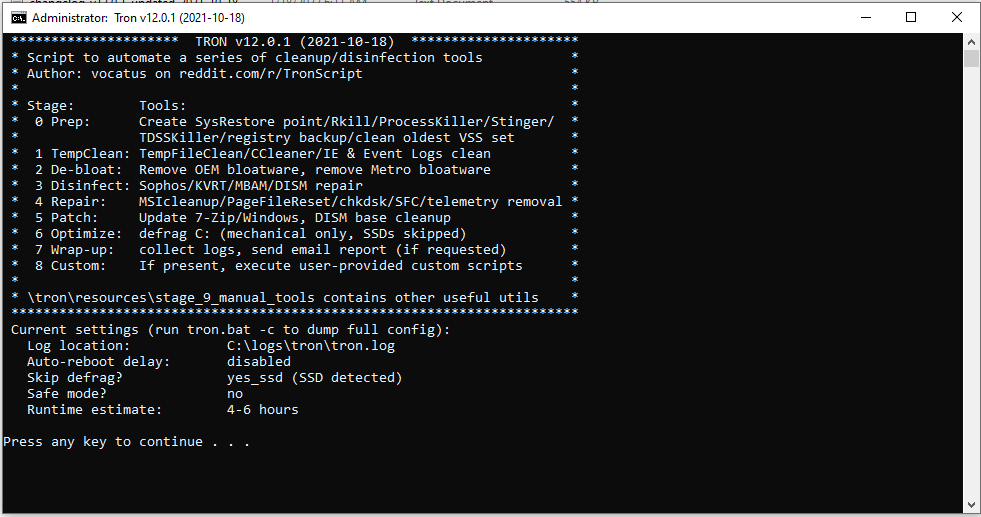
This process can take several hours depending on the computer.

So what does it do?
  • First, it will create a restore point in case the changes are not to your liking.
  • Removes temporary, event logs and the windows update kits. This can take a lot of space on your computer.
  • Removes bloatware, for example, 3d viewer, 3d printing which most people don’t use.
  • It will run several tools for removing viruses, rootkits, malware, spyware, adware, etc.
  • It will clean the windows image of present bugs.
  • It will repair the window image of any tearing that happened in the cleaning process.
  • Defragmenting of hard drive, making for faster access to the file (defragmenting is skipped on SSD, not needed).
  • In the end, it will leave logs with what it has done in the same file as the script.

Pretty nice I would say, but be aware that windows update may revert back some of the changes, such as the removed bloatware, TronScript is mostly recommended to computers that have a hard time with regular tasks.

[mai mult...]

How to Prioritize Wi-Fi Networks on a Mac

By default, your Mac automatically connects to the most-recently-used Wi-Fi network. But if your home has multiple networks, you might want to prioritize one in particular on your Mac. Here’s how to change your default wireless network on Mac.

  • You can reorder the Wi-Fi network priority list from the Network section in System Preferences.
  • The easiest way to get to the Network Preferences is from the Wi-Fi section in the menu bar. Click on the Wi-Fi icon from the menu bar and then select the “Network Preferences” option

ISITZEN — Connect to Wi-Fi (Mac)

  • This opens the Network section from within the System Preferences.
  • Here, from the sidebar, make sure that the “Wi-Fi” option is selected and then click on the “Advanced” button.

Click on Advanced button from the Wi-Fi menu

You’ll see a “Preferred Networks” section in the “Wi-Fi” tab that contains a list of all the networks to which you’ve previously connected. Everything is sorted by preference, meaning that the network on the top of the list gets the first preference. From this list, find the network that you want to be your preferred network (such as your hotspot). Click on the network to select it.

Select a Wi-Fi network from the list

From there, drag the network name to the top of the list and then release it.

Drag the network up to the top spot

  • Once you see the network at the top of the list, it means that it has priority. You can now reorder the rest of the Wi-Fi networks for the second or third priority.
  • Once you’ve prioritized the list of networks, click on the “OK” button from the bottom-right corner.

Click on OK button from the Advanced section

Then, from the Network screen, click on the “Apply” button to update the priority list.

[mai mult...]

How to reset all Windows Account Passwords with iToolab UnlockGo

If you are in this unfortunate situation where all your data and files are inaccessible, then we recommend using iToolab UnlockGo to reset the account password. Not only does it ensure you don’t have to reinstall Windows, but it also works for Local Admin and Microsoft Domain account passwords.

Follow these steps to recover your Windows account.

  1. Create a bootable USB Drive
  2. Boot from USB Drive
  3. Change or Remove Windows account password
  4. Get access to your Windows PC
1] Create a bootable USB Drive

iToolab UnlockGo (Windows) Review

Get access to another Windows PC, download, and install this Windows 10 Password Recovery Tool. Then connect a USB drive, and ensure it’s empty as the drive will be formatted. The next step is to launch the software and click on the Start button. You can choose between a CD/DVD or USB drive on the next screen. Select USB, and then click on the Next button. Click next, confirm the prompts, and let the software create the reset disk.

2]  Boot from USB Drive

BIOS UEFI Keys

Once done, the application will display a list of keyboard keys to press to boot into the BIOS instead of Windows. Most laptops and PCs are set to boot from the storage, so we will have to change to boot from the USB. It can be done via UEFI or BIOS. Look for the Boot section, and you can change the order of the boot from there. Some modern motherboards can detect the connected USB drive as you change the option. Save the change, and restart.

3] Change or Remove Windows account password
  • Once you restart, you should now see the iToolab UnlockGo Recovery screen. Select the Windows version your Account is on and click Next. It will then display the list of accounts on the Windows PC. The list will include a list of Microsoft Account status, Admin account status, and so on.Reset Account Password Windows
  • Select the Account you want to reset, and choose from one o the option. The options allow you to Remove, Reset, Delete accounts and create a new account.
  • Select Reset, and then type the password. And click the Reset button.Change Password Account
  • If you do not want to change the password using this tool, you can create a new admin account. Once done, restart the PC and then use that Account to change your Account password from Windows.

I would suggest creating another admin account even if you don’t need it. If you ever need it, you will have it right away; otherwise, you will have to reuse the software and create it again.

4] Get access to your Windows PC

Make sure to note the password before you leave the recovery. If not, reset once again and record it on paper or your phone. Next, remove the USB drive and reboot the PC using the reset button. Removing the USB ensures the PC does not boot into the recovery mode. Once the PC reboots, login with the new password, or if you choose to create a new account, and then login.

[mai mult...]

Fix PUBG error [25] BattlEye Corrupted Data

A lot of PUBG gamers are unable to play the game as they are seeing the following error message – [25] BattlEye: Corrupted Data – Please perform a clean game reinstall.

BattlEye: Corrupted Data Booting me from games. : r/PUBATTLEGROUNDS

Now, we wouldn’t recommend you straight away uninstall the game as suggested by the error message, reinstallation should be your last resort. But before that, we are going to see some easy solutions to fix PUBG error [25] BattlEye Corrupted Data.

How do I fix corrupted data PUBG BattlEye?

The corrupted data of PUBG BattleEye can be fixed from the Steam Launcher. You need to go to its properties and Verify the Integrity of the game. This will scan your game and fix any corrupted files. If that doesn’t work, then you should try to remove the files that can potentially get corrupted. There are a lot of files that you need to remove, all of them, are mentioned below. In the worst-case scenario, you would have to reinstall PUBG and Steam.

However, we would suggest you just go through the solutions mentioned later in this article to resolve the issue. They are listed in order, such that, a lot of your time will be saved. So, without wasting any time, let us hop into it.

Error [25] BattlEye: Corrupted Data, Please perform a clean game reinstall

Before starting the troubleshooting process, we should update our computer. If you are not using the build, you can be subjected to some incompatibility issues. Aso, updating Windows, will also update your system drivers. But, if you are still seeing the PUBG error [25] BattlEye Corrupted Data, then check out these solutions to resolve the issue. Make sure to go execute them in the given order as that will save you some time.

  1. Delete the BattleEye folder
  2. Verify Integrity of Game Files
  3. Delete Remnant files
  4. Reinstall Steam

Let us talk about them in detail.

1] Delete the BattlEye folder

Let us start by deleting the folder that’s corrupted. In this case, you don’t have to uninstall the whole game, just remove some files, check if everything is ok, and then enjoy PUBG. If that sounds good to you, open File Explorer and go to the following location.

\Program Files\SteamLibrary\steamapps\common\PUBG\TslGame\Binaries\Win64\BattlEye

Now, remove all the content of BattleEye. Also, run the executable file, Uninstall BattEye, and complete the process. Then check if the issue persists. A lot of time, users have to do combine first and second solutions to get things on their way.

2] Verify Integrity of Game Files

After removing the files, it’s time to check if there are some corrupted files left and then fix them. Follow the given steps to do the same.

  1. Open Steam.
  2. Go to LIBRARY, right-click on the game, and select Properties.
  3. Now, click on LOCAL FILES > VERIFY INTEGRITY OF GAME FILES.

Let the process complete, then restart your PC and check if the issue persists.

3] Delete Remnant files

If the first two solutions didn’t help, then you should delete remnant files of PUBG and see if that helps. Before doing that, close Steam and PUBG, Make sure to check Task Manager and end any related process.

Open File Explorer and go to the following location. Then delete the PUBG folder.

\Program Files\SteamLibrary\steamapps\common\PUBG

Then, we need to delete some App Data. For that, go to the following location and then delete the TslGame folder.

C:\Users\USERNAME\AppData\Local\TslGame

Now, we need to delete the BattleEye folder from the following location.

C:\Users\USERNAME\AppData\Local\BattlEye

Then, we have to delete common files of BattleEye. Go to the following location and do that.

C:\Program Files (x86)\Common Files\BattlEye

After deleting the content of directories, move to Command Prompt. Hit Win + R to open Run, type “cmd” and hit Ctrl + Shift + Enter. Then execute the following command.

sc delete BEService

We are going to remove registries now. To do that, open Registry Editor from the Start Menu. Hit Ctrl + F and search “BattleEye”. Now, you need to right-click on BEService and select Delete.

Finally, we need to uninstall PUBG and then reinstall it at a different location.

4] Reinstall Steam

If reinstalling the game is to no avail, then this means that the game was not corrupted, it’s the launcher that needs troubleshooting. The troubleshooting here is the reinstallation. So, go ahead and uninstall Steam from Windows Settings. Follow the given steps to do the same.

  1. Open Settings.
  2. Go to Apps > Apps & Features.
  3. Look for “Steam”.
    • For Windows 11: Click on the three vertical dots and select Uninstall.
    • For Windows 10: Select the app and select Uninstall
  4. You will be prompted to confirm your action, so, do that.
[mai mult...]

How to get back the Dislike counter on YouTube?

YouTube stripped the Dislike button in an effort to protect its creators from harassment and reduce dislike attacks. The Dislike count is of great help in determining the quality of video i.e., if it’s worth recommending or not.  Well, a simple trick can help you get the Dislike counter back on YouTube.

  • Download and install the Return YouTube Dislike extension for your browser.
  • Run the extension/Activate it.
  • The extension, when active, changes the YouTube site to where it shows a dislike count.

Although, you cannot share the Dislike counts publicly, It’s still a step in the right direction as the creators can determine how their content is performing and even how to improve it.

[mai mult...]

How to Install FreeRADIUS and Daloradius on Ubuntu 20.04

FreeRADIUS is a free open source server for UNIX and Unix-like operating systems that allows one to set up a RADIUS protocol server. You also need a correctly configured client that communicates with the server when you want to use it, which could be used for authentication or accounting various types of network access. Sample applications are hotspots, VPN protocols such as OpenVPN, Strongswan, or SoftEther (Wireshark) on an Android smartphone.

What is the RADIUS Protocol?

Remote Authentication Dial-IUser Service (RADIUS) is a networking protocol that manages user authentication, authorization, and accounting by providing centralized AAA management. These are some short descriptions of what each term in AAA means, but they do not all mean the same thing:

  • Authentication: The process of determining whether the client (which can be a user, device or process) is authorized to utilize the system.
  • Authorization: The process of determining how much usage and when to provide this information so that power usage costs may be calculated.
  • Accounting: This is the sum-up report on activity on the network for billing purposes.

The command-line interface for managing FreeRADIUS can be confusing even for expert system administrators. To ease their problem, we can use daloRADIUS which is a web-based GUI version of FreeRADIUS.

What is daloRADIUS?

daloRADIUS is a web-based GUI for managing FreeRADIUS and enables you to manage multiple servers from your browser with ease. And it works with major Linux distributions–CentOS, Red Hat Enterprise Linux, Ubuntu, OpenWrt etc., as long as they are running the latest version of Redis or Memcached and have SSL support.

Prerequisites
  • A server running an Ubuntu 20.04, with a minimum of 512MB RAM, a minimum of 300MB storage space and minimum of 1.4 GHz 64-bit CPU
  • Being logged in as a root user or user with sudo privileges.
Updating your System

To keep your system up-to-date, start by running the update command on your terminal to download and install the latest packages and security updates:

sudo apt update -y
sudo apt upgrade -y

The -y flag is used by the update command to automatically answer yes when asked if you want to continue with the changes.

apt update command will update the list of available packages from their sources. apt upgrade command will download and install the updates.

Sample output:

After the update process is complete, you might want to reboot your system. To do so, run the command below in your terminal:

sudo reboot now
Installing Dependencies

Dependencies are software requirements that need to be fulfilled in order for another program to work. The next thing to do is install the necessary dependencies. Ubuntu Server comes with Apache installed, but there are some related packages that must be added. To install the dependencies, run the command below in your terminal:

sudo apt-get install apache2 mariadb-server php libapache2-mod-php php-mail php-mail-mime php-mysql php-gd php-common php-pear php-db php-mbstring php-xml php-curl unzip wget -y

You can check the version of php installed on your system by running the command below in your terminal:

php -v

The output should be similar to one below:

Installing FreeRADIUS

Once all the prerequisites and dependencies are met, we can now install FreeRADIUS. You can view versions of FreeRADIUS available in your Ubuntu by typing the command below in your terminal:

sudo apt policy freeradius

To install FreeRADIUS and the various utilities that come with it on Ubuntu 20.04, execute the following command:

sudo apt -y install freeradius freeradius-mysql freeradius-utils

To quickly check that FreeRADIUS and up and running, we need to run FreeRADIUS in debug mode.

First stop the FreeRADIUS service by running the command below in your terminal:

sudo systemctl stop freeradius.service

Then run the following command to run FreeRADIUS debug mode:

sudo freeradius -X

The output should be similar to the one below:

We can see the last line says “Ready to process requests”, that means FreeRADIUS is now up and running on your server.

Creating a database

FreeRADIUS needs a database to store its settings and other information about users, clients and network connections. You can create a database for FreeRADIUS by logging into MariaDB server via the terminal:

sudo mysql -u root

Now create a database named radius:

CREATE DATABASE radius;

Next grant access to the radius database:

GRANT ALL ON radius.* TO radius@localhost IDENTIFIED BY "yourpassword ";

The flush privileges and quit MariaDB command to update your privileges:

FLUSH PRIVILEGES;
QUIT;

We can see the radius database is created by running the following command in terminal:

mysql -u root -p -e "show databases;"

You should be able to see the radius database listed as shown in the screenshot below:

Installing Daloradius

Daloradius is required to access FreeRADIUS’s web administration interface. First we will download the latest version of daloRADIUS from the git repository usin the wget command:

wget https://github.com/lirantal/daloradius/archive/master.zip

After the download is complete, extract the zip archive using unzip utility as shown below:

unzip master.zip

Next move the daloradius-master folder using the mv utility as shown below:

mv daloradius-master daloradius

Next move into the daloradius directory for configuration:

cd daloradius

Now we need to populate the database with the daloRADIUS schema. The .sql file is located in the ‘/contrib/db/’ folder. You might have to change this path if you didn’t install it in the root destination.

To import, run:

sudo mysql -u root -p radius < contrib/db/fr2-mysql-daloradius-and-freeradius.sql
sudo mysql -u root -p radius < contrib/db/mysql-daloradius.sql

Next move out of the daloradius directory, and move the daloradius folder into the document root:

cd
sudo mv daloradius /var/www/html/

Then rename the sample file by removing the .example extension using the mv utility as shown below:

sudo mv /var/www/html/daloradius/library/daloradius.conf.php.sample /var/www/html/daloradius/library/daloradius.conf.php

Then run the following command to assign ownership of the daloRADIUS web configuration files to Apache:

sudo chown -R www-data:www-data /var/www/html/daloradius/

Next, configure the permissions of your main configuration file to 664 as shown below:

sudo chmod 664 /var/www/html/daloradius/library/daloradius.conf.php

To allow the DaloRADIUS web interface to access FreeRADIUS, we need to provide its database details in the configuration file for DaloRADIUS. Open the .daloradius.conf.php found in ./www/library/daloradius.conf.php and add the database details(username, password and db name):

sudo nano /var/www/html/daloradius/library/daloradius.conf.php

Change the following values to match your database details:

$configValues['FREERADIUS_VERSION'] = '2';
$configValues['CONFIG_DB_ENGINE'] = 'mysqli';
$configValues['CONFIG_DB_HOST'] = 'localhost';
$configValues['CONFIG_DB_PORT'] = '3306';
$configValues['CONFIG_DB_USER'] = 'howtoforge';
$configValues['CONFIG_DB_PASS'] = 'Str0ngpass@howtoforge';
$configValues['CONFIG_DB_NAME'] = 'howtoforge';

Save and exit the file to make sure that everything is correctly configured. Restarting FreeRADIUS and Apache will ensure that everything is working properly:

sudo systemctl restart freeradius
sudo systemctl restart apache2
[mai mult...]

How to Install and Configure Memcached on Debian 11

Memcached is an open-source and distributed memory object caching system that holds the most frequently queried data in memory. This will reduce data load time as well as provide ease of access to the database. You can use Memcached to speed up dynamic web applications by alleviating database load. It is simple, easy to deploy and can be integrated with several programming languages including PHP, Python and more.

Prerequisites
  • A server running Debian 11.
  • A root password is configured on the server.

By default, Memcached is included in the Debian 11 default repository. You can install it by running the following command:

apt-get install memcached libmemcached-tools -y

Once the Memcached is installed, start the Memcached service and enable it to start at system reboot:

systemctl start memcached
systemctl enable memcached

You can also check the status of the Memcached using the following command:

systemctl status memcached

You should get the following output:

? memcached.service - memcached daemon
     Loaded: loaded (/lib/systemd/system/memcached.service; enabled; vendor preset: enabled)
     Active: active (running) since Mon 2021-11-01 10:12:25 UTC; 14s ago
       Docs: man:memcached(1)
   Main PID: 28398 (memcached)
      Tasks: 10 (limit: 4679)
     Memory: 3.1M
        CPU: 28ms
     CGroup: /system.slice/memcached.service
             ??28398 /usr/bin/memcached -m 64 -p 11211 -u memcache -l 127.0.0.1 -P /var/run/memcached/memcached.pid

Nov 01 10:12:25 debian11 systemd[1]: Started memcached daemon.

By default, Memcached listens on port 11211. You can check it using the following command:

ss -antpl | grep memcached

You will get the following output:

LISTEN 0 1024 127.0.0.1:11211 0.0.0.0:* users:((“memcached”,pid=28398,fd=26))

Configure Memcached

Memcached default configuration file is located at /etc/memcached.conf. You can edit it with the following command:

nano /etc/memcached.conf

You can change some default options as per your requirements:

-l 127.0.0.1
-U 0
-p 11211
-u memcache
-m 2000

Save and close the file then restart the Memcached service to apply the changes:

systemctl restart memcached

Enable Memcached for PHP and Python Applications

In order to use Memcached with a PHP-based application, you will need to install the Memcached PHP library to your server. You can install it using the following command:

apt-get install php-memcached -y

If you want to enable Python and Perl support, run the following command:

apt-get install python3-pymemcache libcache-memcached-libmemcached-perl -y

Once all the libraries are installed, you can proceed to the next step.

Verify Memcached

Memcached is now installed and configured. Now, create a simple PHP script to verify the Memcached. First, install the Apache and PHP with the following command:

apt-get install apache2 php libapache2-mod-php -y

Once all the packages are installed, create a info.php file using the following command:

nano /var/www/html/info.php

Add the following lines:

<?php
// Show all information, defaults to INFO_ALL
phpinfo();
?>

Save and close the file then open your web browser and access the URL http://your-server-ip/info.php. You should see that Memcached is enabled on the following test page:

Access Memcached CLI Interface

Memcached provides a command-line interface to interact with Memcached directly using the command line.

First, connect to Memcached using the following command:

telnet localhost 11211

Once you are connected, you will get the following output:

Trying ::1...
Trying 127.0.0.1...
Connected to localhost.
Escape character is '^]'.

Now, check the status of the Memcached using the following command:

stats

You should see some important information such as uptime, number of items in the cache, and the number of client connections to the instance in the following output:

STAT pid 28398
STAT uptime 222
STAT time 1635761765
STAT version 1.6.9
STAT libevent 2.1.12-stable
STAT pointer_size 64
STAT rusage_user 0.049028
STAT rusage_system 0.049054
STAT max_connections 1024
STAT curr_connections 1
STAT total_connections 2
STAT rejected_connections 0
STAT connection_structures 2
STAT response_obj_oom 0
STAT response_obj_count 1
STAT response_obj_bytes 16384
STAT read_buf_count 2
STAT read_buf_bytes 32768
STAT read_buf_bytes_free 0
STAT read_buf_oom 0
STAT reserved_fds 20
STAT cmd_get 0
STAT cmd_set 0
STAT cmd_flush 0
STAT cmd_touch 0
STAT cmd_meta 0
STAT get_hits 0
STAT get_misses 0
STAT get_expired 0
STAT get_flushed 0
STAT delete_misses 0
STAT delete_hits 0
STAT incr_misses 0
STAT incr_hits 0
STAT decr_misses 0
STAT decr_hits 0
STAT cas_misses 0
STAT cas_hits 0
STAT cas_badval 0
STAT touch_hits 0
STAT touch_misses 0
STAT auth_cmds 0
STAT auth_errors 0
STAT bytes_read 7
STAT bytes_written 0
STAT limit_maxbytes 67108864
STAT accepting_conns 1
STAT listen_disabled_num 0
STAT time_in_listen_disabled_us 0
STAT threads 4
STAT conn_yields 0
STAT hash_power_level 16
STAT hash_bytes 524288
STAT hash_is_expanding 0
STAT slab_reassign_rescues 0
STAT slab_reassign_chunk_rescues 0
STAT slab_reassign_evictions_nomem 0
STAT slab_reassign_inline_reclaim 0
STAT slab_reassign_busy_items 0
STAT slab_reassign_busy_deletes 0
STAT slab_reassign_running 0
STAT slabs_moved 0
STAT lru_crawler_running 0
STAT lru_crawler_starts 3
STAT lru_maintainer_juggles 272
STAT malloc_fails 0
STAT log_worker_dropped 0
STAT log_worker_written 0
STAT log_watcher_skipped 0
STAT log_watcher_sent 0
STAT unexpected_napi_ids 0
STAT round_robin_fallback 0
STAT bytes 0
STAT curr_items 0
STAT total_items 0
STAT slab_global_page_pool 0
STAT expired_unfetched 0
STAT evicted_unfetched 0
STAT evicted_active 0
STAT evictions 0
STAT reclaimed 0
STAT crawler_reclaimed 0
STAT crawler_items_checked 0
STAT lrutail_reflocked 0
STAT moves_to_cold 0
STAT moves_to_warm 0
STAT moves_within_lru 0
STAT direct_reclaims 0
STAT lru_bumps_dropped 0
[mai mult...]

How to install ncdu on Linux / Unix to see disk usage

The du (disk usage) command summarizes directory trees’ sizes, including all of their contents and individual files’ sizes on Linux and Unix-like systems such as macOS. It helps track down space hogs. In other words, we can list directories and files that consume large amounts of space on a hard disk drive. Let us see the ncdu command, a curses-based version of the well-known du command.

Installing ncdu on Linux

Open the Terminal application and then type commands as per your distro. For instances, Debian/Ubuntu Linux users try the apt command/apt-get command as follows:
sudo apt install ncdu

Alpine Linux install ncdu

Try the apk command to install ncdu including man pages on Alpine Linux:
# apk add ncdu ncdu-doc

Arch Linux install ncdu

Use the pacman command:
sudo pacman -S ncdu

OpenSUSE/SUSE Linux

We use the zypper command:
sudo zypper in ncdu

CentOS/RHEL/Fedora Linux

Turn on EPLE repo for RHEL/CentOS and then run the yum command:
sudo yum install ncdu
Fedora Linux user simply run the dnf command:
sudo dnf install ncdu

macOS install ncdu

First, install Homebrew on macOS to use the brew package manager and then type:
brew install ncdu
Or use the following when using macports:
sudo port install ncdu

FreeBSD Unix install ncdu

Type the following pkg command:
sudo pkg install ncdu

OpenBSD installing ncdu

Execute the pkg_add command:
doas pkg_add ncdu

How to use the ncdu command

The basic syntax for ncdu is:
ncdu
ncdu [options] [directories]

Press q to exit to the shell. The ncdu can give information about any directory trees. For example:
ncdu /etc/
ncdu /tmp/
ncdu /nfs
ncdu $HOME

Options

We can enable extended information mode by passing the -e:
ncdu -e
When ou want to scan a full filesystem, your root filesystem, for example, then you’ll want to pass the -x:
sudo ncdu -x /
On large Unix and Linux file servers, scanning a whole directory may take a while. So what you can do is review a directory and export the results for later viewing:
sudo ncdu -1xo- / | gzip >my_root_export.gz
Later after some time, we can use zcommands to read gzip compressed text files on a fly and pipe it out to the ncdu as follows:
ls -l my_root_export.gz
zcat my_root_export.gz | ncdu -f-

The -f option load the given file, which has earlier been created with the -o option. If FILE is equivalent to -, the file is read from standard input (pipe).
It is also possible to scan a system remotely using the ssh command. Then browse through the files locally:
ssh -C user@system ncdu -o- / | ncdu -f-
ssh -C vivek@192.168.2.17 ncdu -o- / | ncdu -f-

Turn on color option:
ncdu --color dark
ncdu --color dark -x /

We can exclude files that match PATTERN:
ncdu --exclude '*.c'
ncdu -x --exclude '/dir1' --exclude '/dir2' /

Follow symlinks and count the size of the file they point to:
ncdu -L
ncdu -L dir1

Keyboard shortcuts
Always press ? to get help about keys
Key Description
upk Move cursor up
downj Move cursor down
right/enter Open selected directory
left<h Open parent directory
n Sort by name (ascending/descending)
s Sort by size (ascending/descending)
C Sort by items (ascending/descending
M Sort by mtime (-e flag)
d Delete selected file or directory
t Toggle dirs before files when sorting
g Show percentage and/or graph
a Toggle between apparent size and disk usage
c Toggle display of child item counts
m Toggle display of latest mtime (-e flag)
e Show/hide hidden or excluded files
i Show information about selected item
r Recalculate the current directory
b Spawn shell in current directory
q Quit ncdu
[mai mult...]

How to use the mount command in UNIX

The mount command tells the UNIX operating system that a file system is ready to use i.e. mount a file system at a particular point in the system’s file system hierarchy.

The syntax is as follows:

mount /dev/XYZN /mount/point
WARNING! The mount commands require root user privilege or the corresponding fine-grained privilege, unless the file system is defined as “user mountable” in the /etc/fstab file.
Examples

Mount /dev/sda5 (Linux partition) in /data directory:

mkdir /data
mount /dev/sda5 /data
df -H
ls /data
cd /data

Mount /dev/aacd0s1g (FreeBSD UNIX partition) in /salesdata directory:

mkdir /salesdata
df -H
mount /dev/aacd0s1g /salesdata
ls /salesdata
cd /salesdata

Mount /dev/dsk/c1t4d0s0 under Solaris UNIX at /data2, enter:

mkdir /data2
mount /dev/dsk/c1t4d0s0 /data2

To remove mount point run:

umount /salesdata

To mount all file systems listed in /etc/fstab, enter:
mount -a
[mai mult...]

How To Linux List Disk Partitions Command

How do I list all hard disk partitions under a Linux operating systems using the CLI?

Usually, your hard disk drive divided into one or more logical disks called partitions. This division is described in the partition table found in sector 0 of the hard disk. The device is usually /dev/sda, /dev/sdb or so on. A device name refers to the entire disk, and the device name will be as follows:

  • /dev/hd* – IDE disks. /dev/hda will be first IDE hard disk, /dev/hdb will be second IDE hard disk, and so on.
  • /dev/sd* – SCSI or SATA disks including SSDs. /dev/sda will be first SATA/SCSI hard disk, /dev/sdb will be second SATA/SCSI hard disk, and so on.
  • /dev/nvme* – NVM Express (NVMe) pci SSD. /dev/nvme0n1 will be first NVMe SSD, /dev/nvme1n1 will be second NVMe SSD, and so on.

WARNING! These examples may crash your computer if NOT executed with proper care. BE EXTREMELY CAREFUL WITH THE FOLLOWING COMMANDS. ONE TYPING MISTAKE AND ALL YOUR DATA IS LOST.

lsblk Command to list block device on Linux

To list all block devices, run:
# lsblk
# lsblk /dev/DEVICE
# lsblk /dev/sda
# lsblk -l
# lsblk -d | grep disk

Linux list block devices

We can also fine-tune information displayed by lsblk as follows to list only Linux partitions and other data:
# lsblk -o NAME,FSTYPE,SIZE,MOUNTPOINT

Pass the following -f and -m to see detailed info:
# lsblk -f -m
# lsblk -f -m | grep ext4

Understanding lsblk option that displays block devices and partitions
  • -m : Show info about Linux permissions
  • -f : List info about Linux filesystems
  • -l : Force list format output option
  • -d : Avoid printing holders. In other words just see block device/disk names
  • -o NAME,FSTYPE,SIZE,MOUNTPOINT : Only display selected columns as per Table 1.
Table 1
Column Descripton
NAME device name
KNAME internal kernel device name
PATH path to the device node
MAJ:MIN major:minor device number
FSAVAIL filesystem size available
FSSIZE filesystem size
FSTYPE filesystem type
FSUSED filesystem size used
FSUSE% filesystem use percentage
MOUNTPOINT where the device is mounted
LABEL filesystem LABEL
UUID filesystem UUID
PTUUID partition table identifier (usually UUID)
PTTYPE partition table type
PARTTYPE partition type UUID
PARTLABEL partition LABEL
PARTUUID partition UUID
PARTFLAGS partition flags
RA read-ahead of the device
RO read-only device
RM removable device
HOTPLUG removable or hotplug device (usb, pcmcia, …)
MODEL device identifier
SERIAL disk serial number
SIZE size of the device
STATE state of the device
OWNER user name
GROUP group name
MODE device node permissions
ALIGNMENT alignment offset
MIN-IO minimum I/O size
OPT-IO optimal I/O size
PHY-SEC physical sector size
LOG-SEC logical sector size
ROTA rotational device
SCHED I/O scheduler name
RQ-SIZE request queue size
TYPE device type
DISC-ALN discard alignment offset
DISC-GRAN discard granularity
DISC-MAX discard max bytes
DISC-ZERO discard zeroes data
WSAME write same max bytes
WWN unique storage identifier
RAND adds randomness
PKNAME internal parent kernel device name
HCTL Host:Channel:Target:Lun for SCSI
TRAN device transport type
SUBSYSTEMS de-duplicated chain of subsystems
REV device revision
VENDOR device vendor
ZONED zone model
How to locate/print block device attributes using blkid

Apart from physical block storage and logical partitions, your Linux box may have software RAID and encrypted hard disks too. We can determine the type of filesystem that a block device holds and also the attributes:
# blkid

List partitions ynder Linux using the fdisk command

Open a terminal window (select Applications > Accessories > Terminal). Switch to the root user by typing the su - and entering the root password, when prompted by the su command. Or use the sudo command:
$ su -
# fdisk -l

OR
$ sudo fdisk -l

You can specify device name as follows (in this example list partitions for /dev/sda):
# fdisk -l

Display disk partitions using sfdisk command in Linux

The sfdisk command act as a partition table manipulator for Linux. You can use this tool to list partitions too:
# sfdisk -l /dev/sda
# sfdisk -lu /dev/sda
# sfdisk -ls /dev/sda

Linux partitions info:

71669760

Disk /dev/sda: 8922 cylinders, 255 heads, 63 sectors/track
Units = cylinders of 8225280 bytes, blocks of 1024 bytes, counting from 0

   Device Boot Start     End   #cyls    #blocks   Id  System
/dev/sda1   *      0+    104-    105-    838656   83  Linux
/dev/sda2        104+    235-    131-   1048576   82  Linux swap / Solaris
/dev/sda3        235+   8922-   8688-  69781504   83  Linux
/dev/sda4          0       -       0          0    0  Empty

Where,

  1. -l : List the partitions of a device.
  2. -s : List the size of a partition.
  3. -u or -uS or -uB or -uC or -uM : Accept or report in units of sectors (blocks, cylinders, megabytes, respecpively). The default is cylinders, at least when the geometry is known.
How Do I List All Partitions Layout On All Block Devices?

Pass the -l OR –list option to the parted command to lists partition layout on all block devices:
# parted -l

Using hardware detction tools to print disk paritions on Linux

You can install and use the following tools. We can use the hwinfo command to probe for hardware as follows:
hwinfo | more
hwinfo --block | more
hwinfo --block --short
inxi -P
inxi -p | more

[mai mult...]