How to use Linux ip addr command

Add an IP address to an Interface

For example:  add the IP address “192.168. 7.22” to the ‘wlp6s0’ interface. To add this Ip address, execute the command as follows: sudo ip addr add 192.168.

As a Linux user, you may have used the ip addr command at some point. But do you know what this command does and how it can be useful?

ip addr command is used to check the IP address of a network interface

The ip addr command is a basic networking utility used to view, add, and delete IP addresses on network interfaces. By default, the ip addr command displays information about all network interfaces on a Linux system. This includes information such as the name of each interface, its IP addresses, the netmask, broadcast address, and the status of the interface (up or down).

With this command, I can easily view information about my system’s current networking configuration and make adjustments as needed. This makes ip addr an invaluable tool for efficiently resolving any network-related issues.

Here’s an example of the ip addr command and its output:

$ ip addr
1: lo: <LOOPBACK,UP,LOWER_UP> mtu 65536 qdisc noqueue state UNKNOWN group default qlen 1000
link/loopback 00:00:00:00:00:00 brd 00:00:00:00:00:00
inet 127.0.0.1/8 scope host lo
valid_lft forever preferred_lft forever
2: eth0: <BROADCAST,MULTICAST,UP,LOWER_UP> mtu 1500 qdisc pfifo_fast state UP group default qlen 1000
link/ether fa:16:3e:18:3a:76 brd ff:ff:ff:ff:ff:ff
inet 10.254.222.37/23 brd 10.254.223.255 scope global dynamic eth0
valid_lft 74268sec preferred_lft 74268sec

This output shows information about two network interfaces on the system: lo (the loopback interface) and eth0 (a network interface card).

For each interface, the output shows:

  • The name of the interface (e.g. lo, eth0)
  • The status of the interface (e.g. UP)
  • The MAC address (e.g. 00:11:22:33:44:55)
  • The IP addresses assigned to the interface (e.g. 127.0.0.1, 192.168.0.100)
  • The netmask (e.g. /8, /24)
  • The broadcast address (e.g. brd 192.168.0.255)

This information can be useful when troubleshooting network connectivity issues, or when configuring network interfaces on a Linux system.

If you want to view information about a specific interface, you can specify the interface name as an argument to the ip addr command. For example, to view information about the eth0 interface, you can use the following command:

ip addr show eth0

This will display information about the eth0 interface, including its IP addresses, netmask, broadcast address, and status. The ip addr add command is used to assign an IP address to a network interface and make it available on the network.

To use this command, you must first specify the IP address that you want to assign, followed by the name of the interface you are working with. For example, to assign the IP address 192.168.1.20, you would type: ip addr add 192.168.1.20/32 dev eth0.

If you need to delete an IP address from a network interface, you can use ip addr del command. This command can be useful for removing old or unused IP addresses and for reorganizing your network configuration.

To use this command, you must first specify the IP address that you want to delete, followed by the name of the interface you are working with. For example, to delete the IP address 192.168.1.20, you would type: ip addr del 192.168.1.20 dev eth0.

ip addr command displays information about all the network interfaces on a Linux system. This includes the IP address, netmask, broadcast address, and more. The ip addr command is useful for troubleshooting networking issues.

[mai mult...]
Check HDD/SSD failures with chkdsk

Check HDD/SSD failures with chkdsk
  1. Boot into your Windows.
  2. Click Start.
  3. Go to Computer.
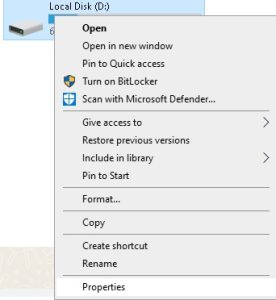
  4. Right-click on the main drive you want to check.
  5. Click Properties.
  6. At the Tools tab, click Get started at the Error-checking section.
  7. Check the Automatically fix file system errors checkbox.
  8. Click Start.

Example:

[mai mult...]

How to find mac address In Linux

How to find mac address In Linux

Here are some methods to get the MAC address. These commands are safe to run without changing anything. The following commands can get you the MAC address of your network interface in Linux.

  • ifconfig -a
  • ifconfig eth0
  • ip link show
  • ip -o link show eth0
  • ip -o link show |cut -d ‘ ‘ -f 2,20
  • cat /sys/class/net/*/address
Procedures to find MAC address in Linux
  • Open the terminal application.
  • Type ifconfig -a or ip link show or cat /sys/class/net/*/address command
  • Press Enter to run the command.
  • The output will display the MAC address for all the network interfaces.
On a Linux machine
  1. Open a terminal window.
  2. Type ifconfig at the command prompt. Your MAC address will be displayed beside the label HWaddr.
MacOS/Linux
  1. Open a Terminal app.
  2. Type /sbin/ifconfig this will list your IP address as well your MAC address.
  3. You can use cmd+a to select all, cmd+c to copy and it can be pasted to any text field.
[mai mult...]

How to check MTU size in Linux

In networking, maximum transmission unit (MTU) is a measurement representing the largest data packet that a network-connected device will accept. Imagine it as being like a height limit for freeway underpasses or tunnels: Cars and trucks that exceed the height limit cannot fit through, just as packets that exceed the MTU of a network cannot pass through that network.

However, unlike cars and trucks, data packets that exceed MTU are broken up into smaller pieces so that they can fit through. This process is called fragmentation. Fragmented packets are reassembled once they reach their destination. MTU is measured in bytes — a “byte” is equal to 8 bits of information, meaning 8 ones and zeroes. 1,500 bytes is the maximum MTU size.

It is important to check MTU size because the wrong setting can lead to poor network performance. A too-large MTU can cause fragmentation, which can lead to lower throughput and higher latency. A too-small MTU can also cause problems, such as dropped packets and retransmissions.

The best practice for MTU size in Linux is to set the MTU size to the same size as the largest packet size that your network can handle. This will help to ensure that packets are not dropped due to being too large.

check MTU size with ifconfig Command in Linux

The easiest way to check MTU size in Linux is using the ifconfig command. Open the terminal and run ifconfig interface name |grep mtu. This command will list the configuration of a network interface including MTU size.

Replace [interface] with the name of your network interface. For example, if you want to view the MTU size of the eth0 interface, you would use the following command: ifconfig eth0 | grep mtu

To change the MTU size of a network interface, use the following command: ifconfig [interface] mtu [size]

Replace [interface] with the name of your network interface and [size] with the desired MTU size. For example, to change the MTU size of the eth0 interface to 1400 bytes, you would use the following command: ifconfig eth0 mtu 1400

check MTU size with ip Command in Linux

The ip command can be used to show or set various network interface parameters. To view the MTU size of a network interface, use the following command: ip link show dev [interface]

Replace [interface] with the name of your network interface. For example, if you want to view the MTU size of the eth0 interface, you would use the following command: ip link show dev eth0

The output of this command will look something like this:
eth0: mtu 1500 qdisc pfifo_fast state UP group default qlen 1000
link/ether 00:11:22:33:44:55 brd ff:ff:ff:ff:ff:ff

As you can see, the MTU size is 1500 bytes for this interface.To change the MTU size of a network interface, use the following command: ip link set dev [interface] mtu [size]

For example, to change the MTU size of the eth0 interface to 1400 bytes, you would use the following command: ip link set dev eth0 mtu 1400.

[mai mult...]

How to Reset CMOS/BIOS Settings on Windows

Reset internally from your device’s BIOS or UEFI menu

By far the most simple and non-technical method, resetting internally from your PC’s BIOS menu during bootup is also the safest and most consistent with the manufacturer’s intentions. It should be your preferred method unless you encounter difficulties starting up your computer or accessing the BIOS menu conventionally.
Pre-Windows 10 builds should look for instructions during bootup, with F2 providing access on most machines. Windows 10 users have several options, though the first is the easiest:
Hold down the shift key while you restart your computer
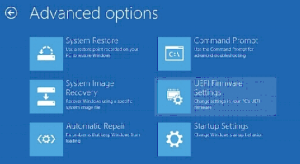
You should see a blue screen with advanced troubleshooting options

  • Navigate to the Settings tab under your Start menu by clicking the gear icon
  • Click the Update & Security option and select Recovery from the left sidebar
  • You should see a Restart now option below the Advanced Setup heading, click this whenever you’re ready
  • When your computer restarts, it should load a blue screen with advanced troubleshooting options
  • Select Troubleshoot and then click Advanced Options from the resulting options
  • UEFI Firmware Settings and click Restart to continue
  • Your computer should shut off and then load a setup menu. This interface can vary in exact appearance and wording, but there should be several areas to find the reset default button.
  • Because the interface can vary, you may want to check multiple tabs for options, but be on the lookout for Configuration, Security, or Exit. Watch for phrases like “Load Setup Defaults” or “Load Default Options,” which should bring up a Yes or No dialog box. Select yes and your default settings should be restored. From here, simply exit and startup as usual.

Reset by removing and replacing the CMOS battery

The first of our more technical solutions involve removing and replacing the CMOS battery. Not every type of motherboard includes a CMOS battery, which provides a power supply so that motherboards can save BIOS settings. Bear in mind that when you remove and replace the CMOS battery, your BIOS will reset.

Here’s how to do it:

  • Turn off your PC’s power supply and remove all connections
  • Make sure you’re properly grounded to prevent damage to your computer
  • Acces your computer’s interior, find the motherboard, and identify the CMOS battery. If you aren’t sure what this component looks like with your device, do some research into your specific model and specifications
  • Remove the battery, wait several minutes, and reattach the battery to your motherboard. You may want to replace it with a new battery, rather than simply reinserting the old one. To avoid damage, remember to take extreme caution removing the battery, particularly if it doesn’t detach easily.
    Shutdown your computer
  • Remove the power cord to make sure that your computer receives no power.
  • Make sure you’re grounded. Static discharges can damage your computer.
  • Remove it. If the battery doesn’t move easily, stop following this method to reset the BIOS.
  • Wait 5 to 10 minutes
  • Put the battery back in
  • Power on your computer
Clear and reset BIOS settings by clearing your motherboard jumper

Our final method for resetting your BIOS involves clearing your motherboard jumper, but it’s almost always limited in application to desktop PCs. It can also involve making fine adjustments to your motherboard, so you should take precautions before you start. You’ll definitely need to do some research beforehand as well.
First, you’ll need to check your owner’s manual or make sure you can successfully identify your motherboard jumper. They often look different, so familiarity with one or another type is not always a guarantee. Videos and guides are common, and manufacturers usually outline these procedures fairly clearly.

Start by disconnecting your computer’s power supply, unplugging all connections, and grounding everything
From here, follow the jumper-clearing instructions in the manual or online guide for your specific motherboard
You can often find them near your CMOS battery or by identifying a small plastic pin covering with associated language. But to avoid hiccups or settings problems, it’s crucial that you work from instructions tailored to your device.
Your computer’s motherboard has a special jumper that can clear the BIOS saved settings and revert them to their original values.

By clearing the jumper, you can also reset the password for the BIOS menu. To do so, follow these steps:

Shutdown your computer
Flip the power switch so that the computer receives no power.
Make sure you’re grounded. Static discharges can damage your computer.
On the motherboard, find a jumper that’s named like any of the following. (This jumper is usually placed near the CMOS battery.)
CLEAR CMOS
CLEAR
CLR CMOS
CLR PWD
Set the jumper to the Clear/CLR position
Power on and start your computer
Once your PC has booted, turn it back off, move the CLR jumper back to its original position. Otherwise, each time you reboot, your settings (and clock) will automatically reset!

[mai mult...]

How to reset your router to restore factory default settings

It’s important to note that when you reset your home router you will lose all of your current network settings, like the name of the Wi-Fi network, its password, etc

How to Reset a Router

  • Keep your router plugged in.
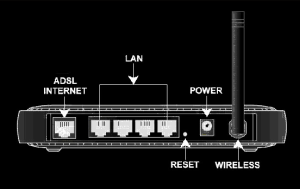
  • Find your router’s reset button. This will be on the back or the bottom of your router.
  • Use a paperclip to hold down the reset button for 10-15 seconds.
  • Release the button.
  • Wait for the router to power back on.
  • On many routers, if you hold in the button for 10 seconds, it factory resets your router.

Should i reset my router to factory settings?
Routers, like computers, work best with regular hard resets. Resetting a router can also clear the memory, which is critical for those with multiple devices or an older router. Resetting your router is an easy way to prevent malware attempts – the FBI even recommends router resets for that reason.

How often should you reset your router?
Know when to reboot your router so you can maintain a healthy, speedy internet connection. A good rule of thumb is to reboot your router or wireless gateway once a month to clear out its memory and refresh your wired and wireless connections or just when you have issues with it.

[mai mult...]

How to protect your home network security

How to Secure Your Wireless Network
The good news is that it is not very hard to make your wireless network secure, which will both prevent others from stealing your internet and will also prevent hackers from taking control of your computers through your own wireless network. Here a few simple things that you should to secure your wireless network:

Step 1. Open your router settings page
First, you need to know how to access your wireless router’s settings. Usually you can do this by typing in “192.168.1.1” into your web browser, and then enter the correct user name and password for the router. This is different for each router, so first check your router’s user manual.

You can also use Google to find the manuals for most routers online in case you lost the printed manual that came with your router purchase. For your reference, here are direct links to the manufacturer’s site of some popular router brands – Linksys, Cisco, Netgear, Apple AirPort, SMC, D-Link, Buffalo, TP-LINK, 3Com, Belkin.

Step 2. Create a unique password on your router
Once you have logged into your router, the first thing you should do to secure your network is to change the default password* of the router to something more secure. This will prevent others from accessing the router and you can easily maintain the security settings that you want. You can change the password from the Administration settings on your router’s settings page. The default values are generally admin / password.

PS:What do the bad guys use – This is a public database of default usernames and passwords of wireless routers, modems, switches and other networking equipment. For instance, anyone can easily make out from the database that the factory-default settings for Linksys equipment can be accessed by using admin for both username and password fields.

Step 3. Change your Network’s SSID name
The SSID (or Wireless Network Name) of your Wireless Router is usually pre-defined as “default” or is set as the brand name of the router (e.g., linksys). Although this will not make your network inherently* more secure, changing the SSID name of your network is a good idea as it will make it more obvious for others to know which network they are connecting to.

This setting is usually under the basic wireless settings in your router’s settings page. Once this is set, you will always be sure that you are connecting to the correct Wireless network even if there are multiple wireless networks in your area. Don’t use your name, home address or other personal information in the SSID name.

Also see: Change Network Name to Prevent Wi-Fi Theft

PS:What do the bad guys use – Wi-Fi scanning tools like inSSIDer (Windows) and Kismet (Mac, Linux) are free and they will allow anyone to find all the available Wireless Networks in an area even if the routers are not broadcasting their SSID name.

Step 4. Enable Network Encryption
In order to prevent other computers in the area from using your internet connection, you need to encrypt your wireless signals.

There are several encryption methods for wireless settings, including WEP, WPA (WPA-Personal), and WPA2 (Wi-Fi Protected Access version 2). WEP is basic encryption and therefore least secure (i.e., it can be easily cracked*, but is compatible with a wide range of devices including older hardware, whereas WPA2 is the most secure but is only compatible with hardware manufactured since 2006.

To enable encryption on your Wireless network, open the wireless security settings on your router’s configuration page. This will usually let you select which security method you wish to choose; if you have older devices, choose WEP, otherwise go with WPA2. Enter a passphrase to access the network; make sure to set this to something that would be difficult for others to guess, and consider using a combination of letters, numbers, and special characters in the passphrase.

PS:What do the bad guys use – AirCrack and coWPAtty are some free tools that allow even non-hackers to crack the WEP / WPA (PSK) keys using dictionary or brute force techniques. A video on YouTube suggests that AirCrack may be easily used to break WiFi encryption using a jail-broken iPhone or an iPod Touch.

Step 5. Filter MAC addresses
Whether you have a laptop or a Wi-Fi enabled mobile phone, all your wireless devices have a unique MAC address (this has nothing to do with an Apple Mac) just like every computer connected to the Internet has a unique IP address. For an added layer of protection, you can add the MAC addresses of all your devices to your wireless router’s settings so that only the specified devices can connect to your Wi-Fi network.

MAC addresses are hard-coded into your networking equipment, so one address will only let that one device on the network. It is, unfortunately, possible to spoof a MAC address*, but an attacker must first know one of the MAC addresses of the computers that are connected to your Wireless network before he can attempt spoofing.

To enable MAC address filtering, first make a list of all your hardware devices that you want to connect to your wireless network**. Find their MAC addresses, and then add them to the MAC address filtering in your router’s administrative settings. You can find the MAC address for your computers by opening Command Prompt and typing in “ipconfig /all”, which will show your MAC address beside the name “Physical Address”. You can find the MAC addresses of Wireless mobile phones and other portable devices under their network settings, though this will vary for each device.

PS:What do the bad guys use – Someone can change the MAC address of his or her own computer and can easily connect to your network since your network allows connection from devices that have that particular MAC address. Anyone can determine the MAC address of your device wireless using a sniffing tool like Nmap and he can then change the MAC address of his own computer using another free tool like MAC Shift.

Step 6. Reduce the Range of the Wireless Signal
If your wireless router has a high range but you are staying in a small studio apartment, you can consider decreasing the signal range by either changing the mode of your router to 802.11g (instead of 802.11n or 802.11b) or use a different wireless channel.

You can also try placing the router under the bed, inside a shoe box or wrap a foil around the router antennas so that you can somewhat restrict the direction of signals.

Apply the Anti-Wi-Fi Paint – Researchers have developed a special Wi-Fi blocking paint that can help you stop neighbors from accessing your home network without you having to set up encryption at the router level. The paint contains chemicals that blocks radio signals by absorbing them. “By coating an entire room, Wi-Fi signals can’t get in and, crucially, can’t get out.”

Step 7. Upgrade your Router’s firmware
You should check the manufacturer’s site occasionally to make sure that your router is running the latest firmware. You can find the existing firmware version of your router using from the router’s dashboard at 192.168.*.

Connect to your Secure Wireless Network
When choosing from among WEP, WPA, WPA2 and WPA3 wireless security protocols, experts agree WPA3 is best for Wi-Fi security. As the most up-to-date wireless encryption protocol, WPA3 is the most secure choice.

Once you have enabled the various security settings in your wireless router, you need to add the new settings to your computers and other wireless devices so that they all can connect to the Wi-Fi network. You can select to have your computer automatically connect to this network, so you won’t have to enter the SSID, passphrase and other information every time you connect to the Internet.

Your wireless network will now be a lot more secure and intruders may have a tough time intercepting your Wi-Fi signals.

Who is Connected to your Wireless Network
If you are worried that an outsider may be connecting to the Internet using your Wireless network, try AirSnare – it’s a free utility that will look for unexpected MAC addresses on your Wireless network as well as to DHCP requests. Another option is that you open your router’s administration page (using the 192.168.* address) and look for the DHCP Clients Table (it’s under Status > Local Network on Linksys routers). Here you will see a list of all computers and wireless devices that are connected to your home network.

*It is also a good idea to turn off the router completely when you are not planning to use the computer for a longer period (like when you are out shopping). You save on electricity and the door remains 100% shut for wireless piggybackers.

**If you ever want to let a new device connect to your network, you will have to find its MAC address and add it to your router. If you simple want to let a friend connect to your wireless network one time, you can remove his MAC address from the router settings when he or she leaves your place.

[mai mult...]

How to pair a bluetooth device in Windows

Turn on Bluetooth
After you’ve checked that your Windows 10 PC supports Bluetooth, you’ll need to turn it on.In Settings: Select Start > Settings > Devices > Bluetooth & other devices, and turn on Bluetooth.

  • Turn on Bluetooth in Settings
  • In action center: Action center can be found next to time and date on your taskbar. On the taskbar, select action center ( or ), then select Bluetooth to turn it on. If it’s turned off, it might appear as Not connected.
  • If you don’t see Bluetooth in your action center, here’s how you can change it:
  • Expand quick actions. On the taskbar, select action center ( or ) > Expand. Bluetooth should appear here. It will appear as Bluetooth or Not connected.
  • Add Bluetooth to action center. Select Start > Settings > System > Notifications & actions > Quick actions. Go to Add or remove quick actions and turn on Bluetooth.

Note: For more info about how to change the apps and settings that appear in action center, see Change notification and action settings in Windows 10.

To pair a Bluetooth headset, speaker, or other audio device

  • Turn on your Bluetooth audio device and make it discoverable. The way you make it discoverable depends on the device. Check the device or visit the manufacturer’s website to learn how.
  • On your PC, select Start > Settings > Devices > Bluetooth & other devices > Add Bluetooth or other device > Bluetooth. Choose the device and follow additional instructions if they appear, then select Done.
  • Your Bluetooth device and PC will usually automatically connect anytime the two devices are in range of each other with Bluetooth turned on.

To pair a Bluetooth keyboard, mouse, or other device

  • Turn on your Bluetooth keyboard, mouse, or other device and make it discoverable. The way you make it discoverable depends on the device. Check the device or visit the manufactur’s website to learn how.
  • On your PC, select Start > Settings > Devices > Bluetooth & other devices > Add Bluetooth or other device > Bluetooth. Choose the device and follow additional instructions if they appear, then select Done.

To pair a Bluetooth printer or scanner
Turn on your Bluetooth printer or scanner and make it discoverable. The way you make it discoverable depends on the device. Check the device or visit the manufacturer’s website to learn how.

  • Select Start > Settings > Devices > Printers & scanners > Add a printer or scanner. Wait for it to find nearby printers, then choose the one you want to use and select Add device.
  • If you’re having installation issues with your printer or scanner, see either Fix printer problems or Install and use a scanner in Windows 10.

To pair a Bluetooth device using Swift Pair
Swift Pair in Windows 10 lets you quickly pair a supported Bluetooth device with your PC. If the Bluetooth device supports Swift Pair, you’ll receive a notification when it’s nearby and you put it into pairing mode to make it discoverable.

  • Turn on a Bluetooth device that supports Swift Pair and make it discoverable. The way you make it discoverable depends on the device. Check the device or visit the manufacturer’s website to learn more.
  • If this is your first time using Swift Pair, select Yes when asked if you want to get notifications and use Swift Pair.
  • When a notification appears that a new Bluetooth device was found, select Connect.
  • After it’s connected, select Close.
[mai mult...]

How to make your windows to chose GPU for performance in games and apps

Windows 10 now lets you select which GPU a game or other application uses right from the Settings app. Previously, you had to use manufacturer-specific tools like the NVIDIA Control Panel or AMD Catalyst Control Center to control this. 

 This feature was added in Windows 10’s April 2018 Update. If you don’t see the Graphics Settings option, you haven’t installed the update yet. 

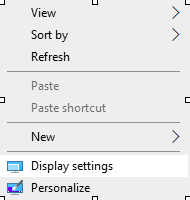
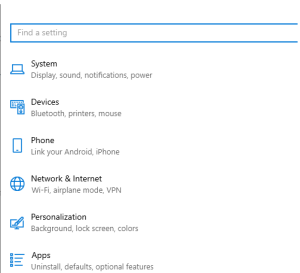
You can reach display settings with right click on desktop ? and click on it. 


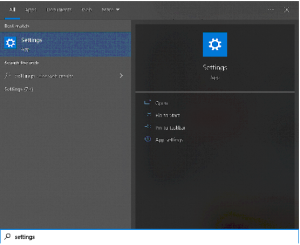
You can also type in windows search bar: settings 


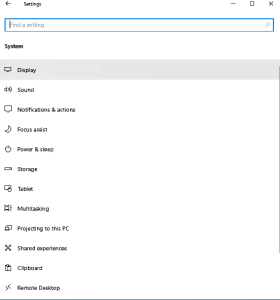
Then you go system 


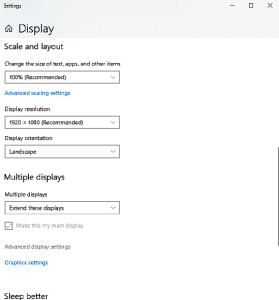
After you go Display 


And Graphics settings 


Browse and go to the installer folder and select the .exe  


Chose High performance GPU and save.

[mai mult...]

How do you play the Chrome dinosaur game?

The simplest way to play the game online is by visiting this URL: chrome://dino/. Just access that link and voilà, there’s your little dino and “no internet” message. Once you see that message, just hit the spacebar and start jumping over cactus.

  • Open Google Chrome browser on your PC.
  • Click on the address bar.
  • Type chrome://dino/ and press Enter.
  • You’ll be able to see the game. Press the Spacebar to begin the game.

[mai mult...]