How to use a PDF

PDF, or “portable document format,” is a common file type that is used for all kinds of important documents. From tax forms to job applications, chances are you’ll need to edit PDF files or fill in an existing one. Learn how to open, edit, and even add your signature to a PDF file that someone else has created in our step-by-step guide.

Can you edit a PDF file?

In most cases, you can make changes to an existing PDF file that you download from the internet or receive as an email attachment. Each PDF will have its own security permissions, which the owner may have locked so that you cannot make any changes. This is most common for copyrighted forms and some educational materials where the document is designed to be read-only.
For the most common forms we use in daily life, however, there are fields specifically placed on the PDF document that we are intended to fill in. A tax withholding form from your employer, for example, may be sent electronically and have places to type in your name, address, and other pertinent tax info. Even PDF documents that don’t have specific text fields can usually be typed on, provided you have the correct software to open, edit, and save the file again.

How to type on a PDF

Before you even begin to modify PDF files, you need to have the right software to view and edit them. If you own Windows, you may already have the Microsoft Edge browser installed. This browser not only lets you view PDFs, but it lets you type and draw on PDF files without strict restrictions.
  1. Use File Explorer to find the PDF document you wish to open. Right-click the document and select Open with, then Microsoft Edge
  2. The file will open in a new Microsoft Edge window or a new tab if the program is already running
  3. From here, it’s easy to use your mouse to point and click on the fields in which you wish to type
You can also add handwritten or illustrated notes using the Add Notes function at the top of the page. Select the color you want to draw with, or even switch to touch writing to have more control from a tablet or touch screen setting. This is one of the best ways to put your digital signature on a document as well.
When you finish editing the document, you can choose to save it as a new file and even print it out. The new data you typed or drew on the document should remain.
Using additional tools to type on PDF files
Sometimes you may want to type on a PDF in areas where there aren’t existing text fields. This is where third-party software comes in handy, such as the basic Adobe Acrobat software. This free PDF reader should support most PDF files you receive, and you can use the Typewriter tools to insert text in the appropriate fields using these steps:
  1. Use the Adobe Reader software to open the PDF file of your choosing
  2. Select the View menu from the top
  3. Choose Toolbars and More Tools
  4. At the bottom of this list, choose Typewriter Toolbar, and click OK (This is only available if the creator of the PDF allows it in the permissions)
  5. Type in the data you want, and hit Enter if you want to add a new line of text to a field
  6. Edit any text you want using the Select tool, and then adjust the text color, text size, line spacing, and more
  7. When you are done, save the doc as a new file.
For those who have a more full-featured version of the Adobe products, you will find additional ways to edit and change Adobe files. This includes the ability to type and sign from your mobile device, access PDFs from Google Drive or Microsoft OneDrive, and turn documents with other file types into PDFs before you modify them.
  • Adding a legally-binding signature to a PDF
With the draw function in many PDF readers and editing tools, it’s simple to draw your name as a signature on any document. Because it’s so easy to edit and erase items on a PDF, these signatures may not always be seen as legally binding. To ensure that your PDF signature is treated as a contract, use one of the more full-featured PDF software products on the market.
These give you the chance to digitally sign your documents, and to digitally verify and securely send them to only those people you trust. Adobe and other third-party companies even have extra tools that can track when documents have been signed. They may also let you put a watermark on the PDF with “approved” or “draft” to help you know which versions are the official, final copies.
  • The legality of modifying PDF
Remember that many tools make it easy to sign, add text, draw on, or even remove part of a PDF file easily so that you can save or send it to someone else. Just because you can do it doesn’t mean you should do this in every situation. Make sure you have the permission of the document creator to make changes to a PDF. Also, always follow copyright law by never removing the copyright or trademark notations listed on the bottom.
If a document has a watermark – typically text or an illustration that shows up on the background when you print, then making any changes may be against the terms of use for that document. If in doubt, ask the person who made, sold, or sent the PDF. If used wisely, PDF is a wonderful file type that can make your home office or school more organized by cutting out the needless printing of materials before typing or signing.
[mai mult...]

How to create and print labels in macOS

Set up and print a page of the same label
  1. Go to Mailings > Labels.
  2. Select Options.
  3. Choose Printer typeLabel products, and Product number.If you don’t see your product number, select New Label and configure a custom label.
  4. Select OK.
  5. Type an address or other information in the Delivery Address box.To use an address from your contacts list select Insert Address Picture of Insert Address button.
  6. To change the formatting, select the text and then select Font to make changes.
  7. Select Full page of the same label.
  8. Select OK.

  9. Select Print, or New Document to edit, save and print later.

[mai mult...]

How to manage your full autofill in Chrome

Web browsers have changed significantly over the years, with a constant accumulation of new features and functionality as each new generation arrives. At the same time, many of us spend an increasing amount of our personal and professional lives online, which means automation and adaptive features are always in demand.
What are the drawbacks to autofill?
A tool like autofill is generally regarded as an incredibly useful addition to the standard browser suite because it helps save time and trouble when you don’t want to type the same thing over and over. But there are times when autofill can become a bit of a headache, popping up when you don’t need it or getting in the way of what you may actually be trying to do. The busier you are, the more likely it is that you’ve run into these types of problems.
Your risk only goes up when you have to use a different address for certain purchases, accidentally confuse one form with another, or let a coworker or loved one use your computer to do some important online paperwork.
Fortunately, it’s relatively easy to clear autofill in Chrome and manage your settings directly. In this article, we’ll give you two easy methods you can use to quickly delete entries, reset the tool, or turn off autofill completely. Before we do, let’s get started with a brief introduction on the basics of autofill and how it works in Google Chrome.
What is autofill and how does it work?
Autofill remembers and fills in specific information and form fields as part of the web browser on your computer. In a perfect world, autofill should save time in a variety of situations, and in most cases, that’s exactly how it works. Autofill is great when you need to fill out an address for online shopping or filing paperwork. It’s also useful when you’re frequently searching for similar things, and when you want to save non-sensitive login or payment information.
Without systems like autofill and predictive text, your life online can slow down a lot more than you’d expect. Mobile platforms like your smartphone or tablet would also become substantially less usable because they would force you to repeatedly input information into their cramped and somewhat tedious interfaces.
How to manage your full autofill features with Chrome
To make sure your settings aren’t causing you unnecessary trouble, we’ll start by highlighting the two quickest methods for getting rid of unwanted autofill entries. Both methods may appear the same, but they give you two ways to gain access and manage your information.
Use the first method if you only want to delete autofill Chrome entries or some combination of accumulated browser data. This is great for when you want to clear out your browser’s saved autofill entries and then get back to work as fast as possible.
If you have a little extra time or want more control over how you manage your settings, you can also access them using the complete autofill interface under your main Chrome settings. This method allows you to visualize more of your options for both autofill and your browser’s overall data settings.
1. Delete ALL autofill entries directly via Chrome settings in your toolbar
This is your quick method for clearing saved autofill entries in particular or in combination with other browser data. As opposed to your own unique arrangement of bookmarks and app icons, the Chrome browser interface is consistent from user to user.
  1. Open your Chrome browser
  2. Look to the top right corner of your browser and click the three dot symbol just below the close option. If you’re having trouble finding the symbol, it should be located next to your Chrome profile picture and to the far right of the search bar where you can type in search terms and web addresses
  3. Hover over the More tools… option until the dropdown appears
  4. Select Clear browsing data… from the dropdown. You can also skip steps 2 and 3 by using a keyboard shortcut (Control + Shift + Delete) from within your Chrome browser. This should load your Chrome Settings in a new tab, with several Basic options ready for use
  5. Click the Advanced tab from the new window. This will load a more detailed list that includes a comprehensive autofill removal option
  6. Check the box next to Autofill form data. Below this option, you should see a brief summary of what will be deleted. If you don’t want to delete anything else, adjust the selections to your preference
  7. Click the Clear data button near the lower right corner
Once that’s done, your Chrome autofill settings should be cleared. That means your problem is gone, but you may have to re-enter a lot of your routine autofill entries. If you want to avoid that, the next method gives you some extra leeway. Using it, you can get rid of what you don’t need while preserving the parts of your autofill data that you’d like to keep.
2. Access the autofill tab under Chrome settings to delete SOME autofill entries
This method guides you through your standard Chrome settings menu so that you can choose between individually managing your autofill categories or deleting everything at once.
  1. Open your Chrome browser
  2. Look for the three dot symbol to find a complete list of options to navigate. This menu icon is located to the far right of the search bar and just below the browser’s close button
  3. Click the Settings option from the dropdown to open a new window with all of your Google Chrome settings options
  4. Either click the Autofill tab on the left sidebar or navigate to the Autofill heading directly in the main feed. You should see three options
  5. You can individually edit or delete different autofill categories: passwords, payment methods, or addresses and more
  6. If you want to delete everything in one go, scroll past the Autofill section and click on the Advanced tab at the bottom of the page.
  7. Scroll down to Privacy and security, which should be the first new category available under Advanced settings options. You can also select it from the left sidebar
  8. At the bottom of Privacy and security, you should see Clear browser data. This will load the same interface described above
  9. Click the Advanced tab from the new window
  10. Check the box next to Autofill form data
  11. Click the Clear data button near the lower right corner
How you delete all your autofill data is essentially the same, but this method gives you the option to micromanage your autofill setup. It may add a few steps to your routine, but you’ll be less likely to encounter unexpected issues down the line.
How to make specific changes to what Autofill saves
Do you want to turn off autofill altogether? You have that option from the Chrome Settings menu as well. Since our second method provides access to the full suite of settings options, we’ll also discuss each of the three categories that make up the Google Chrome autofill feature. Within each category you’ll find a convenient toggle to turn off autofill for that category. They are as follows:
1. Passwords
To turn this feature off, look for the words “Offer to save passwords” and set the toggle to the off position. Look for “Auto sign-in” to turn off storage of your saved login credentials. To manage saved entries individually, you can find a complete index of saved passwords below your saved password and sign-in options.
2. Payment methods
If you want to turn off this feature, look for the words “Save and fill payment methods” and set the toggle to the off position. Below this, you’ll find a link to your Google account’s saved payment information, which is where you can manage your account, and an index of different payment methods.
3. Addresses and more
This category is a catchall for location autofill entries related to your physical and digital contact information, including your email address, billing addresses, and shipping locations. To turn this off, look for “Save and fill addresses” and set the toggle to the off position. Below this, you’ll find a complete list of address information saved by your browser.
Other data settings to keep in mind
To clear your saved autofill entries en masse, use the “Clear browser data” option. As part of this process, your browser prompt already includes several categories of saved information checked off for deletion. Most of your browser data isn’t worth worrying about, but here’s a quick guide to what you’re deleting if you leave these categories checked when you clear out auto fill entries.
1. Browsing history
This encompasses a basic record of your browsing, but it also includes some additional information beyond a list of websites. It provides a rundown of your saved auto-complete entries, which is the predictive text that helps finish familiar URLs in the Chrome search bar.
If your issue stems from auto-complete issues, the most direct solution is to delete your browsing history through the Clear browsing data procedure.
2. Cookies and other site data
Under this category, your browser accumulates the credentials that allow you to freely navigate your most frequently visited websites. If you include this option when you clear browsing data, you’ll be logged out of most of the services and websites that you have used to date. To avoid that, simply uncheck the corresponding box and move on.
3. Cached images and files
Here you’ll find saved images and site resources that your browser archives to more quickly load websites. You can clear a pretty big chunk of space out if you leave this category checked, but you may notice a slight slowdown the next time you visit one of your favorite sites.
4. Advanced settings
From the Clear browsing data window, you can also switch between Basic and Advanced options. Under the Advanced heading you’ll find a more detailed breakdown of options, including a pre-selected field for download history. In these expanded options you can turn off autofill form data, in addition to passwords and sign-in data, site settings, and hosted app data.
Reasons why autofill may not be working correctly
Some usage situations may present their own unique obstacles, but most problems with autofill are relatively easy to understand. For example, there’s always a risk of confusion or small input mistakes when you let a friend or family member use your computer to fill out a form for online paperwork or to make a purchase. You run the same risk when any user adds a new app to their loadout or a new website to their routine.
To combat these issues, it helps to periodically clear out your autofill log. This guarantees that you won’t stumble over redundant information or accidentally ship a gift to the wrong address. But if you find yourself having constant issues, it can also be helpful to manage your autofill settings directly and to periodically check in on each category in your Chrome settings.
If you need extra support with Chrome
For most users, your routine use of Chrome can lead to occasional autofill-related issues. So if you are experiencing an issue that seems more persistent or especially difficult, it may be something larger than just the stored data and browser settings.
If you think you may be dealing with something different or bigger, don’t hesitate to look for help at the main Google Chrome Help page or through your IT support team (either in your workplace or via your internet service provider).
The most important things to remember about autofill
When you have difficulty getting autofill to work correctly, it’s important to remember that you can easily control this feature in a variety of ways. The choice is yours whether or not to turn off autofill altogether, shuffle things around on a category basis, or even to just clear out your saved entries periodically.
[mai mult...]

How to make computer shut down on a timer

Method 1. Use the Command Prompt
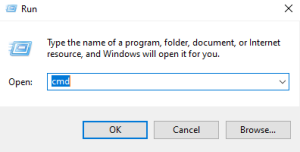
  • Press Windows key + R to open the Run the dialog box
  • Type cmd and hit Enter
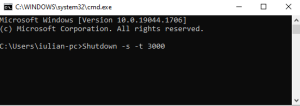
  • Type in the following command, and hit Enter:

Shutdown -s -t 3000

  • -s is giving the command to shut down and -t is the number of seconds, you want it to wait
  • You can change the timing to your own
Method 2. Use the Run box
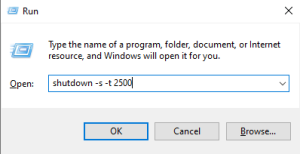
  • Press Windows key + R to open the Run the dialog box
  • Type shutdown -s -t and the number of seconds you need
  • Select OK

Method 3. Use a Desktop Shortcut
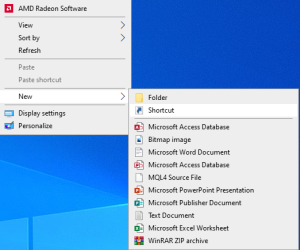
  • Go to your Desktop and right-click anywhere
  • Select New, and then Shortcut

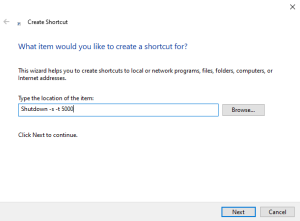
  • Type in the command Shutdown -s -t 5000 and click on Next

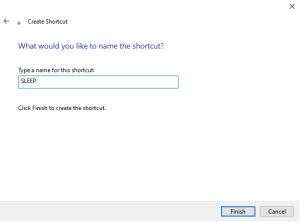
  • Give the shortcut a name and click on Finish
  • A shortcut will be created on your Desktop

Cancel the Sleep Shutdown Command in Windows
  • Go to your Desktop and right-click anywhere
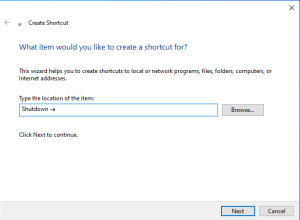
  • Select New, and then Shortcut
  • Type in the following command:

Shutdown -a

[mai mult...]

How to Enter BIOS Setup

What is BIOS?
As your PC’s most important startup program, BIOS, or Basic Input/Output System, is the built-in core processor software responsible for booting up your system. Typically embedded into your computer as a motherboard chip, the BIOS functions as a catalyst for PC functionality action.
Programmed on an erasable, programmable, read-only memory (EPROM) chip, BIOS is stored on this memory chip which retains data when the power source is switched off. When the PC is powered back on, BIOS retrieves that same stored data. The BIOS system is also responsible for managing data flow between your computer’s operating system and any attached devices including a hard drive, keyboard, video adapter, printer, or mouse.
Each time you power your PC on, BIOS runs through a process called Power-On Self Test, or POST, that determines whether your attached devices are operating correctly and are in their proper place. Once all attachments are allocated and given the OK, your computer startup continues as usual and takes you to your load screen in a matter of seconds. If BIOS detects any problems, an error screen will appear or a series of beep codes will sound, effectively indicating to you that something has gone wrong.

1. POST

As we mentioned before, POST is an acronym for the Power-On Self Test that your PC runs through the moment you turn it on. POST tests the hardware of your PC and ensures that there is nothing out of order and no errors present with your operating system. POST goes through everything from your keyboard and disk drive to your RAM speed in a computer and integrated ports. Should everything be in order, POST will continue as usual and allow your PC to boot normally.
If there is a detected error, BIOS will issue an error message that may come in the form of displayed text or a series of error-indicating beeps. These beeps are always signals to certain messages, so if you happen to get this result, you will need to check out what it means for your computer’s hardware [1].

2. CMOS setup

Your PC stores all low-level settings like system time and hardware configuration within its CMOS. This means that every change you make to your BIOS structure is saved on this special memory chip called the Complementary Metal-Oxide Semiconductor, or CMOS. The CMOS setup is responsible for setting your password, time, and date.

3. Bootstrap loader

The program that lives within your computer’s EPROM or ROM, the bootstrap loader is tasked with reading your PC’s hard drive boot sector to move along the complete operating system load. When you restart your PC, the bootstrap loader activates the POST, then loads Windows 10 into memory. Newer PCs have replaced the bootstrap loader with an EFI, or Extensible Firmware Interface.

4. BIOS drivers

BIOS drivers are the many programs stored in your computer’s many memory chips. These low-level drivers are used to boot your system and prompt basic operational controls on your PC.

How to enter BIOS in Windows 10

When you’ve run into an annoying computer bug or need to modify CPU hardware for a newly upgraded processor, you will need access to your computer BIOS. Laptops with Windows 10 and PCs make accessing, checking, and updating your BIOS a breeze by offering two easy methods to achieve the results you’re aiming for. Let’s break down both methods.
Method #1: Use hotkey during boot-up
It may be too quick for you to have ever noticed, but your PC goes through a rapid POST process to get your startup screen loaded up as fast as it can. It is also within this tightly timed window that you can access your BIOS by clicking your PC’s designated hotkey. Unfortunately, different PC brands were all on different pages when designating a definitive BIOS key. HP laptops generally use F10 or the escape key.
DEL and F2 tend to be the most popular hotkeys for PCs, but if you’re unsure of what your brand’s hotkey is, this list of common BIOS keys by brand may help.
  • Acer: F2 or DEL
  • ASUS: F2 for all PCs, F2 or DEL for motherboards
  • Dell: F2 or F12
  • HP: ESC or F10
  • Lenovo: F2 or Fn + F2
  • Lenovo (Desktops): F1
  • Lenovo (ThinkPads): Enter + F1.
  • MSI: DEL for motherboards and PCs
  • Microsoft Surface Tablets: Press and hold volume up button.
  • Origin PC: F2
  • Samsung: F2
  • Sony: F1, F2, or F3
  • Toshiba: F2
Pressing your assigned BIOS hotkey while your computer boots up should retrieve the BIOS setup utility screen you’re looking for. For example, on an HP Pavilion, HP EliteBook, HP Stream, HP OMEN, HP ENVY and more, pressing the F10 key just as your PC status comes up will lead you to the BIOS setup screen. Some manufacturers require repeated hotkey presses, and some require another button to be pressed in addition to the hotkey. To best equip yourself with the most accurate information, check with your PC’s user manual or the manufacturer’s website.
Method #2: Use Windows 10’s start menu
As computers have become more technologically advanced than ever, they boot up in seconds before our eyes. This leaves little room for pressing any hotkeys and can leave those looking to get into their BIOS settings puzzled.For PC users who aren’t able to catch that tiny window to use their hotkey, this method of entering BIOS can be completed through your computer settings.
Step 1. Access your Windows settings
Navigate to your Windows start menu and select “Settings” located on the left panel. You can also access your Windows setting by using Windows shortcut keys Windows + I.
Step 2. Select “Update & security”
Within this window, you may need to scroll down to find the “Update & security” button.
Step 3. Select “Recovery”
Step 4. Click “Restart now”
Under “Advanced startup” you will see a “Restart now” button that allows you to reboot your PC for configuration or restoration.
After your PC boots back up, you will be met with a special menu that gives you the option to “Use a device,” “Continue,” “Turn off your PC,” or “Troubleshoot.”
Step 5. Select “Troubleshoot”
Within this window, select “Advanced options” then select “UEFI Firmware Settings.” This will allow you to enter BIOS on your Windows 10 PC.
Step 6. Confirm your restart
If your PC is running Windows 8.1 or Windows 8, these methods will also work for your older operating system.
How to access Windows 7, Vista, and XP BIOS
The same method of pressing your designated hotkey during boot-up should be able to gain you access into your BIOS. Be sure to press that button as soon as you see your manufacturer’s brand logo.
Older operating systems tend to load more slowly, so your window of time to press your designated hotkey should be wide enough for prompt BIOS access. Follow this three-step method to enter BIOS on Windows 7 or later.
Step 1. Turn off your computer
On older operating systems, you can only access BIOS just before the Microsoft Windows logo appears on your computer screen.
Step 2. Power your PC on
Step 3. Press the BIOS hotkey
The single keystroke or combination of pressed keys will open BIOS on your PC. Oftentimes your computer will indicate on the startup screen which key or keys need to be pressed in order to enter BIOS.
I can’t access BIOS, what do I do?
If you’re still struggling to figure out how to enter BIOS on your Windows 10 desktop computer, you may find yourself in somewhat of a pickle.
Whether your startup is too fast or you suspect a virus has attacked your hardware, you need access into your BIOS as soon as possible. Fortunately, we’ve got what you need. Try these two troubleshooting methods to gain access into your BIOS.
Troubleshoot method #1: Disable fast startup
If your PC is powering on too quickly for you to know when to press your BIOS hotkey, your timing may be keeping you from accessing your PC’s BIOS. To slow down your boot time and open your window for hotkey pressing, you will need to disable fast startup.
To do this:
1. Locate “Power options” in your control panel
2. Press “Choose what the power button does” in the left panel (you’ll note that the shutdown settings are all greyed out and unavailable for modification)
3. Press “Change settings that are currently available” located above the power button and lid settings (this will allow you to uncheck or check boxes to modify your shutdown settings)
4. Uncheck “Turn on fast startup”
5. Try restarting your PC and entering BIOS with your hotkey again
Troubleshoot method #2: Use an emergency boot disk
In the case that your PC refuses to enter BIOS or gives you the dreaded blue screen of death, you could be faced with boot failure. In order to access BIOS, you can try utilizing an emergency boot disk to bring your PC back to life via USB drive.
Once the USB drive boots up, you should be able to select a boot device at the startup.
1. Click “Repair your computer” instead of the centered “Install now” button
2. Click “Troubleshoot”
3. Click “UEFI Firmware Settings”
4. Click “Restart”
If nothing works, you may need to resort to finding a computer repair specialist in your area to help solve your issues.
[mai mult...]

My laptop won’t turn on

You press the power button on your laptop… and nothing happens.
There are few more frustrating technological hiccups than when your laptop won’t turn on. However, you don’t have to resign yourself to the idea that your laptop has met an untimely death. We’ll show you some ways to assess what’s wrong and fix it. If your laptop won’t power up, a faulty power supply, failed hardware, or a malfunctioning screen could be to blame [1]. In many cases, you may be able to resolve the problem yourself by ordering replacement parts or adjusting your laptop’s configuration.
1. Check the power supply and battery
If your HP laptop won’t turn on even when plugged in, start by checking the power supply. There are quite a few issues you could have with the power supply. For example, the problem could be as simple as having the wrong charging cord which means you aren’t getting the proper voltage, or it could be that the power supply has failed [2].
1. To test if the power supply is the issue, completely remove your laptop battery.
2. Then, plug your laptop into a functioning outlet.
3. First, confirm the outlet is functioning properly by plugging another device into it – if it works, the issue isn’t the outlet.
4. If you can power on your laptop without the battery installed, the issue isn’t the power supply, it’s your battery.
5. You’ll need to buy a new one but, in the meantime, you can simply use AC power only.
6. It’s perfectly fine to use your laptop without the battery installed, it just means you’ll always have to be plugged into an outlet to use it.

CMOS battery

One other possible solution to test out is to replace the CMOS battery which stores the BIOS settings in the motherboard [3]. This is especially true if you’re running an older laptop that is off a lot or used with the main battery removed. A new CMOS battery is very budget-friendly to replace.
Pro tip: Make sure that the cables are all properly connected. This might seem simple and obvious but most issues with a laptop that won’t turn on stem from a power supply issue. A loose or unplugged power cable means your computer isn’t getting the juice it needs to run.
2. Diagnose screen issues
If your power supply is working, you will need to troubleshoot further.
1. First, disconnect all of your nonessential external display devices like projectors and monitors to make sure they’re not interfering with the startup processes of your laptop.
2. If the power button is lit and you can hear fans or noises but there isn’t an image being displayed, turn out the lights to see if there’s an image being displayed very faintly.
3. If there is a very faint image once the lights are off, the screen’s inverter has failed and you’ll need to replace it [4].
4. Alternatively, your brightness button may be broken.
If your laptop starts up but there isn’t an image, the LCD panel could be broken. It’s not impossible to fix a broken screen, you can read our article here about how to do so. But if your laptop is an older model it might make more sense to simply replace your entire laptop.
3. Remove all devices from your laptop
If you have left a memory card, DVD, or USB drive in your notebook, this could be a reason why your laptop doesn’t power on. It might be getting “stuck” because the BIOS may be trying to boot from a removable storage device. Remove all USB drives and other devices and try to boot up your computer.
4. Use a rescue disc
A rescue disc allows you to boot your computer and fix any issues you may be having with a Windows operating system [5]. If a virus is the culprit behind your computer problems, the rescue disc will find it via scanning tools so you can remove the offending malware.
5. Boot in safe mode
If your HP laptop won’t turn on you might still be able to get your laptop working in safe mode [6]. Safe mode allows you to uninstall new programs or drivers that could be affecting your laptop. It also allows you to create a new user account if your original account has been corrupted.
6. Check hardware
The last step when diagnosing power issues is to check your hardware. If you’ve recently installed hardware like a new RAM kit, that could be the cause of your boot issues. Remove and reinstall your new hardware and try to boot again.
Unfortunately, sometimes the hardware in your laptop such as your hard drive simply fails and there is no easy fix. If you hear a clicking noise or the drive spinning but then powering down, this is a telltale sign your hard drive has failed [7]. In most cases, this means you’ll need to simply replace your hard drive.
In instances like this, it is smart to have an external hard drive so you can back up any files you may need.
Diagnose, repair, or replace
Answering the question, “Why won’t my laptop turn on?” might seem intimidating to figure out at first. Laptops make our lives more convenient by providing us with mobile computing options that fit any lifestyle.
But if you rely on a laptop for your work, school, and daily multitasking, any major issue can throw a wrench in your productivity.If you find that your laptop won’t turn on, don’t panic. It’s likely a power supply issue that you can troubleshoot and fix. Even if it’s a more complicated issue, there are still budget-friendly ways to test and assess the problem.
[mai mult...]

How to enable Desktop Background Image

Start by enabling the “show desktop background image” option. Here are the steps for enabling the desktop wallpaper:

  1. Press Win + I to open the System Settings.
  2. Click the Ease of Access option from the menu items.
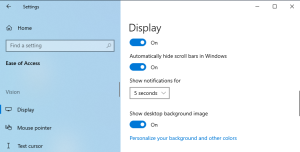
  3. Next, click the Display option on the left-hand side pane.
  4. Locate the Show desktop background image button and then switch it on.

5. Restart your device to save these new changes.

 Configure the Display Settings via the Ease of Access Center

You can also resolve the “black desktop background display” issue by configuring the Ease of Access settings. Here’s how:

  1. Press Win + R to open the Run command dialog box.
  2. Type Control Panel and click Enter.
  3. Next, click the View by drop-down menu and select Small icons.
  4. Select the Ease of Access Center from the menu items.
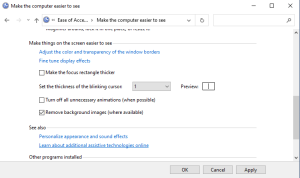
  5. Scroll down and click the Make the computer easier to see option (below the Explore all settings option.)
  6. Next, scroll down and uncheck the Turn off all unnecessary animations and the Remove Background images options.

Click Apply, click OK, and then restart the device to save these changes.

[mai mult...]

How to fix Windows Spotlight Image

Windows Spotlight works best when it’s dynamically changing. If it gets stuck in a location, here’s how to get it traveling again. Now many apps can keep your Windows lock screen looking fresh as perfectly as Windows Spotlight. Once it is enabled, it is hard to go back to the traditional way of setting a lock screen wallpaper.

But like so many other Windows features, Spotlight is not perfect and may stop working. Let’s take a look at the possible reasons why Windows Spotlight stops working and look at some fixes to resolve the issue. Windows Spotlight is a service built into Windows 10 that fetches new pictures from Bing and displays them on the lock screen. The images rotate every few days and feature location information as well.

In addition to images, Windows Spotlight also shows ads on occasion. Unfortunately, if you don’t want to see ads with Windows Spotlight images, you are out of luck. There is no way to disable ads without disabling Windows Spotlight altogether.

  • Common Causes For Windows Spotlight Errors

Windows Spotlight occasionally stops working. While there is no concrete reason for this, common causes include:

  • No Internet connection, since Spotlight needs a connection to download images.
  • Windows updates sometimes break Windows Spotlight, and you may need to restart the service manually.
  • Images used by the Windows Spotlight feature can also get corrupted, resulting in Windows Spotlight errors. In this case, you can clean the Spotlight images folder and let the service populate it once again.
  • Windows Spotlight setting files can also get corrupted requiring you to reset the service.
1. Restart Windows Spotlight

The simplest fix to try when Windows Spotlight is not working is to restart the service.

  • Navigate to Windows Settings by pressing Win + I.
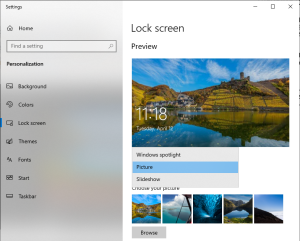
  • Click on Personalization and then hit Lock screen located in the left-hand panel.
  • Under Background, open the dropdown menu and choose Picture or Slideshow.

  • Close the Settings app and restart your computer.

Re-enable Windows Spotlight by retracing the above steps and enabling Spotlight instead of Picture and Slideshow. Now, test if the fix has worked by locking your computer and seeing if you get new backgrounds on the lock screen. If Spotlight still doesn’t work, try deleting the assets.

2. Manually Delete Spotlight Assets

Manually deleting Spotlight assets requires you to navigate to the folder where Spotlight’s assets are stored.

  • Hit the Windows keys, type Run, and choose the appropriate option.
  • When the Run dialogue box appears, paste “%USERPROFILE%/AppData\Local\Packages\Microsoft.Windows.ContentDeliveryManager_cw5n1h2txyewy\LocalState\Assets” and click Ok.

  • After the folder opens, press Ctrl + A to select all files, and hit the Delete key to remove all the files.

Finally, enable the Spotlight feature if you’ve disabled it, and restart your computer. See if the feature has been fixed. If not, then try manually resetting Windows Spotlight.

3. Manually Reset Windows Spotlight Settings

To manually reset Windows Spotlight:

  • Press the Windows key, type Run, and choose the appropriate option to open the Run dialogue box.
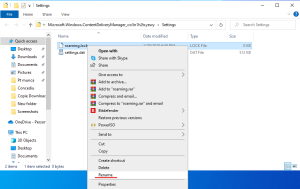
  • Paste “%USERPROFILE%/AppData\Local\Packages\Microsoft.Windows.ContentDeliveryManager_cw5n1h2txyewy\Settings” path into the dialogue box and press Ok. This will open the Settings folder.
  • You’ll find two files settings.dat and roaming.lock in the Settings folder. Rename these files to settings.dat.bak and roaming.lock.bak respectively, by right-clicking on each file and pressing Rename.

  • Close the folder and restart your computer.

Hopefully, Windows Spotlight will start working now. If Spotlight still doesn’t work, you may need to install a fresh copy of Windows.

[mai mult...]

How to fix the Windows Registry Editor When It Won’t Respond

The registry is handy for fixing problems, but sometimes it has issues for itself. Here’s how to fix an unresponsive registry editor on Windows.The Registry Editor is a reliable tool that you can always use for tweaking Windows system settings. But then it’s quite frustrating when this tool suddenly becomes unresponsive.

If the Registry Editor on your device is failing, you’re likely seeing an error message that reads, “The Registry editor has stopped working.” In some instances, the error message might read, “Registry editing has been disabled by your administrator.”

1. Enable the Registry Editor Using the Local Group Policy Editor

The Registry Editor might be unresponsive simply because it’s disabled in the system settings. One of the best ways to enable this tool is by using the Local Group Policy Editor (LGPE.) However, you should note that the Local Group Policy Editor is only available on the Windows Pro, Enterprise, and Education editions.

Now, here’s how you can enable the Registry Editor via the LGPE:

  1. Press Win + R to launch the Run command dialog box.
  2. Type gpedit.msc and press OK to open the Local Group Policy Editor.
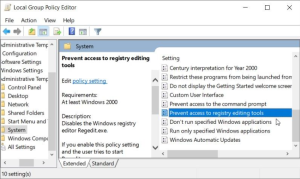
  3. Navigate to User Configuration > Administrative Templates > System.
  4. Double-click the Prevent access to registry editing tools option on the right-hand side panel.

In the next window, select the Disabled or Not configured option. Finally, click Apply, click OK, and then restart your device to save these changes.

2. Enable the Registry Editor Manually Using a Registry Key

You might run into issues while trying to enable the Registry Editor via the LGPE—especially if the LGPE also has its own issues. In such an instance, we’ll explore how you can use a simple Registry key to repair an unresponsive Registry Editor.

  1. To get started, press Win + R to open the Run command dialog box.
  2. Type CMD and press Ctrl + Shift + Enter to open an elevated Command Prompt.
  3. Type the following command and press Enter to enable the Registry Editor: REG add HKCUSoftwareMicrosoftWindowsCurrentVersionPoliciesSystem/ vDisableRegistryTools /t REG_DWORD /d 0 /f
  4. When the process is complete, close the Command Prompt and restart your device.
3. Get Rid of Corrupted System Files

he Registry Editor often fails and won’t load if your PC has bugs and corrupted system files. So, you could resolve the problem by taking care of those unwanted system files. An easy way out is to use the DISM and SFC tools. These are some of Windows’ incredible features that help repair or replace corrupted system files.

Now, let’s start by checking out how you can run the DISM tool:

  1. Type Command Prompt in the Start Menu search bar.
  2. Right-click on the Command Prompt option and select Run as administrator.
  3. Type the following command and press Enter to run a DISM scan: DISM /Online /Cleanup-Image /ScanHealth

Wait for this scan to complete. From there, type the following command and then press Enter: DISM /Online /Cleanup-Image /RestoreHealth

Wait a couple of minutes for the process to complete. From there, restart your device to apply the fixes. Next, run the SFC tool by applying these easy steps:

  1. Open the Command Prompt by following the previous steps.
  2. Type the following command and press Enter to run an SFC scan: sfc /scannow

Finally, close the Command Prompt and restart your device.

4. Restore Your Device to Its Previous State

Registry Editor issues are sometimes caused by the way you’ve configured some system settings. However, if you’ve configured some settings unknowingly, then it becomes hard to resolve this problem. Simply put, you won’t know which settings to tweak to fix the Registry.

Now, that’s where the System Restore tool comes in. This feature helps get rid of issues by restoring your device to its previous state.

So, here’s how you can use the System Restore tool to fix an unresponsive Registry Editor:

  1. Type Win + S to open the Start Menu search bar.
  2. Type Create a Restore Point and then select the Best match.
  3. Click the System Protection tab, select System Restore, and then press Next.
  4. Select the Show more restore points option in the pop-up window.
  5. Choose a restore point and then click Next. Finally, click Finish and follow the on-screen steps.
5. Restore Windows to Its Factory Settings

By now, the Registry Editor issue should be resolved. But if the tool is still unresponsive, then you could consider restoring your device to its factory settings. Before you apply this method, back up your data first just in case things don’t go accordingly. Now, here’s how you can restore Windows to its factory settings:

  1. Press Win + I to open the System Settings.
  2. Select Update & Security from the menu items.
  3. Next, select Recovery on the left-hand side.
  4. Locate the Reset this PC option on the right and then click the Get started button below it. Finally, follow the on-screen steps to finalize the process.
6. Install the Latest Windows Updates

As a last resort, you could consider updating your device to resolve the Registry Editor issue. Installing the latest Windows updates will tackle system bugs that might be interfering with the Registry Editor.

Now, here’s how you can install the latest Windows updates:

  1. Type Settings in the Start Menu search bar and select the Best match.
  2. Select Update & Security and then click Windows Update on the left-hand side.
  3. Finally, click the Check for updates button on the right and follow the on-screen steps.

[mai mult...]

how to enable/disable core isolation in windows 10/11

Turn On or Off Core Isolation Memory Integrity in Windows Security
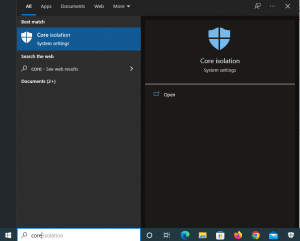
  1. Open Windows Security. (or you can type directly in windows search bar: core isolation)
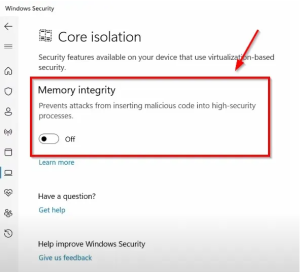
  2. Click/tap on Device security on the left side, and click/tap on the Core isolation details link on the right side.
  3. Turn on (default) or off Memory integrity for what you want.
  4. After you change the settings you must do a system reboot.

If Memory Integrity Can’t be Enabled or Disabled or Greyed Out then Follow the Second Method.

Solution 2: Using Registry Editor

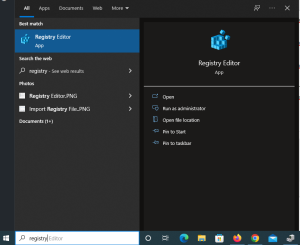
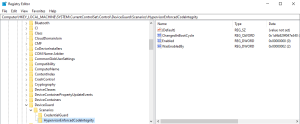
To disable Core Isolation/Memory Integrity, run regedit and navigate to the following locations and make the necessary changes:

Computer\HKEY_LOCAL_MACHINE\SYSTEM\CurrentControlSet\Control\DeviceGuard\Scenarios\CredentialGuard REG_DWORD should be 0.

Computer\HKEY_LOCAL_MACHINE\SYSTEM\CurrentControlSet\Control\DeviceGuard\Scenarios\HypervisorEnforcedCodeIntegrity REG_DWORD should be 0

if you do not see the above keys/values, then go to Computer\HKEY_LOCAL_MACHINE\SOFTWARE\Policies\Microsoft\Windows Defender and confirm there are no similar keys like HypervisorEnforcedCodeIntegrity or CredentialGuard

After you changed the value from 1 to 0 system will need a reboot to apply the changes.

[mai mult...]