How to Hide or Remove New Downloads Flyout Menu in Microsoft Edge

How to Hide or Remove New Downloads Flyout Menu in Microsoft Edge

We told you earlier that the new versions of Microsoft Edge web browser come with a new redesigned Download Manager which shows all downloads in form of a flyout menu or popup in Edge toolbar. When you start downloading a file in Microsoft Edge, a new Downloads button appears in Edge toolbar which opens a flyout menu showing download status and file information.

Following screenshot shows new Downloads toolbar button and flyout menu in Microsoft Edge:

There are some people who like the new Download Manager functionality but they don’t like the new flyout menu which automatically appears as soon as they start downloading any file. Many people find the new flyout menu annoying and they want to permanently disable it.

Fortunately, it’s possible to keep the new Download Manager feature and disable the flyout menu in Edge toolbar. I have received many emails from readers who want to get rid of the new Downloads flyout menu but don’t want to restore classic download panel in Edge.

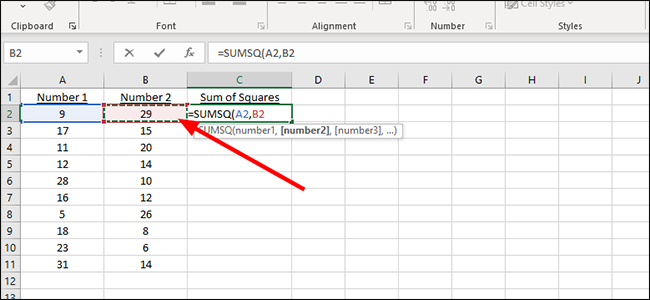
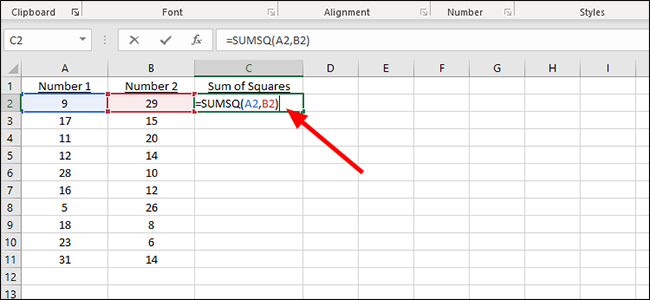
Following steps will help you in disabling or hiding new Downloads flyout menu in Microsoft Edge toolbar:

1. Open Microsoft Edge browser and click on the 3-dots menu button present at the right-side of the toolbar. Now select Settings option from the main menu.

Alternatively, you can press ALT+F keys together to show Edge Menu and then press S key to open Settings page. You can also directly open Edge Settings page using edge://settings/ URL in address bar.

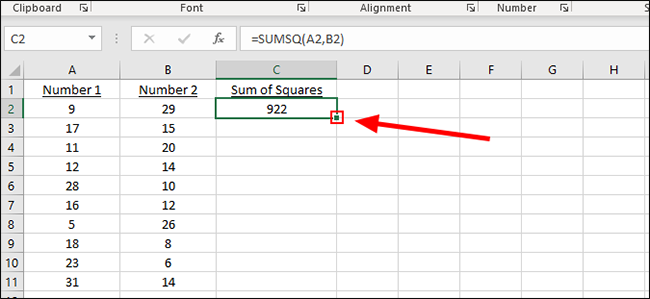
2. Now click on Downloads tab in left sidebar.

PS: You can skip 1 and 2 steps and directly open Downloads tab in Edge Settings page by clicking on 3-dots menu present in Downloads flyout menu and selecting Downloads settings option.

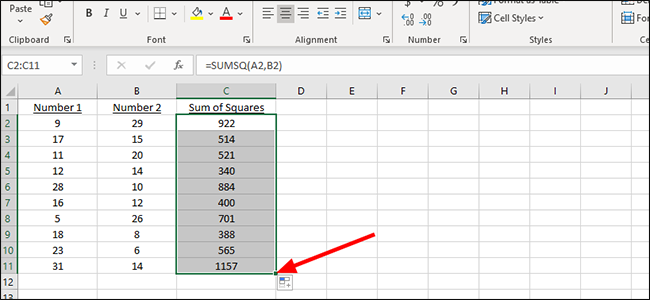
3. In right-side pane, you’ll see Show downloads menu when a download starts option.

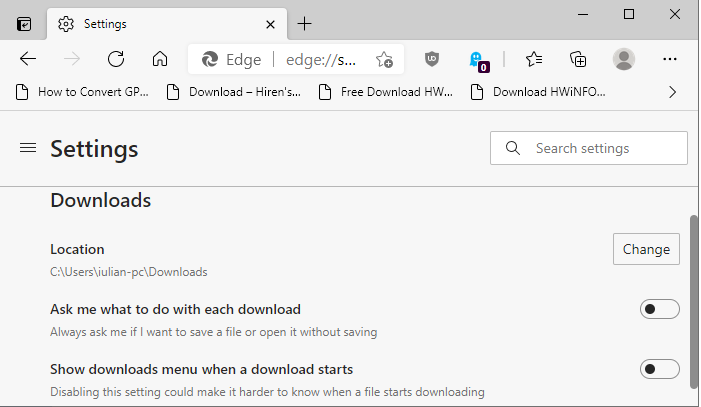
The option is enabled by default which means Edge will always show new flyout menu in toolbar whenever you download a file. To disable new flyout menu, turn off the option i.e. set the option to OFF.

[mai mult...]

How to Reset or Remove All Active Group Policies Applied in Windows?

How to Reset or Remove All Active Group Policies Applied in Windows?

Actually many people apply group policies in Windows to enable/disable features and functionality. In future, they might want to remove those policies but resetting those policies will require lots of time as the user will need to find all active policies using Group Policy Editor and then reset them to “Not Configured” one by one. It’ll waste lots of time.

When a group policy is applied in Windows 10, users also get “Some settings are managed by your organization” warning message or banner showing at the top of pages in Settings app.

If you reset or remove all applied group policies using this tutorial, it’ll also help you in getting rid of that message.

Let’s start the tutorial.

When you apply group policies using Group Policy Editor (gpedit.msc), all policies are stored in following folders:

  • C:\Windows\System32\GroupPolicy
  • C:\Windows\System32\GroupPolicyUsers

If you try to open these folders, you’ll get following files and folders:

  • Machine
  • User
  • gpt.ini
  • comment.cmtx
  • Registry.pol

To reset or remove all applied group policies, you just need to delete these 2 folders: GroupPolicy and GroupPolicyUsers.

PS: In some computers, you’ll get only GroupPolicy folder. That’s completely ok. If only one folder exists, then you need to delete only one folder.

1. To delete the folders, open This PC (or My Computer, File Explorer) and go to C:\Windows\System32 folder.

Now look for GroupPolicy and GroupPolicyUsers folders present under System32 folder.

Once you find the folders, select them and press Delete key. Windows will ask for confirmation, click on Yes and Continue buttons.

That’s it. After deleting folders, you’ll need to forcefully apply group policy changes to Windows.

2. Open Command Prompt as Administrator.

Now run following command:

gpupdate /force

It’ll take a few seconds in processing and you’ll get “Computer Policy / User Policy update has completed successfully” message. That’s it. You have successfully removed all currently active group policies in your Windows device. You can also restart your computer system if required.

Now if you try to open Group Policy Editor (gpedit.msc), you’ll find that all group policies are set to Not Configured which means all applied policies have been removed successfully.

[mai mult...]

How to disable JavaScript in PDF documents in Firefox

How to disable JavaScript in PDF documents in Firefox

The security and feature update for the organization’s Firefox web browser introduced a major change in the native PDF viewer of the browser. Up until now, JavaScript was ignored by Firefox when PDF documents were viewed in the browser. The execution displayed the JavaScript document in the browser but ignored any JavaScript code that it contained.

Mozilla enabled the execution of JavaScript in PDF documents in Firefox 88; this means that JavaScript code will be executed if it is present in a PDF file that is viewed in Firefox. There are legitimate reasons for supporting JavaScript in PDF documents, for instance to verify the input in form fields or to make changes to a document based on data when it is opened or when certain events happen.

Unfortunately, JavaScript in PDFs may also be used to execute malicious code. In other words: JavaScript is a security risk when it is executed in PDF documents. Most Firefox users may not need the feature, and it is a good idea to disable the execution of JavaScript in PDF documents in the browser to protect the system against JavaScript-based attacks.

Disable JavaScript execution in PDF documents

Firefox users may disable the execution of JavaScript by the browser’s native PDF viewer in the following way. Note that there is no option to turn it off in the main settings of the browser.

  1. Load about:config in the web browser’s address bar.
  2. Confirm that you will be careful to proceed.
  3. Use the search at the top to find pdfjs.enableScripting.
  4. Set the preference to FALSE with a click on the toggle button at the end of the line.
    1. A status of FALSE disables JavaScript execution in PDF files.
    2. A status of TRUE enables the execution of JavaScript in PDF documents (default)

Firefox will ignore JavaScript in PDF documents if the preference is set to FALSE.

Testing

You can test the effect by loading PDF documents that include scripting from a site like PDF Scripting. Just download the sample PDF documents and check them in the native PDF viewer of Firefox to see if the execution is blocked.

[mai mult...]

All Windows 10 upgrade safeguards have been lifted

All Windows 10 upgrade safeguards have been lifted

Microsoft resolved the last long-standing upgrade issues in Windows 10 version 2004 and 20H2 this week. The company uses upgrade safeguards to block updates to newer versions of its Windows 10 and Windows Server operating systems to prevent issues during or after the installation of the updates.

Downside to the safeguards is that some devices are not offered the upgrade to a new version of Windows 10. In this particular case, it meant that affected devices running Windows 10 version 1909 could not be upgraded to newer versions of Windows 10 using Windows Update.

Windows 10 version 1909 consumer editions — Home, Pro, Education and Workstations — reach end of life in May 2021. Microsoft plans to release a last batch of security patches for Home versions of the operating system on May 11, 2021, the May 2021 Patch Tuesday before support ends.

Microsoft lifted the last safeguards on May 7, 2021 which prevented the upgrade to newer Windows 10 versions using Windows Update for devices with certain Conexant audio drivers and Conexant ISST audio drivers.

The safeguard hold with safeguard IDs 25702617, 25702660, 25702662, and 25702673 has been removed for all devices as of May 7, 2021, including devices with affected drivers. If updated drivers are not available for your device and you are offered Windows 10, version 2004 or Windows 10, version 20H2, a small number of devices might roll back to the previous version of Windows 10 when attempting to update. If this occurs, you should attempt to update to Windows 10, version 2004 or Windows 10, version 20H2 again.

The issues were opened a year ago in May 2021. Microsoft published a workaround but the issue was not fixed until this month. Some devices may be rolled back according to the resolution and Microsoft asks administrators to run the update again when that happens.

Windows 10 administrators may select Start > Settings > Update & Security to find out if new feature updates are available. Other updating options include using Microsoft’s Windows Media Creation Tool to upgrade a PC or create installation media.

The two upgrade safeguards were the last two listed by Microsoft on the known issues pages of Windows 10 version 2004 and 20H2. Affected devices should receive update options within 48 hours of the lifting of the safeguard.

[mai mult...]

How to enable Tab Scrolling in Microsoft Edge

Microsoft Edge is a Chromium-based web browser, and as such limited to the same default tab handling mechanics as other Chromium-based browsers. By default, tabs get smaller and smaller the more you open, but there is no option to scroll them. Microsoft did introduce support for vertical tabs in the recent release of Edge 89 Stable, and the feature is suggested to users when too many tabs are opened. If you prefer to use a horizontal tab bar on the other hand, you are left with little when it comes to managing lots of tabs in Edge. You could install a browser extension to improve tab management, or, if you run the Canary version, enable tab scrolling.

Tab Scrolling is not a feature that Microsoft added to the browser; instead, it is a feature that is added to the Chromium core. You can enable it in Google Chrome development versions right now, but when you check the flags page in Edge, you will notice that the flag is missing. It appears that Microsoft did remove it, but not all is lost, as you can still enable the feature in Edge Canary.

All you need to do is add a startup parameter to Microsoft Edge to enable it in the browser.

Here is how that is done:

Right-click on the Edge icon on the taskbar, right-click again on Microsoft Edge, and select Properties from the menu.
Locate the target field, add a space at the end, and paste the following parameter afterwards:

–enable-features=ScrollableTabStrip
It should show up like that (apart from the username “example”): “C:\Users\example\AppData\Local\Microsoft\Edge SxS\Application\msedge.exe” –enable-features=ScrollableTabStrip
Click on OK to save the change.
Restart Microsoft Edge Canary.
Once restarted, the following things happen:

  • Edge does not reduce the width of tabs below a minimum threshold anymore (that is larger than the default).
  • Not all tabs may be visible anymore at once because of that.
  • You may use the mousewheel to scroll tabs in the browser’s tab bar when you hover the cursor over the bar.

Note: the feature is experimental at this point in time. It is possible that Microsoft is removing support for it entirely in the browser, or that it is adding support for it at one time. For now, it works in development versions of Edge but not in stable versions.

[mai mult...]

Is the Windows 10 app Microsoft Update Health Tools legitimate?

The Microsoft Update Health Tools application may be listed as an installed application on devices running Microsoft’s Windows 10 operating system. You may see it listed in the Settings application under Apps & Features, and also in the classic Programs and Features listing of the Control Panel.

The application is not listed in the Start Menu or linked on the desktop or taskbar. Some administrators and users may wonder about the purpose of the Microsoft Update Health Tools application, especially since it is not installed manually by users of the system. Is Microsoft Update Health Tools a legitimate application?

The short answer: yes, the program is legitimate. It has been created by Microsoft.

How does it end up on Windows 10 devices?

The application is pushed to Windows 10 devices via system updates, on most systems via Windows Updates, but it can also be installed manually via the Microsoft Update Catalog website. The update in question has the ID KB4023057. Its support page refers to it as “Update for Windows 10 Update Service components”, and labels it as an update for all major versions of the Windows 10 operating system.

Reports about the application go back to mid-2020 when users started to post questions about the functionality of the Microsoft Update Health Tools application on various forums and sites, including Microsoft’s own Community and Docs sites.

  • Microsoft provides the following information about the update:

This update includes files and resources that address issues that affect the update processes in Windows 10 that may prevent important Windows updates from being installed. These improvements help make sure that updates are installed seamlessly on your device, and they help improve the reliability and security of devices that are running Windows 10.

In other words: the update, and the Microsoft Update Health Tools application it installs, is designed to resolve updating issues on Windows 10 devices.

  • Microsoft lists a handful of issues that may be resolved with the help of the update:

Network settings may be reset.
Registry keys may be cleaned up that “may be preventing updates from being installed successfully”.
Repair disabled or corrupted components of the Windows 10 operating system.
Free up disk space to ensure that there is enough space for the update to be downloaded and installed successfully.
Reset the Windows Update database to repair problems.
What if the update is not installed (but Microsoft Health Update Tools is)?

If you check the list of installed Windows updates on newer versions of Windows 10, you may notice that KB4023057 may not be installed. Microsoft lists it as compatible with all versions of Windows 10, but the company’s Update Catalog website does not list versions of newer versions of Windows 10. The newest version listed is Windows 10 version 1803.

One possible explanation for the discrepancy is that Microsoft Update Health Tools may have been installed on earlier versions before the device itself was updated to a more recent version of Windows 10. Another explanation is that it the application could have been installed as part of another update on newer versions of Windows 10.

This needs more researching, feel free to leave a comment in this regard below.

  • Uninstall the Microsoft Update Health Tools application
  • You can remove the application from the system, e.g. by selecting the uninstall button in the Settings application. Note that doing so may interfere with the update capabilities of the system.

It is unclear whether the update will be pushed to systems again if issues are detected during system updates.

[mai mult...]

Write notes in a new tab and save them locally with the TextNotes extension for Firefox

Found something interesting and want to save it for future reference? You could save the web page, or copy the content and save it in Notepad, or a cloud-based note taking service. But if you would like to save the note directly in Firefox, you’ll probably like the TextNotes extension.

Before you get your hopes up and think this is an add-on that saves notes to specific tabs, let me tell you that it doesn’t. Click on the extension’s button on the toolbar and a new tab opens. This is TextNotes’ interface, and the page is divided into two panes. The one on the left is the tree panel which lists the notes that you have added, select a note and its contents will appear on the right pane.

Well, there is no note available to begin with, so let’s add one. Click the + button above the tree and a new blank note is created. Place the cursor in the right pane and type away. TextNotes will automatically save the note. Where does it save it? The extension does not rely on cloud services, as I hinted earlier it is an offline add-on. Your notes are saved directly in your browser’s storage (in your current profile).

There is another way that you can create new notes. Select some text on a web page, access the right-click menu, and choose the option that says “Add Selected Text to TextNotes”. This creates a new note which contains the text, but it doesn’t include the title or the URL of the tab/page that the content was saved from.

You can open TextNotes with a hotkey; Ctrl + Alt + O. Don’t want to open it in a new tab? Use Ctrl + Alt + P, or click the toolbar button while holding the Ctrl key, to open the interface in a new window.

The hotkeys can be changed from Firefox’s add-ons page: Add-ons > Manage Extension Shortcuts > TextNotes.

You can trash notes, and the deleted notes are stored in the add-on’s built-in trash bin, from where they can be recovered instantly if required. Drag and drop notes to rearrange their order. Right-click on the sidebar to create a new note, add a separator to manage a collection of notes or to delete a note.

TextNotes has a feature called hyperclicks, which are clickable hyperlinks or URLS, paste the link in a note, and you’re good to go. To use a saved link, hold the Ctrl key and the left mouse button for a few seconds, that’s a Ctrl + long-click. This action opens the link in a new tab in the foreground. To open it in a background tab, make sure that Caps Lock is enabled while you Ctrl + long-click.

Since TextNotes does not support cloud-based synchronization of its own, you will have to rely on Firefox sync. But, in order to prevent loss of data, you may want to save your notes manually. Click on the three-dot icon in the top right corner of the add-on’s interface. Select Preferences and a pop-up window appears with 3 options. Hit the Save button to store your notes as a TN (compressed document) file. Or you can save the content directly to a plain-text file, which you can open with Notepad or any text editor of your choice.

The TN document is useful if you want to Load (import) it back to TextNotes. If you want cloud-support, you can save this file to your online storage account, as a backup. The add-on’s menu also has a Help file which explains how TextNotes works.

[mai mult...]

uBlock Origin de Raymond Hill

În sfârșit, un blocant de reclame eficient. Folosește procesorul și memoria foarte puțin.

  • Despre această extensie

Un blocant (paravan) eficient: folosește foarte puțin procesorul și memoria și totuși poate încărca și aplica mii de filtre în plus față de alte paravane populare.

Utilizare: Butonul mare de pornire/oprire în fereastra paravanului este pentru a activa/dezactiva uBlock pentru site-ul curent. Funcția este valabilă doar pentru site-ul curent, nu la nivel global. Flexibil, mai mult decât un „blocant de reclame”: acesta poate citi și crea filtre din fișierele de gazde (hosts).

  • În mod implicit, aceste liste de filtre sunt încărcate și aplicate:

– EasyList
– Lista serverelor de reclame a lui Peter Lowe
– EasyPrivacy
– Domenii malițioase

  • De asemenea, mai sunt disponibile și alte liste precum:

– Lista îmbunătățită pentru urmărire a lui Fanboy
– Lista de gazde a lui Dan Pollock
– Lista de reclame și urmărire hpHosts
– Gazdele MVPS
– Spam404

Desigur, cu cât sunt mai multe filtre active cu atât mai mult este utilizată memoria. Totuși, chiar și după adăugarea în plus a două liste Fanboy și lista de reclame și urmărire hPhosts, uBlock₀ tot folosește mai puțină memorie decât restul paravanelor. De retinut că odată cu selectarea în plus a unora dintre liste se poate ajunge la afectarea aspectului site-urilor — în special listele care sunt în mod normal liste de gazde.

Fără listele prestabilite de filtre această extensie nu face nimic. Așadar, dacă totuși vreți să contribuiți, gândiți-vă la persoanele care muncesc să întrețină aceste filtre pe care le utilizați, care sunt oferite pentru utilizare gratuită.

Acest supliment trebuie să:

  • Să citească și să modifice setările de confidențialitate
  • Să acceseze filele browserului
  • Să stocheze un volum nelimitat de date pe partea de client
  • Să acceseze activitatea browserului în timpul navigării
  • Să îți acceseze datele pentru toate site-urile web
[mai mult...]

How to Calculate the Sum of Squares in Excel

Start a new column anywhere in an Excel spreadsheet and label it. It’s here that we’ll output the solution of our squares. The squares don’t have to be next to each other, nor does the output section; it can be anywhere on the page.

Type the following formula into the first cell in the new column: =SUMSQ(

From here you can add the letter and number combination of the column and row manually, or just click it with the mouse. We’ll use the mouse, which autofills this section of the formula with cell A2.

Add a comma and then we’ll add the next number, from B2 this time. Just type in B2 to the formula, or click the appropriate cell to autofill it.

Close the parenthesis and press “Enter” on the keyboard to display the sum of both squares. Alternatively, if you can keep going here, adding additional cells by separating each with a comma within the formula.

To apply the formula to additional cells, look for the small filled square in the cell that contains the solution to our first problem. In this example, it’s C2.

Click the square and drag it down to the last row of number pairs to automatically add the sum of the rest of the squares.

Finding the Sum of Squares for Just a Few Cells

In our “Sum of Squares” column we created in the previous example, C2 in this case, start typing the following formula:

=SUM((A2)^2,(A3)^2)


Alternatively, we can just add the numbers instead of the cells to the formula, as either way gets us to the same place.

That formula looks like this:

=SUM((9)^2, (29)^2)

You can alter these formulas as needed, changing the cells, adding additional numbers, or finding the sum of squares that aren’t even in your workbook, for example. And while it’s easier to follow along with the above tutorial, using the SUMSQ formula, to find the solution for multiple squares, it’s often easier to just type out a quick formula like this if it’s not something you’ll be repeating throughout the workbook.

[mai mult...]

How to Get a Spotlight-Style Search Bar on Windows 10

On a Mac, a system-wide search and launch feature called Spotlight is only a shortcut away with Command+Space. Thanks to PowerToys, Windows 10 can have a similar search and run bar as well when you hit Alt+Space. Here’s how to set it up.

The Power of Microsoft PowerToys

With a PowerToys module called PowerToys Run, you can press Alt+Space and see a quick pop-up search bar appear from anywhere in Windows 10. Once it appears, you can search for applications and documents and run or open them quickly. To get this handy search bar, you’ll need to install PowerToys, a free collection of Windows 10 utilities from Microsoft.

Once PowerToys is installed, launch PowerToys Setup and select “PowerToys Run” in the sidebar. Then make sure that “Enable PowerToys Run” is switched on.

After that, close PowerToys Setup and try out your new search bar. Press Alt+Space and a minimalist search bar will appear in the center of your screen.

Once you type in a search, you can hit Enter to immediately launch (or open) the first result, or you can choose from the results in the list with your mouse or cursor keys and hit Enter.

You can also use several “power user” buttons that appear beside each result to perform certain handy actions. Here’s what they do.

  • Copy icon: This copies the file path to the clipboard (only applies to documents).
  • Box with a Shield: This runs the app as administrator (only applies to programs).
  • Folder: This opens the containing folder, revealing the file or app’s location in File Explorer.
  • C:\ Box: This opens a path to the file or document in a command prompt.

But don’t just think of PowerToys Run as a glorified search bar. You can also use the PowerToys Run box as a replacement for the Windows+R “Run” dialog. Just pull up the box with Alt+Space, type a command, and hit Enter, and the program will run instantly.

It’s just one more way that PowerToys delivers a more convenient and powerful Windows 10 experience. If you like PowerToys Run, it’s worth taking the time to explore other PowerToys features. New ones are often added to the suite over time.

[mai mult...]