Firefox add-on behind lets you download any image that is behind the cursor

It is sometimes difficult to download certain elements from websites. Some sites use code that actively prevents the use of save options of the browser that is being used; many use Javascript for that, others try to force you to sign-up for an account before some functionality becomes available. The new Firefox add-on behind! has been designed as a workaround. It allows you to display and then download any image that is behind the cursor, even on sites that try to prevent this from happening.

All you need to do is install the extension in the browser, right-click on the image that you want to display fully or download, and select the behind! option of the right-click context menu. The extension opens a new tab and loads the selected image in that tab.

The extension may display multiple versions of the image on the opening page; this is the case if the site uses multiple versions, e.g. a small resolution one that it displays on the page and a larger one that it links to. You can look at the images and use built-in functionality to zoom the content or to save it. To save one of the images, right-click on the image and select the “save image as” option of the context menu to do so.

The developer of the extension lists a number of cases where the extension may help users. It can reveal:

  • Background images
  • Images under layers of nonsense (e.g. clickable surfaces designed to hide the image from you)
  • Embedded images / base64-encoded image chunks
  • Alternative resolutions
  • Vector images (even when they are inlined)
  • Images in shadow DOM

The extension has no options at the time of writing. It worked really well on all tested websites but a set of options would certainly make it more useful or flexible. An option to select the target action when selecting the behind! option comes into mind, e.g. to open the image in a foreground tab instead of  a background tab, or to download all images or the smallest/largest right away.

Other than that, it is a great extension for Firefox users who sometimes or often encounter sites that somehow block them from displaying or downloading images.

[mai mult...]

USB Printer is missing on Windows 10 version 1903 and later (with workaround)

USB Printer is missing on Windows 10 version 1903 and later (with workaround)

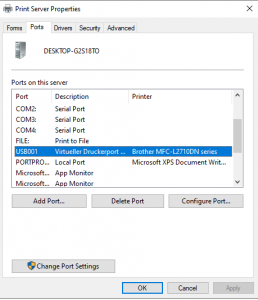
If you run a device with Windows 10 version 1903 or later, e.g. Windows 10 version 2004, and use an USB printer, you may notice that the printer is sometimes missing when you try to print. The printer port is missing on affected devices. Windows 10 users may check the printer ports on the device in the following way: select Start > Settings (gear icon) > Devices > Printers & Scanners > Print Server Properties > switch to the Ports tab.

Check for any USB port in the list. The affected printer and the USB port that it is connected to should not be displayed on the page.

Microsoft describes the symptom in the following way:

If you connect a USB printer to Windows 10 version 1903 or later, then shut down Windows and disconnect or shut off the printer, when you start Windows again the USB printer port will not be available in the list of printer ports. The printer cannot be used for printing tasks or other tasks because of the missing USB printer port.

Microsoft lists the following cause for the issue:

If the driver for the USB printer contains a Language Monitor, the OpenPortEx callback function of the Language Monitor would not be called. As a result, the user cannot fulfill operations dependent on the operation of the Language Monitor. In the “Devices and Printers” control panel, when selecting [Print Server Properties] > [Port] tab, the port for the USB printer (such as “USB001”) would not appear in the list of printer ports. As a result, the user cannot fulfill operations dependent on the existence of the port.

There is a workaround for the issue, and it is quite easy to apply. All that needs to be done is to connect the USB printer to the PC and power it on before Windows is started. If that is done, Windows will recognize the USB printer and printing functionality as well as other functionality provided by the printer is available during the session.

Microsoft is working on a permanent fix for the issue and plans to release it as part of a future Windows 10 operating system update.

[mai mult...]

Windows 10 version 2004 is here, and it has lots of issues

Windows 10 version 2004 is here, and it has lots of issues

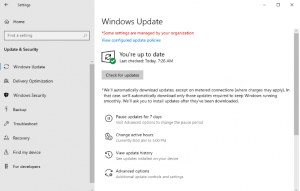
Microsoft released Windows 10 version 2004, also known as the May 2020 Update. The new feature update for Microsoft’s Windows operating system is available for systems running Windows 10 version 1903 or 1909 only via Windows Update, and only if users click on the “check for updates” button to search for the new version manually.

Even then, it may not be offered to the system at that point in time because of issues identified on the system and because Microsoft is rolling it out over time. In other words: the update is only offered if Microsoft’s algorithm concludes that the device is ready for the update and if your device has been picked by Microsoft.

Microsoft published a long list of known issues that have not been resolved yet on the official Windows 10 release information page. A total of ten issues are listed on the page currently; many block the new feature upgrade from being offered to devices.

  1. Difficulty connecting to more than one Bluetooth device — Affects Windows 10 devices with certain Realtek Bluetooth radios. (update hold for affected devices)
  2. Errors or issues during or after updating devices with Conexant ISST audio drivers — Affects Windows 10 devices with Conexant ISST audio drivers (Conexant ISST Audio or Conexant HDAudio Driver) with file names file name uci64a96.dll through uci64a231.dll and file versions lower than 7.231.3.0. (update hold for affected devices)
  3. Errors or issues during or after updating devices with certain Conexant audio drivers — Devices with certain drivers may receive stop errors or bluescreens. Affected driver is Conexant HDAudio Driver, versions 8.65.47.53, 8.65.56.51, or 8.66.0.0 through 8.66.89.00 for chdrt64.sys or chdrt32.sys.
  4. Issues using ImeMode property to control IME mode for individual text entry fields — Issues with some applications that use the ImeMode property, e.g. automatic switching between input methods does not work.
  5. Variable refresh rate not working as expected on devices with Intel iGPU — Monitors with variable refresh rates (VRR) on systems with Intel integrated graphics processing unit display adapters may not work correctly. Microsoft notes that enabling VRR on affected devices won’t enable the feature for most games (especially when using DirectX 9.
  6. Stop error when plugging or unplugging a Thunderbolt dock — Stop error or bluescreen when plugging or unplugging a Thunderbolt dock. Affected devices have at least one Thunderbolt dock, Kernel DMA protection enabled and Windows Hypervisor Platform disabled. (update hold for affected devices)
  7. Errors or unexpected restarts for some devices using Always On, Always Connected — Devices that support the Always On, Always Connected feature may receive errors or unexpected shutdowns or restarts. Devices with more than one “Always On, Always Connected” capable network adapters are affected. (update hold for affected devices)
  8. No mouse input with apps and games using GameInput Redistributable — Incompatibilities with some games using GameInput Redistributable that causes them to lose mouse input. (update hold for affected devices)
  9. Issues updating or starting up devices when aksfridge.sys or aksdf.sys is present — Devices with aksfridge.sys or aksdf.sys drivers may cause the Windows 10 version 2004 upgrade to fail to install, or may prevent the system from starting after updating. (update hold for affected devices)
  10. Issue with older drivers for Nvidia display adapters (GPU) — Affected devices with Nvidia graphics cards may receive stop errors or bluescreens. Affects devices with driver version lower than 358.00. (update hold for affected devices)

Microsoft blocks updates on certain devices automatically but not all issues that Microsoft confirmed officially have an update block in place. It is a good idea to go through the list before you start to upgrade your devices.

[mai mult...]

Mozilla installs Scheduled Telemetry Task on Windows with Firefox 75

Mozilla installs Scheduled Telemetry Task on Windows with Firefox 75

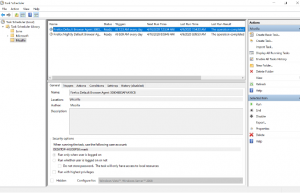
Observant Firefox users on Windows who have updated the web browser to Firefox 75 may have noticed that the upgrade brought along with it a new scheduled tasks. The scheduled task is also added if Firefox 75 is installed on a Windows device. The task’s name is Firefox Default Browser Agent and it is set to run once per day. Mozilla published a blog post on the official blog of the organization that provides information on the task and why it has been created.

According to Mozilla, the task has been created to help the organization “understand changes in default browser settings”. At its core, it is a Telemetry task that collects information and sends the data to Mozilla.

Here are the details:

  • The Task is only created if Telemetry is enabled. If Telemetry is set to off (in the most recently used Firefox profile), it is not created and thus no data is sent. The same is true for Enterprise telemetry policies if they are configured. Update: Some users report that the task is created while Telemetry was set to off on their machine.
  • Mozilla collects information “related to the system’s current and previous default browser setting, as w2ell as the operating system locale and version”.
  • Mozilla notes that the data cannot be “associated with regular profile based telemetry data”.
  • The data is sent to Mozilla every 24 hours using the scheduled task.

Mozilla added the file default-browser-agent.exe to the Firefox installation folder on Windows which defaults to C:\Program Files\Mozilla Firefox\.

Firefox users have the following options if they don’t want the data sent to Mozilla:

  • Firefox users who opted-out of Telemetry are good, they don’t need to make any change as the new Telemetry data is not sent to Mozilla; this applies to users who opted-out of Telemetry in Firefox or used Enterprise policies to do so.
  • Firefox users who have Telemetry enabled can either opt-out of Telemetry or deal with the task/executable that is responsible.
Disable the Firefox Default Browser Agent task

Here is how you disable the task:

  1. Open Start on the Windows machine and type Task Scheduler.
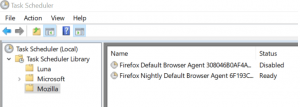
  2. Open the Task Scheduler and go to Task Scheduler Library > Mozilla.
  3. There you should find listed the Firefox Default Browser Agent task.
  4. Right-click on the task and select Disable.
  5. Note: Nightly users may see the Firefox Nightly Default Browser Agent task there as well and may disable it.

The task won’t be executed anymore once it is disabled.

Closing Words

The new Telemetry task is only introduced on Windows and runs only if Telemetry is enabled (which it is by default). Mozilla is transparent about the introduction and while that is good, I’d preferred if the company would have informed users about it in the browser after the upgrade to Firefox 75 or installation of the browser and before the task is executed the first time.

[mai mult...]

What is pingsender.exe on Windows?

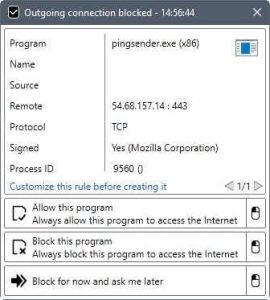
If you monitor the connections your computer makes, you may have noticed that a program called pingsender.exe is making regular connections to the Internet. Depending on the program or service that you use to monitor connections, you may get additional information right away. Windows Firewall Control for instance displays the remote IP address of the connection attempt, and the organization that signed the executable files.

That organization is Mozilla Corporation, and the IP address belongs to Amazon’s cloud service AWS.

  • Pingsender.exe

You may have noticed as well that pingsender.exe springs to action whenever you close the Firefox web browser. The article “Getting Firefox data faster: the shutdown pingsender” by Alessio Placitelli provides additional information on the executable file.

Firefox collects data if telemetry collecting is enabled. The browse transfers the data regularly to Mozilla in intervals. A big chunk of data was sent to Mozilla on the start of the next browsing session up until recently.
The issue was that this could mean that Mozilla would get the data hours, days or even weeks after it had been collected by the browser.
Pingsender is activated from the second browsing session on. It is launched as a separate process during Firefox shut down, and attempts to send the telemetry data that was collected during the browsing session to Mozilla.
Mozilla managed to reduce the sending time significantly. According to Placitelli, 85% of pings reach Mozilla within an hour, and 95% do so within the first 8 hours. Only 25% of pings reached Mozilla in the first hour without pingsender, and it took 90 hours to reach the 95% level of pings without pingsender.
In short: Pingsender is a separate process that Firefox spawns on shut down to send telemetry data to Mozilla.
Firefox users may load about:telemetry in the browser’s address bar to check the data that Mozilla is collecting.
Those who don’t want to provide Mozilla with data can turn the data off under about:preferences#privacy.

Another option is available. If Pingsender.exe is the problem, you may turn that feature off in the following way:

  1. Load about:config?filter=toolkit.telemetry.shutdownPingSender.enabled in the browser’s address bar. This opens the advanced Firefox configuration dialog.
  2. The preference toolkit.telemetry.shutdownPingSender.enabled determines whether Pingsender is used or not. You can disable it by setting its value to False. Simply double-click on the preference to do so.
  3. The preference toolkit.telemetry.shutdownPingSender.enabledFirstSession enables Pingsender for the first session as well.
[mai mult...]

Cortana can’t hear me

If Cortana doesn’t respond when you speak into your PC, try these steps to resolve the most common causes:
Check to make sure you have a working microphone

Cortana will not respond if your microphone does not work. To check if it’s working:

  1. Check that your microphone is enabled and set as the default device:
    • Right-click (or press and hold) the volume icon on the taskbar and select Sounds.
    • In the Recording tab, check that your microphone is enabled and set as the “Default device”.
  2. Make a test recording:
    • Right-click (or press and hold) the volume icon  on the taskbar and select Sounds.
    • In the Recording tab, look for green bars rising as you speak into your recording device.  If the bars are moving, your device is connected and working properly.
    • You should also consider using the Voice Recorder app that is included in Windows 10 to create a test recording.  Distortion or excessive noises may indicate a faulty microphone or a need to install updated audio device drivers.
[mai mult...]

How to export and delete attachments from Messages

How to export and delete attachments from Messages

Apple offers several ways to work with attachments, if you can find them.

Syncing Messages via iCloud lets you have access to all your conversations and associated pictures and files on all the devices you’ve connected with your iCloud account. However, Messages storage can really add up if you send and receive lots of images or videos.

Delete attachments along with conversations

mac911 ios top conversations IDG
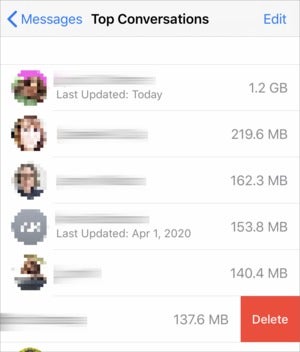
Top Conversations in iOS lets you delete all texts and attachments from an entire conversation. (Images blurred intentionally.)

In iOS or iPadOS, you can find conversations that contain the proportionately largest collection of attachments. Go to Settings > account name > iCloud > Manage Storage > Messages > Top Conversations. There you see a list by descending order of storage consumed of all your Messages conversations. You can swipe left and tap Delete to remove that conversation or swipe all the way from the right to left—but be wary! There’s no confirmation prompt, and all the texts and attachments are removed on all connected devices!

In macOS, select the conversation in Messages, and then select File > Delete Conversation.

mac911 macos delete conversation IDG
You can use Messages in macOS to delete a conversation, including its attachments.

Complete removal is probably not desirable, unless you want no record of those communications. (Hey, some breakups are bad.)

Delete the biggest attachments and optionally export them in iOS/iPadOS

mac911 ios attachment purge IDG
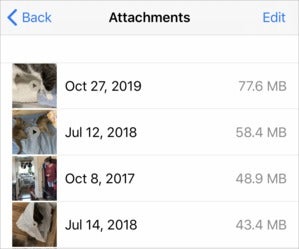
Viewing attachments in order of size lets you pick which to export and delete.

You can pick off the lowest-hanging fruit via iOS and iPadOS in reducing storage by going to Settings > General > iPhone/iPad Storage > Review Large Attachments. The Review Large Attachments link shows beneath the tap target how much storage files occupy.

In the Attachments view, tap the attachment and tap the Share button to save or export the item first. There’s no way to select and export multiple items.

You can swipe left on any attachment and then tap delete or swipe all the way from the right to left to delete it. There’s no prompt, so be careful. You can also tap Edit, select items, and tap the trash can icon to delete multiple files at once.

You would think you would be able to review attachments in the same iPhone/iPad Storage view by tapping Messages and then tapping links below the Documents heading, which shows a total of storage consumed next to each item. However, at least in the version of iOS at this writing, almost nothing appeared in the lists by category when I tapped them. There may be an issue in what’s stored locally on the device and what’s in iCloud, but I’d expect the two to be linked.

Export attachments via Messages on all platforms

There’s an easy way to export attachments in bulk, too.

In iOS and iPadOS:

  1. Open the Messages app.
  2. Tap on a conversation.
  3. Tap the avatar or name at the top of the conversation.
  4. Tap the “i” info button.
  5. Swipe down to Photos and tap See All Photos.
  6. Tap Select at the top of the view.
  7. Now you can select multiple photos and tap Save to store them in the device’s camera roll.

You can repeat that action for Screenshots (by tapping the Screenshots button at the top of the view), but there’s no way to access files.

mac911 save macos messages photos IDG
In Messages for macOS, you can save images out to Photos.

In macOS:

  1. Open the Messages app.
  2. Select the conversation.
  3. Click the Details link in the upper-right corner.
  4. Under Photos or Files, you can select one or multiple items.
  5. With Photos, you can Control-click and choose Add to Photos Library. With Photos and Files, you can drag the selection to the Finder.
[mai mult...]

How to stop iPhone videos from turning into a blurry mess on Android phones (and vice versa)

How to stop iPhone videos from turning into a blurry mess on Android phones (and vice versa)

Sadly, our friends don’t all have iPhones. That means some of our Message chats are peppered with green bubbles and send over regular SMS instead of via Apple’s ultra-fast iMessage system. But it’s not just the color and speed that makes iMessage superior: it’s also the clarity and downright watchability when dealing with videos.

If you thought the latest Game of Thrones episode was hard to see, clearly you’ve never sent a video from Messages on your iPhone to a friend with an Android phone. If they responded with something like, “What is this?!”, it probably wasn’t because of the content—it’s because they could barely see what was going on in the clip. By the time it reached their device, the video is a blurry, garbled mess. That carefully edited HD clip you took on your new iPhone was reduced to an unwatchable sludge once it reached your friend’s phone. And the same is true of the videos they send you.

The phenomenon can also affect group messages. As they say, once bad apple can spoil the bunch, so if one of the recipients in your group is on an Android phone, then the entire message will be sent over SMS. Hence, all users will see blurry, barely watchable videos, even iPhone users with iMessages enabled.

What gives? While it might seem like it’s the result of sabotage between platforms, that’s not the case. It has to do with compression. Apple handles the iPhone-to-iPhone delivery of texted videos, so no matter the size, videos are sent and received in their original quality. However, that’s not the case when not using Apple’s system from start to finish—your carrier gets in the way, and that’s when things break down.

Sent Pictures are mostly OK (large ones will be compressed but still viewable), videos files are hit hard. Texting from Android to Android will see minor compression, but it’s compounded when going from iPhone to Android or from Android to iPhone, since Apple’s system gets in the way. Even when sending relatively short video clips (around 15MB to 20MB), they’ll be compressed on one end and stay that way, resulting in a blurry, unwatchable video.

How can you fix it? Convince all of your friends and family to get an iPhone, of course, so everything you send will be over iMessage. Since that’s probably not realistic, here are some workarounds.

Use a third-party messaging app

The reason why texting video between iPhones and Apple’s Messages app doesn’t result in blurry photos is because Apple controls the compression on both ends. The same is true when you’re using another messaging service, such as Facebook Messenger, WhatsApp, Viber, etc. If you send a video using any of these services, it’ll reach your recipient with its quality intact (as long as you don’t run into any file-size limitations). However, you need to convince your friends to sign up and use the same service you use.

Use email instead

If there’s one messaging service that tried and true, it’s good, old-fashioned email. We all know how it works: launch your client of choice, create a new message, choose the video you want, and hit send. And you’ll be sure that it arrives in the same quality as it was sent.

Send a Google Photos link

It’s always handy to have a copy of Google Photos on your iPhone. It creates a library of every photo on your iPhone that can be viewed anywhere, and it also lets you share your photos with anyone, no matter what phone or device they have. Unless you have lots of space on your Google Drive and choose to save the “original” resolution, the quality will be a bit downgraded, but nothing like what happens when you try to text over Messages.

Use Dropbox or Google Drive

After you take a video, you don’t have to leave it in Apple Photos in order to share it. Open your photo in Photos and tap the share button to get a variety of options, including saving to Dropbox, Google Drive or your cloud-based storage service of choice. From there, you’ll be able to send a link with the full-sized file in tow.

Tell them to turn on chat

Android has finally gotten around to using RCS instead of SMS on Android, so if your friend is using a newer phone with Google’s Messages, they should see a new option for Chat, which brings iMessage-like features such as typing indicators and texting over Wi-Fi. While it won’t turn your Galaxy-using friends’ bubbles blue on iPhones, it should help increase the quality of the photos and videos your receive from them. Photos and videos taken within the Messages app are still compressed, but far less than before. (Unfortunately, this has no effect on the iPhone videos being sent to Android phones.)  They can enable chat (if it’s available) by tapping Settings in the overflow menu in the top right corner of the main conversation list.

[mai mult...]

How to set up and use RTX Voice on all NVIDIA GPUs

How to set up and use RTX Voice on all NVIDIA GPUs — including older GeForce GTX cards

RTX Voice makes an immediate difference in Zoom meetings and Twitch broadcasts.

RTX Voice is an exciting new feature that eliminates background noise from your voice chats — including everything from Twitch game streaming to Discord and Zoom, WebEx, or Slack calls. The feature leverages NVIDIA’s AI capabilities to cut out ambient noise from your surroundings. Best of all, it is available to download on older GeForce GTX cards as well. If you stream regularly and have issues with loud ambient noise, RTX Voice is the solution you’ve been waiting for. Here’s how to set it up on your NVIDIA GPU.

What is RTX Voice, and why is it a big deal?

RTX Voice relies on NVIDIA’s AI smarts to eliminate background noise from your microphone. Basically, if you’re streaming on Twitch or use Discord for voice chats when gaming, enabling RTX Voice makes a noticeable difference in cutting out ambient noise from your surroundings.

The best part about RTX Voice is that you can use it for video calls on Zoom, Skype, WebEx, and Slack.

But what makes the feature stand out is that it isn’t limited to game streaming services. You can use RTX Voice on Zoom, Skype, WebEx, and Slack, and it does a fantastic job eliminating background noise when you’re in a video call. With everyone working from home for the foreseeable future, RTX Voice could not have launched at a better time.

The feature is particularly great at cutting out keyboard sounds, and if you use a mechanical keyboard, RTX Voice makes all the difference. It is astonishing just how well it works in real-world use: I used Audacity to record a few minutes’ worth of audio and started clattering away on my mechanical keyboard (I’m using one with Cherry MX Brown keys) at the same time, and the feature eliminated all the keyboard chatter.

That’s not all, because RTX Voice works with incoming audio as well. So if you’re a video call and you notice a lot of interference from someone else, you can toggle RTX Voice for incoming audio and you’ll immediately see a difference. Basically, if you’re attending a lot of meetings from home these days and have an NVIDIA video card, RTX Voice is a no-brainer.

RTX Voice currently works with these apps

RTX Voice works best on game streaming services like Twitch Studio and Discord, but it isn’t limited to these clients. You can also use it on video calling services like Zoom, WebEx, Skype, and Slack. Here’s the full list of services:

  • OBS Studio
  • Streamlabs
  • XSplit Broadcaster
  • XSplit Gamecaster
  • Twitch Studio
  • Discord
  • Google Chrome
  • Battle.net Chat
  • WebEx
  • Skype
  • Zoom
  • Slack
  • Steam Chat

NVIDIA notes that WebEx, Skype, Zoom, and Slack users may see a few issues when using RTX Voice. The feature itself is still in beta (the current version is 0.5.12.6), and any potential issues should be ironed out in the coming weeks.

How to enable RTX Voice on your NVIDIA GeForce RTX GPU

It’s pretty straightforward to install and get started with RTX Voice on your GeForce RTX GPU. Before you start, make sure you’re running the latest Game Ready driver for your video card. If not, download the latest driver for your RTX card.

Here’s the breakdown:

  1. Download the installer for RTX Voice.
  2. Run the installer.
  3. Hit Agree and continue to start the installation.
  4. You’ll see a message saying “NVIDIA Installer has finished.” Close the installer.

It’s as easy as that. I’ll go into more detail on setting up RTX Voice down below.

How to enable RTX Voice on your NVIDIA GeForce GTX GPU

Although RTX Voice is designed for NVIDIA’s GeForce RTX cards, you can install it on an older GeForce GTX video card. The workaround was first spotted on Guru3D forums, and I tested the feature on a GTX 1080 and GTX 1070, and it worked just fine. You don’t need the dedicated Tensor cores on the Turing-based RTX cards; the CUDA cores on the older GTX series cards are more than adequate.

That said, you will need to tweak a few settings to get RTX Voice working on your GeForce GTX video card. Before you start, make sure you’re running the latest Game Ready driver for your video card. Download the latest driver from here.

Got the latest driver on your GTX video card? Here’s how to install RTX Voice:

  1. Download the installer for RTX Voice.
  2. Run the installer.
  3. You’ll get an error message saying “NVIDIA Installer cannot continue.” Close the installer.
  4. Launch Windows Explorer and navigate to the C:\Temp\NVRTXVoice folder. That’s where the NVIDIA installer extracts the files.
  5. Open the NvAFX folder within the main NVRTXVoice folder.
  6. Open the file RTXVoice.nvi with a text editor (I use Notepad++).
  7. Delete this section of code from the file: <constraints> <property name=”Feature.RTXVoice” level=”silent” text=”${{InstallBlockedMessage}}”/> </constraints>
  8. Save the file and close the text editor.
  9. Now Manually run the installer* by going to **C:\Temp\NVRTXVoice\setup.exe.
  10. The installation should go through without any issues.
[mai mult...]

How to Set Up Microsoft Teams

How to Set Up Microsoft Teams


Microsoft Teams directly competes with Slack and will replace Skype for Business, as a premier collaborative communications platform for large and small businesses. Set up an organization in Teams and invite your colleagues to start chatting, sharing, and integrating.


How to Create an Organization in Microsoft Teams


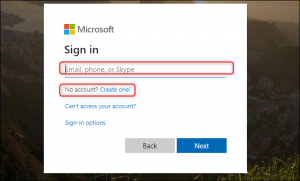
Direct any browser to “teams.microsoft.com” and sign in to your Microsoft account. You can create an account for free if you don’t already have one.

Once you’re signed in to your Microsoft account, select “Get The Windows App” to download and install the app on your Windows, macOS, iOS, Android, or Linux device.


The browser-based web app version doesn’t support real-time calls or meetings, but it is sometimes faster to access Teams through a browser. If you want to access Teams through your browser without downloading the app, click “Use The Web App Instead.”

When the Teams app is first installed on your device, you may need to sign in again. After, click “Sign Up For Teams” to begin setting up your organization.


A new web page will open where you can read through a full list of features and compare pricing plans. Teams is free if you’re using it with no other Microsoft Office 365 apps.

If you’re joining an existing organization, choose “Already Using Teams? Sign In.” Once you sign in, you’ll be ready to explore your organization’s existing Teams infrastructure and start chatting with your colleagues.

If you’re starting a new organization, click “Sign Up For Free.”

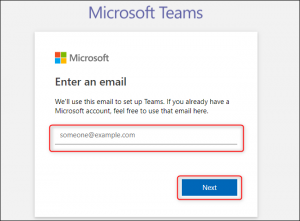
Enter your email and then select “Next“.

Enter your first and last name as well as the name of your company or organization. When you’re done, click “Set Up Teams.”

Assuming the name of your organization isn’t already taken, Teams will start creating your organization and then bring up the web app. Once you’re logged in to Teams for the first time, it will ask for your name and picture (both optional), then guide you through its interface and features.

How to Invite People to Your Organization in Microsoft Teams

You’ll receive an email with a link you can send to colleagues to invite them to join your new Teams organization. Teams will also greet you with this link when you first sign in.

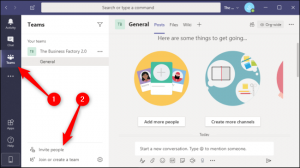
You can always invite new people to your organization within the Teams application. Select the “Teams” tab on the left and then click “Invite People.”

In this menu, you can copy an invite link to your clipboard, invite contacts directly from your email contact list, or invite people with different email addresses. These email addresses do not have to be Microsoft email addresses, but your invitees will be prompted to use their email addresses to create a Microsoft account.

Your invitees will receive an email like the one below. To join the organization, your colleagues need to click “Join Teams” in this email. They can also click the “iOS” and “Android” buttons to install the mobile app for their respective device.

You and your colleagues can now collaborate remotely through this organization in Microsoft Teams. You can build a better communications platform by creating new teams within your organization, integrating Teams with Office 365, and sharing your screen, your files, or your favorite cat pictures.

[mai mult...]