Winrmsrv.exe requiring Firewall Access? It’s Definitely a Malware

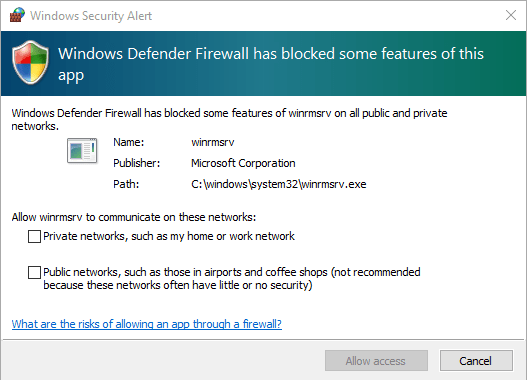
Did you just turn ON your computer and this Windows Firewall dialogue shows up requiring Firewall permission for winrmsrv.exe? Yes, it is most definitely a virus / trojan / malware. Because the original Microsoft Windows winrmsrv file does not need any Network access.

How to ensure if winrmsrv really is a malware?

If you’re still doubtful and want to make sure that the winrmsrv.exe file located in the C:\Windows\System32\winrmsrv.exe really is a virus or trojan them here’s what you need to do.

Go to your Web browser and open www.virustotal.com. Now click on the File option and select Choose File. Browse to the location of the winrmsrv.exe file (C:\Windows\System32\winrmsrv.exe) and upload the file to Virustotal.

VirusTotal scans the file with a number of popular Anti-virus and Anti-malware engines and gives you the result immediately. If you see that there are multiple anti-viruses reporting the file as a Trojan or malware then it is definitely a malware. Now that you are certain that this file is a Trojan / Malware, the next step is to remove it.

How to Remove winrmsrv from your PC

We have tried removing it by installing a number of popular Anti-viruses (both Free and Paid) and the most effective and quickest way was to remove it with MalwareBytes. Simply download the Free version of Malwarebytes from HERE. You don’t need the premium version to remove the virus from your PC. The free version will be sufficient.

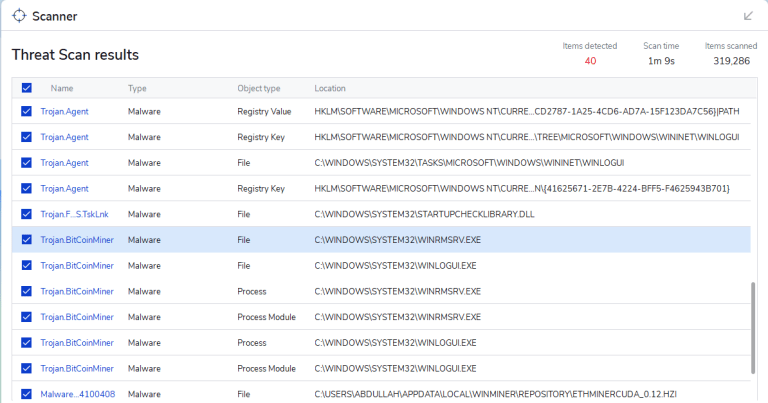
Once it’s downloaded, go ahead and install it on your PC. After installing it, start a complete Scan of your PC. After a few minutes, you will get the result of the Scan. You should be able to find the entry of the winrmsrv virus among the list of infected files.

Now click on Quarantine to get rid of all the viruses and malwares found on your system. After that it should be as good as new.

Winrmsrv can be a very dangerous file for your PC. Most Anti-virus engines classify it as a Trojan and Crypto-miner. The attacker can gain full control of your PC. It can also be used to mine crypto-currency from your PC. In this case your PC will give very degraded performance and you will notice huge lags while browsing or gaming etc.

[mai mult...]

How to Fix Laptop Screen going Messy or Distorted while on Battery

Have you encountered such a problem when your Laptop screen suddenly starts to distort and get messy while on battery (un-plugged)? Well, you’re not the first one because many users have complained about this issue from time to time. You will be surprised to know that there’s actually a very easy fix for it. All you need to do is configure a specific setting in your Intel Graphics control panel.

There are two settings that are actually responsible for this issue:

  • Rate switching
  • Power Saving Technology

To put it simply, you need to disable the Power saving options in the Intel Graphics properties. Below I will show you how to do exactly that.

How to Adjust Power settings to Fix Laptop Screen Distortion

Here are simple steps with screenshots that will get rid of the messy / distorted Laptop screen issue:

  • Go to the Intel Graphics Properties from your Windows Desktop.
  • In the Intel Graphics control Panel you should see multiple options including Basic mode, Advanced mode and Wizard mode. Select Advanced mode and click OK.
  • In the next window, select the Power option from the left menu and then select On Battery in the drop down.
  • In the next screen, you need to disable the power conservation features by unchecking both options: “Display Refresh Rate Switching” and “Display Power saving Technology”.
  • After unchecking both options, click on “Apply” and then click “Ok”.
  • This procedure will solve the problem once and for all. If for some reason the problem still persists, that means there is something wrong with the screen or the external graphics adapter. For most users, this technique fixes the issue.
  • You can test by plugging and unplugging the power adapter from your laptop. There should be no distortion or messy screen when the PC is on battery.
[mai mult...]

How to Disable Internal Laptop Keyboard in Windows OS

Sometimes, due to any reason you may want to disable or block your internal Laptop keyboard. In this guide I am going to show you how to do that in Windows OS without installing any third-party software or application. There could be a number of reasons why you would want to disable the Internal Keyboard. Here are some of the most common scenarios that users usually face:

  • Laptop keyboard is malfunctioning and is not usable anymore
  • You want to use an external keyboard instead of the built-in one
  • Some keys are malfunctioning, causing problems while operating the PC
  • Internal keyboard wiring is faulty and is automatically deleting files or sending commands

Sometimes, you don’t want to visit the local repair store because it’s just not worth it. The repair process can be cumbersome and fixing the laptop might charge you a lot of money. In some scenarios, it is just easier to plugin an external USB Keyboard and use it instead. We are going to explore a way to turn off the keyboard without installing any software on your PC. Windows offers built-in utilities and tools to achieve that within a matter of minutes.

Steps to Disable Keyboard

The procedure is very simple. You can easily disable or block any device including Keyboard, Mouse, Touchpad, USB storage or any other device with the Local Group Policy editor. Group Policy editor is a built-in Windows utility that allows you to control every aspect of your Windows PC. If you know how to properly use this tool, it will give you super power over your PC.

Follow the steps below to turn off your Laptop keyboard by changing the Group Policies:

  • Open the ‘Run’ window and type gpedit.msc and press Enter.
  • Now, under the Computer Configuration, traverse to the following path: Administrative Templates > System > Device Installation > Device Installation Restrictions.
  • Under the list of policies, you need to select the one that says Prevent Installation of devices that match any of these device IDs and then double-click on it.
  • Next, select the Enabled option and click on the Show button to open the Contents window. In this window, you will need to enter the Device ID for the Keyboard you wish to disable.
  • Now, as you can guess, you need to extract the device ID of the keyboard you want to block. To do that, you need to go to the Device Manager. To open Device manager, you can search in the Windows search bar and you will see it in the search results.
  • In the Device manager, go to the Keyboard container, right-click on the Keyboard that needs to be blocked and click on Properties.
  • Now go to the Details tab and select hardware ids from the drop down menu.
  • Afterwards, select the top most hardware id and, right-click on it and select Copy.
  • Go back to the Show contents window of the Group policy editor and paste the hardware id of the keyboard and click OK.
  • Once that’s done, the final step is to uninstall the driver of the Keyboard device from the Device manager. In the Device manager, right-click on the Keyboard and click on Uninstall Device.
  • That’s all you need to do. Once you have completed all these steps, it is time to test the new policy setting. To test it, simply restart your PC and try using the keyboard keys. If everything went right, the keyboard will not work. Now you can plugin an external keyboard and use it instead.
  • How to Revert the Policy Setting

    If ever in the future you need to revert the configuration, it can be done very easily. Go to the policy setting and instead of the Enabled option, select Not Configured. Then restart the PC. This will revert the policy setting and now you will be able to use your keyboard just like before.That’s all you need to do. Once you have completed all these steps, it is time to test the new policy setting. To test it, simply restart your PC and try using the keyboard keys. If everything went right, the keyboard will not work. Now you can plugin an external keyboard and use it instead.

[mai mult...]

How to Restrict USB Read and Write Access in Windows 10

In many situations you might need to restrict USB storage Read and Write access on your Windows 10 system. In this guide I am going to show you a very easy way to do that without typing any commands. Fortunately, Windows gives you granular control over your devices without having the need to install any third party software.

Here are some of the most logical reasons you might want to control USB device access on your PC:

  • To safeguard your PC from malware and viruses. USB devices are the primary source of malware infections
  • To protect your data from getting stolen by anyone with physical access to your PC
  • Not letting someone Live Boot another Operating System and get into your HDD storage

There can be various reasons, and honestly, it is very likely that you may face such a situation at some point. These kind of attacks are more occurring than you might imagine. Any newbie hacker or script kiddie can easily get into your system with just a USB stick.

Restrict / Disable USB Read and Write Access via Group Policy

We are going to look at two ways to disable USB device Read and Write access in Windows 10. Windows comes with Group Policies that control the working environment for Users and Computer accounts. You can easily control your USB device’s permissions by configuring a group policy. Here are two scenarios that you can control:

Denying Access for All Users (Method-1)

Restricting USB devices for all users can be done with a few very easy steps:

  1. First you need to open the Local Group Policy editor. To do that, go to the ‘Run’ and type gpedit.msc and click Enter.

2. One the group policy editor opens, you will see two options: “Computer Configuration” and “User Configuration”. Open the User Configuration by double-clicking on it:

3. In the next Window, browse to the following path: Administrative Templates > System > Removable Storage Access.

4. In the next Window you will see a list of Group Policy settings that includes different types of devices including CD and DVD, Floppy Drives, Tape drives, WPD devices and Removable Disks. The ones that we are interested are Removable Disks. From these settings you can control both Read / Write permissions for USB flash drives. Let’s go ahead and Deny both the Read and Write Permissions:

5. Double click on both the permissions one by one and select the Enable option to enforce these restrictions. Click ‘Apply’ and then ‘OK’.

6. After applying these restrictions, you can check whether the settings have applied correctly or not. To check that, insert a USB flash drive into your system’s USB port and try to open it from ‘My Computer’. It should give the following message:

7. If you see this message, that means the policy setting has applied correctly and you have successfully restricted access to USB drives for all users. To remove the policy setting, simply go back to the settings and select Not Configured. It’s that simple.

Denying Access for a Specific User (Method-2)

If you need to restrict USB access for a specific user that uses your computer and not yourself then it’s also possible. The way to do it is a bit different than the method explained above. With this method, you can also enforce these restrictions for Administrators and Non-Administrators separately. Here are the steps to do it:

  • First you need to open the Run dialog box and type mmc.exe and press Enter. This will open the Microsoft Management Console.
  • In the Console Window, click on the ‘File’ menu and select Add/Remove Snap-in.
  • In the list of Available Snap-ins, select Group Policy Object Editor and click on Add.
  • A window of Group Policy Wizard will pop up. Here you will have to click the browse button to be able to select the User groups of your choice.
  • In the next window, click on the Users tab and select the user for which you want to impose the restriction. Click OK and then click ‘Finish’.
  • After clicking OK, you should see the Group Policy Editor window just like we saw it in the first method. Simply double-click the container and you will see the same Group policy settings that were described in the first method.
  • Now you have to follow the same path: User Configuration > Administrative Templates > System > Removable Storage Access and apply the same Read / Write Deny policy setting on Removable disks. Once it’s done, you can test the policy setting by logging in from that particular User and plugging in the USB storage device. You should see the same error message.
[mai mult...]

Opera adds the Play Music sidebar to Opera Browser for Spotify, Youtube and Apple

Opera Software released a new Developer version of its Opera web browser. The new version introduces support for music playback from the browser’s sidebar. Opera Developer is the cutting-edge development version of the browser. Features are introduced in the browser first before they land in Beta and Stable versions.

If you do like to play music in your browser, you may have noticed that it usually involves juggling between different windows, e.g. different browser tabs in a single browser, or, in the case of a dedicated desktop music player, between different program windows.

Some browsers introduced global media controls, e.g. Firefox and Chrome, to control playback in that browser without switching windows. While that is useful to some, it still requires accessing the music service’s interface for some operations, e.g. searching for music, playing a different playlist, or adding new songs to the existing playlist.

The Opera browser implementation is controlled via an icon in the browser’s sidebar. A click on it display the supported services — currently Apple Music, Spotify, and YouTube Music — that you may access from the sidebar. You can resize the interface and pin it if you want to make it stick to the screen.

A click on a service opens its startpage. What happens next depends on that service, as you may need to sign-in to an account to start using it. A click on YouTube Music displays the service’s startpage and options to play one of the listed playlists, e.g. top 100 charts, or to search for music

A click on the play button starts playback right away. Some services may display ads to free users, and these are played even if you have enabled Opera’s built-in adblocker.

Music playback continues even if the sidebar interface is hidden; Opera indicates playback by changing the icon of the player. If a site is opened that plays music or audio as well, music playback is paused automatically by the player to avoid that multiple sounds play at the same time in the browser. Playback is resumed once all other audio stops playing in the browser.

Opera users may customize the sidebar; they may hide any service that they don’t use to avoid clicking on these unintentionally. Click on the three dots at the bottom of the sidebar and toggle the options to hide them in the interface. You can also hide the entire sidebar if you don’t use it.

Installation links:

[mai mult...]

Enable or Disable Programs and Apps Automatically Restarting with Windows 10

In Windows 10, you might have noticed that sometimes if you don’t close a running program or UWP app and you restart or sign out, the program or app automatically launches once you sign in. Actually Windows 10 comes with a special feature called “Windows Restart Manager” which detects programs and apps (including UWP or Store apps) running in the operating system and if the user doesn’t close those apps and restarts the computer or logs off, this Restart Manager feature automatically restores the previously running programs and apps after reboot or sign in.

To take benefit of this feature, 3rd party programs and apps need to register as restartable app with Restart Manager functionality. Now-a-days many programs such as Mozilla Firefox, etc are utilizing this feature to automatic restart once user restarts or signs out. Don’t confuse this feature with automatic startup programs. Many programs and apps add their entries to Windows startup list and automatically launch as soon as the user logins to Desktop. You can manage (enable/disable) those startup programs.

Windows Restart Manager is a different feature. It restarts those programs and apps which were registered to take benefit of this functionality and were running when the user restarted his device. It doesn’t matter whether those programs and apps have their entries in Startup programs list.

Windows 10 allows users to enable or disable this functionality using Settings app. Previously this functionality was tied with finishing setting up the device after Windows Updates installed in the device.Now the newer versions of Windows 10 (version 2004 and later) come with a dedicated and separate option to turn on/off automatically restarting programs and apps after reboot or sign out.

If you also want to enable or disable this functionality in Windows 10, following steps will help you:

1. Open Settings app from Start Menu. Alternatively, you can press WIN+I keys together to open Settings directly.

2. Now click on Accounts icon in Settings app and then click on Sign-in Options tab present in left-side pane.

PS: Alternatively, You can directly launch this page using “ms-settings:signinoptions” command in RUN dialog box

3. Scroll down to bottom and you’ll see “Automatically save my restartable apps when I sign out and restart them after I sign in” option under “Restart apps” section.

If you want Windows 10 to restart programs and apps after sign in, set the option to ON.

If you want to prevent/restrict Windows 10 from automatically restarting programs and apps after you sign in, set the option to OFF.

[mai mult...]

How to lower the WhatsApp data usage

The following guide provides you with instructions on lowering the data usage of the popular messaging application WhatsApp.Created for Android devices, you can use the guide if you run WhatsApp on another mobile operating system as well.

Applications that you run regularly on your mobile devices can use a considerable amount of data when they are running.Many apps continue to run in the background once they have been started on a device. This is certainly true for most messaging applications, as they check regularly for new messages and other content to notify you the moment it is detected.

How to lower the WhatsApp data usage

First thing you need to do is verify WhatsApp’s data usage on your device. How that is done depends largely on your device. On my Xiaomi Mi4c, I select Security > Data Usage to find out about the data usage of the app. You may find data usage in a different location on your device, for instance under Networks > Data Usage.

If you cannot find that option, or don’t have it, then you may need to install a third-party data tracking application. You can use My Data Manager for that for instance. I suggest you run it at least a week before you check WhatsApp’s data usage during that time.

Once you have the number, you need to decide whether it is too high, or acceptable. If you think it is too high, you can modify some WhatsApp settings to lower the application’s data usage.

  1. Select WhatsApp > Menu > Settings.
  2. Select the Data Usage menu when the Settings page opens.

There you find the following options to lower WhatsApp’s data usage:

Configure media auto-download. You may configure this independently for mobile data, WiFi data, and roaming.

The default setting downloads photos when on mobile, all attachments when connected to a Wifi, and nothing at all when roaming.

To lower the usage, consider blocking all downloads from being processed automatically on mobile and / or on WiFi. The latter depends on whether the wireless networks that you connect the mobile device to are limited in regards to bandwidth.

Note that you may still download any attachment manually. WhatsApp displays a placeholder for attachments that have not been auto-downloaded by the app. A tap on the placeholder downloads the attachments to your device.

Low data usage. This setting enables the low data usage mode during WhatsApp calls. Please note that this goes hand in hand with a reduction in call quality. If you use WhatsApp for calls regularly, you may want to test the setting to see if you can live with the quality reduction, and whether reducing it has a big enough impact on the data usage of the app to make it worthwhile.

Chat Backup settings are another thing that you may want to check. While not configured by default to send data to a cloud provider, WhatsApp may be configured to do that.

Go to Menu > Settings > Chat > Chat Backup to get started. You find the “back up to Google Drive” option on the page. If it is enabled, consider disabling it as WhatsApp will transfer data to Google Drive regularly when it is enabled.

You may change other preferences there, for instance so that videos are not backed up to Google Drive, or the frequency of backups.

[mai mult...]

How to delete WhatsApp messages that you sent

WhatsApp added a new feature to its messaging applications that you may use to delete messages that you sent already using the client.

Messages that you sent up until now could not not be deleted by you after the fact. There was no grace period to undo the sending, and it seems that users requested such a feature which works similarly to how email providers like Gmail provide undo options for a short period of time after sending messages.

This changes with the new deleting messages for everyone functionality that is implemented in the most recent versions of the WhatsApp client for Android, iOS and Windows Phone.

Deleting WhatsApp messages

The new feature has requirements that need to be met.

  1. Messages can only be deleted remotely (read: for everyone), if seven minutes have not passed since they were sent.
  2. Sender and recipients need to use the most recent version of the WhatsApp client.

WhatsApp won’t notify you if the deleting of the message is not successful. It may still be deleted on the device that you are using, but it may not have been deleted on the recipients device. Also, recipients may still see the message before it is deleted.

So, how do you delete messages that you sent using WhatsApp?

The process is simple:

  1. Open the chat and scroll to the message that you want deleted.
  2. Long-tap on the message that you want to delete.
  3. Optional: you may tap on additional messages to mark them as well and delete them in one go.
  4. Tap on the trashcan icon in the interface.
  5. Select the “delete for everyone” option to have WhatsApp delete the selected message locally and remotely.

Deleted messages are marked as such in the conversation history along with the time they were deleted. There is no option to restore deleted messages however.

[mai mult...]

How to show a clear logon background on Windows 10

How to show a clear logon background on Windows 10

When you sign-in to a Windows 10 device you may notice a rather odd behavior. The background image is displayed just fine when you start the device but as soon as you interact with the screen, it is blurred. The following guide helps you restore a clear logon background.

Microsoft probably thought it a good idea to put the focus on the sign-in form and the few icons that it displays on the screen. The change was introduced in Windows 10 version 1903 and is active by default in all recent versions of Microsoft’s operating system.

Windows 10 provides administrators with several options when it comes to disabling the lockscreen blur. The following guide walks you through all available options.

This is probably the easiest option as it requires no changes to the Windows Registry or Group Policy.

  1. Open the Windows 10 Start Menu and select Settings, or use the keyboard shortcut Windows-I to open the Settings application directly.
  2. Go to Personalization > Colors
  3. Toggle the option “Transparency effects” so that its value is “Off”.

Note that this turns off all transparency effects on the system. Undo this by setting the value of Transparency effects to On.

Microsoft added an option to the Group Policy that provides a narrower solution as it is designed to show a clear background.

Note that the Group Policy Editor is not part of Home versions of Windows 10.

  1. Use the keyboard shortcut Windows-R to open the run box.
  2. Type gpedit.msc and select OK to start the Group Policy Editor.
  3. Go to Computer Configuration > Administrative Templates > System > Logon.
  4. Double-click on “Show clear logon background”.
  5. Change the status of the policy to “Enabled” and click ok.

The policy’s description:

This policy setting disables the acrylic blur effect on logon background image. If you enable this policy, the logon background image shows without blur. If you disable or do not configure this policy, the logon background image adopts the acrylic blur effect.

Undo this by setting the policy to Disabled or Not Configured.

You can also edit the Windows 10 Registry to force the system to display a clear background on the lockscreen. The option is useful to Home users as they cannot use the Group Policy to do that.

  1. Use the keyboard shortcut Windows-R to open the run box.
  2. Type regedit.exe and select OK to start the Registry Editor.
  3. Go to Computer\HKEY_LOCAL_MACHINE\SOFTWARE\Policies\Microsoft\Windows\System.
    1. If any of the keys do not exist, e.g. System, right-click on the previous key, e.g. Windows in the case of system and select New > Key to create it.
  4. Right-click on System and select New > Dword (32-bit) Value.
  5. Name it DisableAcrylicBackgroundOnLogon.
  6. Double-click on the newly created Dword and set its value to 1.
  7. Restart the computer.

Undo this by setting the value of the Dword DisableAcrylicBackgroundOnLogon to 0, or by deleting the Dword.

Closing Words

All three options work but you may favor the second and third options as they change the lockscreen behavior only while the first disables all transparency effects on the system.

[mai mult...]

How to check whether your Chrome on Android is 32-bit or 64-bit

How to check whether your Chrome on Android is 32-bit or 64-bit

Google plans to migrate installations of the company’s Chrome web browser on Android from 32-bit to 64-bit in the near future. While the migration is limited to devices running Android 10 or newer, it should have a positive effect on the performance of the browser and security. Chrome users on Android may wonder whether their version of the web browser is a 32-bit or a 64-bit application to find out whether their version of Chrome has been migrated already.

Good news is that the process of finding out is relatively easy. All you need to do is load chrome://version in the mobile browser’s address bar to get information about the architecture and related information. Check the first line of the output on the page to find out whether the installed version of Chrome is 32-bit or 64-bit. The browser has been upgraded to the 64-bit version already if you see 64-bit listed in that line; if it still states 32-bit, you are still using a 32-bit version and need to wait for the migration to happen on the device.

The following screenshot shows a 32-bit version of Google Chrome Stable, currently at version 83, and a 64-bit version of Google Chrome Dev, currently at version 85, running on the same device.

Google Play, the official store for Android applications on most devices, does not provide options to download 32-bit or 64-bit versions of applications. There is no official option to migrate manually to the 64-bit version of Chrome if the 32-bit version is still installed or offered. Third-party sites that provide downloads for Android APK files may offer 64-bit versions of Google Chrome that users with Android 10 or newer versions of the operating system may install. While that may make sense in some cases, it is safer to wait for the official rollout of the feature.

[mai mult...]