
If you’re still using Excel’s default layout, you’re making things harder than they need to be. The software’s interface is surprisingly flexible if you know where to look, and making just a few tweaks can turn a standard spreadsheet app into a personalized number cruncher.
[mai mult...]Running out of phone storage?
Your phone’s storage is bound to get depleted over time. We often blame it on photos and videos, but apps use a lot of storage, too. There are, however, some apps that use much more storage than others.
[mai mult...]Stop using pie charts in Excel: build this dynamic bar chart instead
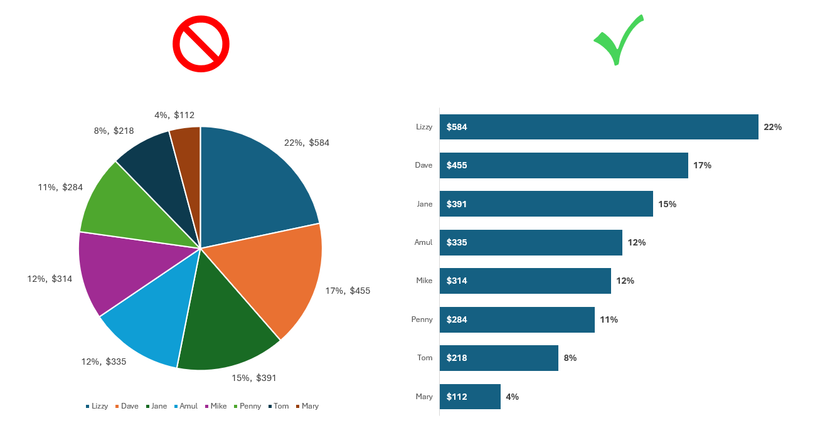
You’ve finalized your Excel spreadsheet and want to visualize your numbers. A pie chart is a tempting option: it takes 20 seconds to create and makes you look sophisticated. However, it often causes more confusion than it solves. To truly impress your coworkers and make your data pop, ditch the circle and build a bar chart that updates itself.
Once you move past three or four slices, pie charts become unreadable, often requiring messy legends and manual labels that clutter the screen. More importantly, even if you sort the underlying data feeding a pie chart, the circular format makes the hierarchy difficult to follow—leaving your visuals in a jumbled mess. By taking the hallmarks of a pie chart and applying them to a dynamic bar chart, you solve all these problems—no legends, no clunky labels, and no confusing order.
5 Gmail features you can turn off
Gmail is one of Google’s oldest apps, and it might be the most widely used. Tons of features have been added over the years. The good news is that many of these things can be turned off—if you can find them in the messy settings.
[mai mult...]7 of the least-known Excel charts and why you should use them
5 Outlook tools that save me time every single day
There’s a reason why Outlook is one of the most widely used email providers. But it’s even better when you know how to get around it better. Here are 5 features you can use to actually get around it faster and way more efficiently.
[mai mult...]How to build a “pro” dashboard engine with excel
Stop wasting hours manually sorting, deduplicating, and filtering your data in Excel. Instead, combine FILTER, UNIQUE, and SORTBY to create a self-cleaning data engine that does all the work from a single cell and never needs updating.
[mai mult...]6 ways to speed up email management in Outlook
How to share files safely using OneDrive links
CLoud services are an important part of our day-to-day lives, but a careless mistake can result in you accidentally sharing sensitive files or documents with the wrong person, or accidentally exposing a file to the entire internet.
[mai mult...]