How to creating Bar Charts using the REPT Function in Excel

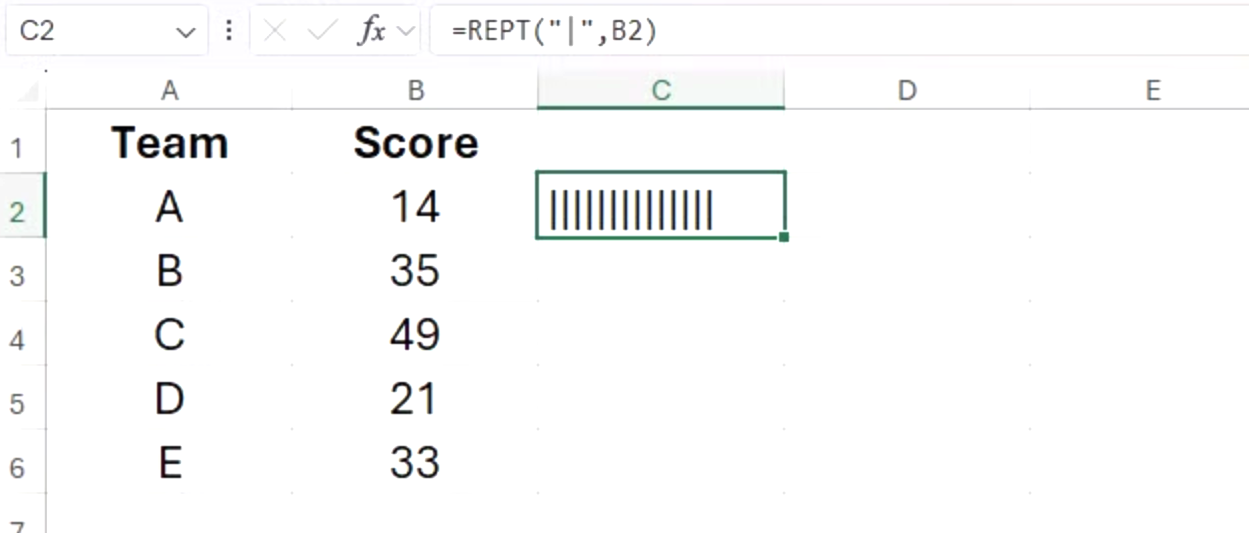
Another way to create in-cell bar charts is to use the REPT function, which repeats a specified character a given number of times.

In the cell next to the first value you want to visualize, type:
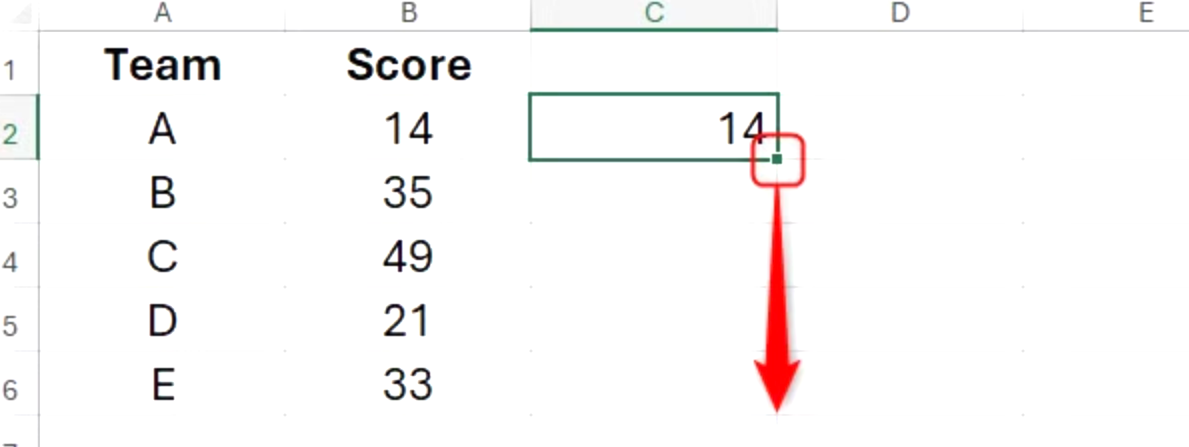
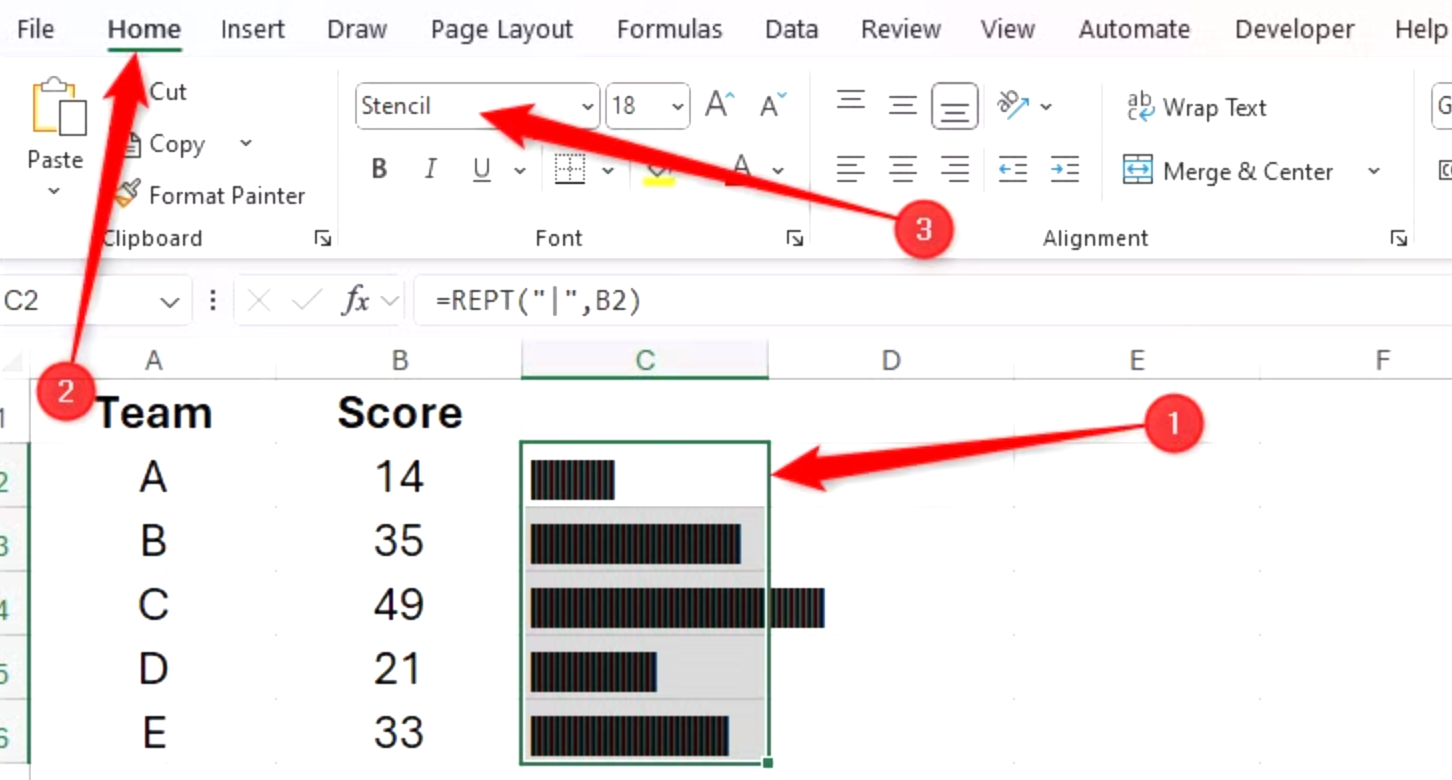
=REPT("|",x)

and press Ctrl+Enter.

In this formula, “|” is the vertical glyph character (enclosed in double quotes) often accessed by pressing Shift or Fn at the same time as the relevant key, and x is a reference to a cell containing a numerical value. Here, the formula references cell B2 and so returns 14 vertical glyphs.

Double-click the fill handle of that cell to repeat the formula down the column.

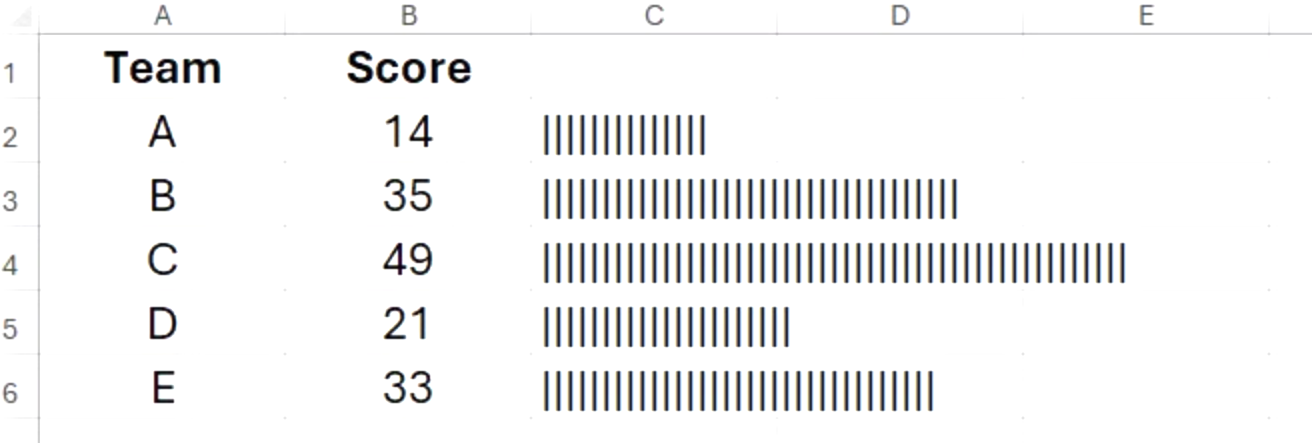
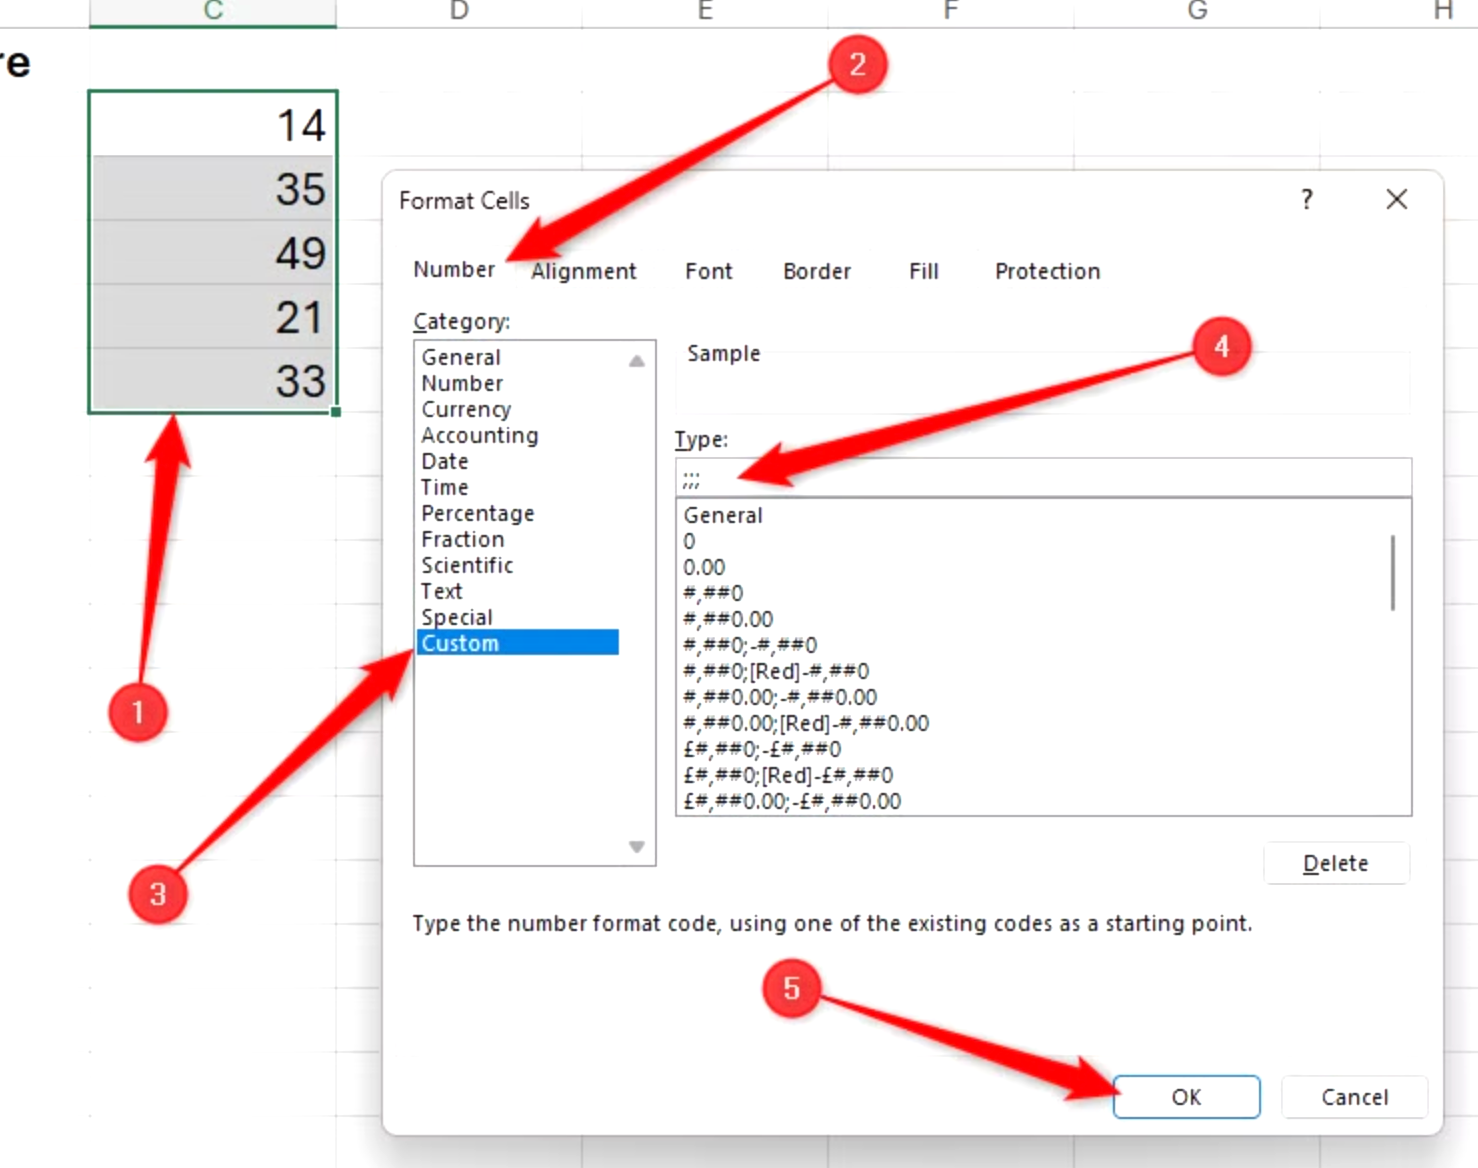
At the moment, the data is visualized as a tally graph, as the default fonts in Excel place small spaces between each character. To fix this, select the relevant cells, and in the Home tab on the ribbon, select a typeface that doesn’t separate characters with a space, like “Stencil” or “Playbill.”

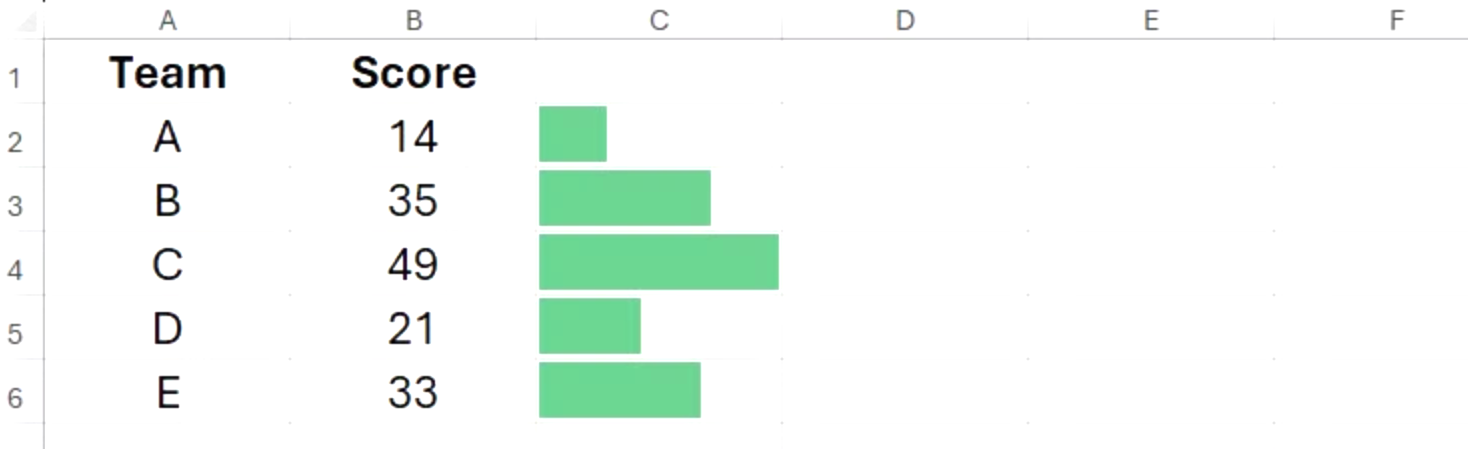
Where data bars adjust to the column width, bar charts created using the REPT function expand or contract dynamically, regardless of the width of the cells they occupy.

[mai mult...]

How to creating Bar Charts using conditional formatting in Excel

To create in-cell bar charts using conditional formatting, select the cells containing the values, and in the Home tab on the ribbon, click “Conditional Formatting”

Then, hover over “Data Bars,” and select a fill type.

Now, the cells you selected are partially filled according to their relative values in the dataset. The largest value is represented by a fully filled cell, while only zeros will be completely empty.

What’s more, if the values change, so do the lengths of the data bars.

However, maybe you want the data bars to be next to the cells containing the values. In the screenshot above, that would mean that column B contains the values, and column C contains the data bars. To do this, first, select cell C2, type:

=B2

and press Ctrl+Enter to stay in the same cell.

Now, double-click the fill handle to duplicate the formula down the column.

Next, select the duplicated values you just generated, and press Ctrl+1 to open the Format Cells dialog box. Then, in the Number tab, click “Custom,” type ;;; (three semicolons) into the text field, and click “OK.”

Even though the cells in column C appear empty, they still contain the values you duplicated from column B earlier—they’re just invisible.

Now, apply the conditional formatting data bars to the cells containing the invisible values.

[mai mult...]

How to manage Quick Actions on a Mac

Over time, as you keep creating new custom Quick Actions, your Mac’s Quick Actions can become cluttered due to too many Quick Actions. You can prevent this by disabling the Quick Actions you don’t use regularly.

To manage Quick Actions on your Mac, launch the “System Settings” app. Go to “General,” scroll down, and select “Login Items & Extensions”.

Scroll down to the “Extensions” section and click the “i” button next to “Finder.” You should see a list of all the built-in and custom Quick Actions you currently have on your Mac. Flip the toggle next to a Quick Action off to disable it and hit “Done”.

In the future, if you need to use this Quick Action again, you can enable it. Head back to the same page and toggle on the switch next to it.

[mai mult...]

How to use Quick actions on a Mac

As soon as you create a Quick Action—using either method—it’s automatically added to the Quick Actions menu on your Mac, ready to use.

Head over to Finder or the desktop—wherever you have the files you want to work with stored. Select the file on which you want to use a Quick Action; you can choose multiple files, too. Now, right-click (Control-click) on your selection, select “Quick Actions,” and click the Quick Action you want to use.

Alternatively, you can click on the Quick Action you want to use in the Preview pane. You need to enable the Preview pane for this to work. Open Finder and go to View > Show Preview, or press the Command+Shift+P shortcut.

Similarly, if your Mac has a Touch Bar, you can execute Quick Actions from it as well. However, you’ll need to configure it first from the Touch Bar settings.

Depending on what Quick Action you just used, it may work in the background, apply changes to the selected files, and save them automatically. Or it may ask for your input. The Convert Image Quick Action is a great example of this. When you run it, you’ll see prompts on your screen asking you to select the desired output format, among other things. Make the appropriate selections, and the Quick Action will complete the operation and save the file.

Unless you’ve opted to preserve the original file while creating a workflow (in Automator or Shortcuts), the Quick Action will overwrite the original file and save it in the same location.

[mai mult...]

How to create custom Quick Actions on a Mac

Creating a Custom Quick Action in the Automator App

Automator is a built-in macOS app that lets you create workflows to automate repetitive tasks on your Mac. While creating workflows often requires a good understanding of programming languages, Automator employs a simple approach, wherein you drag and drop actions to stitch them together and create workflows.

To create a Quick Action, launch the Automator app under Applicatons > Utilities. Click “New Document,” and when prompted to set the document type, select “Quick Action” and hit “Choose.”

In the workflow area, set the Workflow Receives Current action to “Image Files” in “Finder”

Now, in the Actions sidebar, select “Files and Folders” and drag and drop the “Get Selected Finder Items” action to the workflow area on the right.

Next, select “Photos” in the Actions sidebar and drag and drop the “Scale Images” action into the workflow area. Automator will prompt you to add the “Copy Finder Items” action to your workflow to preserve the original files. Click on “Add” to allow this and specify a destination folder for the files, or hit “Don’t Add” to overwrite the original files.

Once done, in the Scale Images action, enter the size (in pixels) you want your images resized to in the text field next to the “To Size” dropdown. Note that this value is essentially the maximum size of the longest side of the image, meaning it could be the width (for a landscape image) and length (for a portrait) image.

Finally, with all the actions added, save the Quick Action. Go to File > Save, or press the Command+S keyboard shortcut. Give a name to this service and click “Save”

If you ever want to edit the Quick Action in the future, open the Finder app and press the Command+Shift+G shortcut to access the Go to Folder window. Type in ~/Library/Services, and you’ll see all your Automator Quick Actions.

Control-click on the Quick Action you want to edit and select Open With > Automator.app. This will open the Quick Action in an Automator window. Make the changes, and don’t forget to save them.

[mai mult...]