Social

How to reset your router to restore factory default settings

It’s important to note that when you reset your home router you will lose all of your current network settings, like the name of the Wi-Fi network, its password, etc

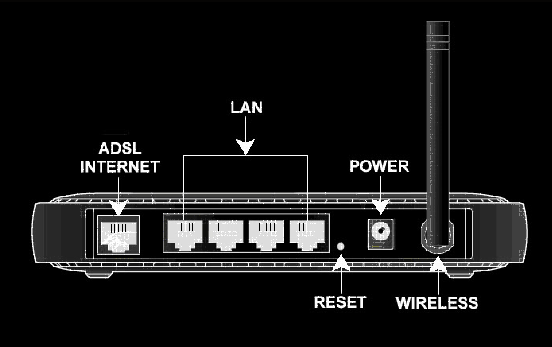
How to Reset a Router

  • Keep your router plugged in.
  • Find your router’s reset button. This will be on the back or the bottom of your router.
  • Use a paperclip to hold down the reset button for 10-15 seconds.
  • Release the button.
  • Wait for the router to power back on.
  • On many routers, if you hold in the button for 10 seconds, it factory resets your router.

Should i reset my router to factory settings?
Routers, like computers, work best with regular hard resets. Resetting a router can also clear the memory, which is critical for those with multiple devices or an older router. Resetting your router is an easy way to prevent malware attempts – the FBI even recommends router resets for that reason.

How often should you reset your router?
Know when to reboot your router so you can maintain a healthy, speedy internet connection. A good rule of thumb is to reboot your router or wireless gateway once a month to clear out its memory and refresh your wired and wireless connections or just when you have issues with it.

[mai mult...]

How to protect your home network security

How to Secure Your Wireless Network
The good news is that it is not very hard to make your wireless network secure, which will both prevent others from stealing your internet and will also prevent hackers from taking control of your computers through your own wireless network. Here a few simple things that you should to secure your wireless network:

Step 1. Open your router settings page
First, you need to know how to access your wireless router’s settings. Usually you can do this by typing in “192.168.1.1” into your web browser, and then enter the correct user name and password for the router. This is different for each router, so first check your router’s user manual.

You can also use Google to find the manuals for most routers online in case you lost the printed manual that came with your router purchase. For your reference, here are direct links to the manufacturer’s site of some popular router brands – Linksys, Cisco, Netgear, Apple AirPort, SMC, D-Link, Buffalo, TP-LINK, 3Com, Belkin.

Step 2. Create a unique password on your router
Once you have logged into your router, the first thing you should do to secure your network is to change the default password* of the router to something more secure. This will prevent others from accessing the router and you can easily maintain the security settings that you want. You can change the password from the Administration settings on your router’s settings page. The default values are generally admin / password.

PS:What do the bad guys use – This is a public database of default usernames and passwords of wireless routers, modems, switches and other networking equipment. For instance, anyone can easily make out from the database that the factory-default settings for Linksys equipment can be accessed by using admin for both username and password fields.

Step 3. Change your Network’s SSID name
The SSID (or Wireless Network Name) of your Wireless Router is usually pre-defined as “default” or is set as the brand name of the router (e.g., linksys). Although this will not make your network inherently* more secure, changing the SSID name of your network is a good idea as it will make it more obvious for others to know which network they are connecting to.

This setting is usually under the basic wireless settings in your router’s settings page. Once this is set, you will always be sure that you are connecting to the correct Wireless network even if there are multiple wireless networks in your area. Don’t use your name, home address or other personal information in the SSID name.

Also see: Change Network Name to Prevent Wi-Fi Theft

PS:What do the bad guys use – Wi-Fi scanning tools like inSSIDer (Windows) and Kismet (Mac, Linux) are free and they will allow anyone to find all the available Wireless Networks in an area even if the routers are not broadcasting their SSID name.

Step 4. Enable Network Encryption
In order to prevent other computers in the area from using your internet connection, you need to encrypt your wireless signals.

There are several encryption methods for wireless settings, including WEP, WPA (WPA-Personal), and WPA2 (Wi-Fi Protected Access version 2). WEP is basic encryption and therefore least secure (i.e., it can be easily cracked*, but is compatible with a wide range of devices including older hardware, whereas WPA2 is the most secure but is only compatible with hardware manufactured since 2006.

To enable encryption on your Wireless network, open the wireless security settings on your router’s configuration page. This will usually let you select which security method you wish to choose; if you have older devices, choose WEP, otherwise go with WPA2. Enter a passphrase to access the network; make sure to set this to something that would be difficult for others to guess, and consider using a combination of letters, numbers, and special characters in the passphrase.

PS:What do the bad guys use – AirCrack and coWPAtty are some free tools that allow even non-hackers to crack the WEP / WPA (PSK) keys using dictionary or brute force techniques. A video on YouTube suggests that AirCrack may be easily used to break WiFi encryption using a jail-broken iPhone or an iPod Touch.

Step 5. Filter MAC addresses
Whether you have a laptop or a Wi-Fi enabled mobile phone, all your wireless devices have a unique MAC address (this has nothing to do with an Apple Mac) just like every computer connected to the Internet has a unique IP address. For an added layer of protection, you can add the MAC addresses of all your devices to your wireless router’s settings so that only the specified devices can connect to your Wi-Fi network.

MAC addresses are hard-coded into your networking equipment, so one address will only let that one device on the network. It is, unfortunately, possible to spoof a MAC address*, but an attacker must first know one of the MAC addresses of the computers that are connected to your Wireless network before he can attempt spoofing.

To enable MAC address filtering, first make a list of all your hardware devices that you want to connect to your wireless network**. Find their MAC addresses, and then add them to the MAC address filtering in your router’s administrative settings. You can find the MAC address for your computers by opening Command Prompt and typing in “ipconfig /all”, which will show your MAC address beside the name “Physical Address”. You can find the MAC addresses of Wireless mobile phones and other portable devices under their network settings, though this will vary for each device.

PS:What do the bad guys use – Someone can change the MAC address of his or her own computer and can easily connect to your network since your network allows connection from devices that have that particular MAC address. Anyone can determine the MAC address of your device wireless using a sniffing tool like Nmap and he can then change the MAC address of his own computer using another free tool like MAC Shift.

Step 6. Reduce the Range of the Wireless Signal
If your wireless router has a high range but you are staying in a small studio apartment, you can consider decreasing the signal range by either changing the mode of your router to 802.11g (instead of 802.11n or 802.11b) or use a different wireless channel.

You can also try placing the router under the bed, inside a shoe box or wrap a foil around the router antennas so that you can somewhat restrict the direction of signals.

Apply the Anti-Wi-Fi Paint – Researchers have developed a special Wi-Fi blocking paint that can help you stop neighbors from accessing your home network without you having to set up encryption at the router level. The paint contains chemicals that blocks radio signals by absorbing them. “By coating an entire room, Wi-Fi signals can’t get in and, crucially, can’t get out.”

Step 7. Upgrade your Router’s firmware
You should check the manufacturer’s site occasionally to make sure that your router is running the latest firmware. You can find the existing firmware version of your router using from the router’s dashboard at 192.168.*.

Connect to your Secure Wireless Network
When choosing from among WEP, WPA, WPA2 and WPA3 wireless security protocols, experts agree WPA3 is best for Wi-Fi security. As the most up-to-date wireless encryption protocol, WPA3 is the most secure choice.

Once you have enabled the various security settings in your wireless router, you need to add the new settings to your computers and other wireless devices so that they all can connect to the Wi-Fi network. You can select to have your computer automatically connect to this network, so you won’t have to enter the SSID, passphrase and other information every time you connect to the Internet.

Your wireless network will now be a lot more secure and intruders may have a tough time intercepting your Wi-Fi signals.

Who is Connected to your Wireless Network
If you are worried that an outsider may be connecting to the Internet using your Wireless network, try AirSnare – it’s a free utility that will look for unexpected MAC addresses on your Wireless network as well as to DHCP requests. Another option is that you open your router’s administration page (using the 192.168.* address) and look for the DHCP Clients Table (it’s under Status > Local Network on Linksys routers). Here you will see a list of all computers and wireless devices that are connected to your home network.

*It is also a good idea to turn off the router completely when you are not planning to use the computer for a longer period (like when you are out shopping). You save on electricity and the door remains 100% shut for wireless piggybackers.

**If you ever want to let a new device connect to your network, you will have to find its MAC address and add it to your router. If you simple want to let a friend connect to your wireless network one time, you can remove his MAC address from the router settings when he or she leaves your place.

[mai mult...]

How to pair a bluetooth device in Windows

Turn on Bluetooth
After you’ve checked that your Windows 10 PC supports Bluetooth, you’ll need to turn it on.In Settings: Select Start > Settings > Devices > Bluetooth & other devices, and turn on Bluetooth.

  • Turn on Bluetooth in Settings
  • In action center: Action center can be found next to time and date on your taskbar. On the taskbar, select action center ( or ), then select Bluetooth to turn it on. If it’s turned off, it might appear as Not connected.
  • If you don’t see Bluetooth in your action center, here’s how you can change it:
  • Expand quick actions. On the taskbar, select action center ( or ) > Expand. Bluetooth should appear here. It will appear as Bluetooth or Not connected.
  • Add Bluetooth to action center. Select Start > Settings > System > Notifications & actions > Quick actions. Go to Add or remove quick actions and turn on Bluetooth.

Note: For more info about how to change the apps and settings that appear in action center, see Change notification and action settings in Windows 10.

To pair a Bluetooth headset, speaker, or other audio device

  • Turn on your Bluetooth audio device and make it discoverable. The way you make it discoverable depends on the device. Check the device or visit the manufacturer’s website to learn how.
  • On your PC, select Start > Settings > Devices > Bluetooth & other devices > Add Bluetooth or other device > Bluetooth. Choose the device and follow additional instructions if they appear, then select Done.
  • Your Bluetooth device and PC will usually automatically connect anytime the two devices are in range of each other with Bluetooth turned on.

To pair a Bluetooth keyboard, mouse, or other device

  • Turn on your Bluetooth keyboard, mouse, or other device and make it discoverable. The way you make it discoverable depends on the device. Check the device or visit the manufactur’s website to learn how.
  • On your PC, select Start > Settings > Devices > Bluetooth & other devices > Add Bluetooth or other device > Bluetooth. Choose the device and follow additional instructions if they appear, then select Done.

To pair a Bluetooth printer or scanner
Turn on your Bluetooth printer or scanner and make it discoverable. The way you make it discoverable depends on the device. Check the device or visit the manufacturer’s website to learn how.

  • Select Start > Settings > Devices > Printers & scanners > Add a printer or scanner. Wait for it to find nearby printers, then choose the one you want to use and select Add device.
  • If you’re having installation issues with your printer or scanner, see either Fix printer problems or Install and use a scanner in Windows 10.

To pair a Bluetooth device using Swift Pair
Swift Pair in Windows 10 lets you quickly pair a supported Bluetooth device with your PC. If the Bluetooth device supports Swift Pair, you’ll receive a notification when it’s nearby and you put it into pairing mode to make it discoverable.

  • Turn on a Bluetooth device that supports Swift Pair and make it discoverable. The way you make it discoverable depends on the device. Check the device or visit the manufacturer’s website to learn more.
  • If this is your first time using Swift Pair, select Yes when asked if you want to get notifications and use Swift Pair.
  • When a notification appears that a new Bluetooth device was found, select Connect.
  • After it’s connected, select Close.
[mai mult...]

How to make your windows to chose GPU for performance in games and apps

Windows 10 now lets you select which GPU a game or other application uses right from the Settings app. Previously, you had to use manufacturer-specific tools like the NVIDIA Control Panel or AMD Catalyst Control Center to control this. 

 This feature was added in Windows 10’s April 2018 Update. If you don’t see the Graphics Settings option, you haven’t installed the update yet. 

You can reach display settings with right click on desktop ? and click on it. 


You can also type in windows search bar: settings 


Then you go system 


After you go Display 


And Graphics settings 


Browse and go to the installer folder and select the .exe  


Chose High performance GPU and save.

[mai mult...]

How do you play the Chrome dinosaur game?

The simplest way to play the game online is by visiting this URL: chrome://dino/. Just access that link and voilà, there’s your little dino and “no internet” message. Once you see that message, just hit the spacebar and start jumping over cactus.

  • Open Google Chrome browser on your PC.
  • Click on the address bar.
  • Type chrome://dino/ and press Enter.
  • You’ll be able to see the game. Press the Spacebar to begin the game.

[mai mult...]

Cum reducem numarul de utilizatori cu privilegii si acces la informatii sensibile din organizatie?

Organizațiile au adesea de două până la trei ori mai multe conturi de utilizator privilegiate decât angajații individuali. Securizarea acestor conturi speciale este vitală pentru a proteja informațiile sensibile și sistemele critice împotriva atacurilor cibernetice. Pentru a ajuta oamenii să rămână productivi, trebuie să oferiți acces adecvat pentru utilizatorii privilegiați, minimizând totodată riscul.

Utilizatorii privilegiați necesită manipulare, instruire și supraveghere speciale.

Trebuie sa acordam atentie speciala urmatoarelor elemente:

-Cum diferă utilizatorii privilegiați de alte tipuri de utilizatori.
-Riscuri asociate cu compromisul și utilizarea greșită a conturilor de utilizator privilegiate.
-Modul în care gestionarea privilegiilor face organizația dvs. mai puțin vulnerabilă la amenințările tot mai mari care cauzează daune monetare și reputaționale.

Veți obține o înțelegere practică a diferitelor tipuri de utilizatori, cu accent pe utilizatorii privilegiați și gestionarea utilizatorilor privilegiați, inclusiv ce sunt utilizatorii privilegiați, unde se află aceștia în mediul dumneavoastră IT și modul în care funcționează. Cel mai important, veți înțelege riscurile asociate cu utilizatorii privilegiați și cum să protejați cel mai bine sistemele IT și datele sensibile de amenințările externe și interne.

Definiții cheie ale contului de utilizator privilegiat

Există două categorii de conturi IT, asociate cu diferite tipuri de utilizatori:

Conturi de utilizator standard: un cont de utilizator reprezintă de obicei o identitate umană (cum ar fi un cont de utilizator Active Directory) și are o parolă asociată pentru a proteja informațiile și pentru a preveni accesul oricui altcineva fără permisiune. De obicei, există o singură parolă de cont pentru fiecare utilizator care trebuie memorată de o persoană.

Utilizatori standard: utilizatorii standard sunt de obicei utilizatori de afaceri care nu au nevoie de sisteme sau informații speciale pentru a-și face treaba. Majoritatea angajaților organizațiilor mari sunt utilizatori standard. Ei pot accesa aplicații de pe propriile computere și sisteme interne, cum ar fi aplicațiile de e-mail și de afaceri. Utilizatorii standard au o capacitate limitată de a face modificări la stațiile de lucru furnizate de companie și nu au acces direct la sisteme sau date sensibile.

Conturi de utilizator privilegiate: Conturile de utilizator privilegiate oferă niveluri administrative sau specializate de acces la sistemele întreprinderii și la date sensibile, pe baza nivelurilor ridicate de permisiuni.

Utilizatori privilegiați: acești utilizatori sunt adesea membri ai echipei IT, dar nu trebuie să fie. Utilizatorul privilegiat tipic este un administrator de sistem responsabil cu gestionarea unui mediu sau un administrator IT al unui anumit software sau hardware. Au nevoie de privilegii ridicate pentru a:

-Instalați hardware/software de sistem
-Resetați parolele pentru alții
-Accesați date sensibile
-Faceți modificări în sistemele de infrastructură IT
-Conectați-vă la toate mașinile dintr-un mediu

Pași pentru a securiza diferite tipuri de conturi de utilizator privilegiate

Conturi de administrator local

Ce este? Fiecare stație de lucru are un cont de administrator. Contul implicit de administrator local este primul cont creat. Acest cont oferă utilizatorului acces și control complet asupra fișierelor, directoarelor, serviciilor, aplicațiilor și altor resurse din serverul local. De asemenea, poate fi folosit pentru a crea noi utilizatori locali și pentru a atribui sau modifica permisiuni pe computerul local.
Care este riscul: acesta este unul dintre principalii vinovați ai angajaților care sunt supraprivilegiați, deoarece este adesea oferit angajaților în mod implicit și le oferă acces în exces de care nu au neapărat nevoie.
Ce trebuie să faceți: eliminați accesul implicit la acest cont sau redenumiți-l sau dezactivați-l pentru a preveni utilizarea neautorizată. Aplicați drepturile de utilizator cu cel mai mic privilegiu pe toate computerele și serverele.

Conturi de administrator de domeniu

Ce este? Contul Domain Admin are acces deplin la aproape toate resursele, inclusiv controlerul Active Directory (AD).
Care este riscul: Deoarece aceasta este implicită pentru controlerele de domeniu, stațiile de lucru și serverele membre, dacă este compromisă sau utilizată greșit, are acces larg în rețea.
Ce trebuie să faceți: Numai un număr limitat de utilizatori ar trebui să aibă acces la acest tip de cont și toată activitatea trebuie monitorizată activ și auditată în mod curent. Stabiliți un proces formal de aprobare pentru a atribui acces „la cerere” acestor conturi.

Conturi privilegiate de utilizator de date

Ce este? Acesta este un cont de utilizator standard care are acces la date sensibile sau privilegiate: un broker cu acces la înregistrările financiare, un contabil cu acces la documentele fiscale, un medic cu acces la datele pacientului, un avocat cu acces la informațiile sensibile ale clienților.
Care este riscul: deoarece acestea sunt adesea conturi obișnuite, care se întâmplă să aibă acces extraordinar, este posibil să nu fie monitorizate sau auditate, iar politica privind parolele poate să nu reflecte natura sensibilă a conturilor.
Ce trebuie să faceți: Efectuați o evaluare a riscului de date pentru a identifica conturile privilegiate și utilizatorii care au acces la acestea, apoi luați măsuri pentru nu numai a consolida aplicația care găzduiește datele, ci și pentru a limita accesul pentru conturile obișnuite. Asigurați-vă că aceste conturi sunt supuse unui control și protocoale de securitate mai ridicate.

Urgență / Spargerea conturi de sticlă

Ce este? În cazul unui incident critic, anumiți utilizatori pot avea nevoie de acces la sisteme sau conturi privilegiate. În aceste cazuri, un cont de urgență, care este dezactivat implicit, poate servi ca o modalitate alternativă de accesare a sistemelor importante. Aceste tipuri de conturi sunt rezervate pentru situații de urgență, cum ar fi un atac cibernetic, care limitează accesul la conturile de administrator obișnuite.
Care este riscul: deoarece aceste conturi au acces la sisteme sensibile atunci când sunt activate, dacă sunt comandate de un atacator, ar putea fi folosite ca ușă din spate.
Ce trebuie să faceți: Limitați accesul la aceste conturi, monitorizați în mod activ și asigurați-vă că sunt disponibile numai în caz de urgență și nu ca o ușă din spate către date sau sisteme sensibile.

[mai mult...]