
Social
How to fix Dism.exe error 1392 on your Windows computer
- In case of looking for a solution to fix the Dism.exe error 1392 on Windows 10, let us help you out.
- You can try to perform an SFC scan or use a different antivirus that interferes less with the system.
Dism.exe error 1392 is usually displayed whenever a file or directory is corrupted, and unreadable.
The location specified in the error message states that some temporary files are corrupt. Since the files are only temporary, you could delete the mentioned file in the error message and check if the issue persists. The error is caused by missing system files or broken corrupt data, which should be fixed as soon as possible. Taking action should prevent further hardware and app damage, as this can lead to system crashes, data loss, or hardware failure in most cases.
How can I fix the Dism.exe error 1392?
- Temporarily disable the antivirus program
- Perform an SFC scan
- Clean out junk files
- Run Check disk to check and fix disk errors
- Scan your computer for malware
- Perform a system restore
1. Temporarily disable the antivirus program
- Go to your taskbar next to the clock, and click on the antivirus security software icon.
- Right-click on it.
- Select the option to disable.
Antivirus software can help protect your computer against viruses and other security threats. In most cases, you shouldn’t disable it. When you have to temporarily disable it to see whether it causes such issues or not, do note that your computer is open to attacks all this time.
Therefore, it’s time to think of an alternative. For top-rated protection, don’t hesitate to give a try to Vipre antivirus. That’s the least intrusive program you should try out, not to mention the anti-threat and ransomware protection that always keeps you away from system performance and security issues.
2. Perform an SFC scan
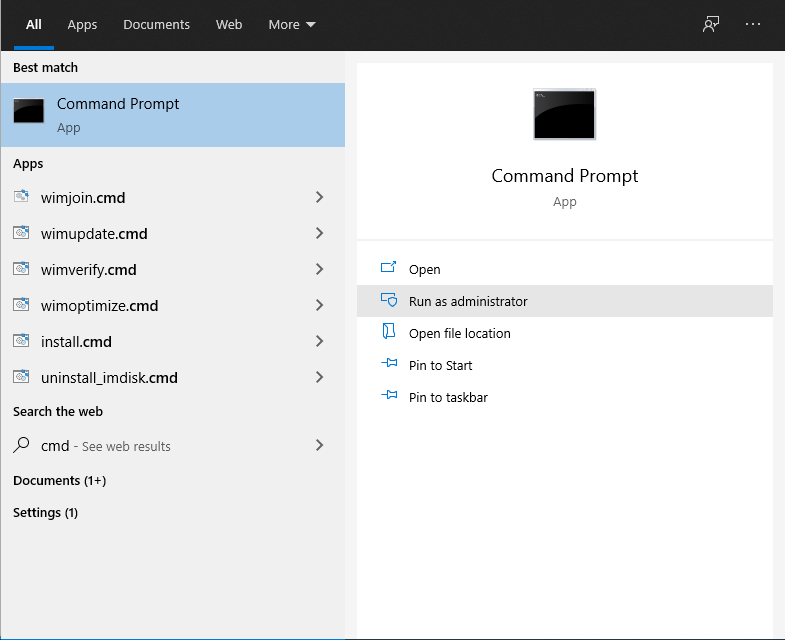
- Click Start.
- Go to the search field box and type CMD.
- Go to Command Prompt.
- Right-click and select Run as Administrator.
Type sfc/scannow.
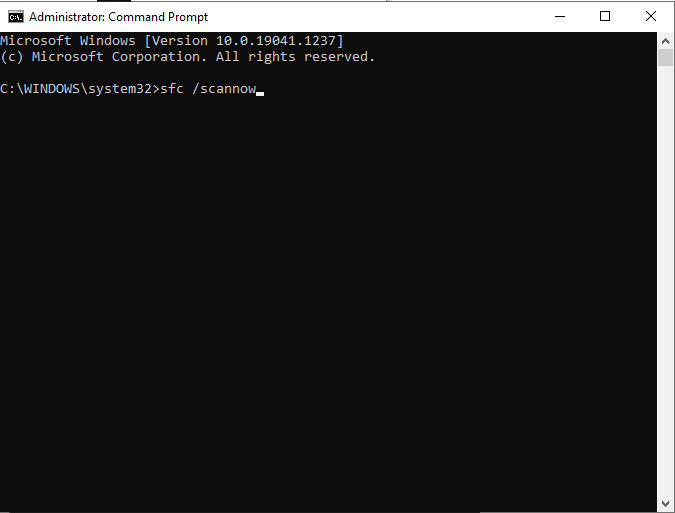
Press enter.
Whenever you find the dism.exe error 1392, most likely there are corrupted files, and a system file checker scan will help you replace the incorrect versions, with the genuine, correct Microsoft versions.
Restart your computer and check if dism.exe error 1392 goes away after completing the above procedure.
3. Clean out junk files
As you use your computer, over time, junk files accumulate and if not cleaned out, they may cause your computer to slow down or lag. This may also bring up the dism.exe error 1392 due to file conflicts, or an overloaded hard drive. You are no stranger to these things.
Cleaning them up can solve the error and improve your PC’s performance and speed. In order to do so right away, make sure to use CCleaner. You’re one step away from freeing up space and making your computer run like new again, so don’t hesitate to install this nifty tool.
4. Run Check disk to check and fix disk errors
- Right-click Start.
- Then, select Command Prompt (Admin).
- Type the following command: chkdsk /f h: and then press enter (h is the drive with the disk.exe error 1392 problem).
You should every so often use the Check Disk tool to check the integrity of disks. This examines disks and can correct many types of common errors on FAT16, FAT32, and NTFS drives. One of the ways Check Disk locates errors is by comparing the volume bitmap with the disk sectors assigned to files in the file system. Check Disk can’t repair corrupted data within files that appear to be structurally intact. You can run Check Disk from the command line or through a graphical interface, as described above.
Note: Check Disk will analyze the disk and return a status message regarding any problems it encounters.
Unless you specify further options, Check Disk won’t repair problems, but, in order to find and repair errors on drive C, use chkdsk /f C:
When you use this command, Check Disk performs an analysis of the disk and then repairs any errors it finds, provided the disk isn’t in use. If it is in use, Check Disk displays a prompt that asks whether you want to schedule the disk to be checked the next time you restart the system. Click Yes to schedule this check.
The complete syntax for Check Disk is as follows:
CHKDSK [volume[[path]filename]] [/F] [/V] [/R] [/X] [/I] [/C] [/L[:size]]
- V is for volume so as to set the volume to work with
- path/filename specifies files to check for fragmentation (FAT16 and FAT32 only)
- /F fixes errors on the disk
- /V displays the full path and name of every file on the disk (FAT16 and FAT32); displays cleanup messages if any (NTFS)
- /R locates bad sectors and recovers readable information (implies /F)
- /X forces the volume to dismount first if necessary (implies /F)
- /I performs a minimum check of index entries (NTFS only)
- /C skips checking of cycles within the folder structure (NTFS only)
- /L:size sets the log file size (NTFS only)
- /B re-evaluates bad clusters on the volume (NTFS only; implies /R)
5. Scan your computer for malware
The dism.exe error 1392 could be related to a malware infection on your computer system, as these, can damage, corrupt, or even delete runtime error-related files. The error could be related to a malicious program’s component. Conduct a full scan to rule out malware issues and remember that Vipre is a great choice in that regard.
6. Perform a system restore
- Click Start.
- Go to the search field box and type System Restore.
- Click Create a restore point in the list of search results.

- Enter your administrator account password or grant permissions if prompted to.
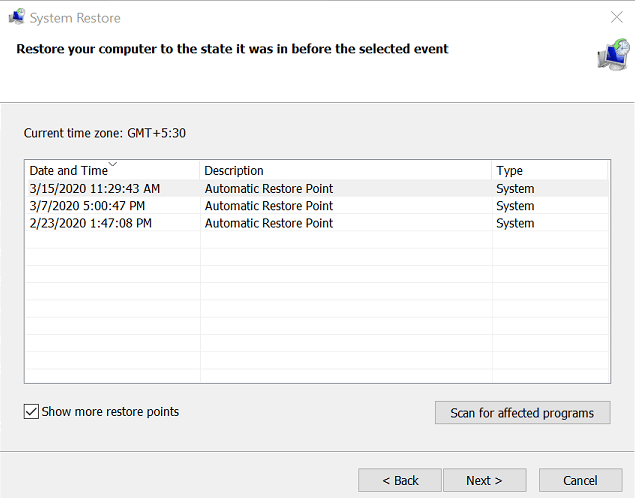
- In the System Restore dialog box, click System Restore.
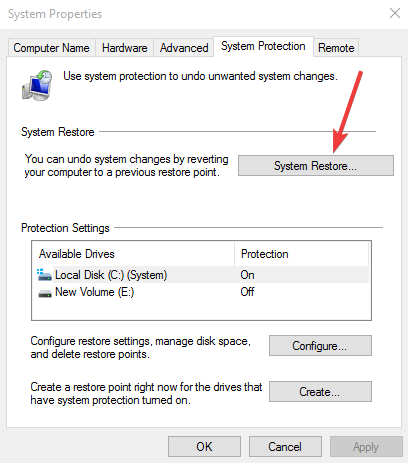
- Click Next.
- Click a restore point created before you experienced the problem.
- Click Next.
- Click Finish.
To go back to a restore point, do the following:
- Right-click Start.
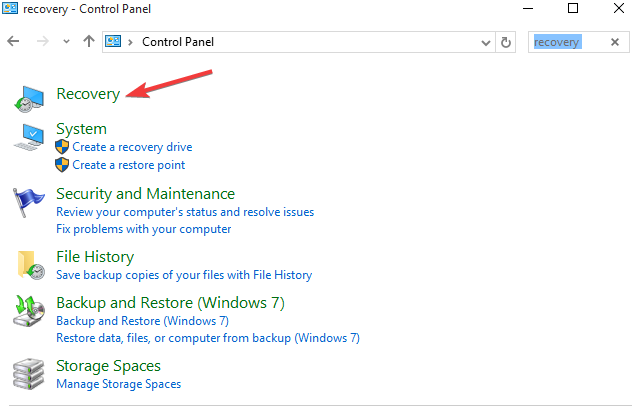
- Select Control Panel.
- In the control panel search box, type Recovery.
- Select Recovery.
Click Open System Restore.
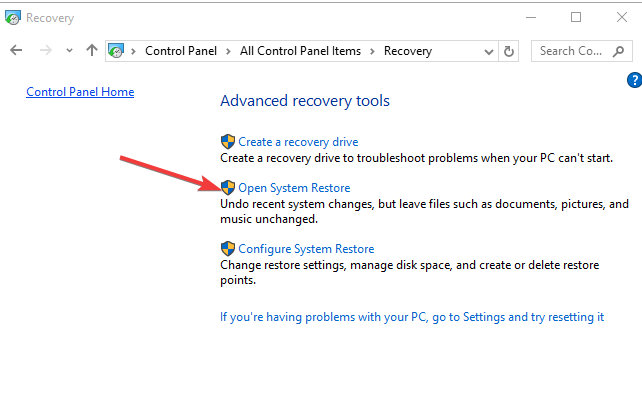
- Click Next.
- Choose the restore point related to the problematic program/app, driver, or update.
- Once again, click Next.
- Click Finish.
Here you can find some other things that you could try:
- Update your computer device drivers as 1392 errors can be related to corrupt or outdated device drivers. Finding the exact driver for the dism.exe error 1392 problem can be hard, so make sure to use the best driver update software.
- Install all available Windows updates as Microsoft constantly updates system files related to the error so resolving runtime error issues may be done by installing the latest updates or service packs, or other patches released regularly
- Uninstall and reinstall the program associated with the dism.exe error 1392.
- Perform a clean Windows installation. Backup all your files and data before beginning this time-consuming process. It is the last resort in trying to resolve the error 1392 issue, but it will erase everything from your hard drive, so you can start with a fresh system. It also cleans out accumulated junk.
If dism.exe error persists after a clean install, your runtime errors are not software but hardware related so replace the hardware that is causing dism.exe error 1392.
[mai mult...]Windows 10 can’t click anything?
- Nowadays mice have become so complex that they even come with their own drivers and updaters.
- However, this means that they are more easily affected when said drivers become damaged or missing.
Sometime you may experience issues with the mouse or trackpad disabling the right and left clicks in Windows 10. Several users have reported that they can’t click anything after booting up the computer or when in the middle of something.
I Started my computer today and I couldn’t click anything at all. Its a Windows 10 computer. It not jut the start menu but everything. I can’t press cancel when I’m in Carl+alt+del. I tried safe mode and the problem was still there. The mouse works fine I just can’t click anything at all
This error can occur if the Windows Explorer has crashed or if you have an old Windows build with a glitch installed. In this article, we have listed a couple of troubleshooting tips to help you resolve the can’t click anything issue in Windows 10.
What to do if I can’t click anything in Windows 10?
1. Restart the explorer.exe process
- Press Ctrl + Shift + Esc to open the Task Manager.
- You can also press Ctrl + Alt + Delete and then use the Tab key to open Task Manager.
- In the Task Manager, press the Tab key until one of the processes is select.
- Use the down arrow keys on your keyboard to select Windows Explorer.
- Since the right-click is not working, we will use Shift + F10 (shortcut for right-click).
- Press Shift + F10 to bring up the context menu.
- Use the down arrow key and select End Task.

- Click Enter to end the explorer.exe task.
- Once the explorer.exe process is killed, you may see a black screen for a short time.
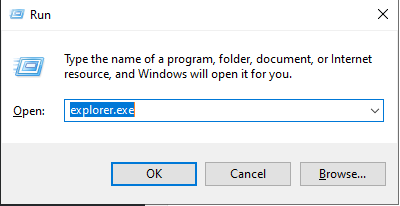
- Press Windows Key + R.
- Type explorer.exe and hit Enter.
- This will relaunch your Windows Explorer.
- Try using the mouse to click anything to see if the issue is resolved.
If your Windows Explorer has crashed or frozen, it may lead to can’t click anything issue in Windows 10. However, ending and restarting the explorer.exe process can resolve this issue.
2. Check your keyboard for issues
- Faulty keyboard keys can prevent the mouse from performing the right-click and left-click actions.
- Check if your keyboard if it has any broken keys or long hold keys that are pressed without your knowledge.
- Spacebar is one of the common keys to break or get stuck in your keyboard. Make sure the keys are working fine.
- You may also unplug the keyboard and restart your computer to see if the mouse and clicking functions work.
- If the mouse works in the absence of a keyboard connected to your computer, check the keyboard for faulty keys.
3. Check for pending Windows updates

- Press the Windows key on your keyboard.
- Type update.
- Use the arrow key if required and open Check for updates.
- In the Windows Update section, use the Tab key to navigate.
- Select Download updates and hit Enter.
- Windows will download and install any pending Windows 10 updates.
Some of the older version of Windows is known to have mouse-clicking issues in Windows 10. Make sure you are running the latest stable Windows 10 build to fix any issues caused by a glitch in the OS.
4. Check your mouse and third-party software
- The above fix will only work if your mouse is in working condition.
- Try unplugging the mouse and connect a secondary mouse to your computer.
- Right-click on any app or the desktop and check if the secondary mouse is working.
- If the mouse works, you may need to replace the device with a new one.
Check for a third-party software
- If you had recently installed third-party software to customize a mouse or keyboard, it might create issues with the pointing device.
- Close any apps such as Razer Synapse or other customization software from the Task Manager.
- Disconnect and reconnect the mouse to see if that resolves the issue.
5. Use a restore point
- Press the Windows key and type restore.
- Select Create a restore point and hit enter to open System Properties.
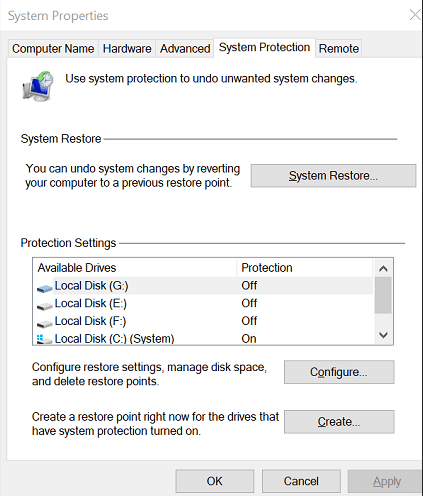
- Press the Tab key to select the System Restore button and hit enter.
- Select Recommended to restore and then use Tab key again to select Next and hit enter.
- To confirm your restore point, select Finish and hit enter.
- Windows will restore your system to the state it was in before the date selected.
- The process may take some time to complete, so wait till the PC reboots and shows a success message.
If System Restore is not successful, repeat the steps again but with an older Restore Point.
Windows 10 can’t click anything problem is most likely to be triggered by an unresponsive explorer.exe process. However, follow other steps in this article if restarting Windows Explorer did not resolve the issue.
[mai mult...]How to reclaim space after upgrading to Windows 11
After upgrading to Windows 11 from Windows 10 or another version, you will probably notice a spike in storage usage. Use these steps to get the storage back.
When you upgrade to Windows 11 from Windows 10 or another version, the setup makes a copy of the previous installation as part of the process, in case something wrong happens during the installation, and the system needs to roll back to the original setup, or Windows 11 is having compatibility issues, and you need to revert to a previous version manually. Although the safeguard feature provides a way to restore the original changes, the copy of the files will be kept even after the upgrade completes successfully, taking a lot of storage (inside the “Windows.old” folder) that can be an issue for devices with limited capacity.
If you notice that your laptop or desktop computer is running out of space after the upgrade, Windows 11 includes an option to delete the previous files that can reclaim 12GB or more, depending on the previous configuration.
In this Windows 11 guide, we will walk you through the steps to delete the previous installation files wasting space after upgrading to the new version of the OS.
- How to free up space after Windows 11 using Settings
- How to free up space after Windows 11 using Disk Cleanup
How to free up space after Windows 11 using Settings
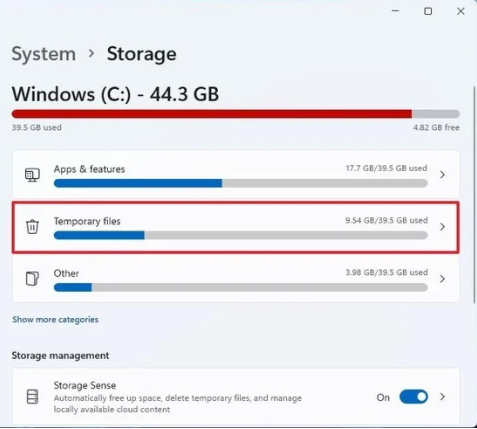
To reclaim space after installing Windows 11, use these steps:
- Open Settings.
- Click on System.
- Click on Storage.
- Click the Temporary files page on the right-side.

- Clear all the preselected items (if applicable).
- Check the Previous Windows installation(s) option.

- Click the Remove files button.
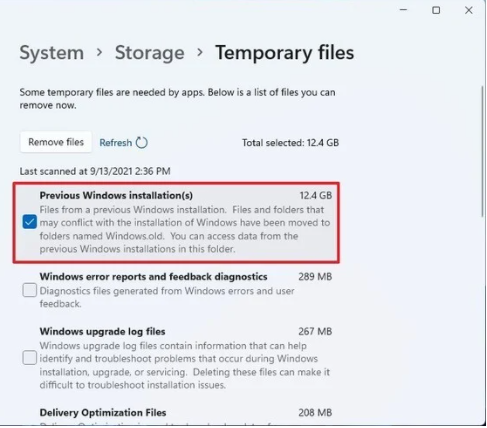
Once you complete the steps, the previous installation files will be removed alongside any other temporary files you may have selected on the settings page.
In previous versions, the option was also available through the Storage settings, but it’s no longer the case with Windows 11.
How to free up space after Windows 11 using Disk Cleanup
In addition to using the Settings app, you can also use the legacy Disk Cleanup tool to delete the folder with the previous installation of Windows 11.
To free up space after the installation of Windows 11 with Disk Cleanup, use these steps:
- Open Start.
- Search for Disk Cleanup, click the top result to open the settings.
- Click the Clean up system files button.

- Check the Previous Windows installation(s) option.


Quick tip: You can also select other temporary files (such as Delivery Optimization Files and Windows update log files) to recover even more space.
- Clear the Downloads option to avoid deleting downloaded files inside the “Downloads” folder.
- Click the OK button.
After you complete the steps, the folder with the previous installation files will be deleted from your computer, freeing up storage on the main drive.
The system will only keep the copy of the earlier setup for the first ten days after the upgrade. After this period, Windows 11 will automatically delete these files. Also, after removing the files, the option to roll back will no longer be available in the Settings app. In the future, if you want to downgrade, you will have to do a clean installation using the version of Windows you want to use.
[mai mult...]How to connect to Wi-Fi network using Command Prompt
You can also use the netsh command-line tool in Command Prompt to connect to a Wi-Fi network on Windows 11. To connect to a Wi-Fi network with commands on Windows 11, use these steps:
- Open Start.
- Search for Command Prompt, right-click the top result, and select the Run as administrator option.
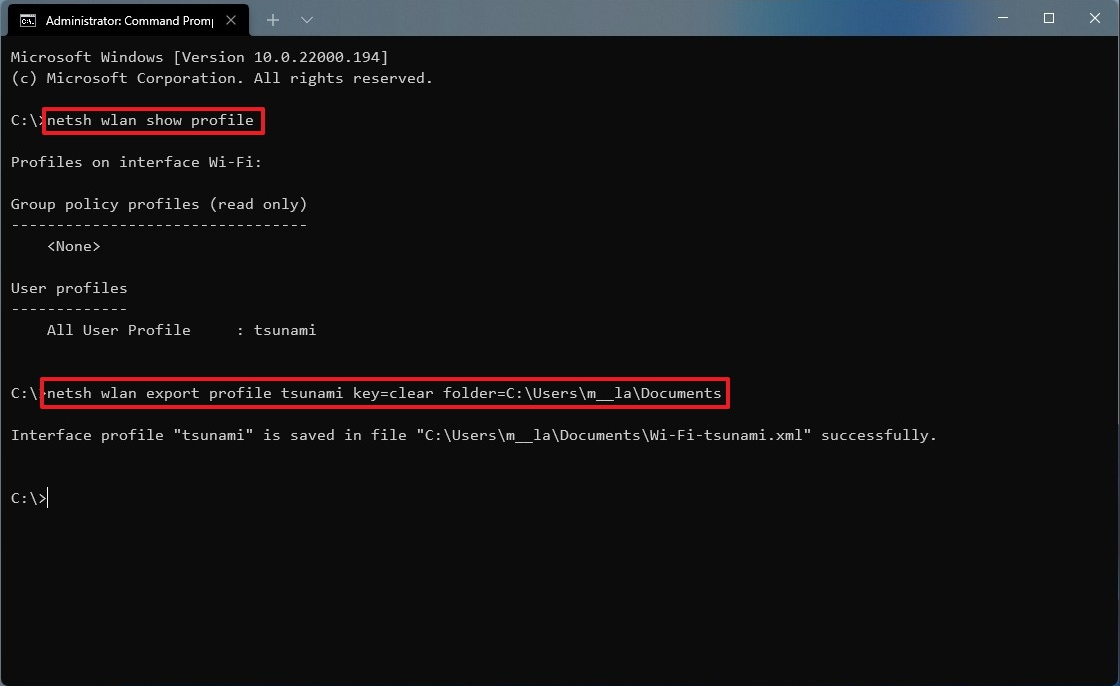
- Type the following command to view the available network profiles and press Enter:
netsh wlan show profile - Confirm the wireless profile.

- Type the following command to connect to the wireless network on Windows 11 and press Enter:
netsh wlan connect ssid=YOUR-WIFI-SSID name=PROFILE-NAME
In the command, update the name (SSID) of the network and profile name with your network information. For example, this command connects to the “tsunami” network using the “tsunami” profile:
netsh wlan connect ssid=tsunami name=tsunami

Quick Tip: On a computer with multiple adapters, you also have to specify the adapter name in the command. For example,: netsh wlan connect ssid=YOUR-WIFI-SSID name=PROFILE-NAME interface=Wi-Fi.
After you complete the steps, the laptop will connect to the Wi-Fi network.
Create network connection
The netsh command tool also allows you to manage Wi-Fi adapters and networks. The only issue is that you can only manage existing profiles. You cannot create new network profiles with this tool. If you have to use Command Prompt to connect one or multiple computers to the same wireless network, you can export the profile created automatically during the first connection. Then you can import it using netsh to connect using commands.
Export Wi-Fi profile
To export a Wi-Fi profile with commands on Windows 11, use these steps:
- Open Start.
- Search for Command Prompt, right-click the top result, and select the Run as administrator option.
- Type the following command to view the available network profiles and press Enter:
netsh wlan show profile - Type the following command to export a profile and press Enter:
netsh wlan export profile PROFILE-NAME key=clear folder=PATH\TO\EXPORT\FOLDERFor example, this command exports the tsunami profile to the “Documents” folder.
netsh wlan export profile tsunami key=clear folder=C:\Users\m\Documents
Once you complete the steps, you can import the same XML file to connect other computers to the wireless network.
Import Wi-Fi profile
To import a Wi-Fi profile on Windows 11, use these steps:
- Open Start.
- Search for Command Prompt, right-click the top result, and select the Run as administrator option.
- Type the following command to determine the name of the network adapter and press Enter:
netsh wlan show interfaces - Confirm the name of the adapter that will connect to the network.
- Type the following command to import the wireless profile and press Enter:
netsh wlan add profile filename="PATH\TO\PROFILE.XML" Interface="YOUR-WIFI-ADAPTER-NAME" user=currentIn the command, you must specify the location of the XML file and network interface name.
For example, this command imports the XML profile located in the “Documents” folder to the Wi-Fi adapter:
netsh wlan add profile filename="C:\Users\m\Documents\wi-fi-tsunami.xml" Interface="WI-FI" user=current
- Type the following command to connect to the wireless network and press Enter:
netsh wlan connect ssid=YOUR-WIFI-SSID name=PROFILE-NAMEIn the command, you must specify the SSID and profile name that corresponds to your network.
For example, this command connects to an access point using the “tsunami” SSID and “tsunami” profile name:
netsh wlan connect ssid=tsunami name=tsunami

- Quick tip: If you have multiple wireless interfaces, you must also specify which adapter you want to use in the command. For example,
netsh wlan connect ssid=YOUR-WIFI-SSID name=PROFILE-NAME interface=Wi-Fi.
After you complete the steps, the computer should connect to the wireless network automatically.
[mai mult...]Add Beats Wireless Headphones to Android
Beats offers several options when it comes to wireless headphones, including:
- Powerbeats
- Beats Solo
- Beats Studio
- Beats X
The key to pairing wireless Beats with any of your devices is knowing where the power button is located. If you’re unsure where the power button is, consult the manual or quick start guide that came with your headphones. To connect Bluetooth headphones to a mobile device, first, make sure the device is discoverable. You accomplish this on your Beats headphones by pressing and holding the power button for about five seconds. You’ll see the Bluetooth LED blink, indicating your device is ready to be paired.
[mai mult...]