Social

How to Set Up Microsoft Teams

How to Set Up Microsoft Teams


Microsoft Teams directly competes with Slack and will replace Skype for Business, as a premier collaborative communications platform for large and small businesses. Set up an organization in Teams and invite your colleagues to start chatting, sharing, and integrating.


How to Create an Organization in Microsoft Teams


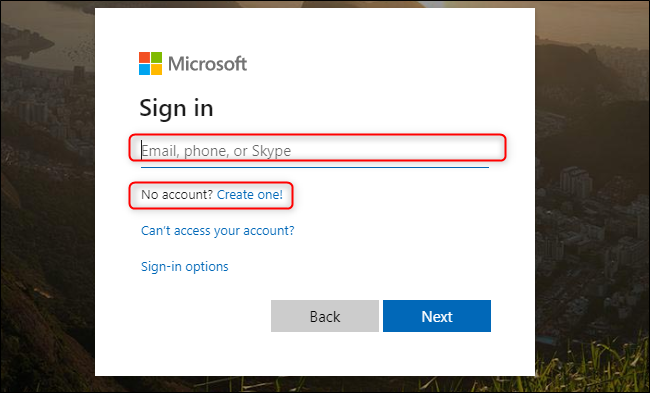
Direct any browser to “teams.microsoft.com” and sign in to your Microsoft account. You can create an account for free if you don’t already have one.

Once you’re signed in to your Microsoft account, select “Get The Windows App” to download and install the app on your Windows, macOS, iOS, Android, or Linux device.


The browser-based web app version doesn’t support real-time calls or meetings, but it is sometimes faster to access Teams through a browser. If you want to access Teams through your browser without downloading the app, click “Use The Web App Instead.”

When the Teams app is first installed on your device, you may need to sign in again. After, click “Sign Up For Teams” to begin setting up your organization.


A new web page will open where you can read through a full list of features and compare pricing plans. Teams is free if you’re using it with no other Microsoft Office 365 apps.

If you’re joining an existing organization, choose “Already Using Teams? Sign In.” Once you sign in, you’ll be ready to explore your organization’s existing Teams infrastructure and start chatting with your colleagues.

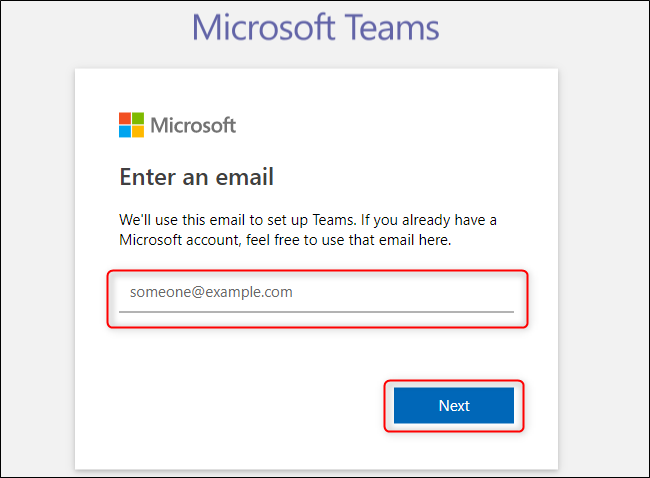
If you’re starting a new organization, click “Sign Up For Free.”

Enter your email and then select “Next“.

Enter your first and last name as well as the name of your company or organization. When you’re done, click “Set Up Teams.”

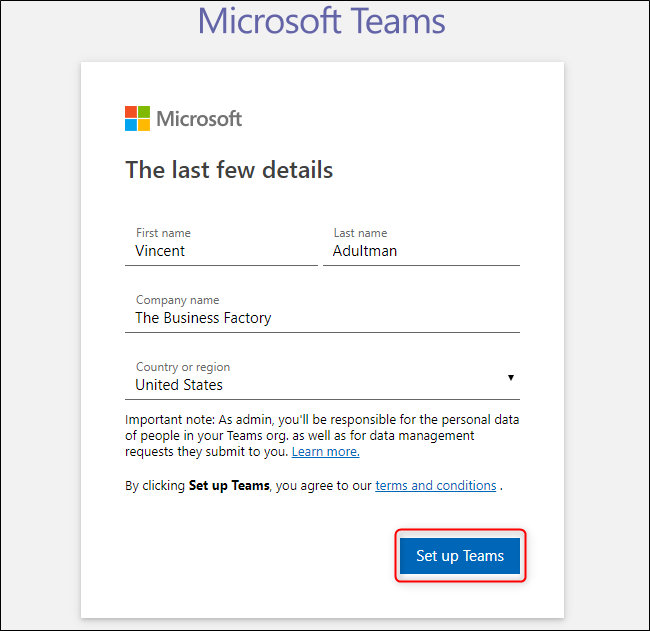
Assuming the name of your organization isn’t already taken, Teams will start creating your organization and then bring up the web app. Once you’re logged in to Teams for the first time, it will ask for your name and picture (both optional), then guide you through its interface and features.

How to Invite People to Your Organization in Microsoft Teams

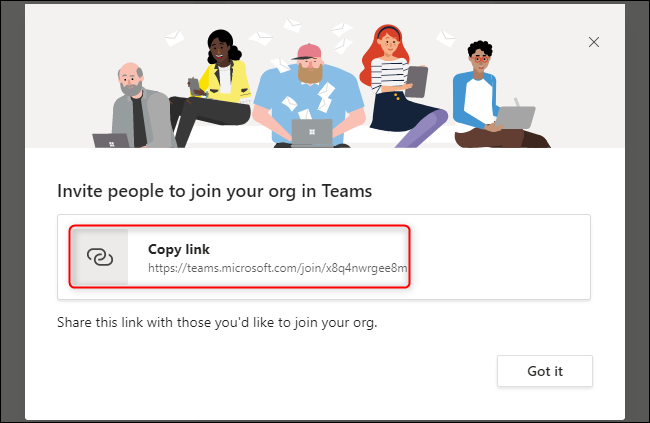
You’ll receive an email with a link you can send to colleagues to invite them to join your new Teams organization. Teams will also greet you with this link when you first sign in.

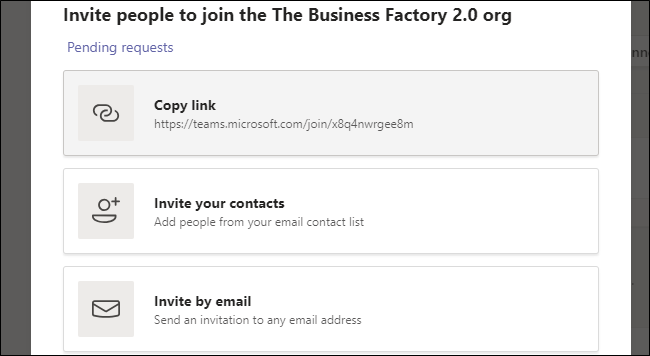
You can always invite new people to your organization within the Teams application. Select the “Teams” tab on the left and then click “Invite People.”

In this menu, you can copy an invite link to your clipboard, invite contacts directly from your email contact list, or invite people with different email addresses. These email addresses do not have to be Microsoft email addresses, but your invitees will be prompted to use their email addresses to create a Microsoft account.

Your invitees will receive an email like the one below. To join the organization, your colleagues need to click “Join Teams” in this email. They can also click the “iOS” and “Android” buttons to install the mobile app for their respective device.

You and your colleagues can now collaborate remotely through this organization in Microsoft Teams. You can build a better communications platform by creating new teams within your organization, integrating Teams with Office 365, and sharing your screen, your files, or your favorite cat pictures.

[mai mult...]

How to Safely Clean Your iPhone With Disinfecting Wipes

How to Safely Clean Your iPhone With Disinfecting Wipes


Apple now says it’s okay to use disinfecting wipes on iPhones. Previously, Apple recommended against using disinfecting wipes on its products while the CDC said it was a good idea to protect against COVID-19.


Why Did Apple Recommend Against Disinfectants?


Traditionally, device manufacturers like Apple recommended against harsh disinfectants because they can wear away the oleophobic coating on your smartphone’s screen. This is an oil-repelling coating that helps prevent fingerprints and smudges from sticking to your smartphone’s screen.


This coating naturally and slowly wears away as you use your phone, but harsh cleaners can cause it to wear away faster.


How to Safely Disinfect an iPhone With a Wipe

On Mar. 9, 2020, Apple updated its official cleaning guide to say that disinfecting wipes are an acceptable way to clean your iPhone, iPad, MacBook, and other Apple products.


Specifically, Apple says you should use “a 70 percent isopropyl alcohol wipe or Clorox Disinfecting Wipes.” Don’t use anything with bleach in it.


Apple recommends disinfecting wipes and not disinfecting sprays. If you have a spray, you should spray it on a soft, lint-free cloth (like a microfiber cloth) and use that to wipe your iPhone or other Apple product rather than spraying it directly. Apple says you should “avoid abrasive cloths, towels, paper towels, or similar items.” Never submerge your hardware in any cleaning solution.


With your wipe, “you may gently wipe the hard, nonporous surfaces of your Apple product, such as the display, keyboard, or other exterior surfaces.” In other words, take your iPhone out of its case and wipe its exterior: The screen, back, and sides.


Be sure to wipe gently and “avoid excessive wiping” to protect the coating as much as possible. A single wipe with a disinfecting wipe should do it.


While wiping, be sure to “avoid getting moisture in any opening.” Don’t let any of the cleaning solution drip into any speaker grill or the iPhone’s Lightning port, for example. This can damage your phone’s hardware.


Apple cautions against using cleaning solutions on fabric or leather surfaces. For example, if you have an Apple leather case for your iPhone, you should avoid using the disinfecting wipe on that. This can damage the material. However, if you have a case that can handle the disinfecting wipe—a plastic or silicone case, for example—you should wipe it as well.

While you’re at it, be sure to clean your AirPods regularly, too.

[mai mult...]

How to Find Your Windows 10 Product Key Using the Command Prompt

How to Find Your Windows 10 Product Key Using the Command Prompt

If you’re looking for your Windows 10 product key, you can find it by entering a quick command in the Command Prompt. Here’s how—plus a neat little trick for finding the product key using a Windows Registry method.

Find Your Windows 10 Product Key Using the Command Prompt

To find your Windows 10 product key using the Command Prompt, you’ll need to open the command line application with administrative privileges. To do this, type “cmd” in the Windows search bar.

Command Prompt will appear in the search results. Right-click it and select “Run As Administrator” from the window that appears. If prompted, enter your Windows account password.

Once open, copy and paste the following command and then hit the Enter key:

wmic path softwarelicensingservice get OA3xOriginalProductKey

The 25-digit product key will then appear.

That’s all there is to it. This way is quick, but this isn’t likely a code you’ll remember very easily. If you’d like a faster way of accessing your product key in the future, you can use the Windows Registry method instead.

Find Your Windows 10 Product Key Using a Windows Registry Method

The Windows Registry tip was initially posted by a user (whose account is no longer active) in the Microsoft forum.

First, open Notepad by right-clicking anywhere on the desktop, hovering over “New,” and then selecting “Text Document” from the menu.

Copy and paste this code into Notepad:

Set WshShell = CreateObject(“WScript.Shell”)

MsgBox ConvertToKey(WshShell.RegRead(“HKLM\SOFTWARE\Microsoft\Windows NT\CurrentVersion\DigitalProductId”))

Function ConvertToKey(Key)

Const KeyOffset = 52

i = 28

Chars = “BCDFGHJKMPQRTVWXY2346789”

Do

Cur = 0

x = 14

Do

Cur = Cur * 256

Cur = Key(x + KeyOffset) + Cur

Key(x + KeyOffset) = (Cur \ 24) And 255

Cur = Cur Mod 24

x = x -1

Loop While x >= 0

i = i -1

KeyOutput = Mid(Chars, Cur + 1, 1) & KeyOutput

If (((29 – i) Mod 6) = 0) And (i <> -1) Then

i = i -1

KeyOutput = “-” & KeyOutput

End If

Loop While i >= 0

ConvertToKey = KeyOutput

End Function

Next, click the “File” tab and select “Save As.”

In File Explorer, set the “Save As Type” dropdown to “All Files” and give your file a name. You can use any name, but it has to be a .vbs file. You can name it something like: productkey.vbs

Once you’ve entered a file name, save the file.

You can now view your Windows 10 product key at any time by opening the new file.

[mai mult...]

How to set up Google Authenticator for a Gmail account

How to set up Google Authenticator for a Gmail account

Two factor authentication is normally set up with a phone number. When you sign in to an account secured with 2FA, a code is sent to your phone and the code needs to be entered on the sign in page in order to get into the account. The only problem is that if someone really wants to get into your account, a phone number isn’t the best tool to use to secure it. You can use alternative methods for 2FA. If you’re using it for Gmail, you can use the Google Authenticator app. Here’s how to set it up for a Gmail account.

Google Authenticator for Gmail

First, you need to install the Google Authenticator app on your phone. You can get it for iOS from here, and for Android here. In order to set up Google Authenticator for a Gmail account, you must have a phone number set up with your account. If you do not have a phone number set up with your account, click the ‘Add a mobile phone number’ option and set it up. Google will walk you through the process but you must have the phone on-hand.

Once you’ve set up Two Factor Authentication, scroll down the Two Factor authentication page and click ‘Set Up’ under Authenticator app.

The web page will show you a QR code. Switch over to your phone.

Open the Google Authenticator app and tap the plus button at the top. In the menu that opens, tap the ‘Scan barcode’ option and then scan the code on the web page.

The web page will ask you to enter the code shown in the app. Enter it and the set up will be complete.

How it works

When you sign into your Gmail account, you will have to enter the password for it, and then the code from the Google Authenticator app.


The code expires within a minute so if you see the number turn red, it means it’s about to expire. You must enter it before it expires. If it expires, you will get a new code. The old one won’t work. Use the new one, and then complete signing in.

If you ever need to remove the app, you can return to the Two Factor Authentication page, and click the Remove button under the Google Authenticator app. Your phone number will still be associated with your account and a code will be sent to it when you next sign it. It will have to be removed separately.

[mai mult...]

Cum să recuperați un browser Chrome hijacked

Cum să recuperați un browser Chrome hijacked

Nu a fost ușor să scăpați de aplicațiile rău intenționate, de la schimbarea setărilor browserului la injectarea de reclame și manipularea rezultatelor căutării. Chrome a fost la fel de praduit pentru aceste aplicații ca orice alt browser și a luat măsuri pentru a preveni acest lucru și pentru a vă ajuta să vă readuceți browserul în cazul în care se întâmplă. Iată cum puteți recupera un browser Chrome deturnat.

Eliminați programele malware

Înainte de a putea repara browserul, trebuie să scăpați de orice a preluat-o. Dacă este o aplicație instalată pe desktop, scoateți-o și scanați-vă sistemul cu un antivirus. Dacă credeți că o extensie este de vină, îndepărtați-o. Dacă nu sunteți sigur că este o extensie, eliminați-le pe toate.

Ar trebui să rulați și scanarea computeră încorporată a Chrome. Faceți click pe butonul pentru mai multe opțiuni din dreapta sus și selectați Setări. Extindeți Setări avansate și selectați Resetare și curățare. Faceți clic pe opțiunea „Curățați computerul” pentru a rula scanarea.

În unele cazuri, aplicația ar fi putut face o modificare a registrului sau a folderului de utilizator. Acestea nu sunt curățate atunci când o aplicație este dezinstalată și este posibil să nu fie detectate de un antivirus. Utilizați versiunea gratuită a programelor Malware Bytes pentru a scana sistemul și a elimina orice elemente rău intenționate pe care le găsește.

Backup Chrome data

Configurați sincronizarea Chrome astfel încât datele dvs. să nu fie pierdute. Sincronizarea Chrome vă va asigura că toate lucrurile importante precum istoricul, marcajele și datele formularului sunt salvate fără a copia date care ar fi putut fi modificate de aplicația dăunătoare. Acest lucru vă va permite să recuperați totul atunci când ați curățat Chrome.

Reset Chrome

Acum este timpul să resetați Chrome. Faceți clic pe butonul pentru mai multe opțiuni din dreapta sus și selectați Setări. Accesați Setări avansate și selectați „Resetați și curățați”. Faceți clic pe opțiunea „Restaurați setările la setările prestabilite inițiale”. Când restaurarea este completă, verificați dacă browserul dvs. funcționează la fel ca înainte.

Dacă nu functioneaza, treceți la secțiunea următoare.

  • Curățați instalarea Chrome
  • Trebuie să dezinstalați Chrome și să îl instalați din nou, însă, între toate acestea, trebuie să ștergeți folderul creat de Chrome pentru stocarea datelor de profil. În primul rând, dezinstalați browserul.
  • Apoi, accesați următoarea locație din folderul utilizator și ștergeți folderul Google.

C:\Users\YourUserName\AppData\Local
Instalați Chrome din nou și utilizați sincronizarea Chrome pentru a vă primi înapoi marcajele, istoricul, datele formularelor etc. Acest lucru ar trebui să facă truc și Chrome va funcționa așa cum a făcut-o înainte.

[mai mult...]

Cum activez sugestii de cuvinte si corectarea greselilor in Windows 10 la tastarea de pe tastatura

Cum activez sugestii de cuvinte si corectarea greselilor in Windows 10 la tastarea de pe tastatura

Functii predictive introducerii textului cand se solicita cuvantul tastat si pentru unele fraze. Cu toate acestea, functia este prezenta si in Windows 10, desi in mod implicit este activata doar pentru tastatura ecranului tactil.

Activarea sugestiilor de text la tastarea de pe tastatura hardware

Pentru a activa functia text predictiv la utilizarea tastaturii hardware Windows 10, urmeaza pasii:

  1. Acceseaza Start – Setari sau apasa combinatia tastelor Win+I.
  2. Acceseaza rubrica «Dispozitive» – «Tastare».
  3. In rubrica «Tastatura hardware» activeaza optiunea «Afisati sugestii text in timp ce tastez», «Corectati automat cuvintele ortografiate incorect pe care le tastez».

  1. De asemenea, poti activa «Sugestii de text multilingv», doar ca nu mi-am dat seama cum exact functioneaza aceasta optiune, desi am incercat sa introduc propozitii constand din cuvinte in mai multe limbi simultan.

La introducerea oricaror cuvinte vei primi sugestii pentru cuvantul introdus curent, precum si in unele cazuri pentru urmatoarele cuvinte. In acelasi timp, pentru a selecta cuvantul potrivit nu trebuie neaparat sa apelezi la mouse – suficient e sa utilizezi tastele sageata (sus si dreapta) si Enter de pe tastatura.

Daca pentru tine va parea utila aceasta functie, activarea si dezactivarea sugestiilor de cuvinte la tastarea de pe o tastatura obisnuita se realizeaza in parametrul DWORD cu numele EnableHwkbPrediction in rubrica registrului HKEY_CURRENT_USER\Software\Microsoft\Input\Settings (valoarea 0 – sugestiile dezactivate, 1 – activate).

[mai mult...]