Soluții

Windows 10 can’t click anything?

  • Nowadays mice have become so complex that they even come with their own drivers and updaters.
  • However, this means that they are more easily affected when said drivers become damaged or missing.

Sometime you may experience issues with the mouse or trackpad disabling the right and left clicks in Windows 10. Several users have reported that they can’t click anything after booting up the computer or when in the middle of something.

I Started my computer today and I couldn’t click anything at all. Its a Windows 10 computer. It not jut the start menu but everything. I can’t press cancel when I’m in Carl+alt+del. I tried  safe mode and the problem was still there. The mouse works fine I just can’t click anything at all

This error can occur if the Windows Explorer has crashed or if you have an old Windows build with a glitch installed. In this article, we have listed a couple of troubleshooting tips to help you resolve the can’t click anything issue in Windows 10.

What to do if I can’t click anything in Windows 10?

1.  Restart the explorer.exe process

  1. Press Ctrl + Shift + Esc to open the Task Manager.
  2. You can also press Ctrl + Alt + Delete and then use the Tab key to open Task Manager.
  3. In the Task Manager, press the Tab key until one of the processes is select.
  4. Use the down arrow keys on your keyboard to select Windows Explorer.
  5. Since the right-click is not working, we will use Shift + F10 (shortcut for right-click).
  6. Press  Shift + F10 to bring up the context menu.
  7. Use the down arrow key and select End Task.

  1. Click Enter to end the explorer.exe task.
  2. Once the explorer.exe process is killed, you may see a black screen for a short time.
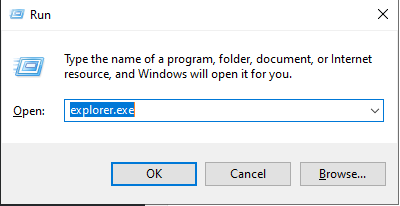
  3. Press Windows Key + R.
  4. Type explorer.exe and hit Enter.
  5. This will relaunch your Windows Explorer.
    • Try using the mouse to click anything to see if the issue is resolved.

If your Windows Explorer has crashed or frozen, it may lead to can’t click anything issue in Windows 10. However, ending and restarting the explorer.exe process can resolve this issue.

2. Check your keyboard for issues
  1. Faulty keyboard keys can prevent the mouse from performing the right-click and left-click actions.
  2. Check if your keyboard if it has any broken keys or long hold keys that are pressed without your knowledge.
  3. Spacebar is one of the common keys to break or get stuck in your keyboard. Make sure the keys are working fine.
  4. You may also unplug the keyboard and restart your computer to see if the mouse and clicking functions work.
  5. If the mouse works in the absence of a keyboard connected to your computer, check the keyboard for faulty keys.
3. Check for pending Windows updates

  1. Press the Windows key on your keyboard.
  2. Type update.
  3. Use the arrow key if required and open Check for updates.
  4. In the Windows Update section, use the Tab key to navigate.
  5. Select Download updates and hit Enter.
  6. Windows will download and install any pending Windows 10 updates.

Some of the older version of Windows is known to have mouse-clicking issues in Windows 10. Make sure you are running the latest stable Windows 10 build to fix any issues caused by a glitch in the OS.

4. Check your mouse and third-party software
  1. The above fix will only work if your mouse is in working condition.
  2. Try unplugging the mouse and connect a secondary mouse to your computer.
  3. Right-click on any app or the desktop and check if the secondary mouse is working.
  4. If the mouse works, you may need to replace the device with a new one.

Check for a third-party software

  1. If you had recently installed third-party software to customize a mouse or keyboard, it might create issues with the pointing device.
  2. Close any apps such as Razer Synapse or other customization software from the Task Manager.
  3. Disconnect and reconnect the mouse to see if that resolves the issue.

5. Use a restore point

  1. Press the Windows key and type restore.
  2. Select Create a restore point and hit enter to open System Properties.

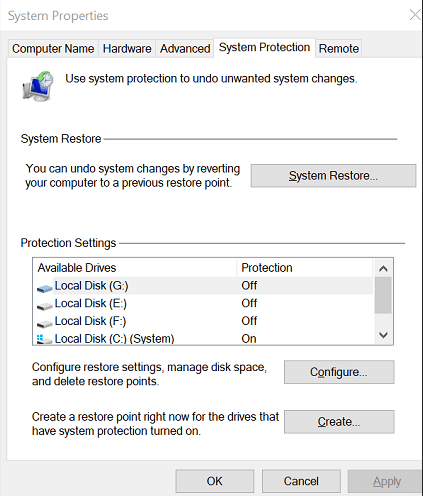
  1. Press the Tab key to select the System Restore button and hit enter.
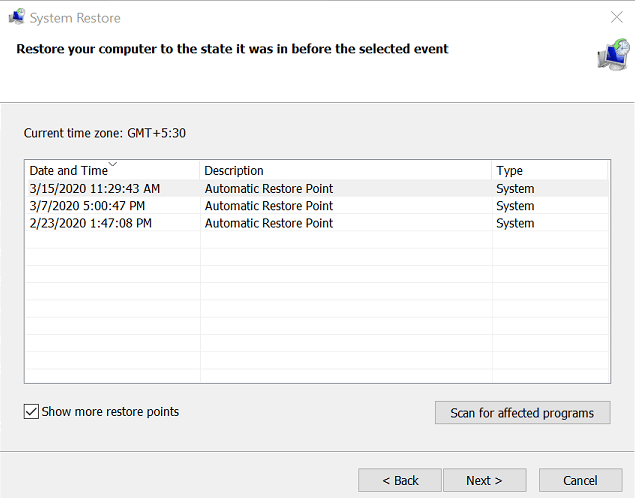
  2. Select Recommended to restore and then use Tab key again to select Next and hit enter.
  3. To confirm your restore point, select Finish and hit enter.
  4. Windows will restore your system to the state it was in before the date selected.
  5. The process may take some time to complete, so wait till the PC reboots and shows a success message.

If System Restore is not successful, repeat the steps again but with an older Restore Point.

Windows 10 can’t click anything problem is most likely to be triggered by an unresponsive explorer.exe process. However, follow other steps in this article if restarting Windows Explorer did not resolve the issue.

[mai mult...]

How to reclaim space after upgrading to Windows 11

After upgrading to Windows 11 from Windows 10 or another version, you will probably notice a spike in storage usage. Use these steps to get the storage back.

When you upgrade to Windows 11 from Windows 10 or another version, the setup makes a copy of the previous installation as part of the process, in case something wrong happens during the installation, and the system needs to roll back to the original setup, or Windows 11 is having compatibility issues, and you need to revert to a previous version manually. Although the safeguard feature provides a way to restore the original changes, the copy of the files will be kept even after the upgrade completes successfully, taking a lot of storage (inside the “Windows.old” folder) that can be an issue for devices with limited capacity.

If you notice that your laptop or desktop computer is running out of space after the upgrade, Windows 11 includes an option to delete the previous files that can reclaim 12GB or more, depending on the previous configuration.

In this Windows 11 guide, we will walk you through the steps to delete the previous installation files wasting space after upgrading to the new version of the OS.

  • How to free up space after Windows 11 using Settings
  • How to free up space after Windows 11 using Disk Cleanup  
How to free up space after Windows 11 using Settings

To reclaim space after installing Windows 11, use these steps:

  1. Open Settings.
  2. Click on System.
  3. Click on Storage.
  4. Click the Temporary files page on the right-side.
  5. Clear all the preselected items (if applicable).
  6. Check the Previous Windows installation(s) option.
  7. Click the Remove files button.

Once you complete the steps, the previous installation files will be removed alongside any other temporary files you may have selected on the settings page.

In previous versions, the option was also available through the Storage settings, but it’s no longer the case with Windows 11.

How to free up space after Windows 11 using Disk Cleanup

In addition to using the Settings app, you can also use the legacy Disk Cleanup tool to delete the folder with the previous installation of Windows 11.

To free up space after the installation of Windows 11 with Disk Cleanup, use these steps:

  1. Open Start.
  2. Search for Disk Cleanup, click the top result to open the settings.
  3. Click the Clean up system files button.
  4. Check the Previous Windows installation(s) option.

Quick tip: You can also select other temporary files (such as Delivery Optimization Files and Windows update log files) to recover even more space.

  1. Clear the Downloads option to avoid deleting downloaded files inside the “Downloads” folder.
  2. Click the OK button.

After you complete the steps, the folder with the previous installation files will be deleted from your computer, freeing up storage on the main drive.

The system will only keep the copy of the earlier setup for the first ten days after the upgrade. After this period, Windows 11 will automatically delete these files. Also, after removing the files, the option to roll back will no longer be available in the Settings app. In the future, if you want to downgrade, you will have to do a clean installation using the version of Windows you want to use.

[mai mult...]

How to connect to Wi-Fi network using Command Prompt

You can also use the netsh command-line tool in Command Prompt to connect to a Wi-Fi network on Windows 11. To connect to a Wi-Fi network with commands on Windows 11, use these steps:

  • Open Start.
  • Search for Command Prompt, right-click the top result, and select the Run as administrator option.
  • Type the following command to view the available network profiles and press Enter:netsh wlan show profile
  • Confirm the wireless profile.

  •  Type the following command to connect to the wireless network on Windows 11 and press Enter:

netsh wlan connect ssid=YOUR-WIFI-SSID name=PROFILE-NAME

In the command, update the name (SSID) of the network and profile name with your network information. For example, this command connects to the “tsunami” network using the “tsunami” profile:

netsh wlan connect ssid=tsunami name=tsunami

Quick Tip: On a computer with multiple adapters, you also have to specify the adapter name in the command. For example,: netsh wlan connect ssid=YOUR-WIFI-SSID name=PROFILE-NAME interface=Wi-Fi.

After you complete the steps, the laptop will connect to the Wi-Fi network.

Create network connection

The netsh command tool also allows you to manage Wi-Fi adapters and networks. The only issue is that you can only manage existing profiles. You cannot create new network profiles with this tool. If you have to use Command Prompt to connect one or multiple computers to the same wireless network, you can export the profile created automatically during the first connection. Then you can import it using netsh to connect using commands.

Export Wi-Fi profile

To export a Wi-Fi profile with commands on Windows 11, use these steps:

  1. Open Start.
  2. Search for Command Prompt, right-click the top result, and select the Run as administrator option.
  3. Type the following command to view the available network profiles and press Enter:netsh wlan show profile
  4. Type the following command to export a profile and press Enter:netsh wlan export profile PROFILE-NAME key=clear folder=PATH\TO\EXPORT\FOLDER

    For example, this command exports the tsunami profile to the “Documents” folder.

    netsh wlan export profile tsunami key=clear folder=C:\Users\m\Documents

Once you complete the steps, you can import the same XML file to connect other computers to the wireless network.

Import Wi-Fi profile

To import a Wi-Fi profile on Windows 11, use these steps:

  1. Open Start.
  2. Search for Command Prompt, right-click the top result, and select the Run as administrator option.
  3. Type the following command to determine the name of the network adapter and press Enter:netsh wlan show interfaces
  4. Confirm the name of the adapter that will connect to the network.
  5. Type the following command to import the wireless profile and press Enter:netsh wlan add profile filename="PATH\TO\PROFILE.XML" Interface="YOUR-WIFI-ADAPTER-NAME" user=current

    In the command, you must specify the location of the XML file and network interface name.

    For example, this command imports the XML profile located in the “Documents” folder to the Wi-Fi adapter:

    netsh wlan add profile filename="C:\Users\m\Documents\wi-fi-tsunami.xml" Interface="WI-FI" user=current

  6. Type the following command to connect to the wireless network and press Enter:netsh wlan connect ssid=YOUR-WIFI-SSID name=PROFILE-NAME

    In the command, you must specify the SSID and profile name that corresponds to your network.

    For example, this command connects to an access point using the “tsunami” SSID and “tsunami” profile name:

    netsh wlan connect ssid=tsunami name=tsunami

  1. Quick tip: If you have multiple wireless interfaces, you must also specify which adapter you want to use in the command. For example, netsh wlan connect ssid=YOUR-WIFI-SSID name=PROFILE-NAME interface=Wi-Fi.

After you complete the steps, the computer should connect to the wireless network automatically.

[mai mult...]

Cum să deconectați o unitate de rețea mapată pentru Windows 11

Dacă utilizați frecvent o unitate de rețea (sau „partajați”) cu Windows 11, o puteți asocia cu o literă de unitate în File Explorer pentru a face să pară mai mult ca o unitate locală și să o accesați rapid în viitor. Iată cum să o faci.

  • Mai întâi, deschideți File Explorer . Dacă nu aveți o comandă rapidă către File Explorer în bara de activități, faceți click dreapta pe butonul Start și selectați „File Explorer”.
[mai mult...]

Cum se activează hardware GPU în Windows 11

De obicei, procesorul computerului dvs. descarcă unele date vizuale și grafice intensive pe GPU pentru a le reda, astfel încât jocurile, multimedia și alte aplicații să ruleze fără probleme. CPU adună datele cadrului, atribuie comenzi și le acordă prioritate una câte una, astfel încât GPU să poată reda cadrul.

Cu caracteristica Hardware-Accelerated GPU Scheduling, procesorul și memoria (VRAM) de planificare a GPU preiau aceeași muncă și o rulează în loturi pentru a reda cadrele. În acest fel, GPU-ul dvs. scutește procesorul de unele lucrări și reduce latența pentru a vă face posibil ca computerul să funcționeze mai bine.

[mai mult...]