Soluții

How to use TRIMRANGE & Trim Ref Operators to Tidy Up an Excel Spreadsheet

Looking for a way to tidy up your spreadsheet and reduce its size without having to use dynamic range formulas like OFFSET, INDEX, or TOCOL? TRIMRANGE detects the cells your data occupies and automatically expands and contracts with it.

The TRIMRANGE Syntax

The TRIMRANGE function has three arguments:

=TRIMRANGE(a,b,c)

where

  • a (required) is the range to be trimmed,
  • b (optional) determines which rows to trim (0 = no rows, 1 = leading rows, 2 = trailing rows, and 3 = both leading and trailing rows), and
  • c (optional) determines which columns to trim (0 = no columns, 1 = leading columns, 2 = trailing columns, and 3 = both leading and trailing columns).

If you omit arguments b and/or c, Excel will default to trimming both the leading and trailing rows and/or columns.

At the time of writing (January 2025), TRIMRANGE doesn’t allow you to trim blank rows or columns between existing data. You can only use it to trim data before or after your data. Instead, use other ways to delete empty rows of data between populated rows of data.

Example 1: TRIMRANGE With a Sum

In this example, I want to subtract the values in column B from those in column C to produce a profit.

An unformatted table in Excel containing various item IDs, the price paid for each, and the price each sold for. There is a blank column headed Profit.

I know that I will add additional rows at the bottom at some point in the future, so I want Excel to automatically pick these up as part of the subtraction formula. To do this, I could type:

=(C2:C200)-(B2:B200)

into cell D2, as this would spill the references to the first 200 rows. However, doing this would result in an untidy spreadsheet with lots of empty calculations. What’s more, if I used whole-column references, the calculation would spill to the very bottom of the spreadsheet. This would cause there to be over a million calculations, thus significantly increasing my spreadsheet’s size and slowing it down.

An Excel spreadsheet containing a spilled calculation that expands below the last row of data.

Instead, I will type:

=TRIMRANGE(C2:C200)-TRIMRANGE(B2:B200)

into cell D2, which would effectively trim the redundant cells at the bottom of my data to prevent Excel from having to work too hard and keep my spreadsheet looking tidy.

An Excel spreadsheet containing a spilled calculation that is trimmed at the bottom of the data.

I’ve omitted arguments b and in the above TRIMRANGE references, as Excel’s default of trimming leading and trailing columns and rows works well in this example, since there are no leading blank rows or columns, and there is no data to the right of column D.

Now, when I add further rows of data at the bottom, the corresponding cells in the Profit column will calculate automatically.

An Excel spreadsheet containing a spilled calculation that automatically picks up new rows due to the addition of the TRIMRANGE function.

In this second example, I have a list of soccer players, and I’m going to use the XLOOKUP function to tell me which color jersey I need to provide them with, depending on the team they’re in.

An Excel spreadsheet containing soccer player data with the Jersey column blank. There's also a reference table with the jersey colors specified.

I also know that I’m going to recruit a further five players, so when I add my XLOOKUP formula, I need to extend it to row 22. So, in cell E2, I could type:

=XLOOKUP(B2:B22,$G$2:$G$7,$H$2:$H$7)

where B2:B22 is the range, $G$2:$G$7 is the lookup array, and $H$2:$H$7 is the return array. I’ve used $ symbols to tell Excel that these are absolute (fixed) cell references. However, as with the previous example, this would leave the five rows of empty data looking untidy due to the #N/A error. Also, Excel is working harder than it needs to, an issue that could affect performance if you have lots of blank rows included in your formula.

An Excel spreadsheet containing an XLOOKUP formula that results in the NA error due to blank rows of data.

could also use OFFSET, INDEX, or TOCOL to create dynamic range formulas, but these are much more complicated ways to achieve the same outcome as the much simpler TRIMRANGE method.

So, in cell E2, I will type:

=XLOOKUP(TRIMRANGE(B2:B22,2),$G$2:$G$7,$H$2:$H$7)

which is exactly the same formula as above, except that I’ve referenced the range (B2:B22) within the TRIMRANGE function. Notice how, this time, I’ve decided to include the second argument (“2”), which tells Excel that I want to trim trailing blank rows. However, I’ve not included a third argument, as my range only spans one column.

This time, Excel has trimmed my XLOOKUP result, and when I add more rows of data at the bottom, the cell in column E populates automatically.

An Excel spreadsheet that performs an XLOOKUP calculation on a new row of data due to the addition of the TRIMRANGE function.

Admittedly, some of the formulas I’ve used in the examples above are quite complex. This is why Microsoft has also introduced Trim Ref operators, a shorthand version of the TRIMRANGE function. In other words, the Trim Ref operators save you from having to embed TRIMRANGE within other functions. What’s more, the Trim Ref operators don’t require you to specify whether you’re trimming rows or columns, as they automatically trim both.

Using the Trim Ref operator involves adding a period (.) on either or both sides of the colon within your formula:

Where to Add the Period Which Blanks Are Trimmed
After the colon Trailing blanks
Before the colon Leading blanks
Both sides of the colon Trailing and leading blanks

Since the Trim Ref operators are a single “dot” in your formula, they can be difficult to spot when you’re reviewing your work or someone else’s spreadsheet. It’s something to look out for if things aren’t working as you might expect!

Using the same soccer player data as in Example 2, in cell E2, I will type:

=XLOOKUP(B2:.B22,$G$2:$G$7,$H$2:$H$7)

Notice how I’ve added a period after the colon in B2:.B22. This is because I want Excel to trim the trailing blanks. The screenshot below reveals the same outcome, even though I’ve used a much more straightforward formula without nesting the TRIMRANGE function within my formula.

An example of a trailing Trim Ref operator being used in a formula in Excel to trim trailing rows of vacant data.

Like when I use the TRIMRANGE function, I know I can add more rows of data at the bottom, and the XLOOKUP function will apply to that data. You may justifiably argue that you should instead present your data in formatted Excel tables and use structured references, which automatically expand to include new data and any relevant calculations you create. In most situations, I would agree.

However, spill arrays (and some LAMBDAS) can’t go in structured tables, so in these situations, using TRIMRANGE is a handy alternative to have up your sleeve. Also, in some scenarios, you might prefer to place a range outside a structured table (for example, if you want to format your data uniquely), and the TRIMRANGE function helps you keep unstructured data tidy.

[mai mult...]

How to split a PDF File on Windows 11

The easiest built-in way to create a new PDF using chosen pages from an existing PDF is by using Microsoft Edge. Although this is a web browser, it allows you to view and work with PDF files.

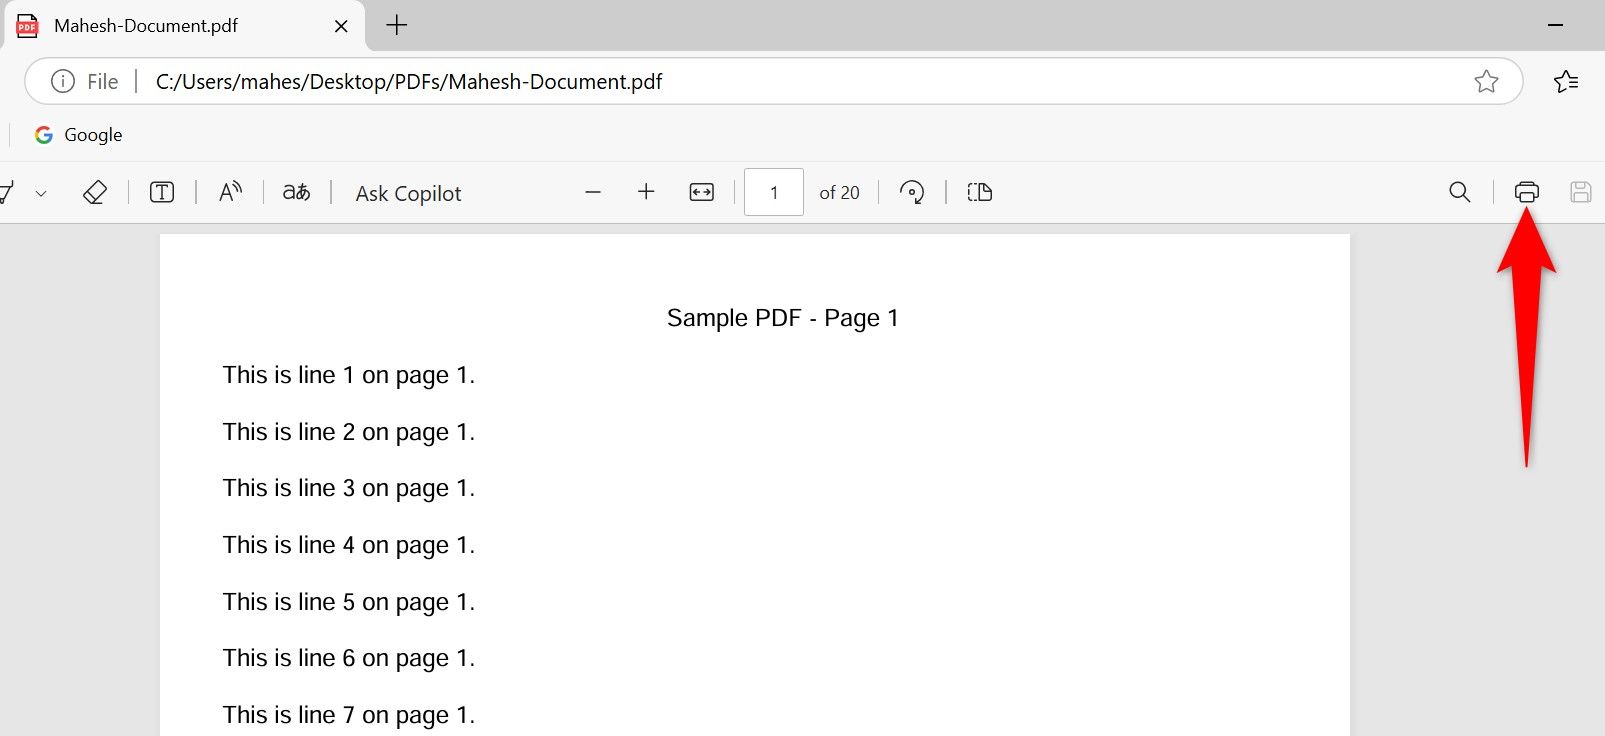
To start the process, launch File Explorer (press Windows+E) and find the PDF you want to split. Right-click the file and choose Open With > Microsoft Edge.

When the PDF is open in Edge, from the tool list at the top, click “Print” (the printer icon), or press Ctrl+P. Note that you aren’t actually printing anything.

"Print" highlighted in Edge.

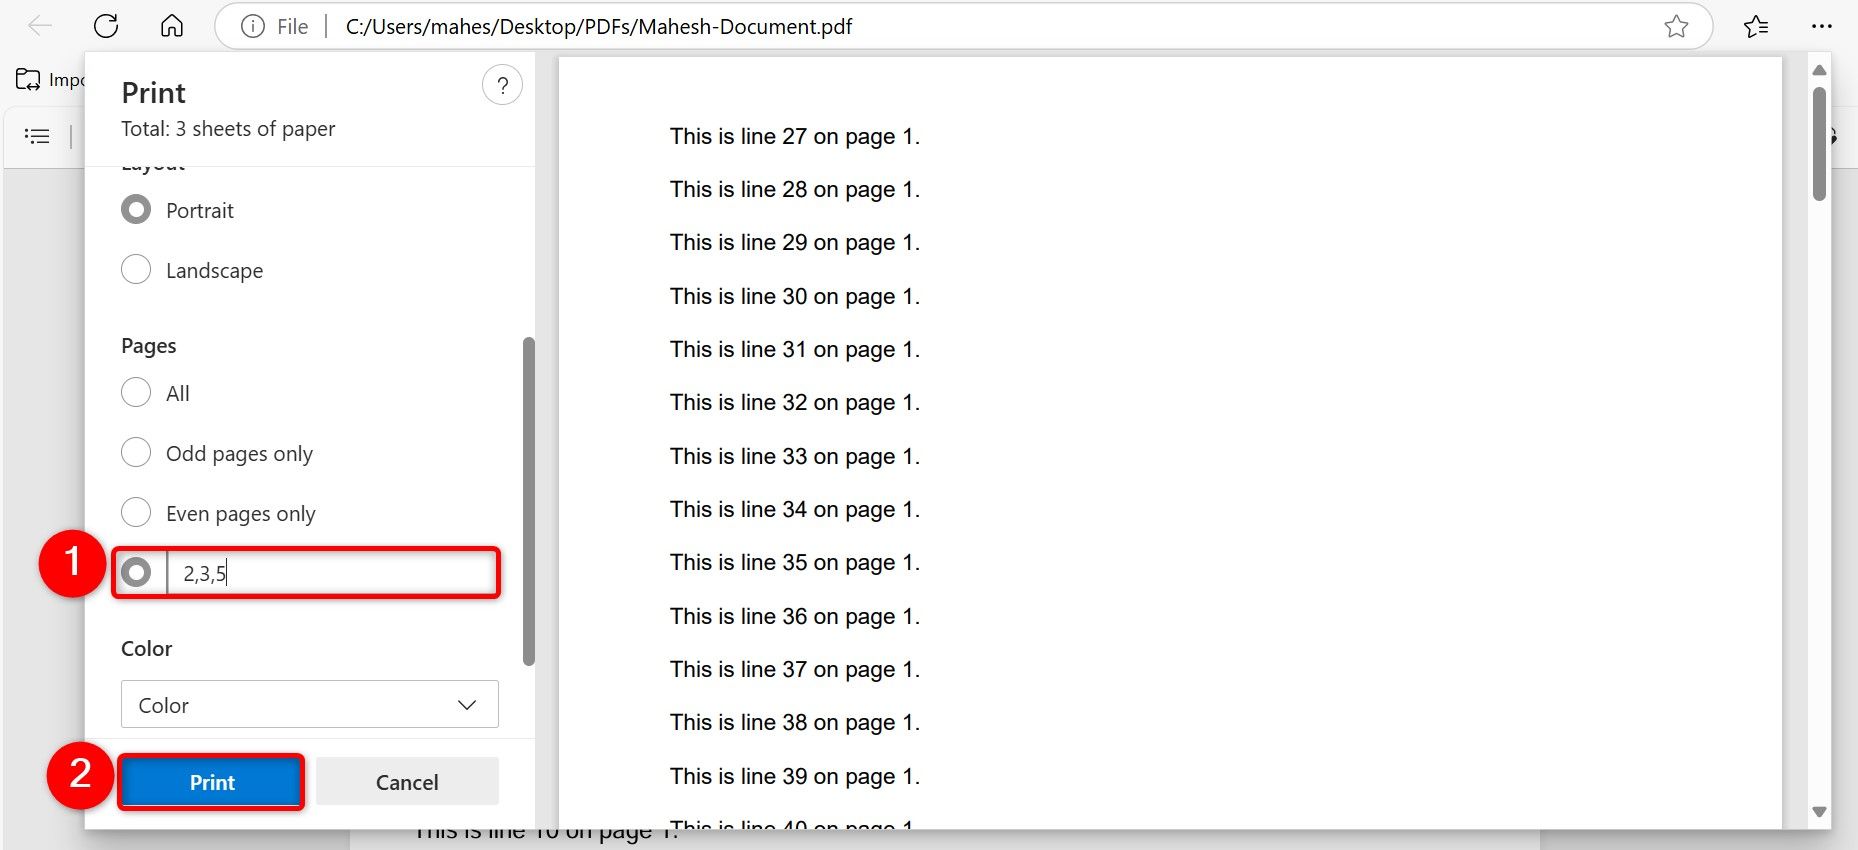
On the Print window, click the “Printer” drop-down menu and choose “Microsoft Print to PDF.” Scroll down and click the “Pages” field. Here, type the page numbers of the existing PDF you want in your new PDF. For example, to only extract the second page, type 2. To extract pages from 2 to 4, type, 2-4. To extract pages 2, 3, and 5, type 2,3,5. Then, at the bottom, click “Print”.

"Pages" and "Print" highlighted in Edge.

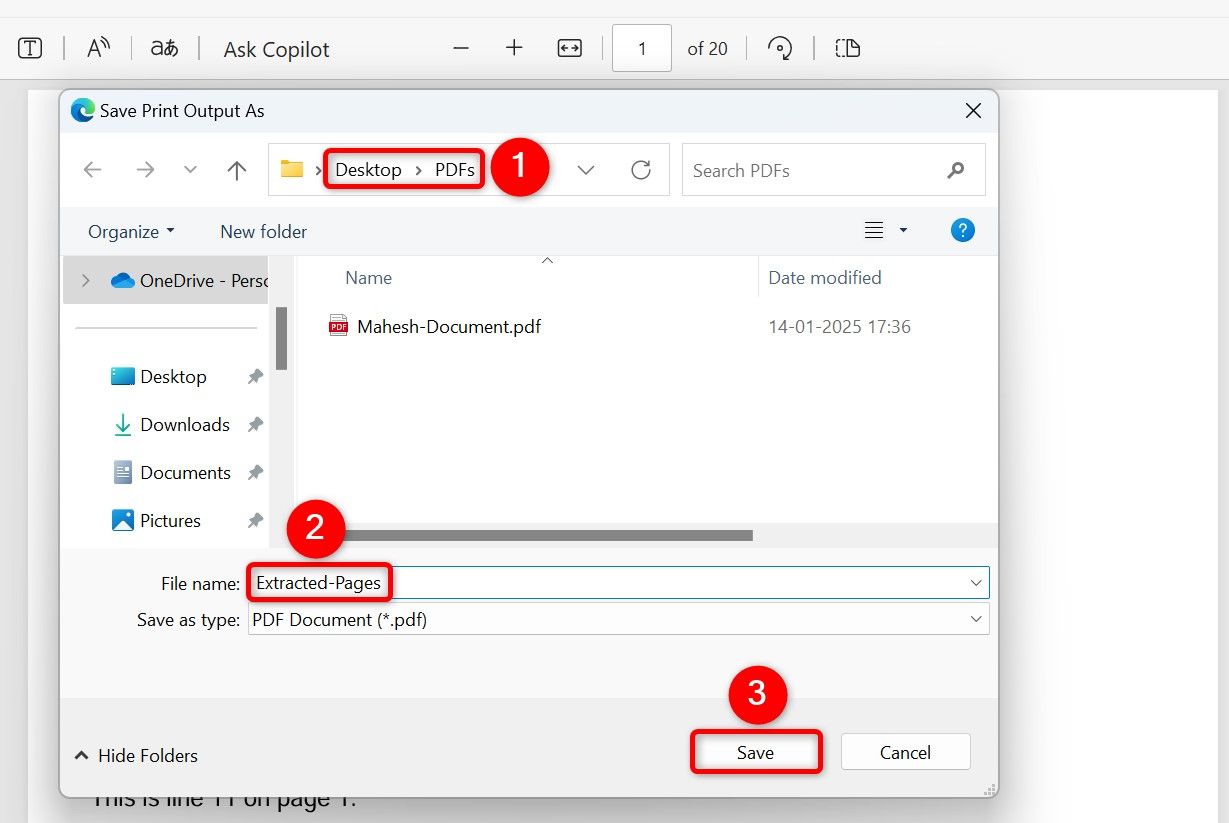
You’ll see the Save Print Output As window. Here, choose the folder to save your new PDF in. Select the “File Name” field and type a name for the file. Then, choose “Save”.

Various options highlighted on the PDF save window in Edge.

Make a New PDF From Chosen Pages Using a Free App

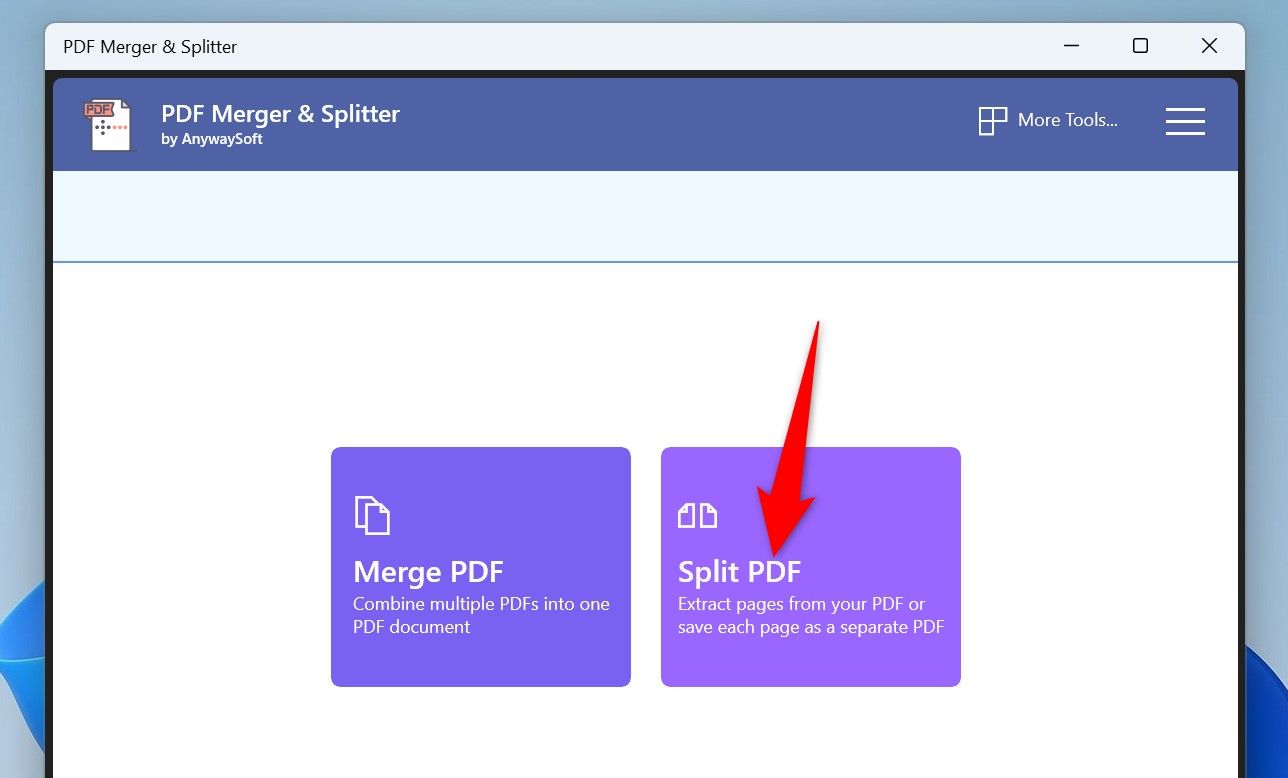
Another way to split a PDF is by using a free app called PDF Merger & Splitter. To use it, launch Microsoft Store on your PC, type PDF Merger & Splitter in the search box, press Enter, select the app in the search results, and choose “Get”.

Open the newly installed app and choose “Split PDF”.

"Split PDF" highlighted in PDF Merger & Splitter.

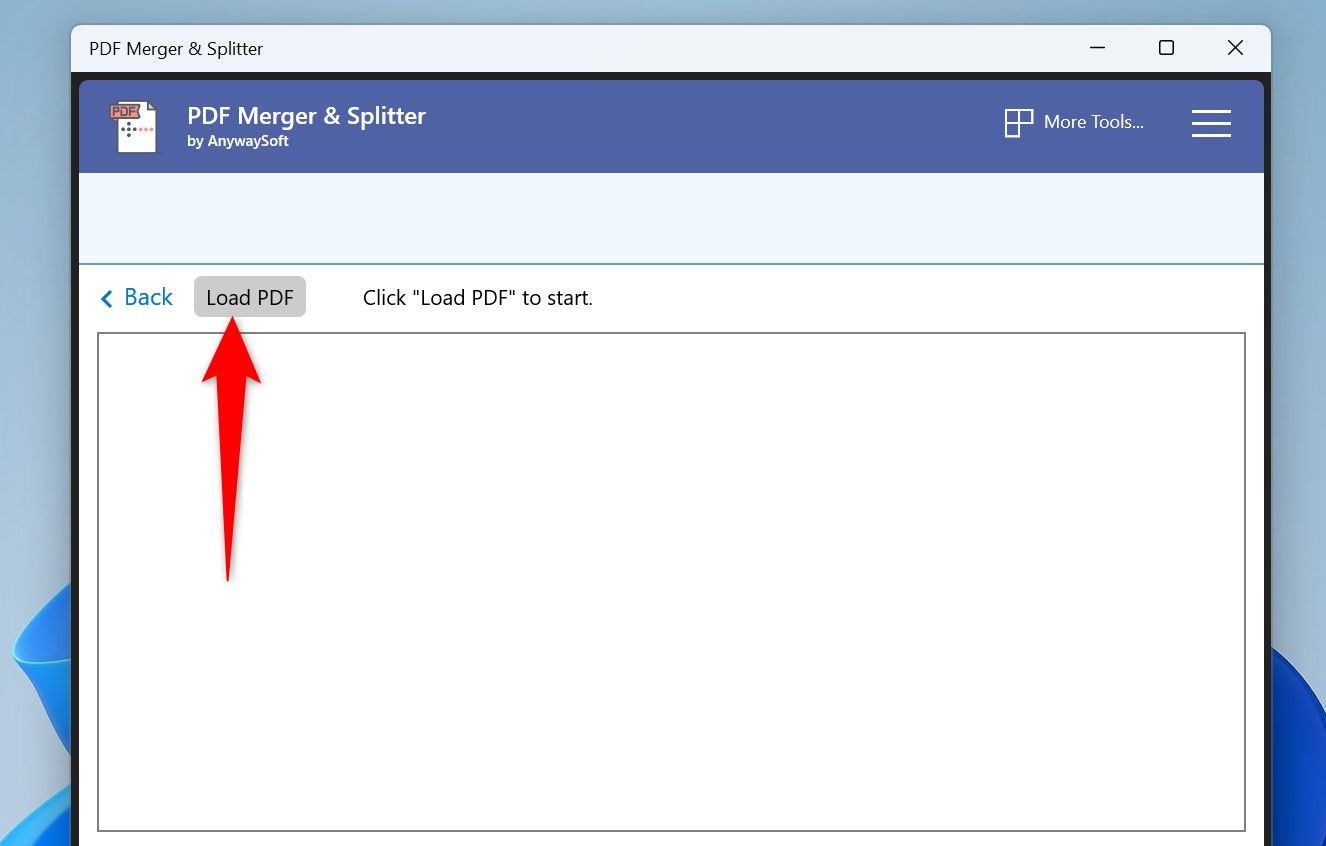
Click “Load PDF” at the top and select the PDF you want to split.

"Load PDF" highlighted in PDF Merger & Splitter.

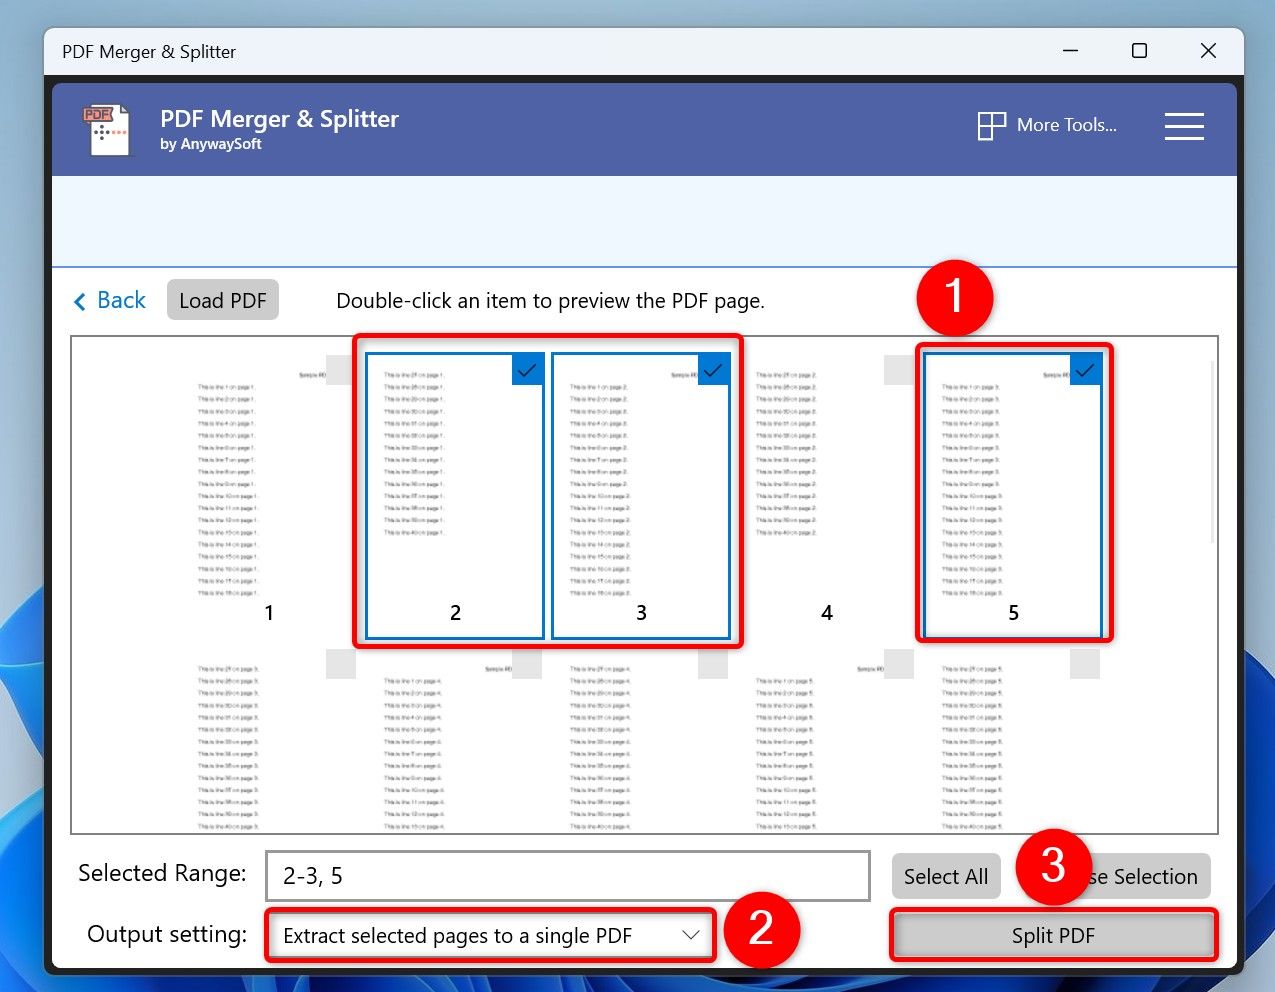
When the PDF is loaded, you’ll see each page’s preview. Click the pages you want to create a new PDF from. As you select pages, the app fills in the page numbers in the Selected Range field.

After choosing the pages, select the “Output Setting” drop-down menu and choose one of the two options:

  • Extract Selected Pages to a Single PDF: This option extracts the selected pages from the loaded PDF file and makes a single new PDF.
  • Extract Each Selected Page to a PDF: This option turns each selected page in the source PDF file into a new PDF file. You’ll have one PDF for each page.

Then, click the “Split PDF” button at the bottom.

Various options to split a PDF highlighted in PDF Merger & Splitter.

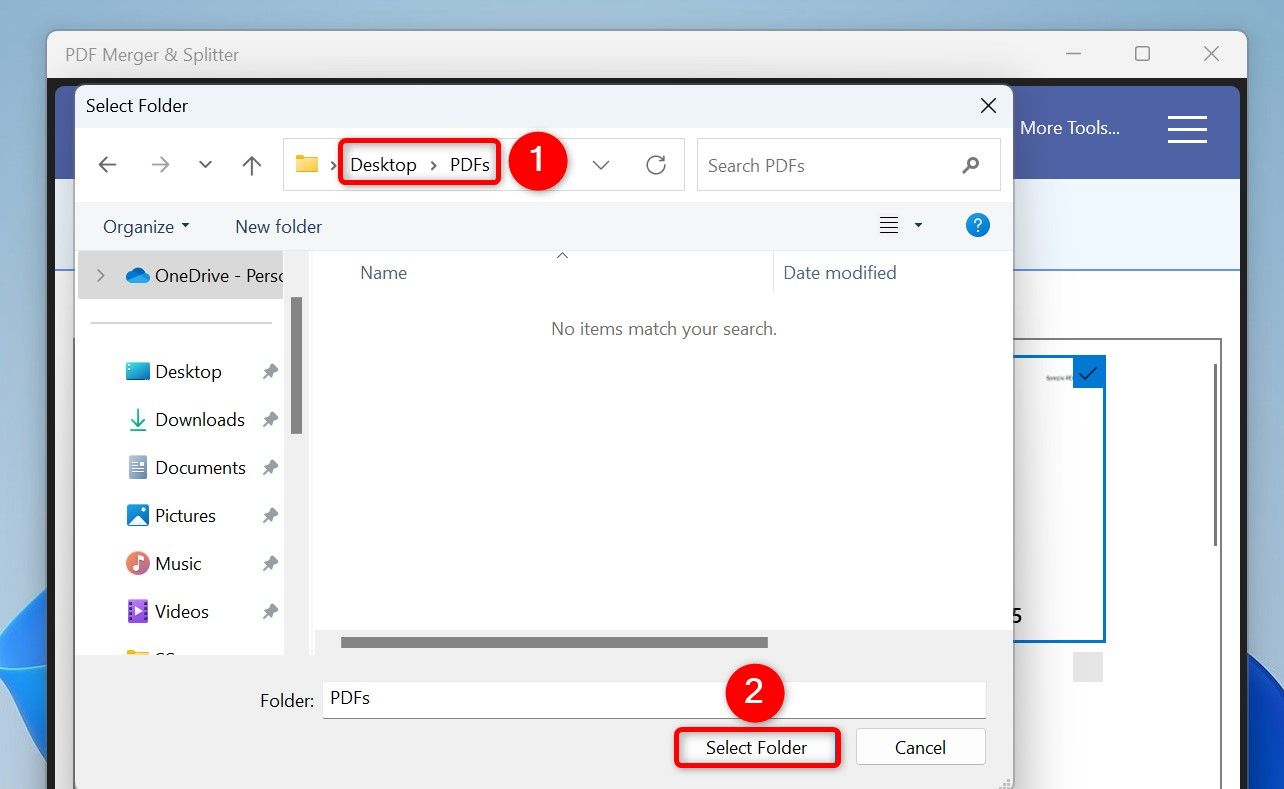
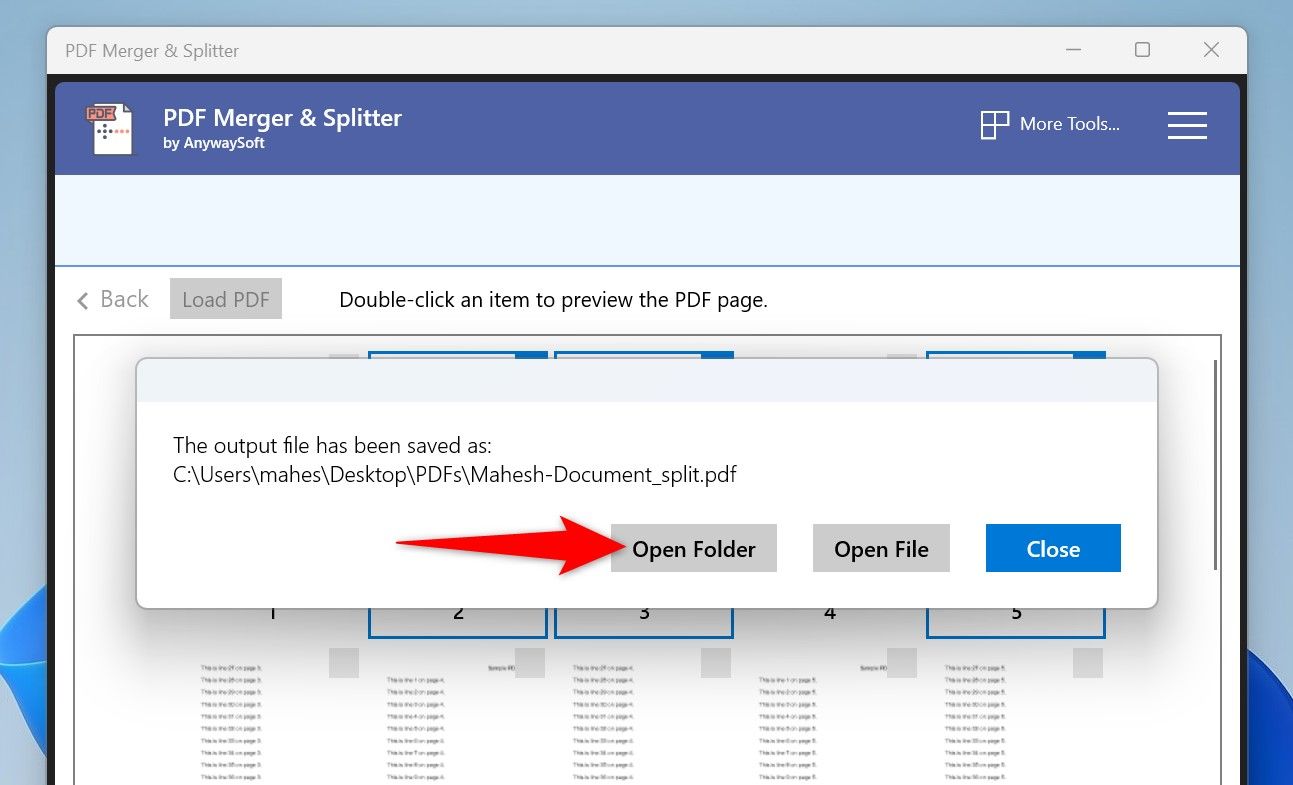
Choose the folder in which you want to save the resulting PDF and click “Select Folder”.

"Select Folder" highlighted on the Select Folder window.

In the open prompt, click “Open Folder” to open the folder where your split PDF is located.

"Open Folder" highlighted in PDF Merger & Splitter.

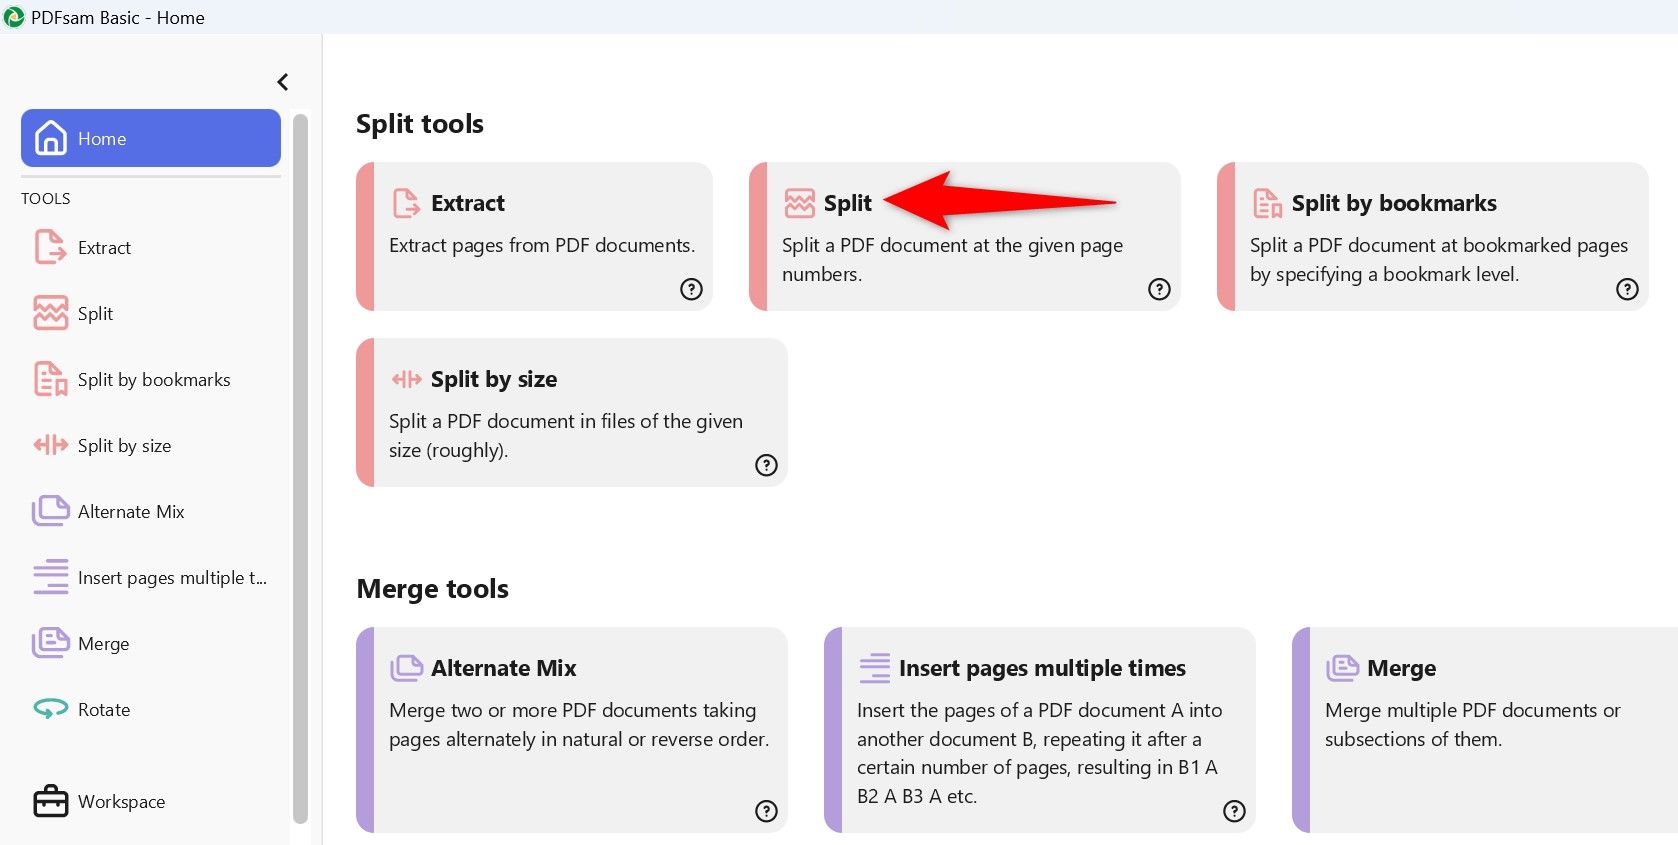
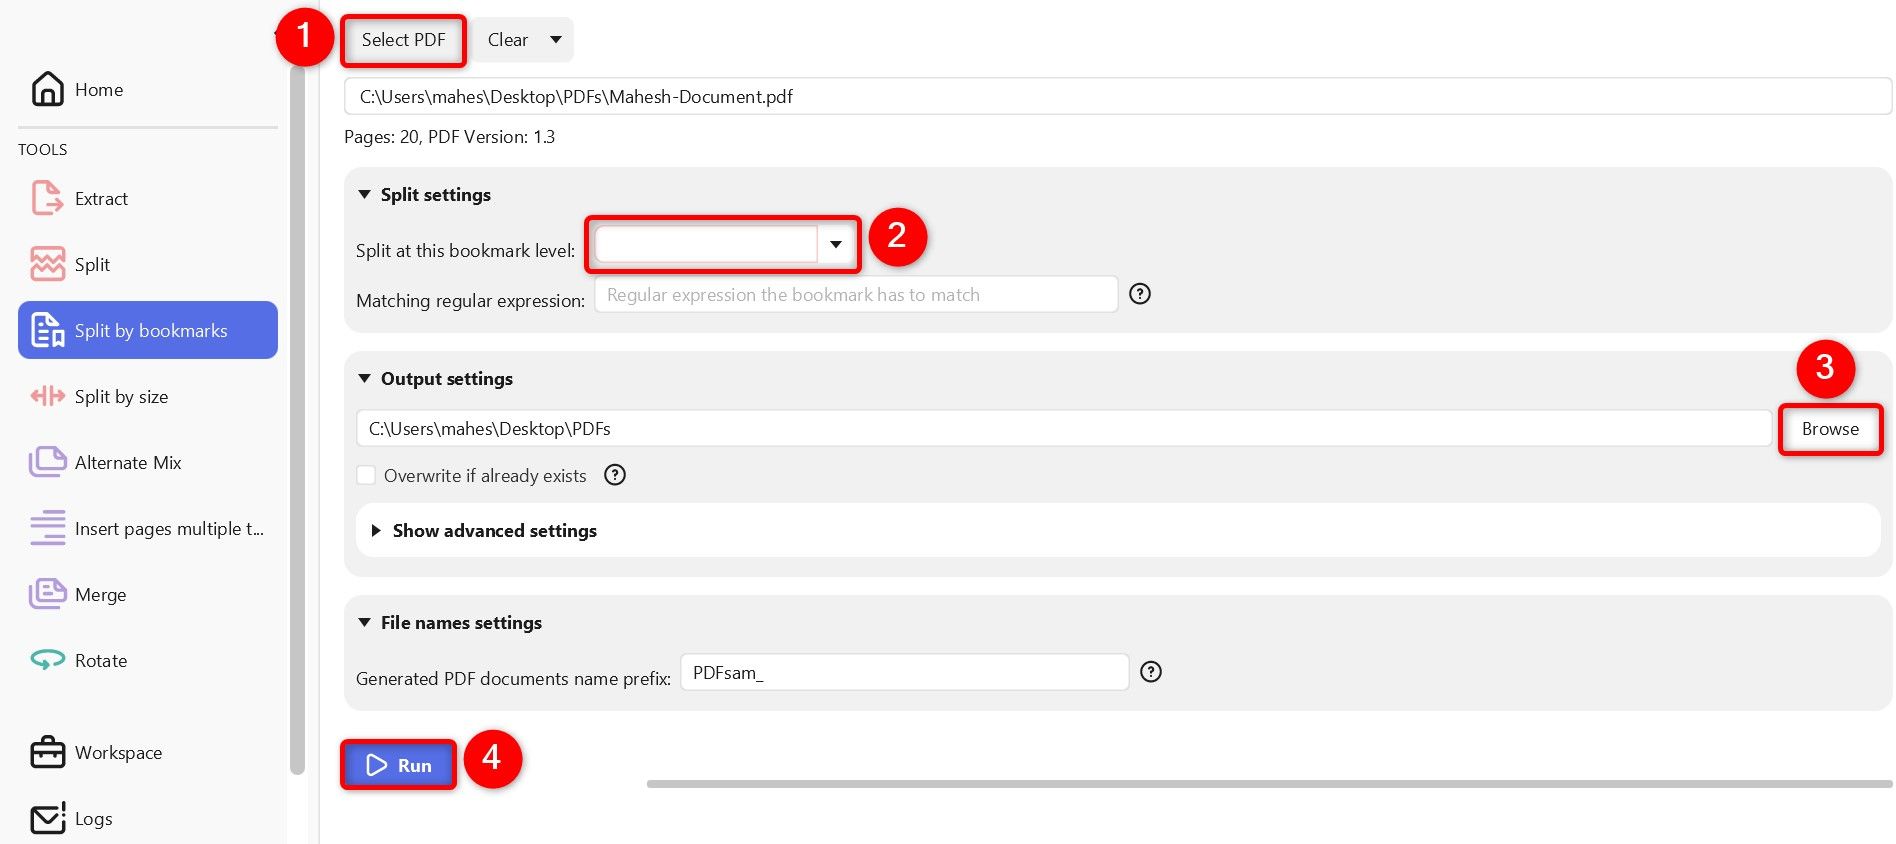
If you’re looking for more advanced options, like the ability to split a PDF by every n number of pages, after the specified page numbers, or bookmarks, use the free and open-source PDFsam Basic app.

Launch the PDFsam site and download and install the app on your PC. In the installation wizard, make sure to uncheck the option to install PDFsam Enhanced as you don’t need that to perform the task.

Launch the newly installed app. In the Split Tools section, click “Split”.

"Split" highlighted in PDF24.

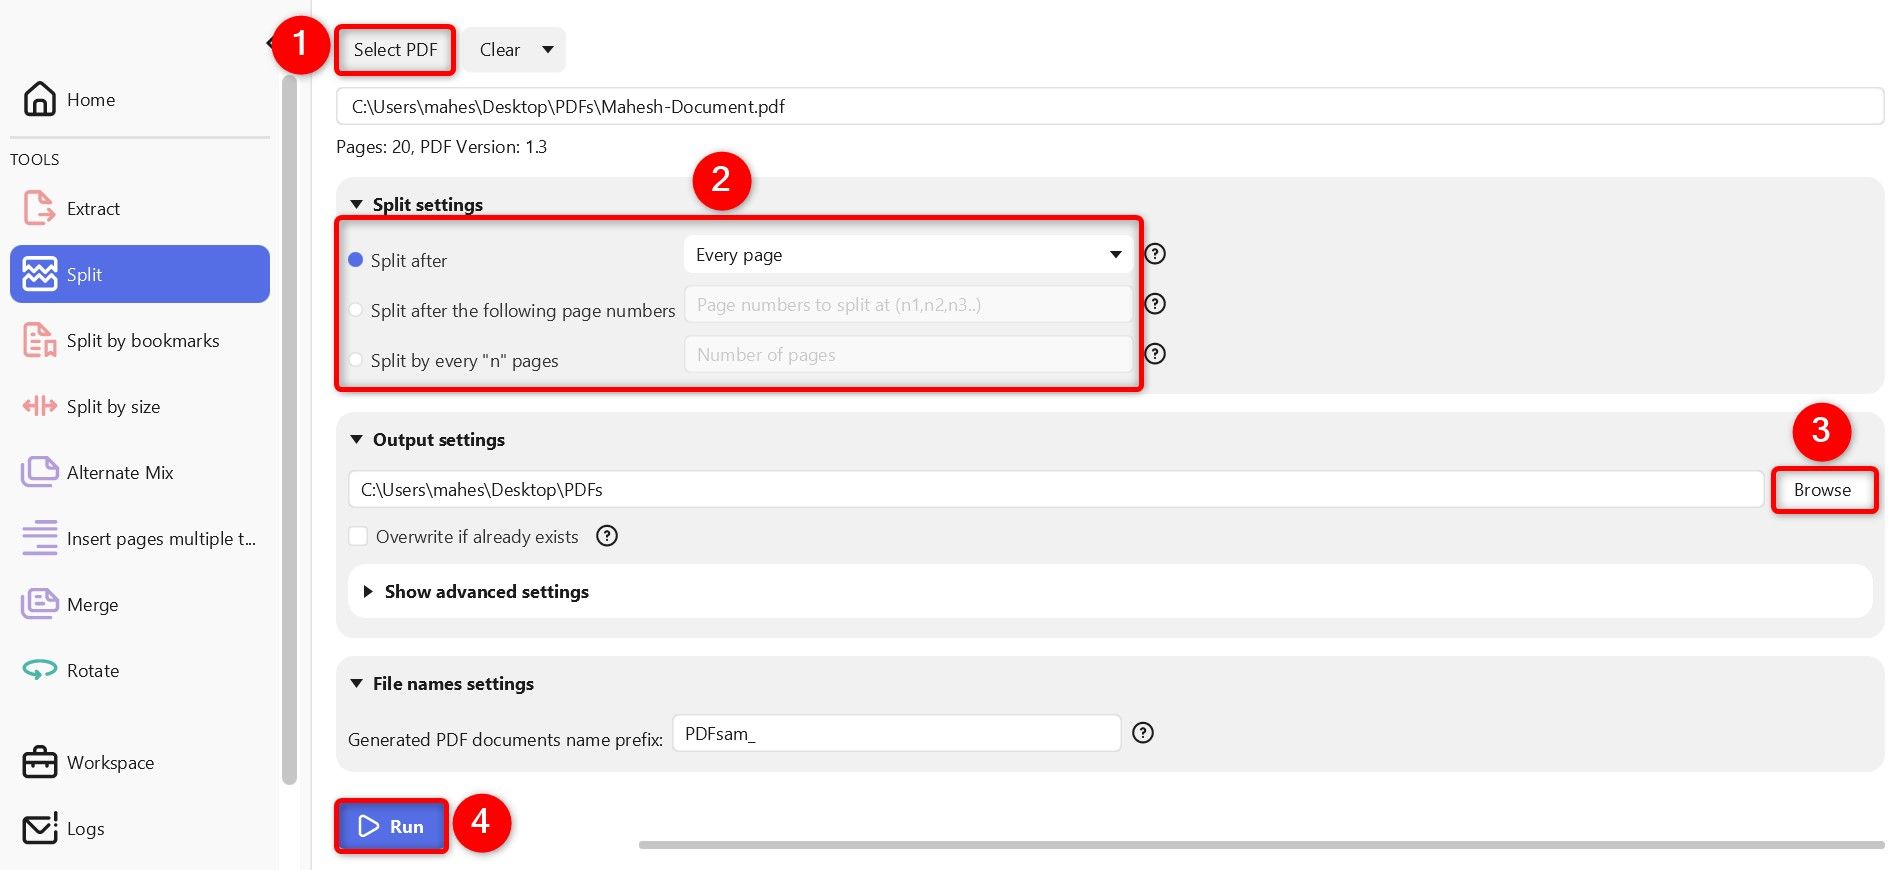
At the top, click “Select PDF” and choose the PDF you want to split. In the Split Settings section, select how you want to extract pages from your file:

  • Split After: This option splits your PDF after Every Page, after Even Pages, or after Odd Pages.
  • Split After the Following Page Numbers: This option splits the PDF after the specified page numbers.
  • Split by Every N Pages: You specify the N number and the app splits the PDF for every N page.

In the Output Settings section, click “Browse” and choose where you want to save the resulting PDF files. Then, at the bottom, click “Run”.

Various options to split a PDF highlighted in PDF24.

To split a PDF by bookmarks, launch PDFsam Basic and click “Split by Bookmarks.” Choose “Select PDF” and load your PDF. In the Split Settings section, click “Split at This Bookmark Level” and type the level. Select the destination folder in the Output Settings section. Then, at the bottom, click “Run.”

Options to split a PDF by bookmarks highlighted in PDF24.

If you only have one or a few PDFs to split, you can use a web-based app to perform the task. This eliminates the need to download and install an app. Some tools you can use are Adobe Acrobat  and iLovePDF. Note that I don’t recommend using this method for confidential files, as you risk exposing your file’s data to these web-based services.

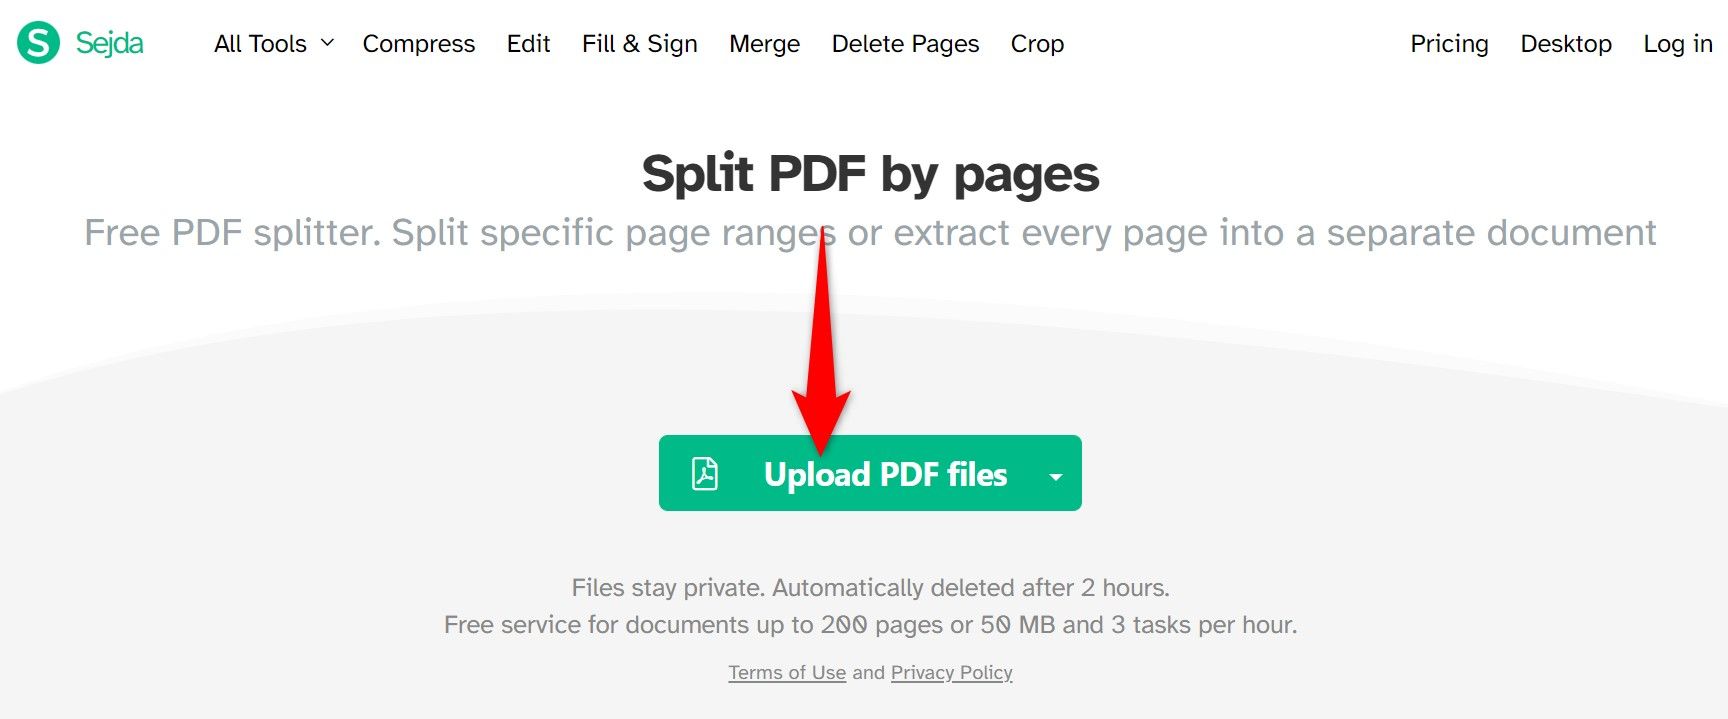
To use the Sejda method, launch its site, click “Upload PDF Files,” choose your PDF, and wait for the file to upload.

"Upload PDF Files" highlighted on Sejda.

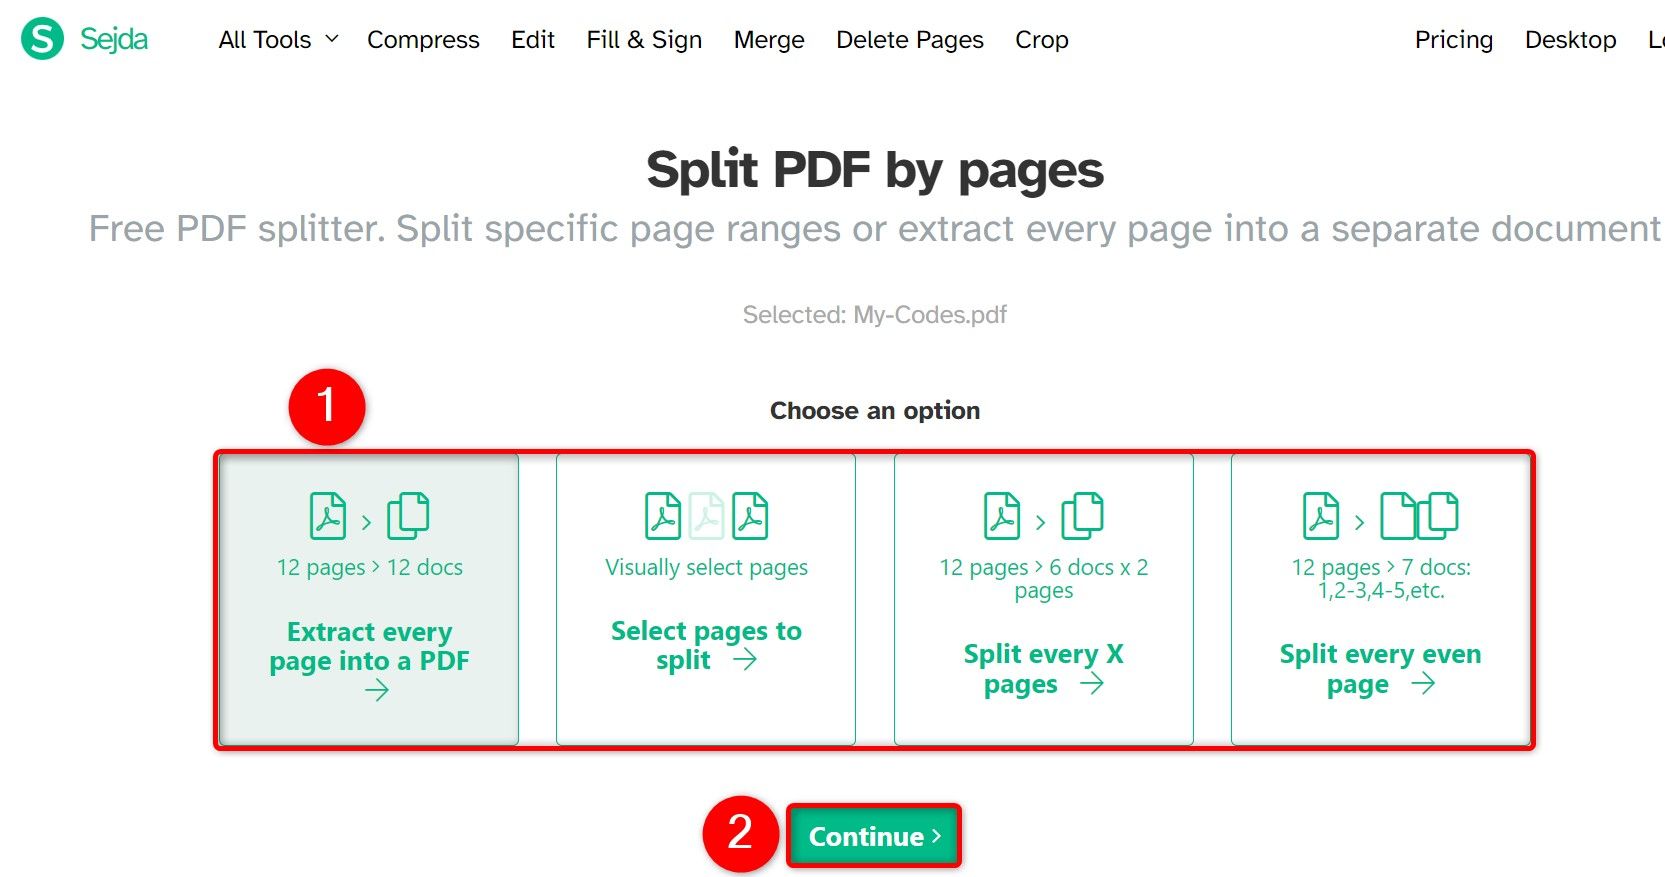
Choose how you’d like to split the file. Your options are:

  • Extract Every Page Into a PDF: This turns every page in your PDF into a new PDF file.
  • Select Pages to Split: This allows you to select the pages in your PDF to then turn into a new PDF file.
  • Split Every X Pages: This option lets you create a new PDF after every X number of pages.
  • Split Every Even Page: This option splits the PDF after every even page.

I’ll choose the “Select Pages to Split” option. Then, choose “Continue”

PDF split options and "Continue" highlighted on Sejda.

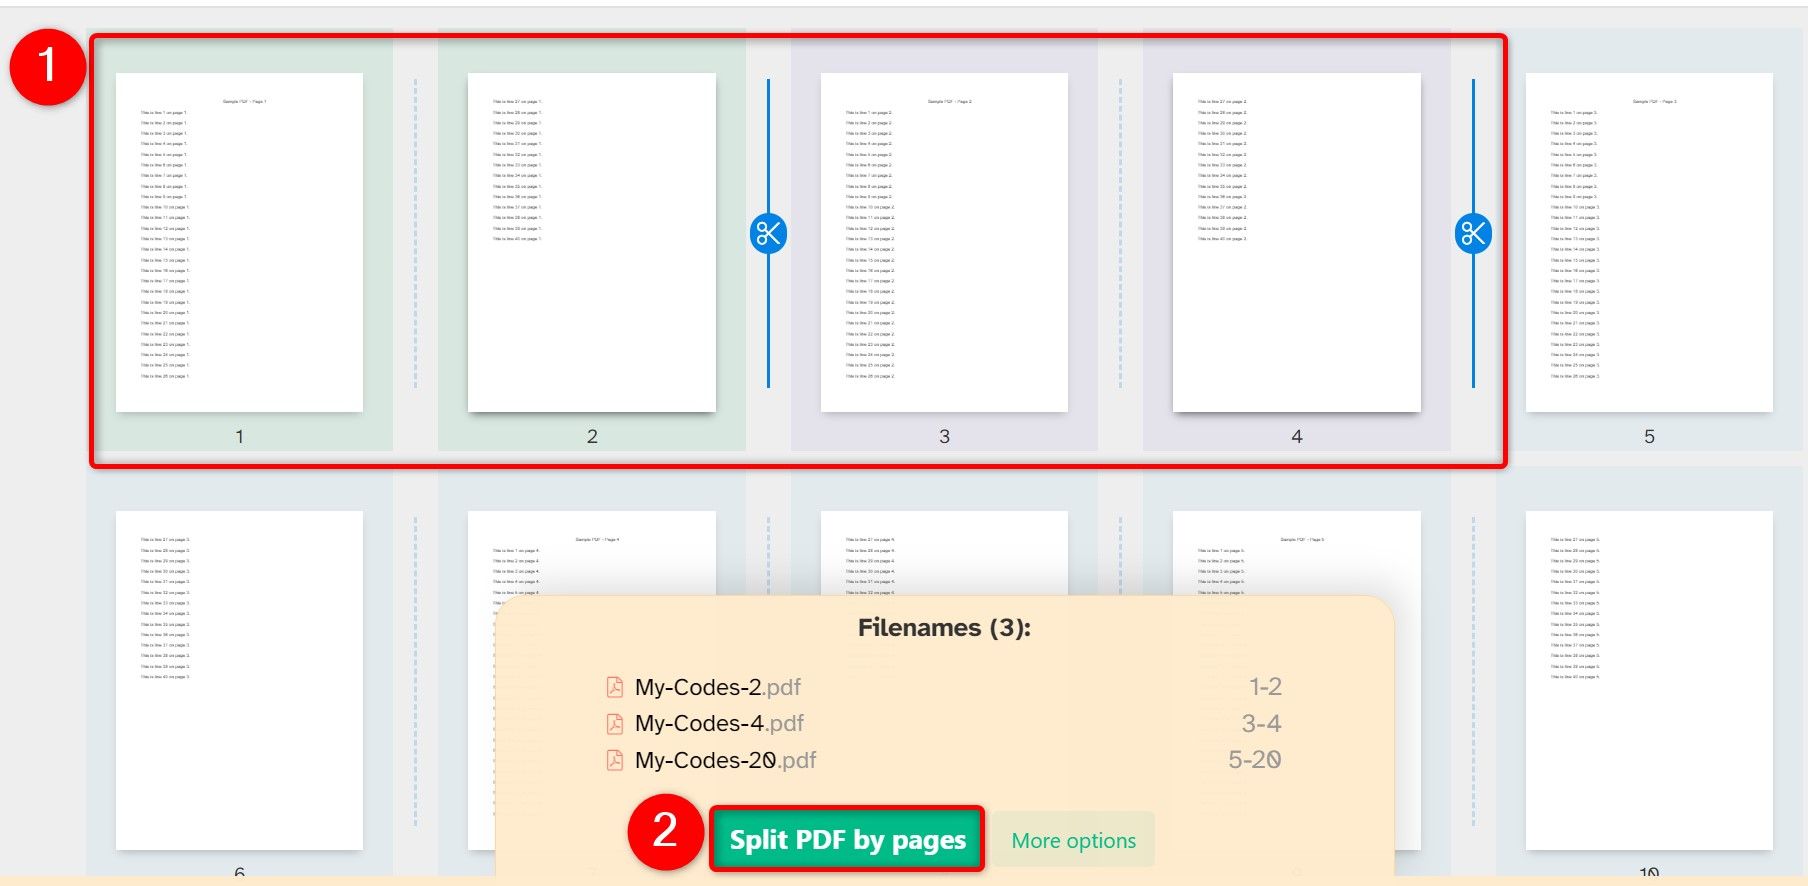
On the following screen, select the pages to extract. Click the dividing line, and the pages to the right of the line will go into a new PDF. When you’ve made your selection, at the bottom, click “Split PDF by Pages.”

PDF pages and "Split PDF by Pages" highlighted on Sejda.

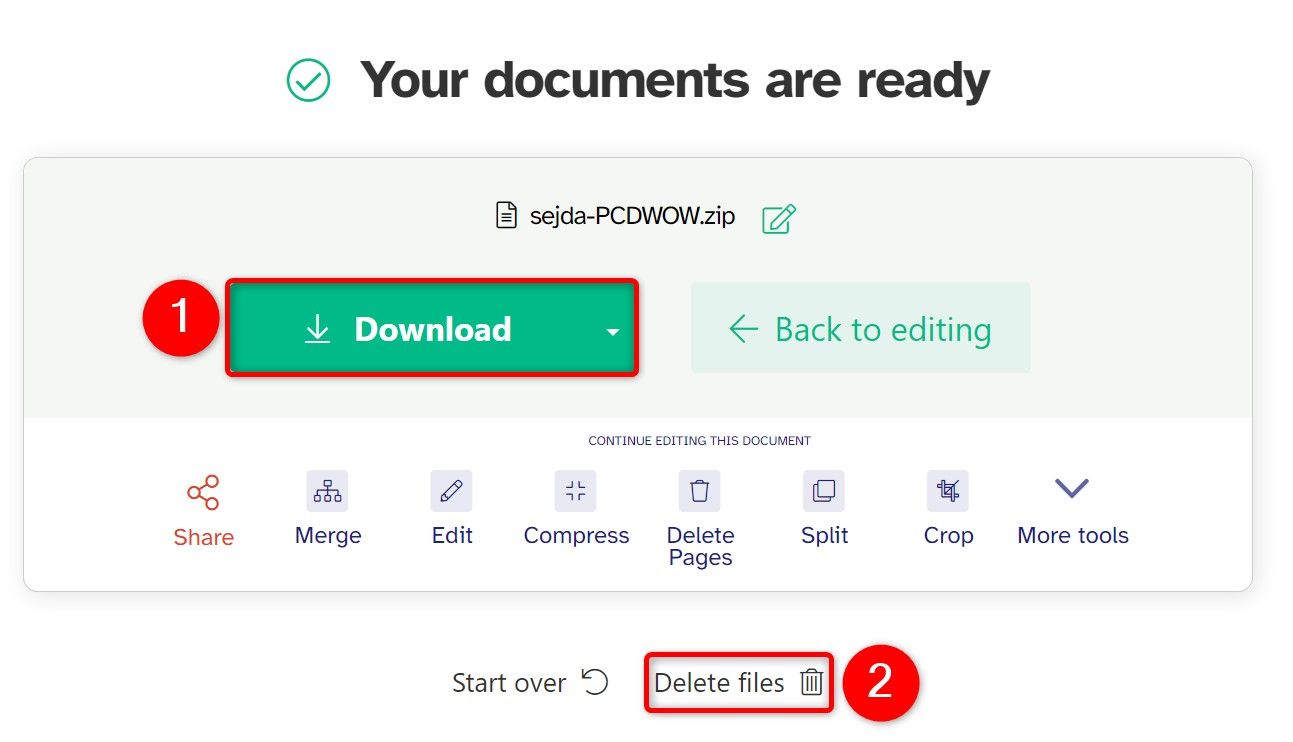
Select “Download” to save the resulting PDF(s) to your PC. Then, click “Delete Files” to remove your PDF from the site’s servers.

"Download" and "Delete Files" highlighted on Sejda.
[mai mult...]

How to recover a deleted File

If you’re unsure whether you permanently deleted a file, look around for it first. Try performing a search in File Explorer. Hopefully, you just misplaced the file and you can find it again.

Searching for a file in File Explorer on Windows.

You might also want to check your external storage drives, such as flash drives, HDDs, and SDDs, in case you moved the file there and don’t remember.

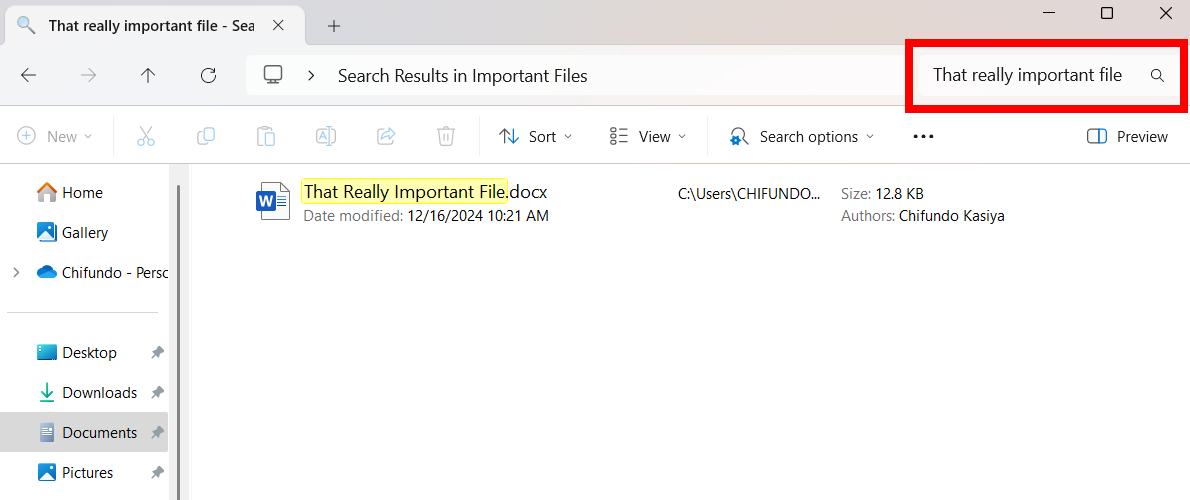
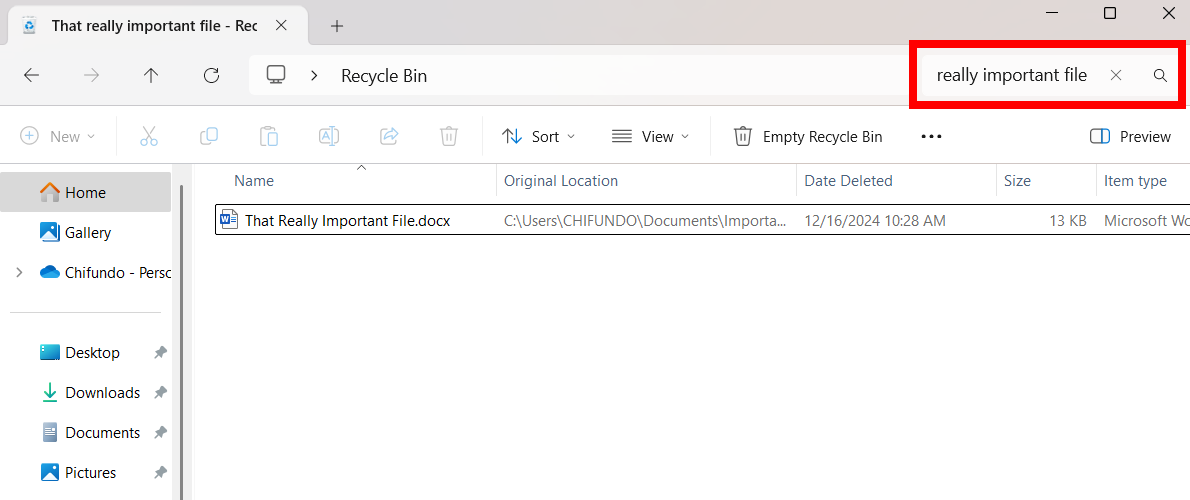
You can also peek inside the Recycle Bin. If you have a lot of files in there, you can use the search box in the top-right corner of the window to search for the file.

Searching for a file in the Recycle Bin on Windows.

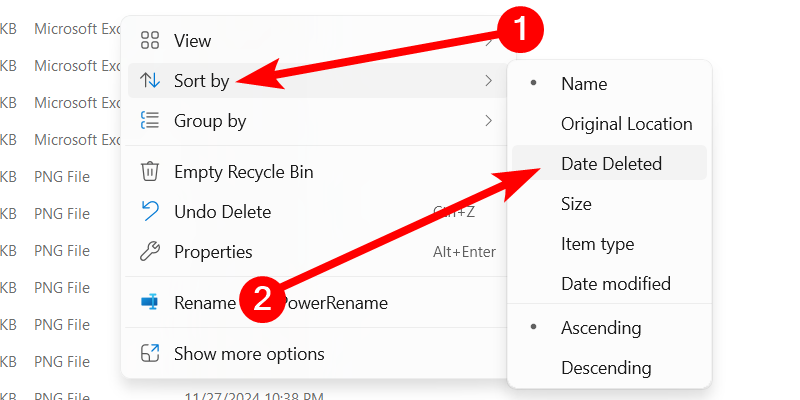
You can also right-click in the Recycle Bin window and select Sort By > Date Deleted to more easily view recently deleted files.

Sorting files by the deletion date in the Recycle Bin on Windows.

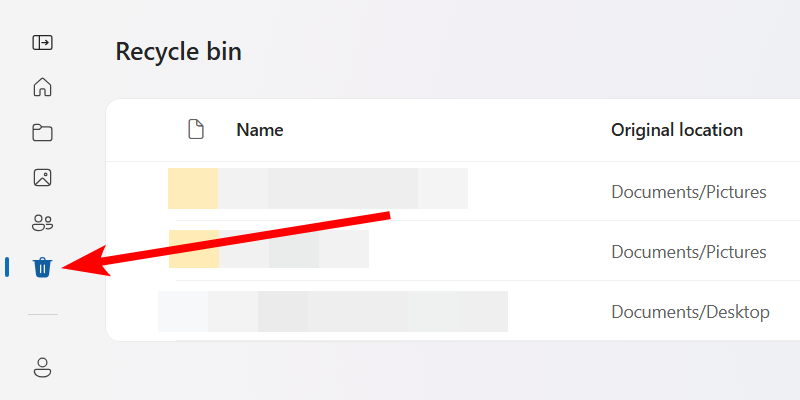
If your file was stored in a cloud storage service like OneDrive, Google Drive, or Dropbox, log into your account on the service’s website and check your deleted files there—you may find the file is still recoverable. This is the cloud storage version of the Recycle Bin.

On OneDrive, for instance, click the “Recycle Bin”—the trash can icon—in the left sidebar to see your recently deleted files. Keep in mind that these will only remain in OneDrive for 30 days if it is your personal OneDrive.

The Recycle Bin in OneDrive.

Windows File History tool is useful for easily recovering deleted files and older versions of files from an external drive. It backs up files from specific locations, such as Libraries, Desktop, Contacts, and Favorites. If you enabled File History (it’s disabled by default), all you have to do is use it to recover the file.

File History saves the state of the included folders at a specific time. That means you will be reverting the entire folder to a previous version, and you may lose your recent files. Use this option if the deleted file is extremely important.

To do that, open the Start Menu, type File History in the search bar, and click it when it appears in the search results. Next, click “Restore Personal Files” in the left sidebar. Then, select the folder with the missing file and click the “Restore”—a green button with the restore icon—to restore the previous version of that folder.

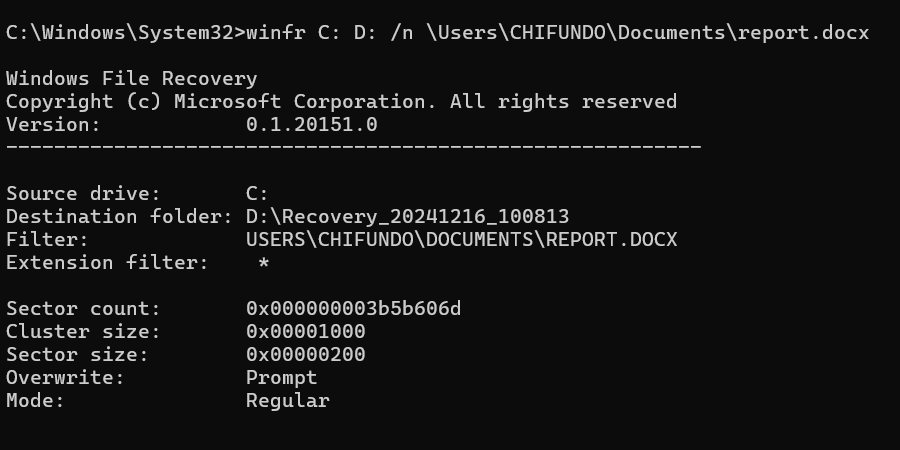
Microsoft has a tool for recovering deleted and corrupted files on Windows. It’s called Windows File Recover, and it’s an easy-to-use command-line tool that ensures your files aren’t permanently lost.

Once you install Windows File Recovery, launch it by opening the Start Menu, typing Windows File Recover in the search box, and selecting it when it appears in the search results. You need to know which commands to use to find the deleted file, but since this is not an in-depth tutorial on how to use this tool, I will just use an example of finding a find named report.docx.

The command for this would look like this:

winfr C: D: /n \Users\CHIFUNDO\Documents\report.docx

In the above command, C: is the drive to check for the deleted file (source drive), and D: is the drive to store it once found (destination drive). The /n is called a switch, which is a modifier that tells the command to target specific files or folders. The file path afterward tells Windows File Recovery where to find the file on the C: drive.

Using Windows File Recovery to recover a file on Windows.

After the command runs successfully, check the destination drive for the recovered file. Keep in mind that this process can take a few minutes to complete.

[mai mult...]