Soluții

How to Disable Internal Laptop Keyboard in Windows OS

Sometimes, due to any reason you may want to disable or block your internal Laptop keyboard. In this guide I am going to show you how to do that in Windows OS without installing any third-party software or application. There could be a number of reasons why you would want to disable the Internal Keyboard. Here are some of the most common scenarios that users usually face:

  • Laptop keyboard is malfunctioning and is not usable anymore
  • You want to use an external keyboard instead of the built-in one
  • Some keys are malfunctioning, causing problems while operating the PC
  • Internal keyboard wiring is faulty and is automatically deleting files or sending commands

Sometimes, you don’t want to visit the local repair store because it’s just not worth it. The repair process can be cumbersome and fixing the laptop might charge you a lot of money. In some scenarios, it is just easier to plugin an external USB Keyboard and use it instead. We are going to explore a way to turn off the keyboard without installing any software on your PC. Windows offers built-in utilities and tools to achieve that within a matter of minutes.

Steps to Disable Keyboard

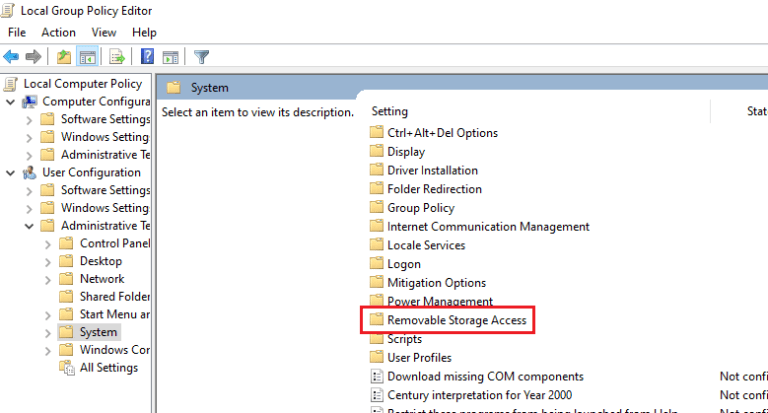
The procedure is very simple. You can easily disable or block any device including Keyboard, Mouse, Touchpad, USB storage or any other device with the Local Group Policy editor. Group Policy editor is a built-in Windows utility that allows you to control every aspect of your Windows PC. If you know how to properly use this tool, it will give you super power over your PC.

Follow the steps below to turn off your Laptop keyboard by changing the Group Policies:

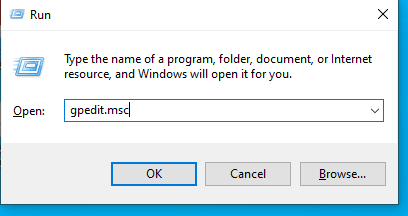
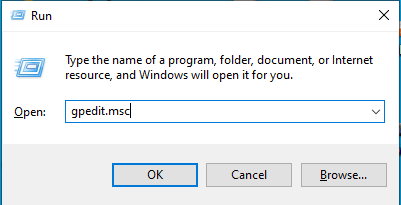
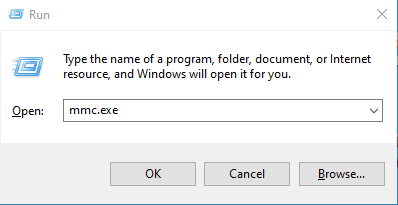
  • Open the ‘Run’ window and type gpedit.msc and press Enter.
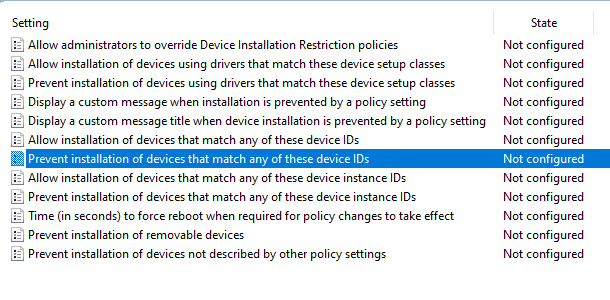
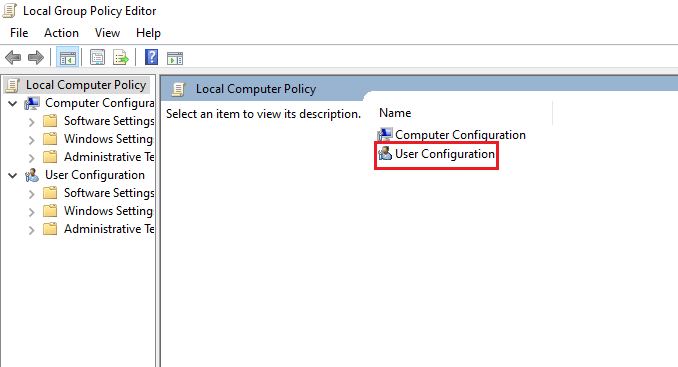
  • Now, under the Computer Configuration, traverse to the following path: Administrative Templates > System > Device Installation > Device Installation Restrictions.
  • Under the list of policies, you need to select the one that says Prevent Installation of devices that match any of these device IDs and then double-click on it.
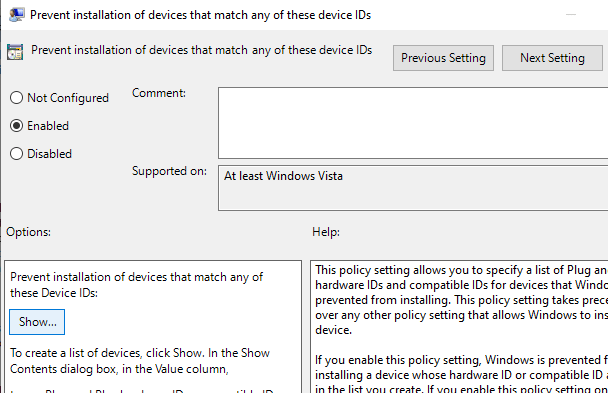
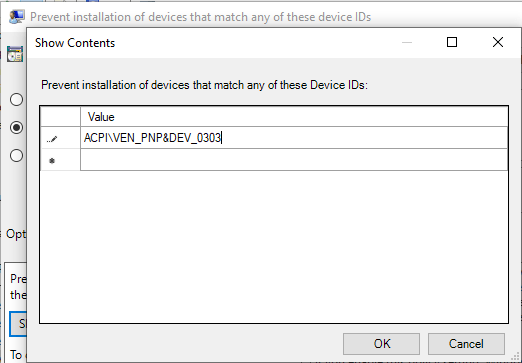
  • Next, select the Enabled option and click on the Show button to open the Contents window. In this window, you will need to enter the Device ID for the Keyboard you wish to disable.
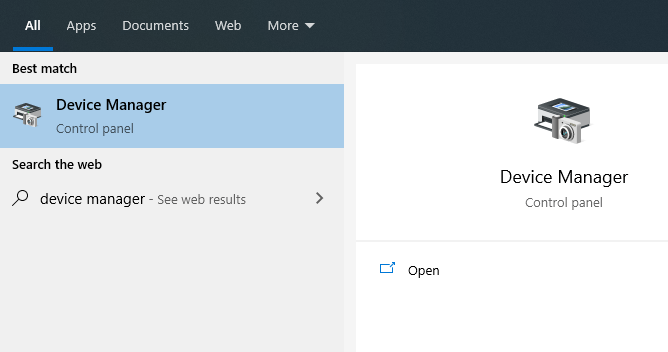
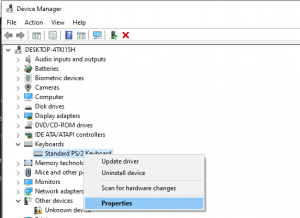
  • Now, as you can guess, you need to extract the device ID of the keyboard you want to block. To do that, you need to go to the Device Manager. To open Device manager, you can search in the Windows search bar and you will see it in the search results.
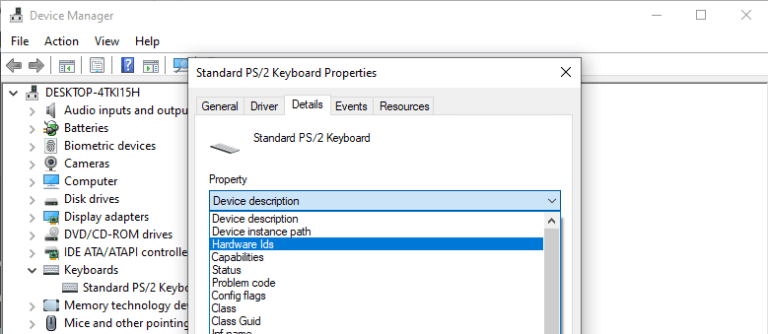
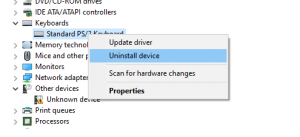
  • In the Device manager, go to the Keyboard container, right-click on the Keyboard that needs to be blocked and click on Properties.
  • Now go to the Details tab and select hardware ids from the drop down menu.
  • Afterwards, select the top most hardware id and, right-click on it and select Copy.
  • Go back to the Show contents window of the Group policy editor and paste the hardware id of the keyboard and click OK.
  • Once that’s done, the final step is to uninstall the driver of the Keyboard device from the Device manager. In the Device manager, right-click on the Keyboard and click on Uninstall Device.
  • That’s all you need to do. Once you have completed all these steps, it is time to test the new policy setting. To test it, simply restart your PC and try using the keyboard keys. If everything went right, the keyboard will not work. Now you can plugin an external keyboard and use it instead.
  • How to Revert the Policy Setting

    If ever in the future you need to revert the configuration, it can be done very easily. Go to the policy setting and instead of the Enabled option, select Not Configured. Then restart the PC. This will revert the policy setting and now you will be able to use your keyboard just like before.That’s all you need to do. Once you have completed all these steps, it is time to test the new policy setting. To test it, simply restart your PC and try using the keyboard keys. If everything went right, the keyboard will not work. Now you can plugin an external keyboard and use it instead.

[mai mult...]

How to Restrict USB Read and Write Access in Windows 10

In many situations you might need to restrict USB storage Read and Write access on your Windows 10 system. In this guide I am going to show you a very easy way to do that without typing any commands. Fortunately, Windows gives you granular control over your devices without having the need to install any third party software.

Here are some of the most logical reasons you might want to control USB device access on your PC:

  • To safeguard your PC from malware and viruses. USB devices are the primary source of malware infections
  • To protect your data from getting stolen by anyone with physical access to your PC
  • Not letting someone Live Boot another Operating System and get into your HDD storage

There can be various reasons, and honestly, it is very likely that you may face such a situation at some point. These kind of attacks are more occurring than you might imagine. Any newbie hacker or script kiddie can easily get into your system with just a USB stick.

Restrict / Disable USB Read and Write Access via Group Policy

We are going to look at two ways to disable USB device Read and Write access in Windows 10. Windows comes with Group Policies that control the working environment for Users and Computer accounts. You can easily control your USB device’s permissions by configuring a group policy. Here are two scenarios that you can control:

Denying Access for All Users (Method-1)

Restricting USB devices for all users can be done with a few very easy steps:

  1. First you need to open the Local Group Policy editor. To do that, go to the ‘Run’ and type gpedit.msc and click Enter.

2. One the group policy editor opens, you will see two options: “Computer Configuration” and “User Configuration”. Open the User Configuration by double-clicking on it:

3. In the next Window, browse to the following path: Administrative Templates > System > Removable Storage Access.

4. In the next Window you will see a list of Group Policy settings that includes different types of devices including CD and DVD, Floppy Drives, Tape drives, WPD devices and Removable Disks. The ones that we are interested are Removable Disks. From these settings you can control both Read / Write permissions for USB flash drives. Let’s go ahead and Deny both the Read and Write Permissions:

5. Double click on both the permissions one by one and select the Enable option to enforce these restrictions. Click ‘Apply’ and then ‘OK’.

6. After applying these restrictions, you can check whether the settings have applied correctly or not. To check that, insert a USB flash drive into your system’s USB port and try to open it from ‘My Computer’. It should give the following message:

7. If you see this message, that means the policy setting has applied correctly and you have successfully restricted access to USB drives for all users. To remove the policy setting, simply go back to the settings and select Not Configured. It’s that simple.

Denying Access for a Specific User (Method-2)

If you need to restrict USB access for a specific user that uses your computer and not yourself then it’s also possible. The way to do it is a bit different than the method explained above. With this method, you can also enforce these restrictions for Administrators and Non-Administrators separately. Here are the steps to do it:

  • First you need to open the Run dialog box and type mmc.exe and press Enter. This will open the Microsoft Management Console.
  • In the Console Window, click on the ‘File’ menu and select Add/Remove Snap-in.
  • In the list of Available Snap-ins, select Group Policy Object Editor and click on Add.
  • A window of Group Policy Wizard will pop up. Here you will have to click the browse button to be able to select the User groups of your choice.
  • In the next window, click on the Users tab and select the user for which you want to impose the restriction. Click OK and then click ‘Finish’.
  • After clicking OK, you should see the Group Policy Editor window just like we saw it in the first method. Simply double-click the container and you will see the same Group policy settings that were described in the first method.
  • Now you have to follow the same path: User Configuration > Administrative Templates > System > Removable Storage Access and apply the same Read / Write Deny policy setting on Removable disks. Once it’s done, you can test the policy setting by logging in from that particular User and plugging in the USB storage device. You should see the same error message.
[mai mult...]

How to Mark All Text Messages as Read on an iPhone or iPad

If you have a huge number of unread text messages in your Messages app on iPhone or iPad, dealing with them one-by-one can be a hassle. Luckily, it’s easy to mark every one of your unread messages as read in the blink of an eye, but the feature is a bit hidden. Here’s how to do it.

First, open “Messages.” On an iPhone, look in the upper-right corner of the screen and tap the ellipses button, which looks like three dots in a circle. (The iPad button is slightly different, as you’ll see below.)

On an iPad, tap “Edit” in the upper-left corner of the screen.

In the menu that pops up, tap “Select Messages.” Messages will now enter “Edit” mode. But you don’t need to deal with individual messages at the moment. On both iPhone and iPad, look for the “Read All” button in the lower left corner of the screen. Tap it.

[mai mult...]

How to Change The Default Font In Microsoft Word

You don’t have to be stuck with the Word’s default font if you don’t like it. There’s actually an option that lets you use any font on your system as the default font in Word. This means you can choose your newly installed font to be the default font in any new document from now on. You can always revert back to the previous default font if you don’t like the new font.

[mai mult...]

How To Back Up Your Computer To Google Drive

The Google Drive desktop app is now called Backup and Sync. While it still lets you access your Google Drive files, you can also use it as a backup tool. This lets you back up files to the cloud even if they aren’t in your Google Drive folder. Since Google Drive gives you 15GB for free (spread across your Gmail, Google Drive, and Google Photos accounts), it’s an attractive option for basic backups. If you need more space you have to subscribe to Google One.

[mai mult...]