Soluții

How to block USB Devices on Windows 11

If you want to disable all the USB ports so no USB devices can work with your system, use the Device Manager utility. Note that this method even turns off any USB-enabled mice or keyboards. Just keep in mind that this could be a problem if you don’t have an alternative way to control your PC set up in advance.

  • To start, launch Windows Search (press Windows+S), type Device Manager, and open the utility. Expand the “Universal Serial Bus Controllers” section, right-click a USB port on the list, and choose “Disable Device”.
  • Select “Yes” in the prompt. If you don’t find the “Disable Device” option for a USB port, you’ll have to disable that port using BIOS as explained below in this guide.
  • Repeat the above step until you’ve disabled all the ports on the list.

From now on, when you connect a device to any USB port on your machine, your system won’t connect with that device. In the future, you can re-enable your USB ports by opening Device Manager, expanding “Universal Serials Bus Controllers,” right-clicking each port on the list, and choosing “Enable Device”.

Block USB Storage Devices from PowerShell

If you like command-line methods, you can use a cmdlet in PowerShell to block all USB storage devices on your PC. Note that other devices like keyboards and mice will still continue to work.

  • To start, open Windows Search (press Windows+S), type PowerShell, and choose “Run as Administrator”. Select “Yes” in the User Account Control prompt.
  • On the PowerShell window, type the following cmdlet and press Enter. This cmdlet changes a value in the Windows registry to prevent USB storage devices from working with your machine.
Set-ItemProperty -Path "HKLM:\SYSTEM\CurrentControlSet\Services\USBSTOR" -Name "Start" -Value 4
  • After executing the cmdlet, restart your Windows 11 PC to bring the changes into effect.
  • In the future, you can re-enable USB storage devices on your PC by running the following command in PowerShell.
Set-ItemProperty -Path "HKLM:\SYSTEM\CurrentControlSet\Services\USBSTOR" -Name "Start" -Value 3

Don’t forget to restart your computer after executing the command. If you’re running Windows 11’s Pro edition, you can use the Local Group Policy Editor tool to block USB storage devices. Note that this tool isn’t available in Windows 11’s Home edition.

  • To use it, launch the Run dialog box by pressing Windows+R, Type the following in the box and select “OK” or press Enter:
gpedit.msc
  • On the Local Group Policy Editor window, using the options on the left, navigate to the following path. On the right pane, double-click the item that says “All Removable Storage Classes: Deny All Access.”
Computer Configuration > Administrative Templates > System > Removable Storage Access
  • On the open window, at the top, select the “Enabled” option. Then, at the bottom, choose “Apply” followed by “OK.”

Close Local Group Policy Editor and restart your PC.

In the future, to unblock USB storage devices, double-click the “All Removable Storage Classes: Deny All Access” entry, choose “Not Configured,” and select “Apply” followed by “OK”. Make sure to then reboot your computer.

You can tweak a value in the Windows registry to disable and enable USB storage devices. This method works on both Pro and Home editions of Windows 11. Making accidental changes in the Windows registry can cause your system to be unstable. Therefore, back up the registry before making any changes and follow the instructions carefully.

  • To begin, launch Run by pressing Windows+R. Type the following in the box and select “OK” or press Enter:
regedit
  • Select “Yes” in the User Account Control prompt.
  • In Registry Editor, navigate to the following path:
HKEY_LOCAL_MACHINE\SYSTEM\CurrentControlSet\Services\USBSTOR

On the right pane, double-click the item that says “Start.” In the open window, click the “Value Data” field and type 4. Then, select “OK”. The value of 4 tells Windows not to acknowledge any USB storage devices.

  • Close Registry Editor and restart your PC to bring the changes into effect.
  • To reverse your change and unblock USB storage devices in the future, navigate to the above path in Registry Editor, double-click the “Start” entry, type 3 in the “Value Data” field, select “OK,” and restart your PC.
  • If you don’t see the option to disable USB ports in Device Manager, use your PC’s BIOS settings menu to turn off those ports. To do that, launch Settings, select System > Recovery, click “Restart Now” next to Advanced Startup, and choose “Restart Now” in the prompt.
  • On the Choose an Option page, select Troubleshoot > Advanced Options > UEFI Firmware Settings and click “Restart”. Each BIOS menu is different, but you’ll find an option labeled as USB or similar. On my Asus laptop, I’ll head into the “Advanced” tab, choose “USB Configuration” and then disable the ports.

When you want to re-use the ports, you’ll have to enable them from BIOS (since you disabled them from BIOS).
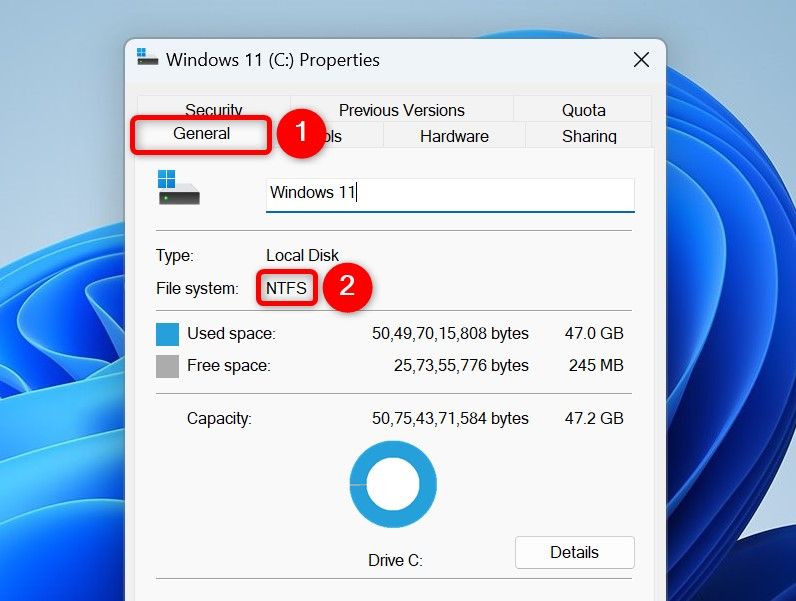
[mai mult...]

How to enable and use File Compression on NTFS Drives in Windows 11

NTFS compression is a feature that compresses (reduces the size of) your files. It uses certain algorithms to make your files smaller without affecting their data. Unlike other methods, this method doesn’t make an archive or anything from your files; your files remain as they are.

This compression method only works on the drives formatted in the NTFS file system. It doesn’t work for the drives that use the FAT32 or exFAT file system. You can format your drive in the NTFS format to make it compatible with this feature. If you want to change your drive to use NTFS without deleting any data, open Windows Search (press Windows+S), type Command Prompt, select “Run as Administrator,” and choose “Yes” in the prompt. Then, run the following command replacing “X” with the letter of your drive.

convert X: /fs:ntfs

You should use NTFS compression for files that can be efficiently compressed, such as text files, documents, databases, and so on. You should also only use it for infrequently accessed files, as if you access a file often, the system needs to decompress it before you can view it.

You should not use this compression for media or system files, as this can affect your system performance. This is because the files need to be decompressed each time you view them.

Compress an Individual File or Folder

To enable NTFS compression for a single file or folder, you have both graphical and command-line options, as explained below.

Using File Explorer

File Explorer offers the easiest graphical way to turn on NTFS compression for your files and folders. To use it, launch a File Explorer window (press Windows+E) and find the file or folder you want to compress.

  • Right-click that file or folder and choose “Properties.” Access the “General” tab. In the Attributes section, click the “Advanced” button
  • On the Advanced Attributes window, enable “Compress Contents to Save Disk Space.” Then, click “OK”
  • On the Properties window, click “Apply” followed by “OK.” If you’re compressing a folder (not a file), you’ll see a prompt with two options:
  • Apply Changes to This Folder Only: Choose this option to only compress the selected folder and not its subfolders and their files
  • Apply Changes to This Folder, Subfolders and Files: Select this option to apply compression to all the subfolders and their files as well
  • Then, choose “OK”.

Once your files and folders are compressed, you’ll see a blue icon on them. To disable compression in the future, right-click your file or folder and choose “Properties”. Open the “General” tab, click the “Advanced” button, turn off “Compress Contents to Save Disk Space,” choose “OK,” and select “Apply” followed by “OK”.

From Command Prompt

If you like running commands, use a command in Command Prompt to turn on NTFS compression for your files or folders. To do it, open Windows Search (press Windows+S), type Command Prompt, and select “Run as Administrator.” Choose “Yes” in the User Account Control prompt.

On the Command Prompt window, type the following command. Replace “PATH” with the full path to the file or the folder you want to compress. Then, press Enter. Whether your file or folder path has spaces or not, keep the path enclosed in double quotes to avoid running into any issues. The command below already uses double quotes for paths.

compact /c "PATH"

The “c” parameter in this command tells the command to compress the specified file or folder. In the future, you can decompress your file or folder using the following command. Replace “PATH” with the full path to the file or the folder you want to decompress.

compact /u "PATH"

You can compress an entire drive (including all its folders and files) using NTFS compression. You can use File Explorer or Command Prompt to do that, as shown below.

Using File Explorer

Open File Explorer (press Windows+E), right-click the drive you want to compress, and select “Properties.” Open the “General” tab and turn on “Compress This Drive to Save Disk Space.” Then, choose “Apply” followed by “OK”.

In the prompt that opens, choose “Apply Changes to Drive X:\, Subfolders and Files” to enable compression for all the subfolders and files on the drive. Or, choose the “Apply Changes to Drive X:\” option. (X is your drive’s letter)

Then, click “OK.”

To turn off compression in the future, right-click the compressed drive and choose “Properties.” Access the “General” tab and disable “Compress This Drive to Save Disk Space.” Then, choose “Apply” followed by “OK”.

From Command Prompt

  • Launch Windows Search (press Windows+S), type Command Prompt, and select “Run as Administrator.” In the User Account Control prompt, select “Yes”.
  • In Command Prompt, type the following command. Replace “X” with the letter of the drive you want to compress. Then, press Enter. This command compresses all the subfolders and files on the drive.
compact /c /s /a "X:\"
  • The “c” parameter tells the command to compress the specified drive. The “s” parameter ensures that all the subdirectories are included. The “a” parameter makes sure the hidden and system files are included as well.
  • In the future, you can decompress the drive by running the following command. Make sure to replace “X” with your drive’s letter.
compact /u /s "X:\"

The “u” parameter tells the command to decompress the specified drive. The “s” parameter ensures all the subdirectories are decompressed as well.
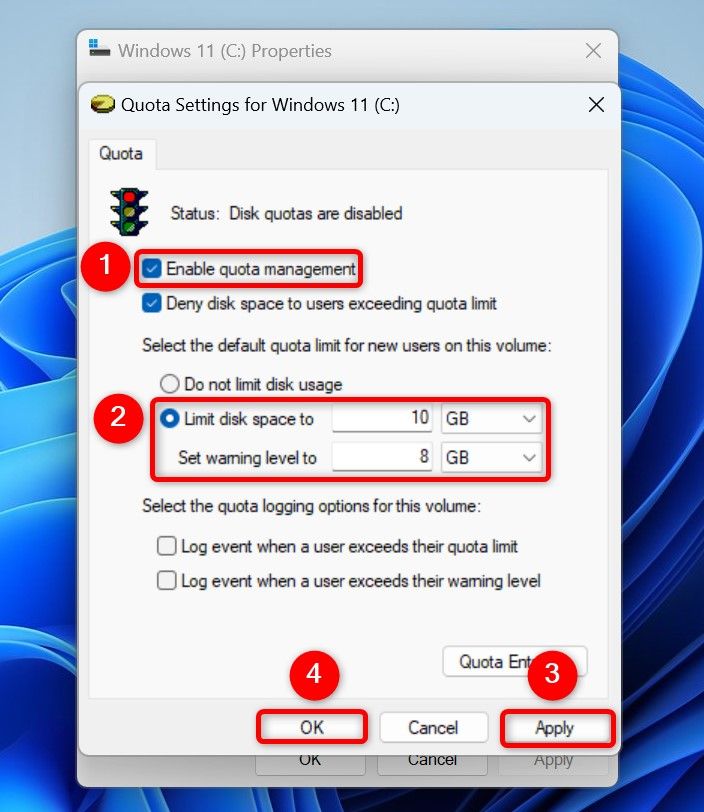
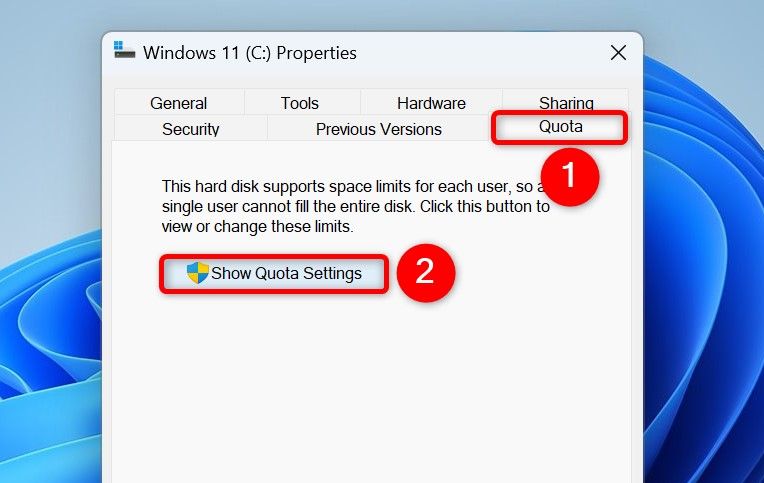
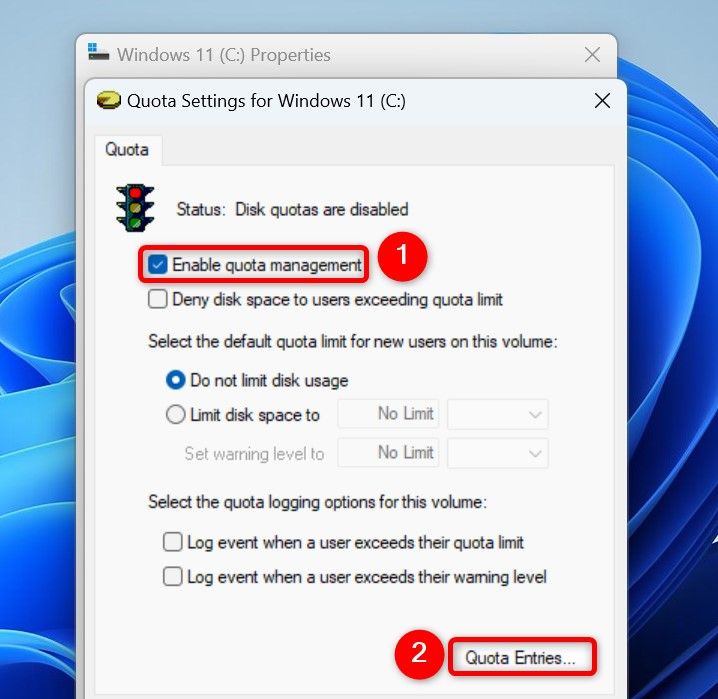
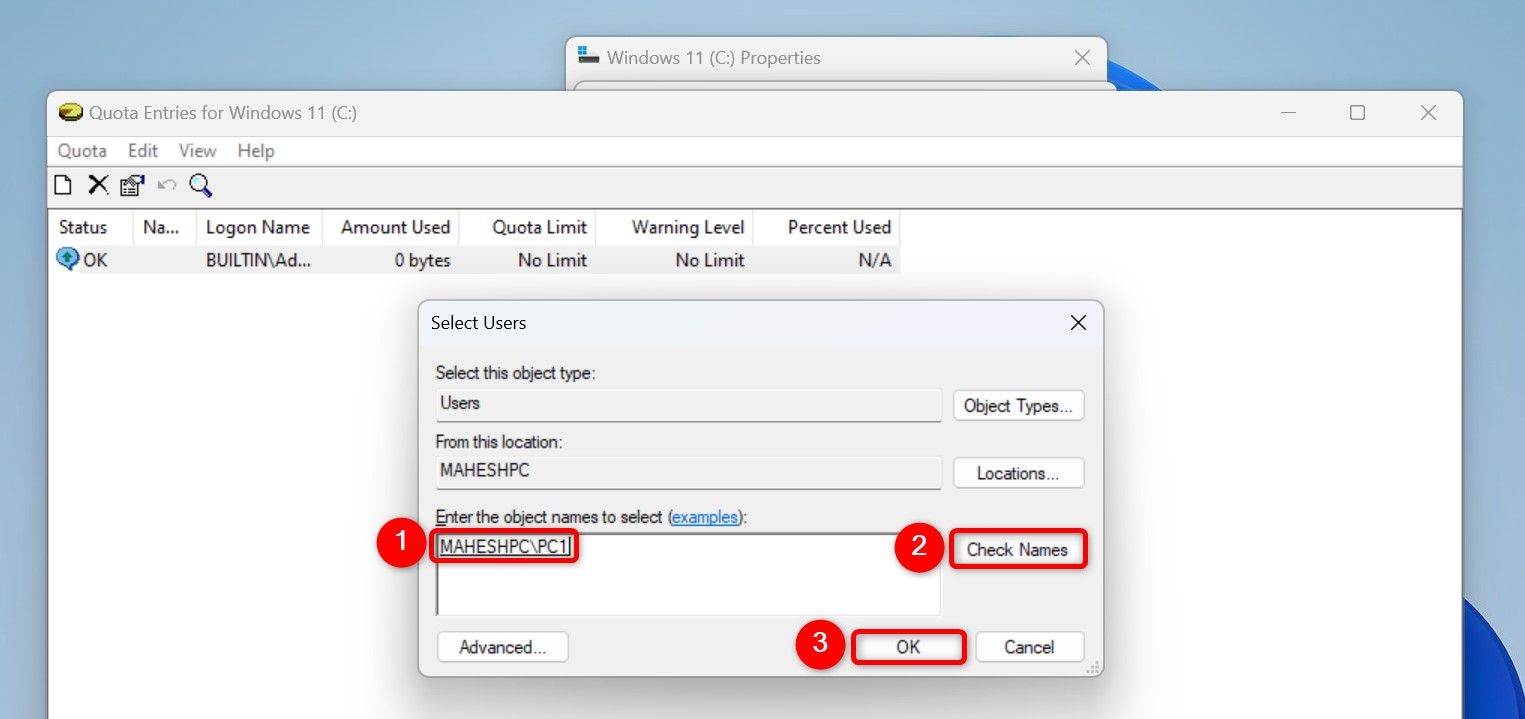
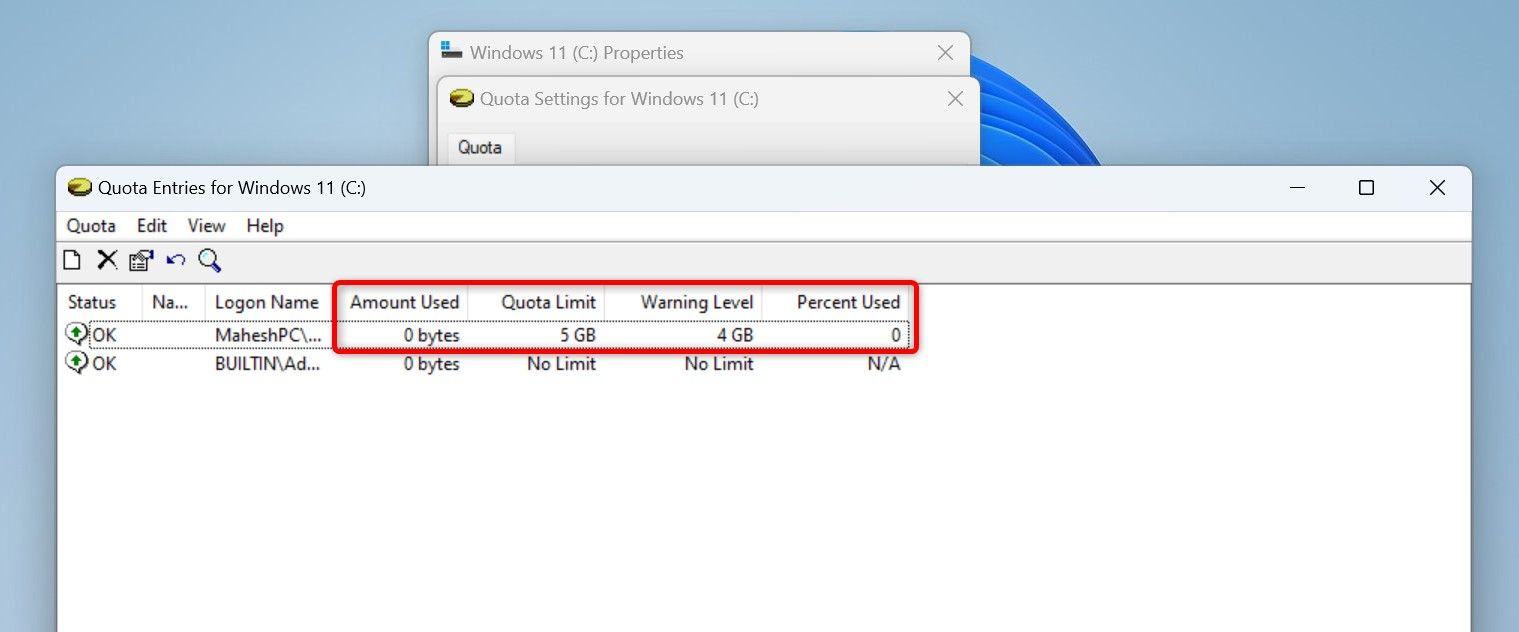
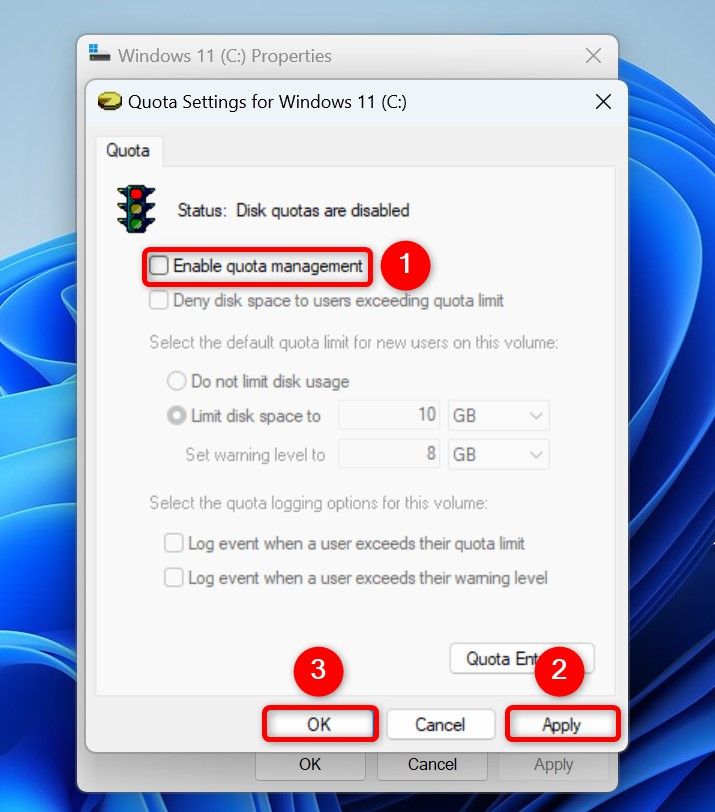
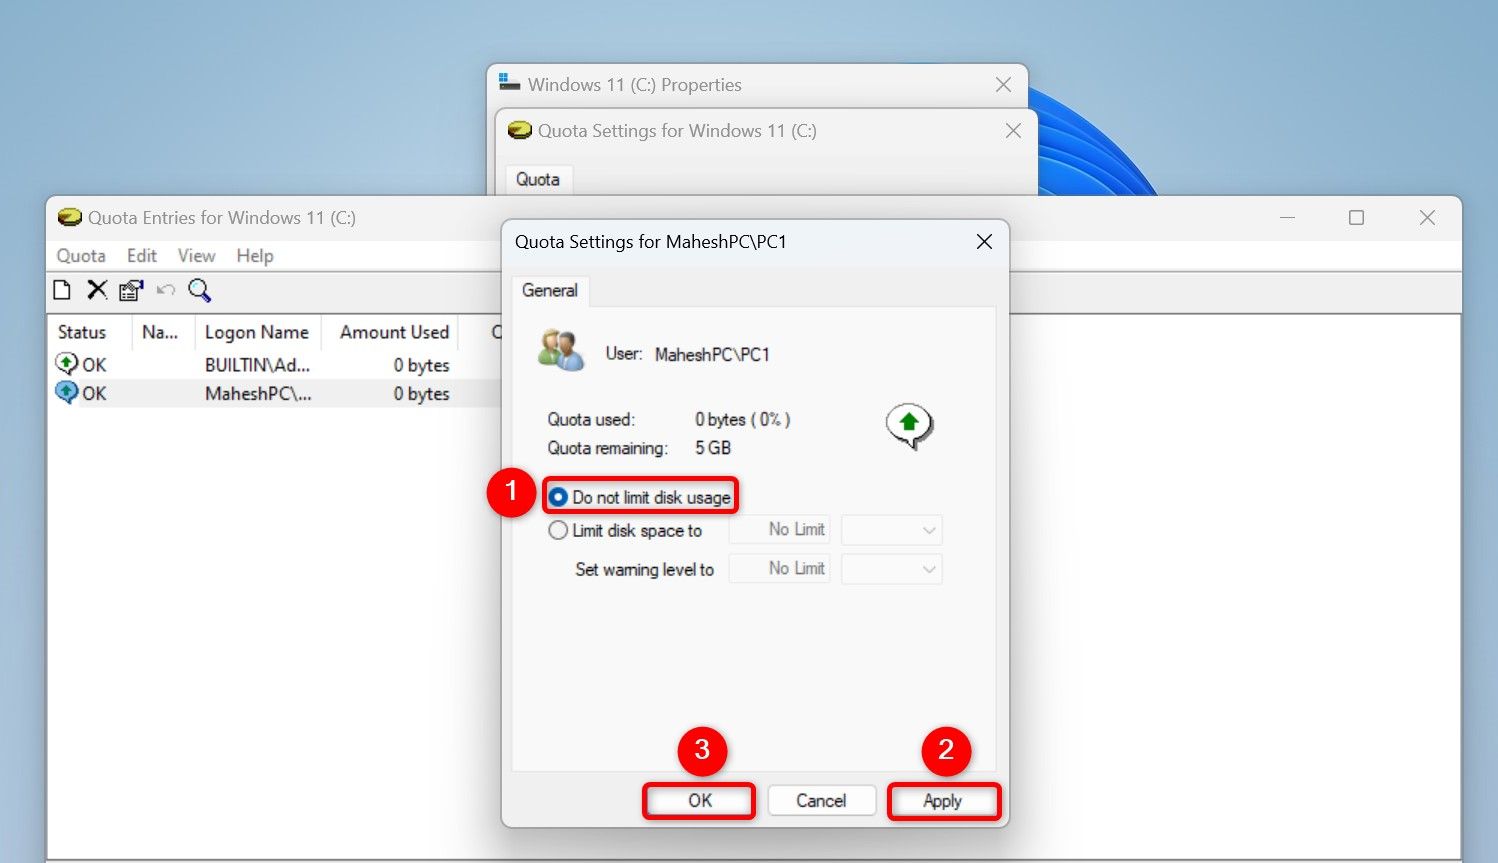
[mai mult...]

How to use Disk Quotas to limit user Storage on Windows 11

Disk quotas are a built-in Windows 11 feature that lets you specify the storage space user accounts on your system can use. This ensures one user doesn’t end up using the entire storage space on your computer. You can set up a warning for users when their storage quota is exceeded. You can also completely prevent them from storing more files until they free up some disk space.

Note that this feature is only available on the drives formatted in the NTFS file system. To check if your drive is NTFS, open File Explorer (press Windows+E), right-click your drive, and choose “Properties”. Access the “General” tab, and next to File System, you’ll see your drive’s file system.

"General" and "NTFS" highlighted on a drive's "Properties" window.

Also, you must be an administrator to enable disk quotas on your PC.

Set a Disk Quota for all users

To apply the same disk quota limit for all users on your system, use this method.

  • Launch File Explorer (press Windows+E), right-click your drive, and select “Properties.” Open the “Quota” tab and click the “Show Quota Settings” button.
"Quota" and "Show Quota Settings" highlighted on a drive's "Properties" window.

In the Quota Settings for [Drive Name] window, activate the “Enable Quota Management” option. Turn on the “Limit Disk Space To” option and type the quota you want to allow in the given field. From the drop-down menu, choose the appropriate unit. Choose the “Set Warning Level To” field and type the quota a user reaches before they get a notification about the quota usage. Again, choose the appropriate unit from the drop-down menu.

  • To strictly enforce the quota, so users can’t store more files, turn on the “Deny Disk Spaces to Users Exceeding Quota Limit” option. Then, choose “Apply” followed by “OK”.
The options to enable disk quota highlighted.

To apply a unique disk quota limit to specific users, launch File Explorer (press Windows+E), right-click your drive, and choose “Properties.” Open the “Quota” tab and select “Show Quota Settings”.

"Quota" and "Show Quota Settings" highlighted.

Turn on “Enable Quota Management” and click “Quota Entries”

"Enable Quota Management" and "Quota Entries" highlighted on the Quota Settings window.

In the Quota Entries for [Drive Name] window, from the menu bar, choose Quota > New Quota Entry. On the open window, click the “Enter the Object Names to Select” field, type the username of the user you want to specify quota, click “Check Names,” and choose “OK”.

Various options highlighted on the "Select Users" window.

Turn on “Limit Disk Space To” and type the quota in the text field. Choose the appropriate unit from the drop-down menu. Select the “Set Warning Level To” field and type the quote the user reaches to get a notification. Select the appropriate unit from the drop-down menu. Then, click “OK”.Repeat the above steps for each user you want to assign unique quotas.

After turning on disk quotas, you can monitor disk usage to see which user is using what storage space. To do that, open File Explorer, right-click your drive, and select “Properties.” Open the “Quota” tab and click Show Quota Settings > Quota Entries.

On the open window, next to users’ usernames, you’ll see their disk usage. Here’s what each column means:

  • Amount Used: This column tells you the storage amount used by the specific user.
  • Quota Limit: This is the limit you set for this user.
  • Warning Level: This is the storage this user will reach to get a notification for disk quotas.
  • Percent Used: This is the quota used by this user in percentage.
Disk usage options highlighted on the Quota Entries window.

To change the amount of space allocated to a user, right-click that user on the list and choose “Properties”. On the open window, tweak the quota options and select “Apply” followed by “OK”.

Disable Disk Quotas

If you want to turn off disk quotas for all or specific users, launch File Explorer (press Windows+E), right-click your drive, select “Properties” and choose Quota > Show Quota Settings.

  • To disable disk quotas entirely, disable the “Enable Quota Management” option. Then, click “Apply” followed by “OK”
"Enable Quota Management," "Apply," and "OK" highlighted on the Quota Settings window.

To disable disk quotas for specific users, ensure the “Enable Quota Management” option is still enabled. Then, click the “Quota Entries” button. Find and right-click the user you want to disable quotas for and choose “Properties.” On the open window, enable the “Do Not Limit Disk Usage” option, then click “Apply” followed by “OK”.

"Do Not Limit Disk Usage," "Apply," and "OK" highlighted on the Quota Settings window.

Another way to disable quotas for a specific user is by right-clicking their username on the Quota Entries for [Drive Name] window and choosing Delete > Yes. This then applies the generic quota to all users, if you have set one.

If you don’t find the “Quota” option on a drive’s Properties window, that means your drive isn’t using the NTFS file system. Your drive might be using FAT32 or exFAT file system.

You can change your drive’s file system to NTFS with or without formatting the drive. To change the file system without deleting the drive’s data, open Windows Search, type Command Prompt, select “Run as Administrator,” choose “Yes” in the prompt, type the following command replacing “A” with your drive’s letter, and press Enter.

convert A: /fs:ntfs
[mai mult...]