Situatie
Solutie
Before you try to make any changes to the picture or pictures within the template, you should take a few moments to understand how the template is laid out.
There are two core template structures in Microsoft Word:
- A single-copy template that sets a single design on a whole page (like a poster) or multiple pages (like a newsletter)
- .Templates containing the same item repeated on one page (like a grid of duplicated business cards)
Each of these template types has unique formatting, so it’s important to understand their layouts before you try to make any changes to their pictures.
Uncover the Formatting Used
Microsoft Word tends to use tables to structure the templates and the image positioning, but because the borders are removed, this is not immediately evident. There are two steps to uncovering the hidden formatting in a Word template. First, display the non-printing characters by clicking the pilcrow icon (¶) in the Home tab on the ribbon.
These characters show you where there are new paragraphs, spaces, and tabs. Most importantly, however, they indicate where tables are located, thanks to the table cell non-printing character.
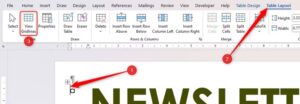
The second step is to show the gridlines for all the tables in the template. To do this, locate any table in the document using the non-printing table characters shown above, and click anywhere within any of those tables. Then, click “View Gridlines” in the Table group of the Table Layout tab.
The layouts of all the tables in the template are now clearer to see, and you can start to work out where the pictures are located and how they’ve been added.
Changing Pictures within Table Cells
Because I activated the table gridlines, I can see that the third page of this family Christmas newsletter template contains individual images contained within several cells of the table.
Indeed, if I select one of the images and press Delete, I can see that the cursor sits in the center of the cell, ready for me to add text or a new image to that self-contained part of the document.
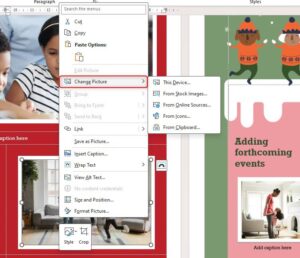
However, because the default images are already formatted with a thick, white border, and the pictures are already nicely positioned, I want to keep these formatting settings as they are. In this case, I need to right-click the image, and hover over “Change Picture”.
Once I’ve located the replacement image and clicked “Insert,” the position and border will remain unchanged. What’s more, the picture will automatically resize to fit inside the cell, even if it has a ratio that differs from the previous image.
You could be forgiven for arguing that adjusting Microsoft Word’s templates to suit your purpose is too complicated—and I’d tend to agree. Templates are designed to make life easier, but things become tricky as soon as you want to personalize their design. A good alternative is to create your own template design and save it for use later on. In this case, because you’re creating the template yourself, you know how it’s formatted, so it’s easier to make adjustments if needed.


Leave A Comment?