Situatie
You can also use the netsh command-line tool in Command Prompt to connect to a Wi-Fi network on Windows 11. To connect to a Wi-Fi network with commands on Windows 11, use these steps:
- Open Start.
- Search for Command Prompt, right-click the top result, and select the Run as administrator option.
- Type the following command to view the available network profiles and press Enter:
netsh wlan show profile - Confirm the wireless profile.

- Type the following command to connect to the wireless network on Windows 11 and press Enter:
netsh wlan connect ssid=YOUR-WIFI-SSID name=PROFILE-NAME
In the command, update the name (SSID) of the network and profile name with your network information. For example, this command connects to the “tsunami” network using the “tsunami” profile:
netsh wlan connect ssid=tsunami name=tsunami

Quick Tip: On a computer with multiple adapters, you also have to specify the adapter name in the command. For example,: netsh wlan connect ssid=YOUR-WIFI-SSID name=PROFILE-NAME interface=Wi-Fi.
After you complete the steps, the laptop will connect to the Wi-Fi network.
Create network connection
The netsh command tool also allows you to manage Wi-Fi adapters and networks. The only issue is that you can only manage existing profiles. You cannot create new network profiles with this tool. If you have to use Command Prompt to connect one or multiple computers to the same wireless network, you can export the profile created automatically during the first connection. Then you can import it using netsh to connect using commands.
Export Wi-Fi profile
To export a Wi-Fi profile with commands on Windows 11, use these steps:
- Open Start.
- Search for Command Prompt, right-click the top result, and select the Run as administrator option.
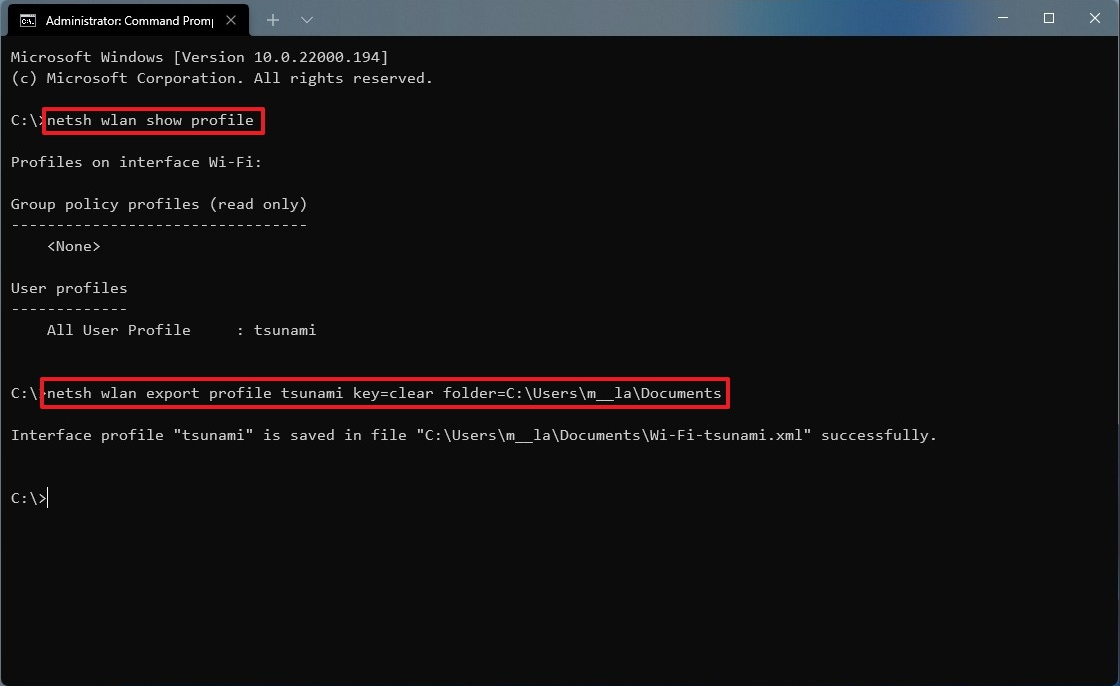
- Type the following command to view the available network profiles and press Enter:
netsh wlan show profile - Type the following command to export a profile and press Enter:
netsh wlan export profile PROFILE-NAME key=clear folder=PATH\TO\EXPORT\FOLDERFor example, this command exports the tsunami profile to the “Documents” folder.
netsh wlan export profile tsunami key=clear folder=C:\Users\m\Documents
Once you complete the steps, you can import the same XML file to connect other computers to the wireless network.
Import Wi-Fi profile
To import a Wi-Fi profile on Windows 11, use these steps:
- Open Start.
- Search for Command Prompt, right-click the top result, and select the Run as administrator option.
- Type the following command to determine the name of the network adapter and press Enter:
netsh wlan show interfaces - Confirm the name of the adapter that will connect to the network.
- Type the following command to import the wireless profile and press Enter:
netsh wlan add profile filename="PATH\TO\PROFILE.XML" Interface="YOUR-WIFI-ADAPTER-NAME" user=currentIn the command, you must specify the location of the XML file and network interface name.
For example, this command imports the XML profile located in the “Documents” folder to the Wi-Fi adapter:
netsh wlan add profile filename="C:\Users\m\Documents\wi-fi-tsunami.xml" Interface="WI-FI" user=current
- Type the following command to connect to the wireless network and press Enter:
netsh wlan connect ssid=YOUR-WIFI-SSID name=PROFILE-NAMEIn the command, you must specify the SSID and profile name that corresponds to your network.
For example, this command connects to an access point using the “tsunami” SSID and “tsunami” profile name:
netsh wlan connect ssid=tsunami name=tsunami

- Quick tip: If you have multiple wireless interfaces, you must also specify which adapter you want to use in the command. For example,
netsh wlan connect ssid=YOUR-WIFI-SSID name=PROFILE-NAME interface=Wi-Fi.
After you complete the steps, the computer should connect to the wireless network automatically.
Leave A Comment?