How to find hidden Startup Programs slowing down your Windows PC

Configurare noua (How To)

Situatie

Disable Startup Programs in Task Manager

The Windows Task Manager is a handy tool that, in addition to showing currently active programs, also reveals applications that are part of your computer’s startup process.

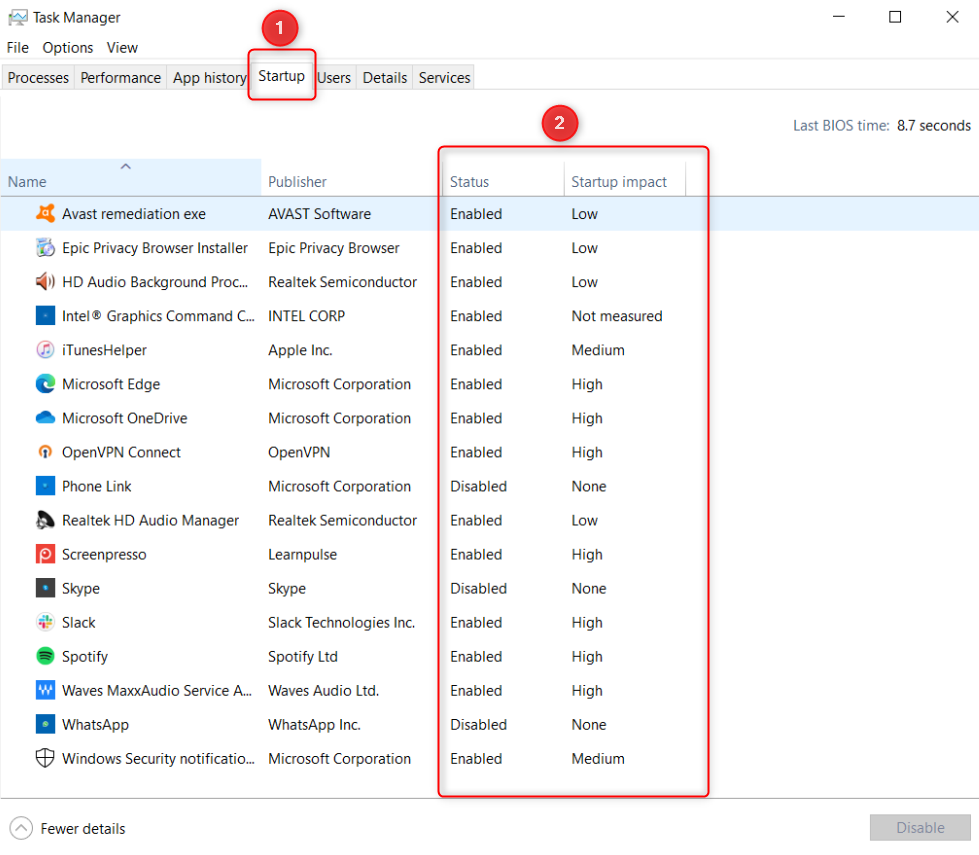
To access Task Manager, press Ctrl+Alt+Del and select “Task Manager.” On Windows 10, switch to the “Startup” tab at the top. On Windows 11, select “Startup apps” from the left sidebar.

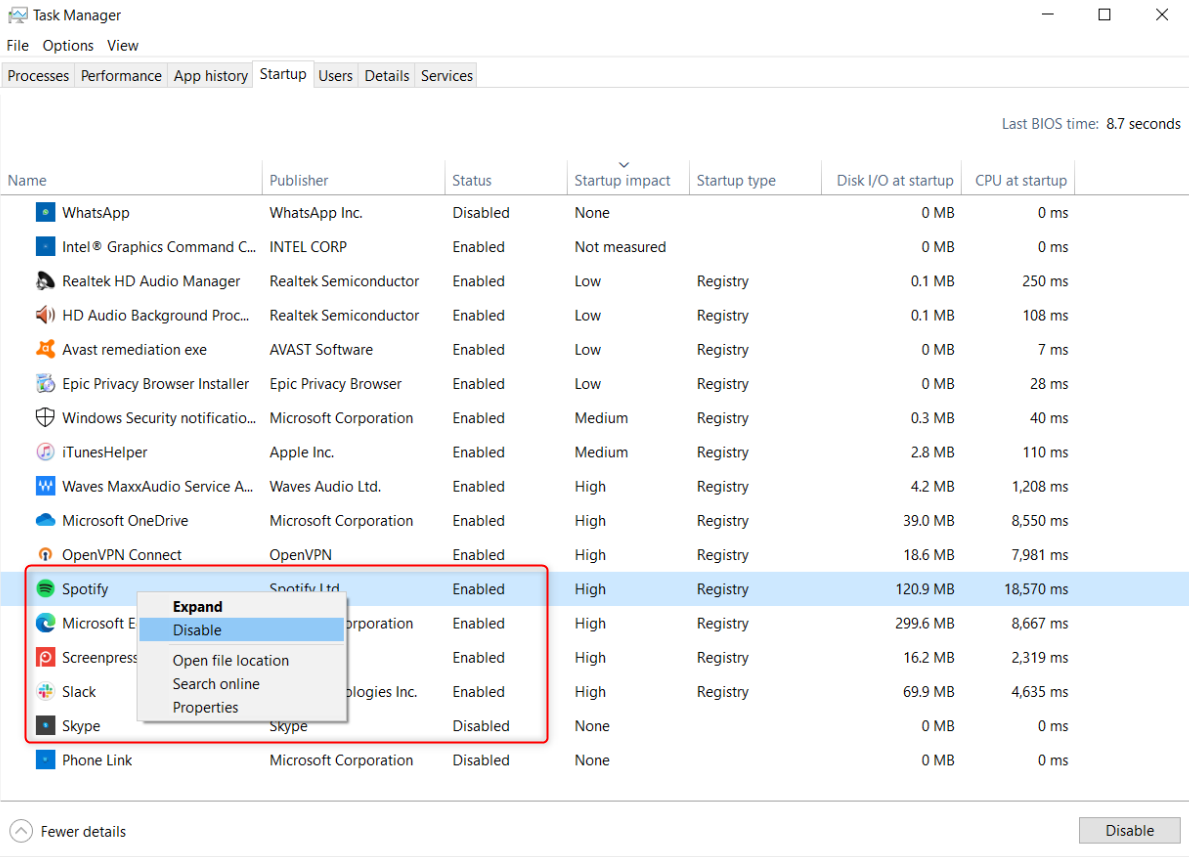
Each row lists an application alongside details relating to the startup. The “Status” column shows if the application is enabled or disabled on startup, and “Start-up Impact” scores based on the program’s impact on the CPU or disk (High, Medium, Low, or Not measured). This data helps you determine if you want an app to automatically launch when you log in to your computer.

A list of startup applications in Task Manager.

If you want more information, right-click an existing column and select, in turn, which columns to add.

Solutie

For example, you may wish to add the following:
  • Start-up type: Shows the source of the application, like from the registry or a folder. This is sometimes blank, which indicates the program is probably from the Microsoft Store.
  • Disk I/O at start-up: Shows how much data is read and written from the disk when booting, which helps determine if your hard drive is overworked during the boot process.
  • CPU at start-up: Shows how much time it takes the CPU to process its startup, measured in milliseconds.
    You can use this information to identify programs that you don’t need to automatically launch, with a focus on those that are particularly resource-heavy. For example, gaming clients like Steam and messaging applications like Slack often run at startup so that they can run updates in the background and be quickly accessible. But if you rarely use these programs, you don’t need them slowing your startup.

To remove a program from startup, right-click it and select “Disable.”

Disabling a program from starting up by clicking the 'Disable' button in Task Manager.
Don’t be deceived by the “Last BIOS Time” in the top-right of Task Manager. This is how long it took for your PC to begin loading Windows, and it isn’t timing the entire startup process. It’s impacted by factors like the hardware you have connected, rather than your startup programs.
Remove Programs, Scripts, and Shortcuts From the Startup Folders

Your computer has a special folder where you can add programs to the Windows startup. You may not need to access this folder regularly or add anything here as a standard user, but knowing how to get here is important because you may need to delete programs that have added themselves to your boot process.

So, if you find any unfamiliar program in the Task Manager, you can head over to the startup folder and delete it instead of just disabling it. The folder may also contain scripts and shortcuts that may not appear in Task Manager.

  • If you have multiple users on your computer, each individual will have different startup folders. There’s also a general startup folder for the whole PC. Changes in the user startup folder will only affect the currently logged-in user, while changes in the general startup folder will impact all users.To access the startup folder, first press Win+R to open Run. Enter shell:startup for current user programs or shell:common startup for system-wide startup programs, then click “OK.”

    Your startup folder might be empty, depending on how new your computer is or what applications you’ve downloaded. If that’s the case, you have no action to take.When you’ve identified something you want to remove from your startup process, right-click it and select “Delete.”

Disable Unnecessary Windows Services

Windows Services is a great place to check for programs that might be draining resources. There are Windows services required to run the PC and third-party services that are installed when you install an application.

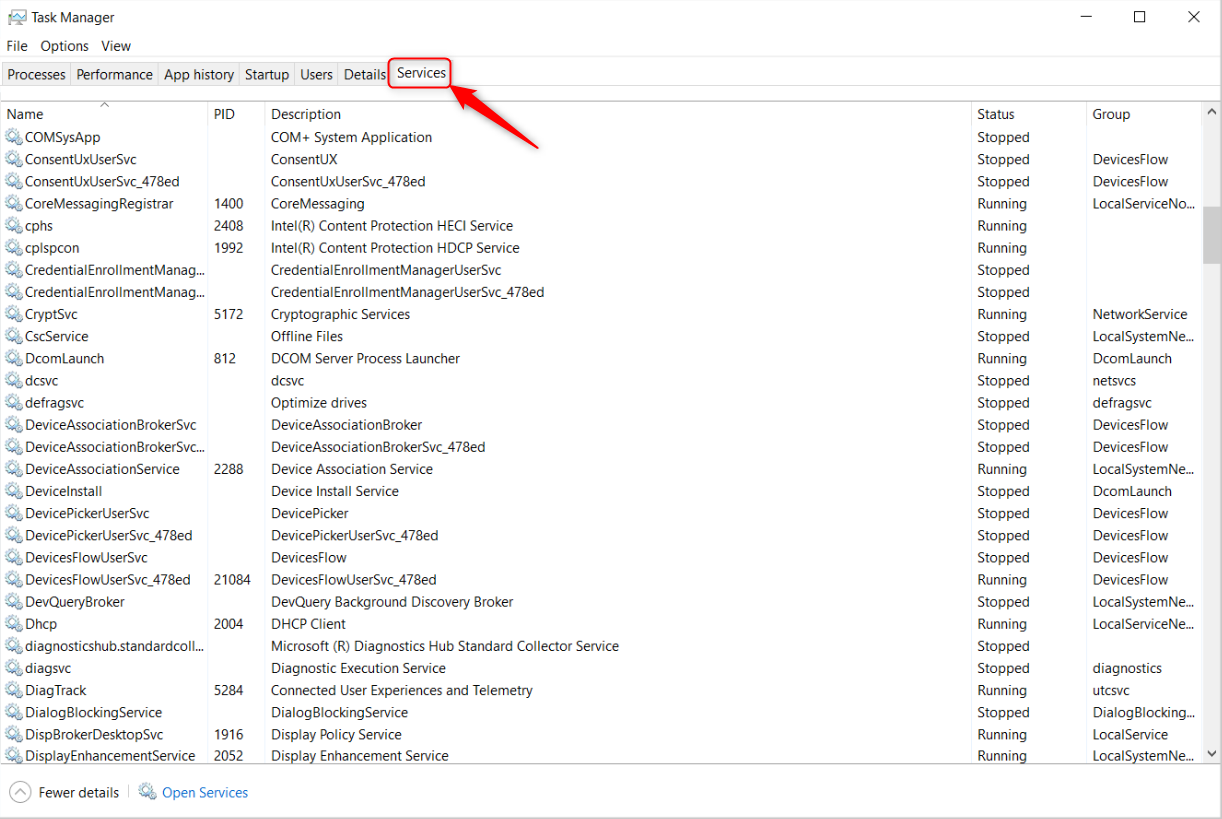
Windows services are programs responsible for background processes—you’re unlikely to see them open in your taskbar, for example. However, you can see them in Task Manager. Press Ctrl+Alt+Del, open Task Manager, and switch to the “Services” tab (at the top on Windows 10, or the left on Windows 11).

A list of running services shown in the task manager

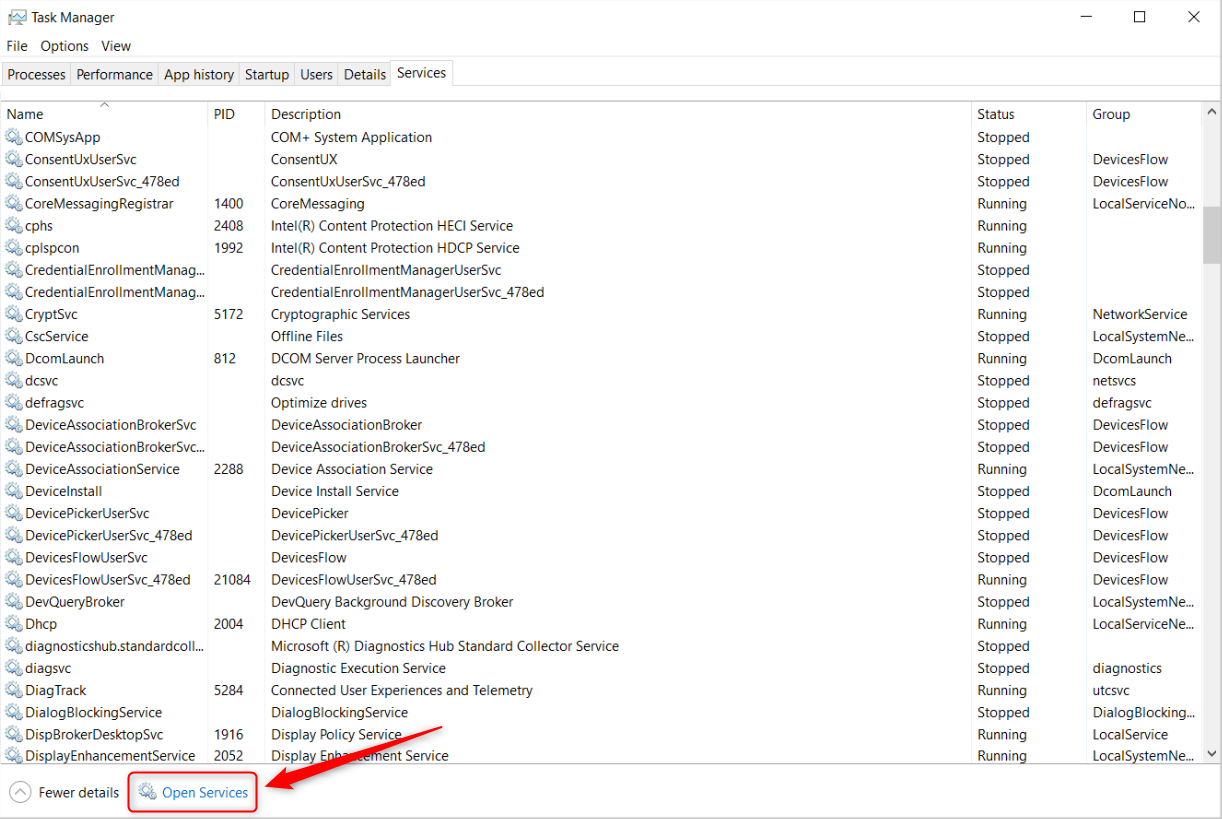
You can’t make changes here, though, so click “Open Services” (at the bottom on Windows 10, or the top on Windows 11).

Using the 'Open Services' button to access and modify services.

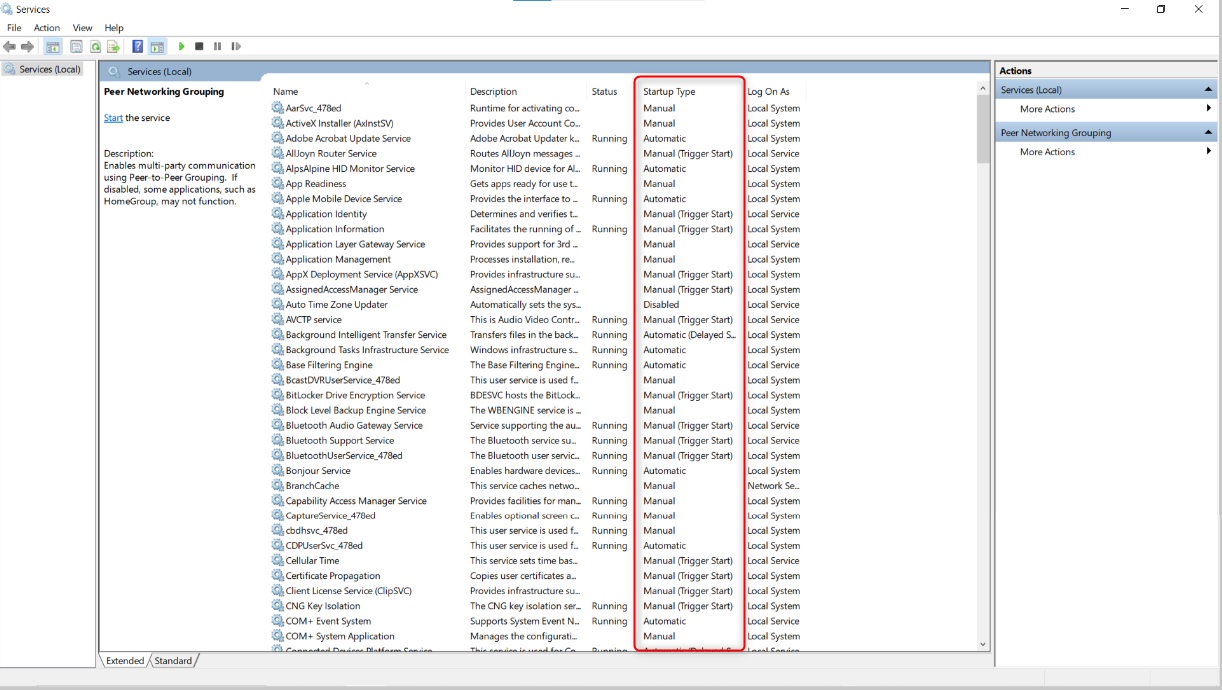
On the list of services, look at the Startup Type column. This shows whether a service starts automatically (including on a delayed start), manually, or requires a trigger. For your purposes, focus on those that are “Automatic”—to make this easier, click the column header to sort the services.

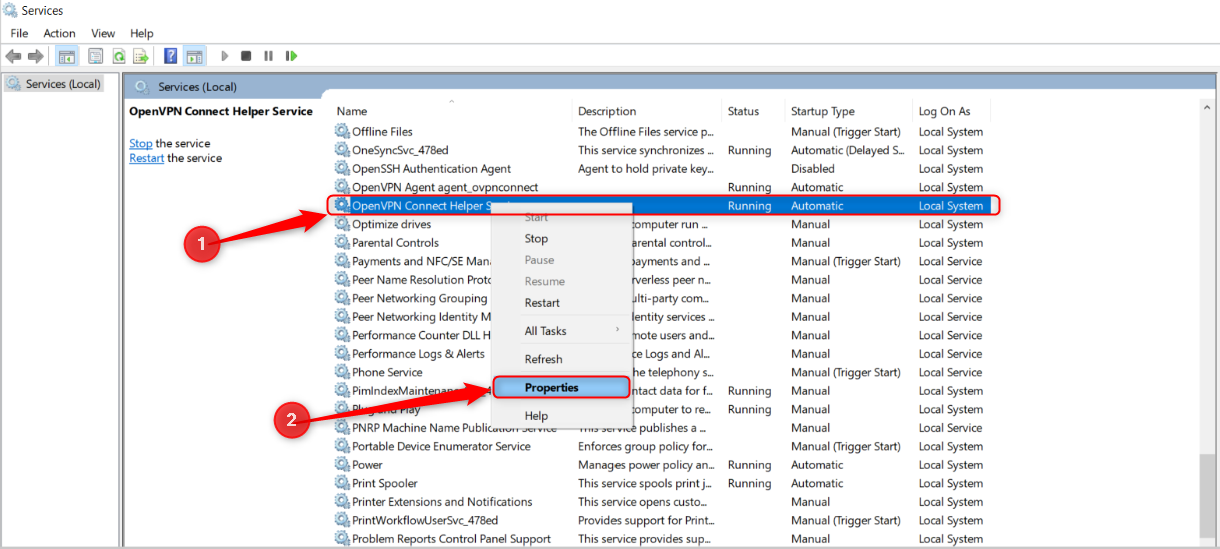
A list of services in the 'Services' application with the 'Startup Type' highlighted.

Right-click the service you want to modify and select “Properties.”

Viewing the properties of a running service.

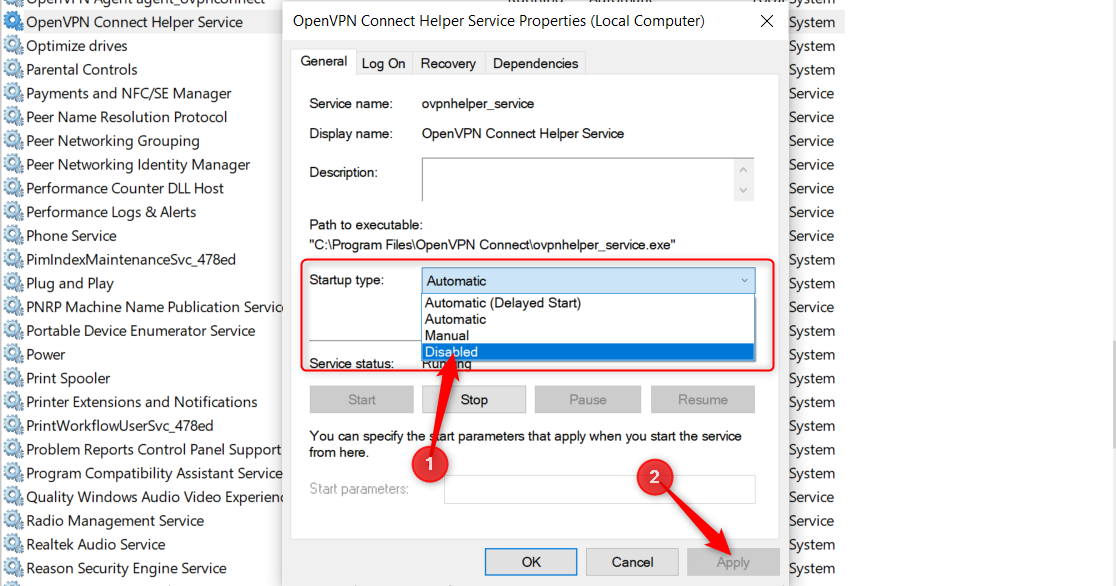
Using the “Startup type” dropdown, select “Manual” or “Disabled”, then click “Apply”.

Disabling a running service.
Remove Automated Activities in Task Scheduler

Task Scheduler is a Windows feature that lets you automate activities, like launching applications, at scheduled times. Many of these are legitimate and necessary, but some applications can use this to avoid being detected in the Task Manager as part of the boot process.

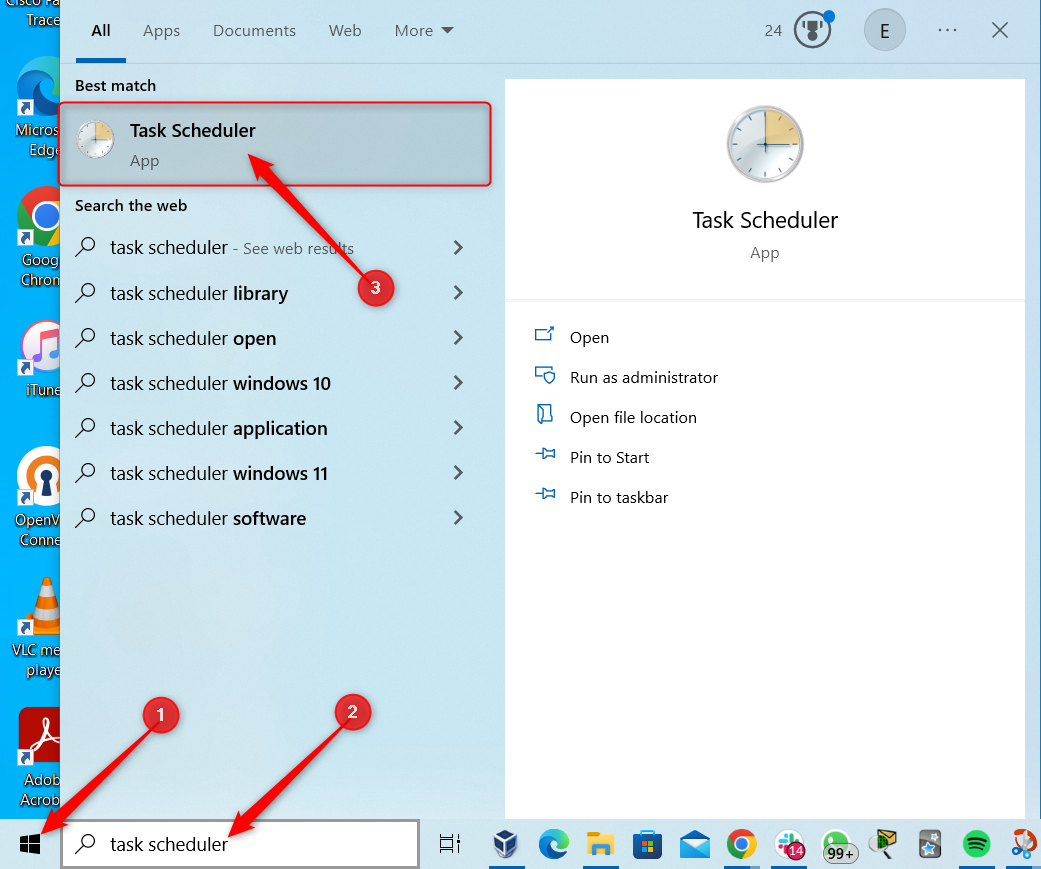
To begin, search for and open Task Scheduler through the Start menu.

Opening the 'Task Scheduler' through the Start menu.

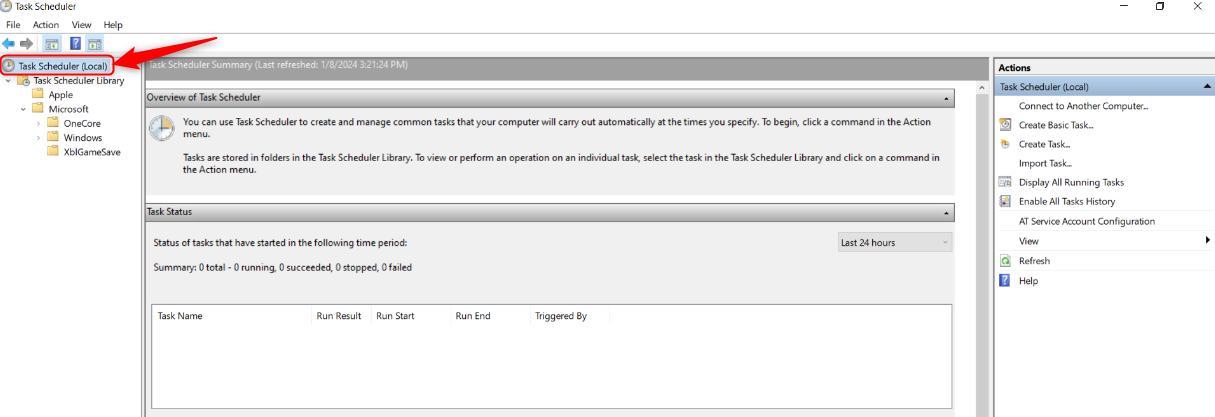
In the left pane, click “Task Scheduler (Local).”

Task Scheduler showing the Task Scheduler (Local) and Task Scheduler Library folder.

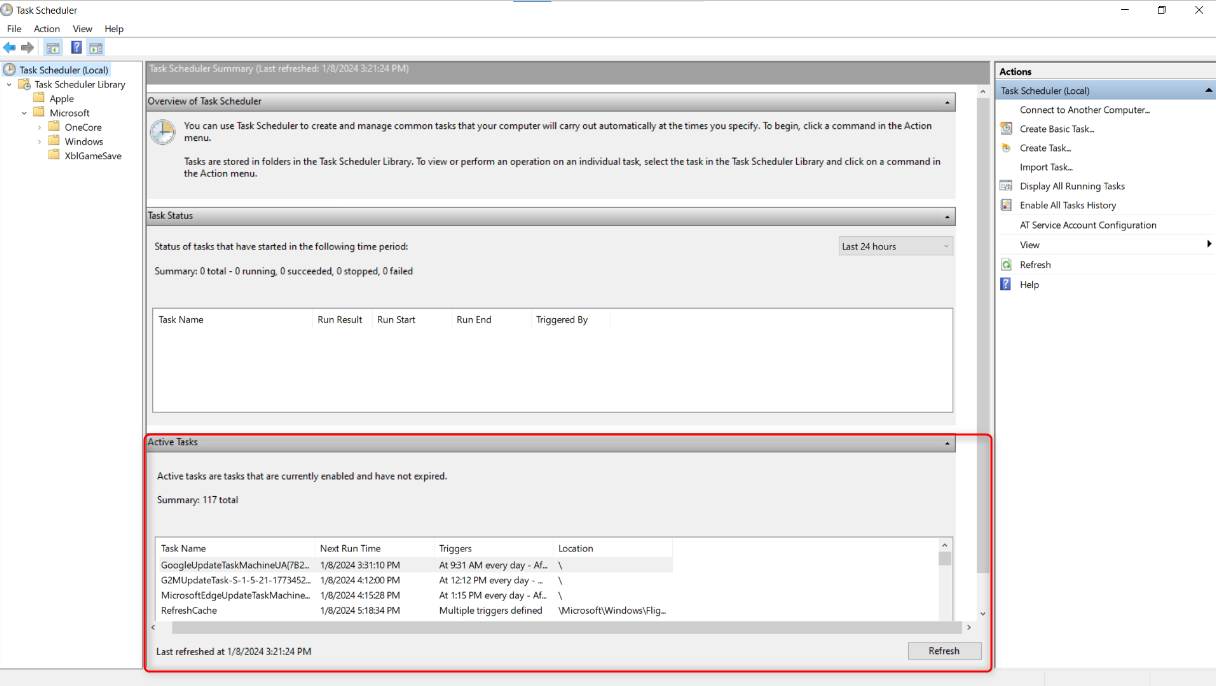
At the end of the center pane is the list of Active Tasks, which shows all scheduled tasks in your Library.

Active tasks in Task Scheduler.

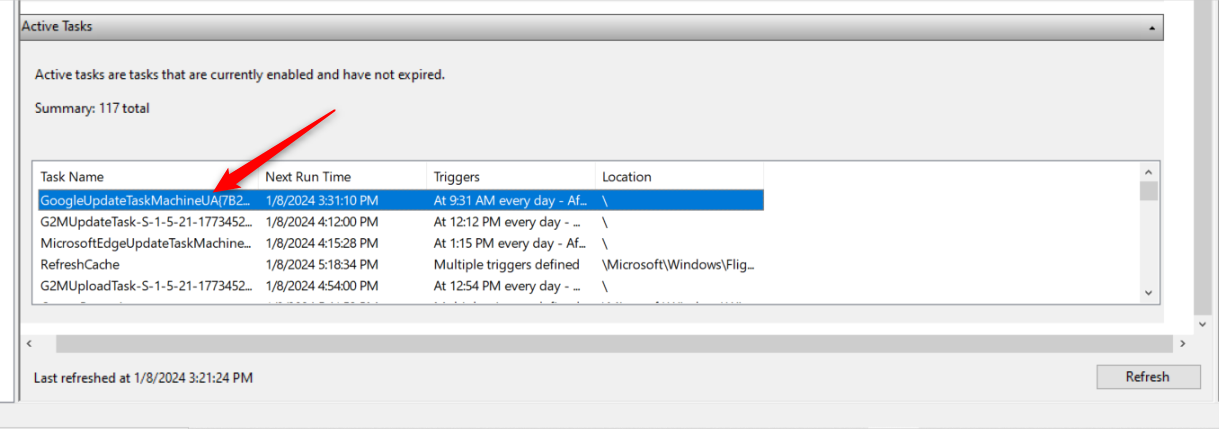
Double-click on a task to open it and view more details. Use the information herein to decide whether you need to disable a task.

Opening a task in Task Scheduler.

The center pane is divided into two. In the top half is a summary of the Status, Triggers (conditions), Next and Last Run Time, Last Run Result, and Author (application publisher).

Task summary in Task Scheduler.

To disable the task, right-click it and select “Disable.”

Disabling a task by right-clicking and selecting disable.

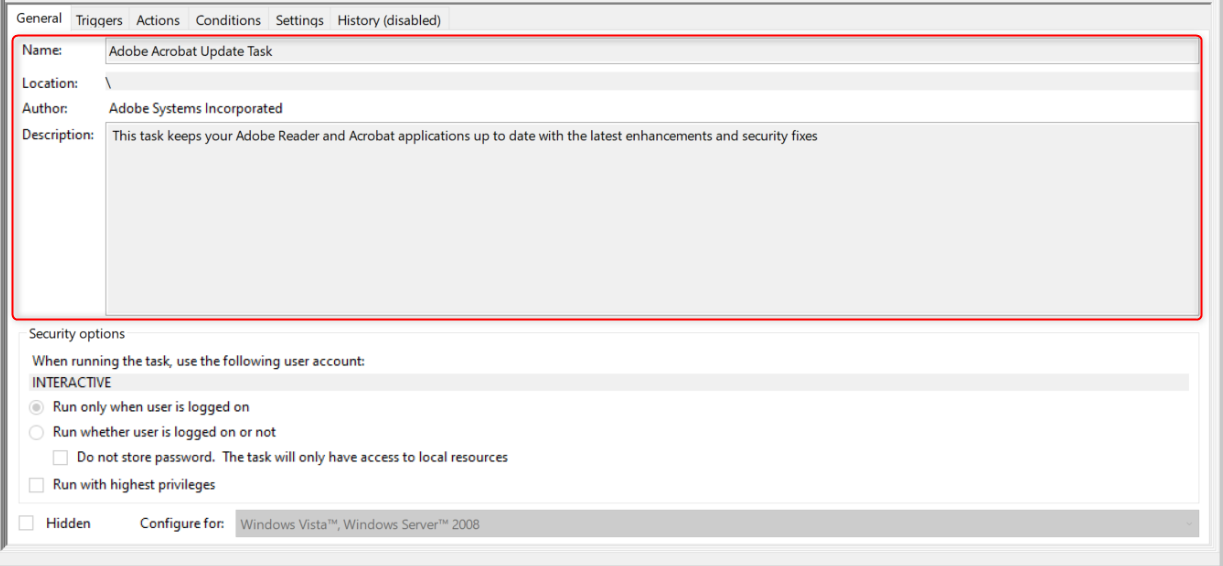
However, if you need more information before deciding to disable, look at the lower half of the center pane. The “General” tab provides the task name, location, and description.

General tab showing the name, location, and description of a scheduled task.

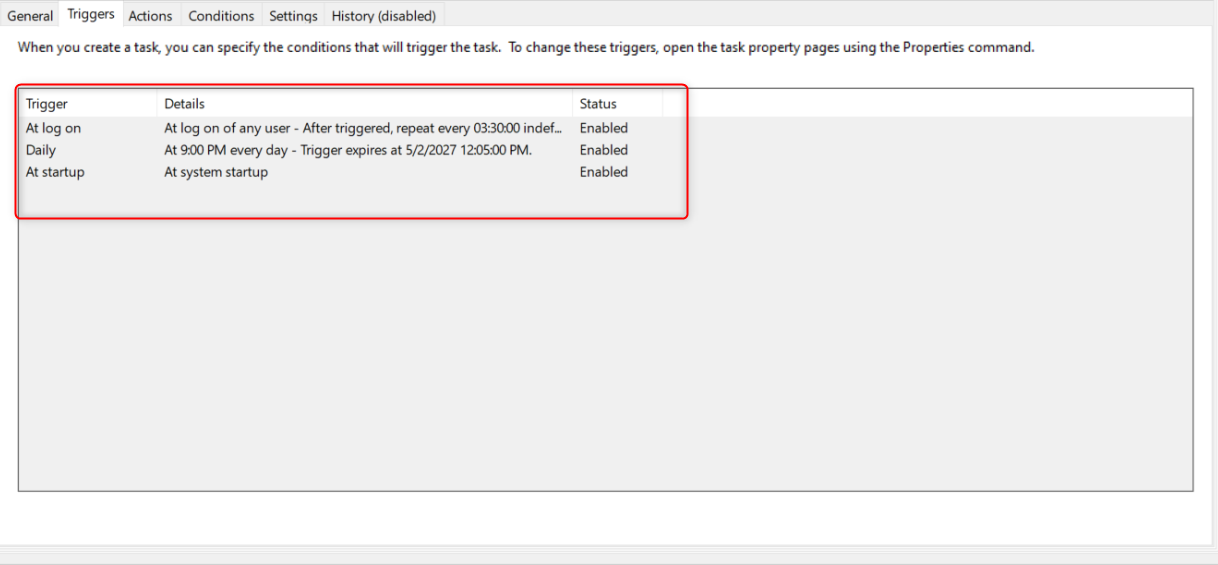
The “Triggers” tab shows what conditions will activate the task. Using my “Adobe Acrobat Update Task” as an example, it has three triggers:

  1. At log on: Adobe Acrobat will update when a user logs on.
  2. Daily: Adobe Acrobat will update within the specified times.
  3. At startup: Adobe Acrobat will start with the PC.
Triggers tab showing two triggers for the Adobe Acrobat Update task.

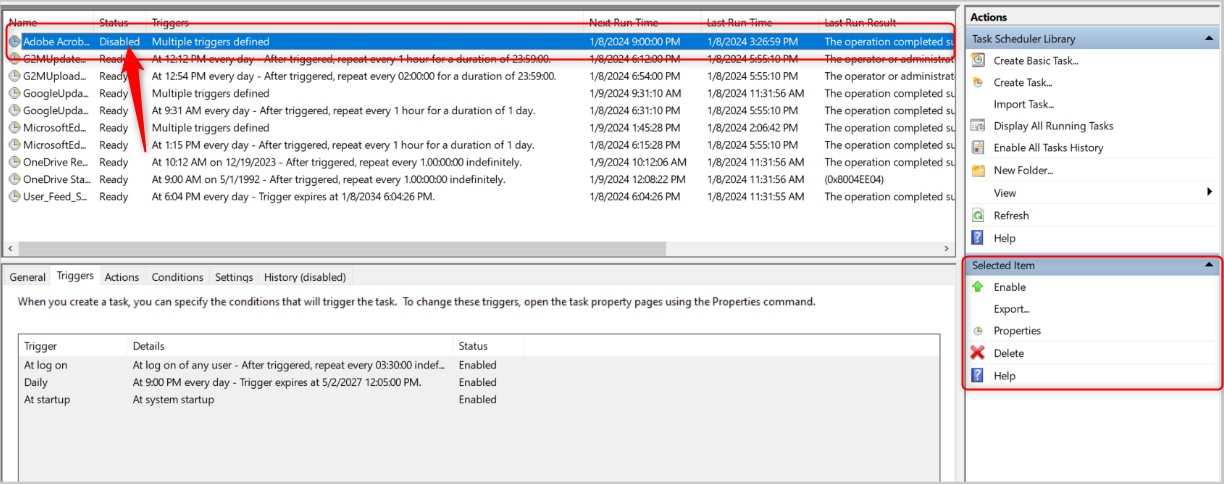
If any task is added to startup, you can either disable it or modify its triggers. To disable it completely, click “Disable” in the right pane under “Selected Item.”

Disable the selected task with the Disable button in the right pane.

At the top half of the center pane, the Status will change from “Ready” to “Disabled.”

Task status changed from Ready to Disabled.

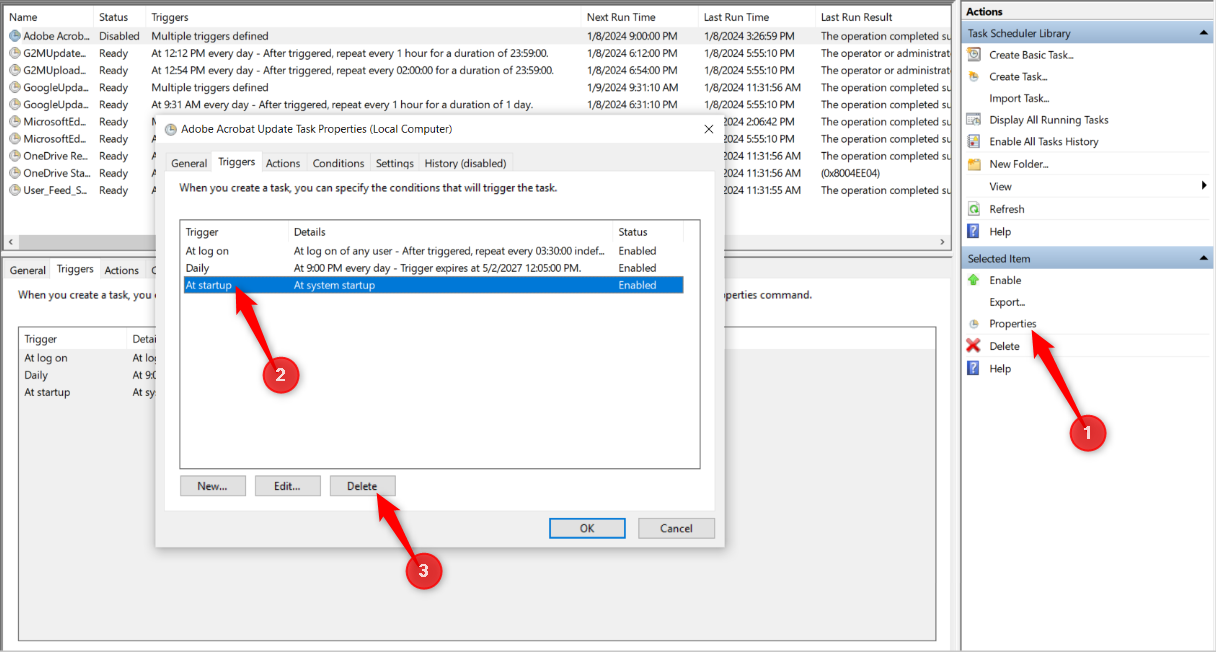
The second option is to modify the triggers. For example, if you want to delete the “At startup” trigger and leave the others to run, click “Properties” in the right pane under “Selected Item.” Open the “Triggers” tab, select the desired trigger, click “Delete.”

Deleting a trigger via the task's properties.

Click “OK” when done. That’s it—the task will not start with the PC.

There are other tabs that can help you decide whether the task is necessary, or provide further customization options:

  • Actions: Specify the actions carried out when the conditions are met.
  • Conditions: Work in addition to triggers and help determine if a task will run. For example, if using a laptop, you can tell a task to stop when the computer switches to battery power.
  • Settings: Specify additional settings that affect the behavior of the task.
  • History: See the event trigger history (disabled by default).
  • By disabling unnecessary startup processes, your system should stop being so sluggish when you first log in. If you still experience a slowdown, there might be more to the issue. It could indicate faulty hardware or even a malware attack, so consider running hardware diagnostics and a malware scan.

Tip solutie

Permanent

Voteaza

(2 din 10 persoane apreciaza acest articol)

Despre Autor

Leave A Comment?