Situatie
Error 0x800f081f is one of the most common error codes related to Windows 11 updates, along with 0x800F0906, 0x800F0907, and 0x800F0922. This error code appears when Windows cannot download the critical files for a given update. When this error code is encountered, the user will typically see an error message that reads, “Windows could not find required files to complete the requested changes. Error code: 0x800f081f”.
Solutie
Method 1. Run the Windows Update Troubleshooter
If you are experiencing Windows 11 install error – 0x800f081f, you can use the Windows Update Troubleshooter to find and fix any errors.
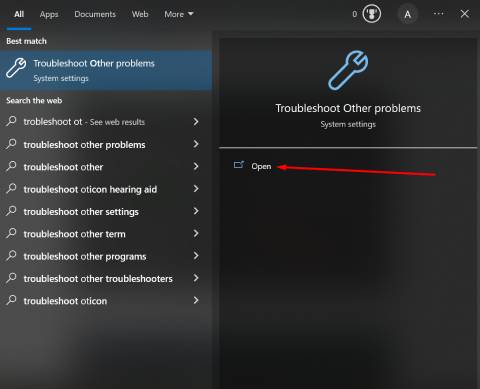
- Open the Start Menu and type in “Troubleshoot other problems.”

- Scroll down the list of troubleshooting options and click “Run” next to Windows Update.

- The troubleshooter will begin the diagnosis and check for errors.

- If any errors are found, it will list recommended fixes. Apply the fixes that it suggests, and then restart your PC.
This should help to resolve the install error – 0x800f081f Windows 11 issue.
Method 2. Repair Windows System files
To quickly and efficiently scan for and repair any errors in your system files, use these simple steps:
- Bring up the Start menu and look for “Command Prompt”
- Run Command Prompt as an administrator.

- Type in the command “sfc /scanow” and hit Enter.

- Reboot the PC and relaunch the Command Prompt and input the command “chkdsk C: /f /r /x,” then hit Enter.

- Enter the command “DISM.exe /Online /Cleanup-image /Restorehealth” and press Enter.
- Close the window and reboot the PC.
Method 3. Adjust Your Group Policy
If you’re having trouble installing Windows 11 due to the error 0x800f081f, one possible solution is to adjust your Group Policy settings. This method involves setting up a Windows update configuration that allows for optional component installation and component repair. Here’s what you need to do:
- To launch the Run dialogue, press the Windows + R keys simultaneously.

- Enter gpedit.msc and hit Enter.

- Extend Computer Configuration, then Administrative Templates, then System.

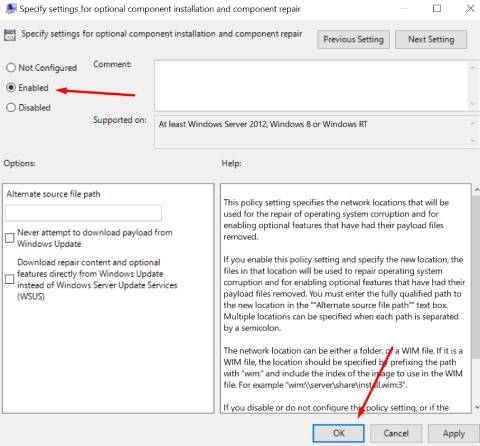
- Click on the entry labeled Specify settings for optional component installation and component repair.

- Double-click on this entry to open it
- Check Enabled and hit OK.

By adjusting your Group Policy settings, you can allow Windows 11 to install optional components and component repair to fix errors like install error – 0x800f081f Windows 11. If you’re still having trouble, try the other methods outlined in this article.
Method 4. Reinstall Microsoft .NET Framework 3.5
Reinstalling the Microsoft .NET Framework 3.5 should help to solve the Windows 11 install error – 0x800f081f issue. The Microsoft .NET Framework 3.5 can be enabled through the Windows Control Panel.
- To do this, click the Windows key and type “Turn Windows features on or off.”

- When the dialogue box appears, look down and make sure the .NET Framework 3.5 (including .NET 2.0 and 3.0) option is selected.

- Click OK and then reboot your computer if prompted.
Method 5. Remove Windows Update Cache and Components
The fifth method to fix Windows 11 Install Error: 0x800f081f is removing the Windows Update cache and components. This may help remove any unnecessary components that are preventing the installation from completing. To do this, follow the steps below:
Step 1. Open the Start menu. Enter “Command Prompt” and run it as an administrator

Step 2. Type the below commands and hit Enter after each command:
- Net stop wuauserv
- Net stop cryptSvc
- Net stop bits
- Net Stop appidsvc
- Ren %systemroot%system32catroot2 catroot2.bak
- Ren %systemroot%SoftwareDistribution SoftwareDistribution.bak
- Ren %systemroot%system32catroot2 catroot2.bak
- Net Start bits
- Net Start wuauserv
- Net Start appidsvc
- Net Start cryptsvc

Step 3. Exit cmd and restart the PC
You will have removed all Windows Update cache and components from your system by executing these commands. This should help fix any errors related to Install Error: 0x800f081f on Windows 11.
Method 6. Delete WUServer and WIStatusServer From the Registry
If you’re receiving the 0x800f081f error when attempting to install Windows 11, one potential fix is to delete the WUServer and WIStatusServer entries from the registry. This can be done by following the steps below:
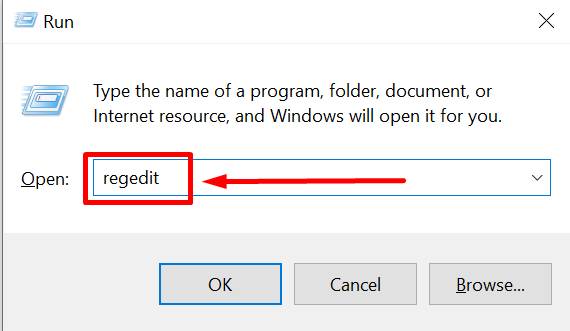
- Launch the Run dialog by clicking the Windows + R keys simultaneously.

- Type “regedit” in the field and press Enter. If prompted for permission, click Yes.

- To the left in the Registry Editor window, find the “HKEY_LOCAL_MACHINE\SOFTWARE\Policies\Microsoft\Windows\WindowsUpdate.”

- On the right pane of the window, locate WUServer and WIStatusServer. Right-click on both entries and select Delete
- Restart your computer and try installing Windows 11 again.

Leave A Comment?