Situatie
I had never been big on maintaining backups until an update recently broke my CachyOS setup. The computer was bricked, and I had no way to recover the OS or my data. Since then, I’ve made it a strict rule for myself to maintain regular backups of my Linux systems.
Solutie
How Linux backups work
There are any number of ways you can back up your Linux machine. You could simply copy your local files to an external drive and back them up using something like rsync. This tool lets you copy only the file changes, saving a lot of time when transferring files.
You could also use a tool like MX Snapshot to convert your current operating system (including files, if you so choose) into a bootable .iso image. If your machine breaks, you can just create a bootable medium with that .iso file and put everything back in place, just as it was (files and all). I’m currently using MX Linux, so I made a .iso backup like that. However, it’s more of a secondary backup for me because it’s not very convenient.

For daily use, I’ve been loving Timeshift. It works a lot like the system restore points on Windows. It’s pre-installed on a lot of Debian and Ubuntu-based Linux distros. You can use this system restore utility to create snapshots at regular intervals and, if anything goes wrong, revert the system to that timestamped snapshot.

It can even automate the process for you. You can set Timeshift to automatically create hourly, daily, weekly, or monthly backups and delete older backups. Restoring backups takes only a couple of clicks. If, for some reason, you can’t even login or access your desktop and the Timeshift app, you can use the TTY console to restore Timeshift backups. That way, you can always be sure that if you or an update accidentally borks your machine, you can always get it back to normal within seconds.
Creating system snapshots with Timeshift
Open the Timeshift app to create a new system snapshot. A lot of distros have it pre-installed, so you can just look it up in the search bar. If it’s not available, try installing it with the following command.
sudo apt install timeshift
Click the “Create” button at the top to start the process. You’ll be asked to choose between “rsync” or “BTRFS.” Choose rsync (BTRFS only works on partitions that are formatted in BTRFS.) It’ll save a new snapshot to the directory you point at. The first backup will take some time (a few minutes to an hour, depending on how big the system directory is). The subsequent backups should only take seconds.

To automate this process and create scheduled snapshots, click the Wizard button. Select the snapshot type, location, and snapshot levels. Here you can also choose to include the home directory with all your personal files. Snapshot levels in this context means how many snapshots Timeshift is allowed to keep at a time. You can set the count based on how much storage you have to spare. It’ll automatically clear old backups as new ones are created.


Restoring snapshots with Timeshift
Restoring snapshots is just as simple. All you need to do is select a snapshot (they all have dates and timestamps). It’ll show you a list of devices where the restored files will go. Click “Next” and wait for Timeshift to complete a dry run. It’ll present you with a list detailing which files will be deleted, overwritten, or kept. Once you provide confirmation, Timeshift will make those changes.


By default, you don’t need to make any changes because it automatically selects the correct devices based on the configuration you had when the snapshot was created. You only need to make changes if you’ve changed the partition or storage drive configuration since the last time.
Your computer will automatically reboot once it’s done and on the next login, the OS will revert to its older state.
If you want to restore a snapshot, but you cannot access the desktop app or log into your device, you can run a simple command from the TTY console. You can access the TTY console by pressing Ctrl+Alt+F2.
sudo timeshift –restore
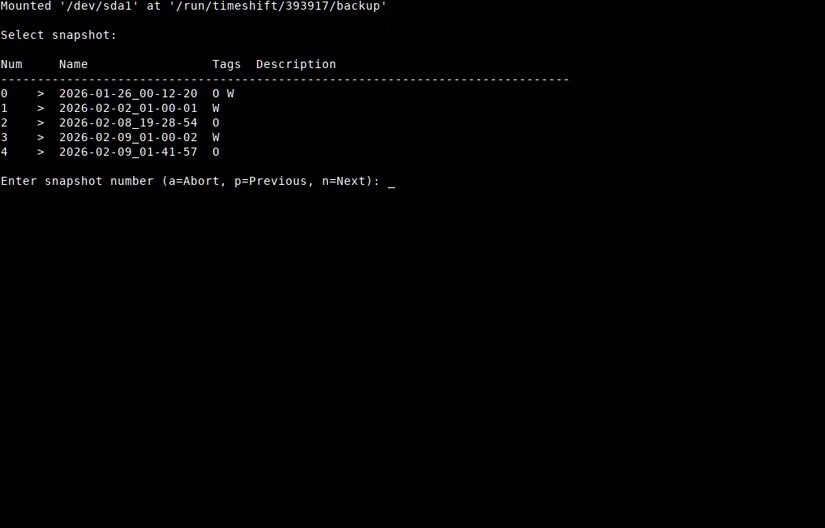
It’ll show you a list of snapshots. You can restore the target by entering its number in the list and waiting for the dry run. Then confirm the changes by pressing “y.”
System failures and bad updates aren’t incredibly common, especially if you’re using a stable, point release distro. However, your future self will thank you if your OS does break, and you have a backup system in place.
Leave A Comment?