Situatie
On Windows 10, File Explorer shows visible checkboxes whenever you select a file. This makes file management easier with a touch screen, but you might prefer a classic experience without those checkboxes. Here’s how to turn them off.
When enabled, Item checkboxes look like a small square—either empty or with a checkmark inside of them—beside each file’s icon, thumbnail, or file name. They appear in every File Explorer layout mode, including List and Detailed views.
Solutie
Pasi de urmat
This feature first appeared in Windows Vista and became enabled by default in Windows 8. You can even use Item checkboxes on Windows 7.
Toggle Checkboxes From File Explorer’s Ribbon
You can remove these checkboxes from within File Explorer itself.
First, open File Explorer. To do so quickly, press Windows+E, or click the folder icon in your taskbar if File Explorer is pinned there. You’ll also find File Explorer in your Start menu.
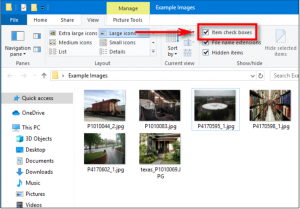
In the ribbon bar at the top of the File Explorer window, click the “View” tab.
Locate “Item Check Boxes” in the View toolbar and click on it.
It the feature was enabled, the checkmark in the box beside each file will disappear. Once you select files, they will no longer display a checkbox beside them.
If you’d like to turn the feature back on, return to the View toolbar in File Explorer and check the box beside “Item Check Boxes” again. Click this option whenever you want to hide and unhide the checkboxes.
Alternative Method: Use the Folder Options Window
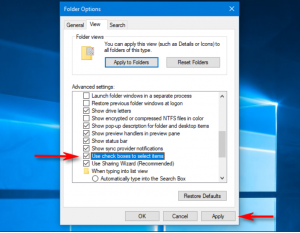
It is also possible to disable Item checkboxes using folder options in File Explorer. To do so, open a File Explorer window and click “View” on the toolbar. Click the “Options” button, and you’ll see the Folder Options window.
Scroll down the list until you see “Use Check Boxes To Select Items.” Uncheck it, then click Apply.
After that, close the Folder Options window and the checkboxes in File Explorer will be gone. Enjoy!


Leave A Comment?