Situatie
A static IP address assigns a fixed address to your device on a network, unlike a dynamic IP that changes over time. Static IPs are essential for servers, network printers, or any device requiring reliable access, such as for SSH, hosting, or database connections. Setting up a static IP ensures consistent connectivity and avoids IP conflicts in a dynamic environment.
Solutie
Step 1: Identify Your Network Interface
First, determine your active network interface. Use the following command:
Look for the interface name (e.g., eth0, ens33, or wlan0) and note its current IP configuration.
Step 2: Backup Current Network Configuration
Before making changes, back up your current network configuration file to avoid accidental misconfigurations:
If you’re using Netplan (common in newer Ubuntu versions), back up /etc/netplan/*.yaml instead.
Step 3: Edit the Network Configuration
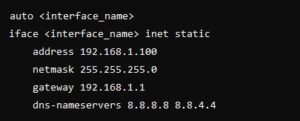
Open the network configuration file with a text editor. For systems using interfaces:
sudo nano /etc/network/interfaces
Modify or add the following lines (replace placeholders with your desired values):
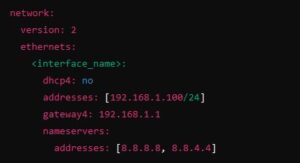
For systems using Netplan:
sudo nano /etc/netplan/*.yaml
Add or modify the following:
Step 4: Apply the Configuration
Restart your networking service to apply changes:
For interfaces:
sudo systemctl restart networking
For Netplan:
sudo netplan apply
Step 5: Verify the Static IP
Check if the static IP is successfully assigned:
ip addr
Test connectivity by pinging your gateway or an external server:


Leave A Comment?