Situatie
If you have an Nvidia graphics card, you might have seen Nvidia High Definition Audio as an option in the audio drop-down in the Windows taskbar. While most people probably ignore it and use external speakers connected to the PC’s motherboard, Nvidia’s digital audio solution can sometimes improve the audio on your PC if your display has built-in speakers.
Solutie
Nvidia High Definition Audio, or Nvidia HD Audio, is an audio driver included with Nvidia GPU drivers. It allows your GPU to output audio through an audio-capable display. This means that your particular Nvidia GPU should have at least one audio-capable display connection (usually HDMI or DP), and your display (monitor or TV) should also be audio-capable. Depending on your setup, Nvidia High Definition Audio might result in a better audio experience.
So, using Nvidia HD Audio makes sense for monitors with built-in speakers that can receive audio output from your GPU. The Nvidia High Definition Audio driver supports a variety of audio formats, providing 5.1 and 7.1 surround capabilities for compatible displays or speakers. Depending on your setup, it also supports several uncompressed and lossless audio formats, which might result in a better audio experience.
How to set up Nvidia High-Definition Audio
Switch to your GPU audio
If you have an audio-capable monitor or a TV connected to your GPU with an HDMI or DP cable, then you can set up Nvidia High Definition Audio. It’s likely that you already have Nvidia HD Audio set up and available as an option in the Windows Sound panel, but the steps below can still help you customize your experience, especially if you have multiple monitors.
- Right-click the Windows button and select Device Manager
- Under Sound, video, and game controllers, look for NVIDIA High Definition Audio. If it’s missing, you’ll have to update your graphics card drivers
- Next, right-click on your desktop and select NVIDIA Control Panel
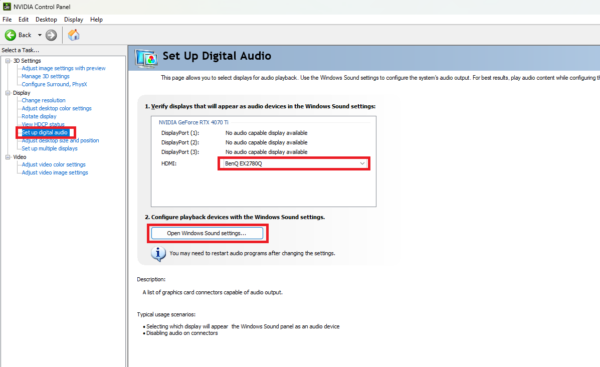
- Under Display, select Set up digital audio
The right-side panel will list all your audio-capable displays (if you have multiple displays) next to the connectors they’re connected to. By default, every audio-capable display will appear in the Windows Sound panel. If you want a certain display not to appear there, select it, and click the drop-down arrow next to it. Then, select Turn off audio. For every other display, you can leave the settings unchanged.
- Click Apply to save your changes
- Click Open Windows Sound Settings. You can configure settings for Nvidia High Definition Audio from the open Sound panel
- Nvidia High Definition Audio will now appear in the Windows Sound panel alongside any other audio outputs you have configured
- Switching to Nvidia High Definition Audio does have some perks. In a nutshell, you should use it if:
- You have decent speakers on your monitor
- You’ve connected your PC to your TV and want to use audio formats such as Dolby Atmos, Dolby Digital, and DTS
- You want to eliminate signal interference that accompanies audio output from the motherboard.
For most users, monitor speakers are just bad to the point of being unusable. They use external speakers or headphones connected directly to the motherboard. In such cases, Nvidia High Definition Audio is just part of your GPU drivers and exists as a toggle option in your Windows Sound panel.
Digital audio on Windows
Nvidia High Definition Audio is just one of the ways to use digital audio on Windows. You might have noticed Realtek Digital Output in your Windows Sound panel, which is usually used to route digital audio to home theaters and surround sound systems from your PC. If you want to enhance your audio experience on Windows, you can also set up spatial audio on Windows 11. On the other hand, if you’re struggling with audio issues, update audio drivers on your Windows 11 PC.

