Situatie
Disk First Aid and the Startup Drive
You can use Disk Utility’s First Aid on your Mac’s startup drive. However, in order for First Aid to perform any repairs, the selected volume must first be unmounted. Your Mac’s startup drive can’t be unmounted since it’s in use, which means you will have to start up your Mac from another bootable device. This can be any drive that has a bootable copy of OS X installed; alternatively, you can use the Recovery HD volume that OS X created when it was installed on your Mac.
We’ll give you instructions for using Disk Utility’s First Aid on a non-startup volume, and then for using First Aid when you need to repair your Mac’s startup volume. The two methods are similar; the main difference is the need to boot from another volume instead of your normal startup drive. In our example, we’ll use the Recovery HD volume that was created when you installed OS X.
Solutie
Pasi de urmat
Launch Disk Utility, located at /Applications/Utilities/.
Because you’ll probably be using Disk Utility occasionally, I suggest adding it to the Dock, to make it easier to access in the future.
The Disk Utility window appears as three panes. Across the top of the window is a button bar, containing commonly used functions, including First Aid. On the left is a sidebar that displays all the mounted volumes connected to your Mac; on the right is the main pane, which displays information from the currently selected activity or device.
Use the sidebar to select the volume you wish to run First Aid on. The volumes are the items just below a device’s primary name. As an example, you may have a Western Digital drive listed, with two volumes below it named Macintosh HD and Music.
The right pane will display information about the selected volume, including size and amount of space used.
With the volume you wish to verify and repair selected, click the First Aid button on the top pane.
A drop-down sheet will appear, asking if you wish to run First Aid on the selected volume. Click Run to start the verification and repair process.
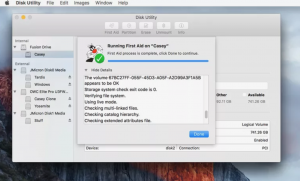
The drop-down sheet will be replaced with another sheet that shows the status of the verification and repair process. It will include a small disclosure triangle in the bottom left side of the sheet. Click the triangle to show details.
The details will reveal the steps being taken by the verification and repair process. The actual messages displayed will vary by the type of volume being tested or repaired. Standard drives may show information about catalog files, catalog hierarchy, and multi-linked files, while Fusion drives will have additional items that are checked, such as segment headers and checkpoints.
If there are no errors found, you’ll see a green check mark appear at the top of the drop-down sheet.
If errors are found, the repair process will begin.


Leave A Comment?