Situatie
Creating a Distributed Virtual Switch
1. In vCenter, select “Home” and then “Networking.” Click the datacenter on which the host or hosts reside.
2. Select from the toolbar the icon to launch the Create vNetwork Distributed Switch wizard. Name the vNetwork. Click “Next.”
3. Select each host to associate with the DvSwitch, and then select which network adapters to use with each ESX/ESXi host. Choose multiple network adapters to create uplink groups and provide load balancing and fault tolerance to a host. Make sure to select the correct network adapters during the creation process, as reassigning the adapters is not a simple process. Click “Next.”
4. Click “Finish” to create the DvSwitch in vCenter.
- Configuring DvSwitches and Port Groups
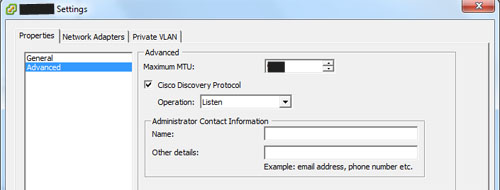
DvSwitches and vSwitches share most of the same options, but distributed switches offer a little bit more control over the operation of the vNetwork. To access the settings, right-click the virtual switch and then select “Edit Settings” from the context menu.
On the General tab are options to change the name of the switch and the number of dvUplinks connected to the vNetwork. On the Advanced tab are options to increase or decrease the maximum transmission unit (MTU), which limits packet size, and enable Cisco Discovery Protocol. In later versions of vSphere, you can also set up features like NetFlow, which analyzes network communications transmitted between virtual machines and physical networks; or port mirroring, which copies packets from one port to another for monitoring purposes.


Leave A Comment?