Situatie
In the situation where the video and audio are out of sync, following the next steps can help in solving the issue.
- First, check the internet connection, as an unstable and weak connection can cause this issue. Try disconnecting the internet connection and restart the Wi-Fi router and reconnect it back after 2 minutes. If you are using an ethernet connection, just unplug the cable wire and plug it back after a couple minutes.
- Secondly, the device may be running too many programs in the background beside the media player, try closing the unneeded applications and restarting the computer.
- Thirdly, the problem might be with the media player you are using for playing the videos. Try restarting the application or try a different media player.
Solutie
Pasi de urmat
- Disable the Hardware Acceleration
- Open the Chrome browser.
- In a new tab, type chrome://settings/system in the address bar and press the Enter key.
Now disable the hardware acceleration feature by toggling the Use hardware acceleration when available option to turn it Off. Once you do that, there appears a relaunch button and you need to click on the Relaunch button.
Update the Audio driver on the system
- Press the Windows key + R at the same time, type devmgmt.msc then click on OK to open the Device Manager window.
- Expand the Audio inputs and outputs option by double-clicking on it.
- Now right-click on the Audio device and select the Update driver option from the list.
- Then, select the Search automatically for drivers option by clicking on it in the Update window.
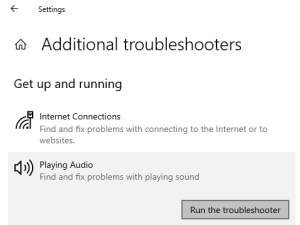
Run the Playing Audio troubleshooter
Step 1: Press the Windows and R keys together to open the Run command box.
Step 2: Type control.exe /name Microsoft.Troubleshooting in the run textbox and press Enter key.
Step 3: This opens the Troubleshoot page on your system.
Step 4: Click the Additional troubleshooters option on the page
Step 5: Now run the playing audio troubleshooter by clicking the Run button of the Playing Audio option under the Most frequent section as shown in the below screenshot.
Step 6: This will start the troubleshooter window which then starts to detect any issues related to playing audio on the system.
Step 7: Follow the instructions and fix the issues detected by the troubleshooter.
Step 8: Restart the computer now.
Change the Speaker properties
Step 1: Open the Run command box by pressing the Windows and R keys simultaneously.
Step 2: Type mmsys.cpl in it and press the Enter key.
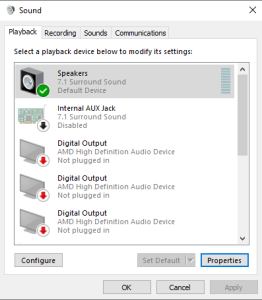
Step 3: Now this opens the Sound properties window.
Step 4: Under the Playback tab, select the Playback device from the list and click the Properties button at the bottom.
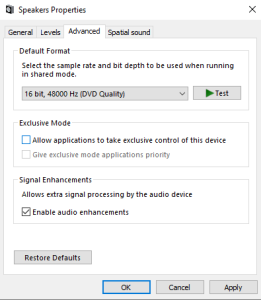
Step 5: In the Playback device’s properties window, click the Advanced tab and uncheck the Allow applications to take exclusive control of this device and the Give exclusive mode applications priority checkboxes.
Step 6: Then click Apply and OK.
Step 7: Close all other windows as well and reboot the system.


Leave A Comment?