How to Reset Chrome Settings to Default

Sometimes, unbeknownst to us, adware, malware, and unwanted extensions change settings—like homepages and default search engines—and make it nearly impossible to change them back. When you reset a browser’s settings, it removes some of the guesswork and does it all for you.

When you reset Chrome to default, a lot of data gets deleted, but not everything. While you’re signed in to your Google account on Chrome, the following settings will revert to the default on all devices you’re currently signed in on:

  • Default Search Engine: Changes back to Google.
  • Homepage and Tabs: The Home button—if you’ve enabled it—will disappear and any startup tabs will be cleared.
  • New Tab Page: Changes back to the default New Tab page with Google logo, search bar, and thumbnails of most visited sites.
  • Pinned Tabs: These will unpin and be removed.
  • Content Settings: This includes a site’s access to the camera or microphone, notifications, whether to block pop-ups, and so on.
  • Cookies and Site Data: All will be cleared.
  • Extensions and Themes: Will be disabled.

Some settings, like fonts, accessibility features, bookmarks, history, and passwords, will remain unaffected.

[mai mult...]
How to Check What Graphics Card (GPU) Is in Your PC

All computers have graphics hardware that handles everything from drawing your desktop and decoding videos to rendering demanding PC games. Most modern PCs have graphics processing units (GPUs) made by Intel, NVIDIA, or AMD.

While your computer’s CPU and RAM are also important, the GPU is usually the most critical component when it comes to playing PC games. If you don’t have a powerful enough GPU, you can’t play newer PC games—or you may have to play them with lower graphical settings. Some computers have low-power “onboard” or “integrated” graphics, while others have powerful “dedicated” or “discrete” graphics cards (sometimes called video cards.) Here’s how to see what graphics hardware is in your Windows PC.

[mai mult...]

How to Add an Emoji Viewer to Your Mac’s Menu Bar

Using emoji is easy on your phone, and it can be just as easy on your Mac. Add an emoji viewer to your Mac’s menu bar for easy access to emoji, symbols, and more with just a couple of clicks.

Macs support emoji just as well as iPhones and iPads do. You can open an emoji panel anywhere by pressing Control+Command+Space, but this larger emoji viewer makes your Mac’s complete catalog of emoji much more browsable.

Of all the different ways of inserting emoji, this one is the easiest. It puts emoji only two clicks away, and as a bonus, it puts other symbols at your fingertips, too. Whether you want to insert the © sign, the Ω symbol, or just a cheeky ?, you can do it all in a flash by following this guide.

[mai mult...]

Cum optimizam viteza de rulare a Windows 10

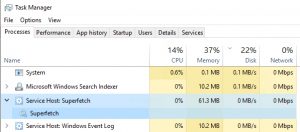
     Superfetch  este un alt serviciu Windows (Windows Services) care face ca sistemele de operare sa rulreze greu, in special in primele zile de dupa instalarea sistemului de operare. Activitate si consumul de resurse al acestui serviciu de sistem poate fi viibil in Task Manager.

Serviciul Superfetch se ocupa cu indexarea si cache-ul datelor aplicatiilor din sistem, pentru a putea fi puse rapid la dispozitia utilizatorului cand acesta o cere. Pana aici ar fi un lucru bun, insa daca avem de a face cu un hard disk mai vechi, de 5200 rpm, cache-ul datelor o sa ne tina hard-ul in usage foarte mare, iar sistemul s-ar “misca” greu. Un simptom al rularii serviciului Superfetch este si consumul excesiv de resurse CPU si Hard Disk atunci cand laptop-ul este pornit dar nu lucram pe el. Probabil ca ati auzit cooler-ul accelerand foarte mult, chiar daca dvs nu aveti nici o aplicatie deschisa pe laptop si nu atingeti tastatura sau mouse-ul.
Dezactivarea Superfetch nu va duce la o degradare a performantelor sistemului de operare si nici la erori de executie, deoarece acesta nu are dependenta cu alte procese sau aplicatii. Poate degrada in schimb rularea unor aplicatii sau jocuri.

[mai mult...]

Cum să actualizați firmware-ul pentru AirPods


Din fericire, AirPod-urile își vor actualiza în mod normal firmware-ul pe cont propriu. 
Atâta timp cât sunt îndeplinite câteva cerințe, nu trebuie să forțați AirPod-urile să 
isi actualizeze manual firmware-ul. 
Aceste cerinte sunt:
- AirPod-urile se află în carcasa de incarcare
- Carcasa de încărcare este conectata sau asezata pe un dispozitiv de incarcare wireless
- AirPod-urile sunt în raza de acțiune a unui dispozitiv la care au fost conectate anterior.
 Acest dispozitiv trebuie să aibă și o conexiune la internet
Acest lucru ar trebui să fie tot ce este necesar pentru a vă asigura că AirPod-urile isi fac 
automat ultimele actualizări de firmware. Este posibil ca acest lucru să se întâmple fără 
să-ți dați seama, atunci când vă incarcati AirPod-urile.
Există totuși câteva momente în care doriți să dezactivați manual actualizarea. Mai întâi, 
să verificăm ce versiune de software AirPods rulează în prezent.
[mai mult...]

Cum puteți seta ora de plecare și de sosire în Google Maps

Google Maps este de mare ajutor atunci cand vrei sa stii cat timp faci pana la o anumita locatie.
Acum, în cea mai recentă actualizare, puteți seta fie o oră de plecare, fie o oră de sosire.
Adică, dacă setați o oră de plecare, vă va oferi o estimare a momentului în care ar trebui să ajungeți,
 iar dacă ați stabilit un timp de sosire, veți primi o estimare a momentului în care ar trebui să plecați.


[mai mult...]

How to Disable the Windows 10 Startup Delay

After Windows starts up, it waits about ten seconds before opening your startup programs. This “startup delay” lets your desktop and Windows services finish loading, making everything run a bit smoother. If you have apps you’d rather run immediately, you can do it with a simple Registry hack.

The Registry hack we’re talking about in this article reduces or disables the startup delay, meaning that it applies to all startup apps. There’s no way to apply this technique only to specific apps.

Eliminating the startup delay works best on solid-state drives since they load things much quicker. While you can certainly give it a try if you have a traditional hard drive, you might not see much increase in how fast your startup apps load.

[mai mult...]

Cum se utilizează Voice Memos pe iPhone și iPad

Indiferent dacă înregistrați un mesaj vocal sau capturați un fragment dintr-o melodie nouă despre care știți că veți uita, aplicația iPhone Voice Memos este un instrument perfect.

Aplicația Voice Memos este gratuită și este livrată cu fiecare iPhone și iPad pe care Apple le vinde. 

Acest lucru face alegerea evidentă pentru înregistrarea audio. 

Înregistrarea audio și apoi partajarea acesteia este cea mai obișnuită utilizare a aplicației și vă vom arăta exact cum să procedați.
[mai mult...]