How to use your iPad as a second screen for your Mac

  1. Click the AirPlay icon in the Apple menu, then select your iPad. If you don’t see the AirPlay icon, open System Preferences, click Sidecar, then use the Connect to dropdown menu to select your iPad.
  2. Your iPad should now show an extended part of your desktop. You can drag the mouse cursor and windows onto it, and use it like a second monitor.
  3. Another way to move windows (and apps) to the iPad is to hover the mouse over on the green fullscreen button in the top-left corner of a window/app, then choose Move to my iPad. The window or app will then instantly appear on the iPads display.
  4. To mirror your Mac’s screen, rather than extend it, click on the AirPlay icon in the Apple menu (which now looks like a blue rectangle), and choose Mirror.
  5. To finish extending your desktop, click on the AirPlay icon then choose Disconnect. Alternatively, you can tap the Disconnect button on your iPad.
Sidebar controls

Take a look at the sidebar on your iPad and you’ll see a number of controls running down the side of the screen. Here’s what each button means:

Tap this to show or hide the menu bar when viewing a window full screen.

This will show or hide the Mac’s Dock on the iPad.

Touch and hold to set the Command key. Double-tap to lock the key. 

Touch and hold to set the Option key. Double-tap to lock the key.

Touch and hold to set the Control key. Double-tap to lock the key.

Touch and hold to set the Shift key. Double-tap to lock the key.

Undo the last action. Some apps will support multiple undos.

Display an on-screen keyboard.

Disconnect your iPad from the Mac.

Display a Touch Bar on the iPad

With Sidecar, you can show the Touch Bar from the MacBook Pro keyboard on your iPad’s display — even if your Mac doesn’t have a Touch Bar. To display this Touch Bar on your iPad:

  1. Open System Preferences, then click Sidecar.
  2. Tick Show Touch Bar, then use the drop-down menu to choose a location on the iPad’s screen.

Use an Apple Pencil

If you have an Apple Pencil with your iPad, then you can use it to edit photos, sign documents, paint, and manipulate objects. You can also use your Apple Pencil as a replacement for the mouse or trackpad to select things. 

[mai mult...]

How to create an Ubuntu Server SDcard for Raspberry Pi

What you’ll need
  • A microSD card (4GB minimum, 8GB recommended)
  • A computer with a microSD card drive
  • A raspberry pi 2, 3 or 4

Warning
Following these steps will erase any existing content on the microSD card.

Insert the microSD card into your computer and install the right Raspberry Pi Imager for your operating system. You can do this with the following links:

Or if you’re on Ubuntu by opening a terminal and running:

sudo snap install rpi-imager

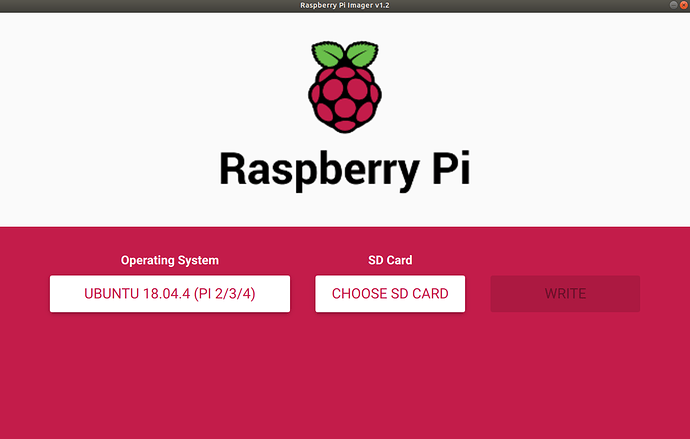
Once this has downloaded install and open the application. It should look something like this:

Open the “CHOOSE OS” menu, scroll down and click “Ubuntu”.

You will then be able to see a list of Ubuntu downloads to choose from. For this tutorial we recommend you select the Ubuntu 18.04 download. As indicated in the imager this will work for the Raspberry Pi 2,3, 3+ and any of the 4’s.

Select the image you want and open the “SD Card” menu. Select the microSD card you have inserted.

Finally, click “WRITE” and wait, this might take a few minutes.

[mai mult...]

How to boot Ubuntu Core in recovery mode

Accessing recovery hidden boot menu

If you prefer to recover the system when booting or if the system is no longer accessible via the network, you can use the recovery hidden menu:

  1. Start or reboot the device with the ‘1’ key held on a connected keyboard. In some systems or with some keyboards it is necessary to press the key repeatedly.
  2. After the initial boot process completes, a status screen appears to show “System mode selection triggered. Proceed to select one of the available systems and actions.”. Press OK.
  3. On the next screen, select with TAB or cursor keys the desired action and press ENTER.
  4. A message indicating the selected mode is displayed. Press CONFIRM to proceed.
  • If “Run normally” has been selected, the system boots in run mode.
  • If “Recover” has been selected, the system boots in recovery mode.
  • If “Reinstall” has been selected, the system boots in reinstall mode.
Using console

First, you have to log into your device using SSH. Run the ssh command which will be something like:

ssh <user>@<device_address> And you should be welcome to Ubuntu Core:
pasted image 0

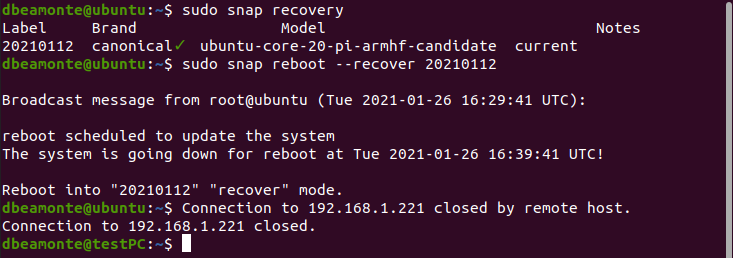
Once you are in the device console, you can check the list of recovery systems that can be used for recovering.

snap recovery
 pasted image 0

The snap reboot command allows you to boot in the different booting modes (run, recovery, install) from the console. The procedure is as simple as just typing the following command:

sudo snap reboot --recover 20210112

The system shows a message on the console indicating that it is going to reboot with the system indicated in the label.

This process takes some time. The device will be accessible via SSH but the snaps take some time to install and update. You can check by running the command “snap list” until the full list of packages is up to date.

Using Recovery mode

Once the system has booted in recovery mode, you can access via SSH with your prior credentials, and have a clean system where the desired maintenance action can be performed. For exiting recovery mode, you can use any of the following options:

  • Enter the following command
snap reboot --run
  • Power off and on the system

Either method returns the system to run mode, and all changes done to the temporary system are lost.

[mai mult...]

How to Fix Wrong Time Displayed in Windows-Linux Dual Boot Setup

If you dual boot Windows and Ubuntu or any other Linux distribution, you might have noticed a time difference between the two operating systems. When you use Linux, it shows the correct time. But when you boot into Windows, it shows the wrong time. Sometimes, it is the opposite and Linux shows the wrong time and Windows has the correct time.

That’s strange specially because you are connected to the internet and your date and time is set to be used automatically. Don’t worry! You are not the only one to face this issue. You can fix it by using the following command in the Linux terminal: timedatectl set-local-rtc 1

Why Windows and Linux show different time in dual boot?

A computer has two main clocks: a system clock and a hardware clock. A hardware clock which is also called RTC or CMOS/BIOS clock. This clock is outside the operating system, on your computer’s motherboard. It keeps on running even after your system is powered off. The system clock is what you see inside your operating system.

When your computer is powered on, the hardware clock is read and used to set the system clock. Afterward, the system clock is used for tracking time. If your operating system makes any changes to system clock, like changing time zone etc, it tries to sync this information to the hardware clock.

By default, Linux assumes that the time stored in the hardware clock is in UTC, not the local time. On the other hand, Windows thinks that the time stored on the hardware clock is local time. That’s where the trouble starts.

Fixing Windows Showing Wrong Time in a Dual Boot Setup With Linux

There are two ways you can go about handling this issue:

  • Make Windows use UTC time for the hardware clock
  • Make Linux use local time for the hardware clock

It is easier to make the changes in Linux and hence I’ll recommend going with the second method.Ubuntu and most other Linux distributions use systemd these days and hence you can use timedatectl command to change the settings.

What you are doing is to tell your Linux system to use the local time for the hardware clock (RTC). You do that with the set-local-rtc (set local time for RTC) option: timedatectl set-local-rtc 1

Set local time for RTC in Ubuntu

Now if you boot into Windows, it takes the hardware clock to be as local time which is actually correct this time. When you boot into Linux, your Linux system knows that the hardware clock is using local time, not UTC. And hence, it doesn’t try to add the off-set this time.

This fixes the time difference issue between Linux and Windows in dual boot.

[mai mult...]

Microsoft Edge 91 will be the first to support syncing on Linux

It took Microsoft quite some time to release the first versions of its Chromium-based Edge web browser for Linux. One thing that was not implemented in the initial releases was support for syncing data. While data syncing was a work in progress for a long time on Windows and Mac OS as well, Linux users had to wait a bit longer still.

Now, with Microsoft Edge 91 comes synchronization functionality on Linux. The feature is available in development versions and labeled experimental, which means that users need to enable it right now to make use of it.

microsoft edge sync linux

The functionality enables Linux users to sync data such as passwords, favorites or extensions. It does require a Microsoft account, but that is to be expected as Microsoft’s sync functionality requires a Microsoft account on all supported platforms.

To enable syncing on Linux, Linux users need to do the following:

  1. Make sure that Edge is at version 91.0.831.x or higher.
  2. Load edge://flags in the browser’s address bar.
  3. Search for MSA sign in.
  4. Set the status of the flag to Enabled.
  5. Restart the Microsoft Edge web browser.

Login functionality becomes available after the restart. Select the profile image on the browser’s main toolbar and there sign in to sign-in with a Microsoft account.

The feature syncs data using the account, which means that synced data will become available on other platforms.

Microsoft notes that the synchronization may take a few seconds to complete.

Linux users may experience issues when the feature gets enabled. Microsoft published a few scenarios on its Tech Community website. These are:

  • My browser is not behaving correctly since I logged in and enabled Sync.
  • My browser crashes when I launch it since I logged in and enabled Sync.
  • Disabling things as described above did not work for me.
  • Deleting my Profile folder did not work for me.

Edge can be started with the parameter –disable-features=msOneAuthEnableMSALSignInOnLinux to turn off the feature; useful if it is not starting anymore after enabling it.

A quick test of the sync functionality on several Linux systems was successful. Syncing could be enabled and was working as expected on these devices.

[mai mult...]

How to Use Touch Controls on HomePod Mini

HomePod mini is out of the box, a compact choice of smart speakers in a small space | TechNews – 6Park News En

While you only see the volume buttons on the HomePod and HomePod mini’s touch control surface, there’s a lot more you can do with this glowing screen. Here’s how to use touch controls on HomePod.

The unassuming screen on top of the HomePod mini can be used for everything from pausing music playback to skipping tracks. If you don’t like using the Hey Siri functionality on your HomePod, the touch controls can be really handy.

You will find the touch control surface at the top of the HomePod and HomePod mini. This is a screen that lights up with multiple colors.Apple HomePod Mini has a hidden sensor that can be activated via temperature monitoring software - India News Republic

You’ll see pulsating colors when your HomePod or HomePod mini is listening to you, when it’s processing a request, or when it’s being used as an intercom.

When your HomePod is playing something, you’ll see a white light in the middle of the screen. When your HomePod is inactive, the screen will be blank.

  • Activate Siri: Press and hold the touch surface to activate Siri (no need to say “Hey Siri” if you’re next to the HomePod mini).
  • Adjust Volume: Tap the “+” or “-” buttons on the HomePod to increase or decrease the volume. You can press and hold the buttons to make the change faster.
  • Pause/Resume: If you want to quickly pause or resume the playback, tap once on the touch surface. This is the fastest way to mute the HomePod.
  • Next Track: Double-tap on the touch surface to skip to the next song or track.
  • Previous Track: Triple-tap on the top of the HomePod to go back to the previous track. This will only work if you’re listening to a playlist or an album.
  • Stop an Alarm: If you keep your HomePod mini on your bedside table and you like using it for alarms, here’s some good news: Simply tapping the touch surface will dismiss an alarm. No need to yell “Hey Siri, stop!” every morning.
[mai mult...]

How to Transfer Saves via PlayStation Plus

Imagini pentru playstation plu

If you have a PlayStation Plus subscription, then you have the option for moving your saved data from one console to another. You’ll need to ensure that you’re logged in to your PlayStation Plus account on both consoles. You can do this by going to the “Settings” menu and double-checking the “Account” menu to make sure that your username is the same on both consoles.

To move your saves, go to Settings > Application Saved Data Management.

where to find saved data in ps4

These settings will let you control how to transfer saved data between the system storage, the online cloud storage you get with PS Plus, and a USB device. Select “Saved Data in System Storage.”

Select "Saved Data in System Storage."

From there, choose “Upload to Online Storage.” This option has a little PlayStation Plus symbol next to it.

upload ps4 saves to online storage

You’ll see a list of all the games for which you have saved data. Selecting one game will show you a list of every single save you have in the game. You can choose to transfer all or just specific saves. This process will also alert you if these saves are already uploaded to the cloud. PlayStation Plus frequently syncs saves, so you may not have to repeat the process manually.

Once you’ve uploaded all the saves you wish to the cloud, turn on your PS5 and download the game of your choice. Then go to Settings > Saved Data and Game/App Settings.

save data settings on ps5

From there, scroll down to “Saved Data (PS4),” then select “Cloud Storage” from the submenu. It’ll have a little PS Plus symbol next to it.

where to find ps4 saves in cloud storage

Select “Download to Console Storage.”

PS4 saves downloaded to console storage from cloud

From the list that pops up, select the PS4 saves(s) you wish to save, then hit “Download

download ps4 saves to ps5 console storage

When you boot up the PS4 game in question on your PS5, your saves will be there waiting for you.

[mai mult...]

How to Send Disappearing Messages in Instagram

For dispatching self-destructing texts, Instagram offers a feature called “Vanish Mode” on its messaging service. Any text or media you send in Vanish Mode is automatically wiped as soon as the recipient sees it. To access Vanish Mode, first, make sure you have the latest version of the Instagram app on your Android smartphone or iPhone.

Next, open the Instagram app on your phone and swipe in from the left edge of the screen (or tap the text bubble button at the top right) to view a list of your direct messages.

Visit your Instagram chats

Select the conversation that you’d like to use Vanish Mode for.

Perform a swipe up gesture above the text box to activate Vanish Mode. Once that’s successful, Instagram will update your chat background with a darker shade and throw in a few animations to let you know Vanish Mode is active.

Turn on Vanish Mode on Instagram

In Vanish Mode, you can continue to chat normally and send messages in all the usual formats, like direct stories, voice clips, and more.

Send disappearing messages on Instagram

The difference is that once you swipe up again to leave Vanish Mode and the other person reads whatever you have sent, Instagram will delete those messages.

Turn off Vanish Mode on Instagram

While the recipient is free to take a screenshot of your messages in Vanish Mode, Instagram will notify you if and when they do. Do note that Instagram retains your Vanish Mode media and texts for up to an hour after they have been deleted. This is in case the recipient files a report for abuse and harassment and Instagram needs the Vanish Mode data to take action.

[mai mult...]