How to Block Ads on your Smart TV (Samsung, LG, Roku and Sony)

Ads can be very annoying. Especially on Smart TVs like the Samsung, LG, Roku and Sony some ads can be overwhelming. It’s not a nice feeling when you just brought in a new TV and turned it ON for the first time. You would not expect to see Ads immediately.

Worry not. We are going to share a couple of ways to block ads on your Smart TV. With those controls, you will be able to completely block the ads on your TV, even the in-app ads. Sounds cool right?

Here are the 2 ways to block ads on your Samsung, LG, Sony and Roku Smart TVs:

  • Filtering specific Ad URLs to your Home Internet Router
  • Installing BlockADA app for Android (Works on Android TVs only)

Now we will discuss each method in detail and explain all the steps required to effectively block all the annoying ads:

[mai mult...]
How to Run NodeJS Application as a Windows Service

In a development environment, it’s very easy to run your server using a simple command but in a production environment, your Node application needs to be up and running at all times. To run a Node application as a Windows service, you need to leverage another third-party tool. The best and the easiest one to configure in this case would be NSSM.

What does NSSM offer?

Once you install and configure NSSM for your Node.js application, you can be assured that your server will run forever as a background service.

Here are the most salient features of NSSM:

  • NSSM is a free and open-source software
  • It converts executables into Windows services
  • NSSM can manage the CPU affinity and process priority of the managed application
  • It acts as a Load balancer for your services
  • NSSM monitors the services at all times. Whenever there’s a failure or machine reboots, it will automatically start the services

How to run Node server as a Service using NSSM

Here are step-by-step instructions with screenshots on how to install and use NSSM to ensure the availability of your Node application server at all times:

[mai mult...]

How to use Microsoft’s new Windows File Recovery Tool

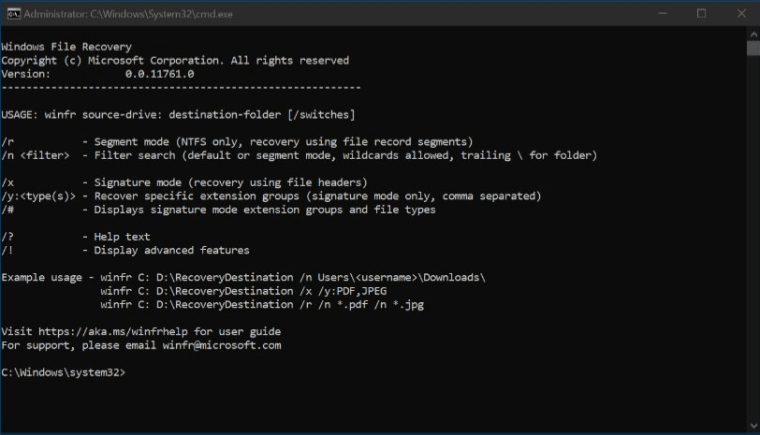
Here’s a great news for Windows 10 users: Microsoft has just released a new free built-in Windows File recovery app which is available in the Microsoft Store. With the new recovery tool, you will be able to recover lost files that cannot be recovered from the Recycle Bin.

Windows File Recovery command line

This new feature has been introduced only for the Windows 10 version 2004 or newer. So, if your Windows OS is not updated, you need to update it now to get it.

Windows File Recovery is a command-line based application that can be downloaded directly from Microsoft store. This tool works for all types of local storage devices including internal drivesexternal drives and USB storage devices.

Here are the different use cases when the app can be of use:

  • If you have accidentally deleted an important file
  • You have deleted a file with the shift+D switch that removes it from Recycle Bin as well
  • Hard drive has been wiped clean
  • Windows or Hard Drive has corrupted data

The Three Modes of Windows File Recovery

Windows supports different types of File systems belonging to different types of storage devices. Here’s a quick summary of the different file systems support by Windows:

File Systems OS and Device Types
FAT and exFAT USB drives, Flash drives, SD Cards (Less than 4 GB)
ReFS Windows Servers and Windows Workstations (Pro)
NTFS Internal HDD, SDD, External Drives, USB and SD Cards having Greater than 4 GB storage capacity

The tool supports three modes of operation. Here’s a brief description for all three modes:

  1. Default Mode: Default mode uses the Master File Table (MFT) to locate the lost files. It works best for files that were deleted recently. It only support the NTFS file system.
  2. Segment Mode: This mode does not require MFT, it only requires segments of data. It works best for situations when the data was deleted a while ago or after the disk was formatted. It also works for recovering data from corrupt drives.
  3. Signature Mode: Signature mode works for both types of partitions, i-e FAT, ReFS, exFAT and NTFS. This mode only works for large files and searches for specific file types. Data from external storage devices and USB devices can only be recovered with Signature mode.

Here are the different types of data that can be recovered with this tool (audio, video, photos, documents, archives):

  • wma, wmv, asf
  • jpg, jpeg, jpe, jif, jfif, jfi
  • mp3
  • mpeg, mpg, mp4, m4v, m4a, m4r, m4b, mov, 3gp, qt
  • png
  • pdf
  • zip
  • xlsx, pptx, docx, odp, ods, ott, otg, otc, ots, otf, oth

Steps to Recover Deleted Files in Windows 10

Here’s how you can use the new Windows File Recovery tool to recover the deleted data:

[mai mult...]

How to Disable Control Center in iOS 7

Control Center is an awesome feature that allows you to quickly access your most commonly used iPhone/iPad features with a swipe. The problem however is that by default, Control Center can be accessed even if your iPhone or iPad is unlocked. This is a great convenience, but it’s also not very secure in that anyone with physical access to your iPhone can turn on AirPlane mode and or mess with some of your phone’s settings.

To prevent this from happening you can head into Settings to disable this feature or limit when it is accessible. Follow the instructions below to learn how to disable and/or enable Control Center in iOS7.

disable-control-center-ios7

[mai mult...]

How to download the Android 11 beta to your smartphone

You can now download the Android 11 beta, because Google has released an early version of its newest operating system that select users can test out, ahead of the wider roll-out towards the end of the year.

If you’ve got a Google Pixel 2, Pixel 2 XL, Pixel 3, Pixel 3 XL, Pixel 3a, Pixel 3a XL, Pixel 4 or Pixel 4 XL, OnePlus 8 or OnePlus 8 Pro, and want to test out an early build of the Android upgrade that’ll come to most smartphones over the next year, you can. That beta list will be growing as the months go on, with Xiaomi and Oppo saying their phones will join the list soon. It’s worth pointing out this is an early build, and it can be a little risky to download, so make sure to back up your data first. This is especially true on OnePlus 8 phones, as OnePlus has warned it’s a developers’ build.

[mai mult...]

Ghid pentru Windows 10 built-in Packet Sniffer ‘PktMon’

Microsoft a adăugat în mod silențios un pachet sniffer la Windows 10 în actualizarea din octombrie 2018. Instrumentul se numește PktMon.exe și funcționează în același mod ca oricare alt Packer sau Network Sniffer, inclusiv WireShark și Microsoft Network Monitor .

Locația fișierului exe al Windows 10 Packer Monitor este: C:\Windows\system32\pktmon.exe

În acest ghid, vă voi arăta cum să executați comenzile de bază și să exportați fișierul jurnal de captare a pachetelor în formate ETL și PCAPNG.

[mai mult...]

Cum să planificați o întâlnire cu zoom

Logo Zoom

Menținerea unui program este o modalitate sigură de a vă asigura că nu întârziați niciodată pentru o întâlnire. Cu Zoom, puteți programa un apel video unic sau repetat și să-l trimiteți la calendarele tuturor. Iată cum să programați o întâlnire Zoom. În primul rând, mergeți și descărcați aplicația Zoom pe computerul dvs. Windows 10 , Mac , iPhone , iPad sau Android . După instalare, deschideți aplicația Zoom și conectați-vă cu contul dvs.

[mai mult...]

Cum să mutați bara de căutare Spotlight pe macOS

Bara de căutare Spotlight se deschide în centrul ecranului. Dacă ai folosit Mac-uri toată viața, ești probabil obișnuit să fie mereu în centru. Chiar dacă nu-ți place să apară acest loc, este posibil să fi învățat totuși să trăiești cu el, care îți blochează ecranul ori de câte ori vrei să deschizi ceva. Chestia este că bara de căutare Spotlight poate fi mutată și se poate lipi oriunde o așezați. Iată cum puteți muta bara de căutare Spotlight pe macOS.

[mai mult...]