Aplicații

E-mail 984 Solutii

How to Set Up Shadowsocks With Outline

Shadowsocks is a tool that uses the SOCKS5 proxy to reroute and disguise internet traffic and thus get past censorship blocks. It was developed initially by a Chinese programmer and is thus particularly useful in getting past the Great Firewall of China, though we’ve received reports you can use it for bypassing other regimes’ blocks, too.

However, if you’re looking to change your Netflix region or use BitTorrent, you’re much better off using a VPN. That’s something we explain in detail in our article comparing Shadowsocks vs. VPNs. The problem with Shadowsocks, though, is that it’s a bit tricky to set up, something we can hopefully help you with. There are several ways in which you can install Shadowsocks, but as many of them involve scripts cobbled together by enthusiasts, we like to use a program called Outline, which comes with a nice GUI and takes just a few minutes to set up.
  • How to Set Up Shadowsocks the Easy Way

Assuming you want to give Outline a shot, though, let’s get started with downloading the program. For this. For this, go to the Outline website and click on “get Outline.” The next page will show you download links for both the Manager and the Client, for now just install the Manager.

Outline Manager and Client

Once downloaded, open the program (for Linux you need to open the .AppImage file) and you’ll be met with a screen where you can choose the cloud service or server you’re using to route your traffic through. We’re using DigitalOcean for ours, but there are plenty of other options. DigitalOcean is the easiest option by far, though; you don’t even need to have a server ready.

Outline server options

In most cases, you’d have to set up your server beforehand, but using DigitalOcean all you need to do is link Outline to your account and the hard work is done for you. Just follow the on-screen prompts to authorize Outline to access your hosting account, all you need to do is choose a server location.

Server locations for Outline

If you’re in China, Singapore is probably your best bet, though Bengaluru in India is a good alternative; we went with Amsterdam. Whichever location you go with, just click “set up Outline” in the top right when you’re done and the program will get started. The setup process will take a few minutes.

Outline install screen

Once it’s done setting up, you’ll be greeted by Outline’s connection center, where you can set up connections—both your own as well as those of whomever you want to share the connection with—and track data usage. In the top right, you can also go to the settings screen to find information about the server as well as tweak functions to your liking. In our case, though, we want to hook up a device to the server, so we need to click on the icon next to “my access key.”

Outline's configuration screen

You’ll get a pop-up, just click “connect this device” and then make sure to copy the secure key in the next screen. After that, you’ll go to a third screen where you need to install the Outline Client. Just click “install outline” and the download will automatically start.

Outline Client installation

Once it’s downloaded, go to your downloads folder and open up the installer for the client. If it’s on the same device as the Outline Manager, the key will be automatically detected. Otherwise, you can enter it manually (in the image below, we’ve blanked part of the secure key.) Then hit “Add Server.”

Outline enter secure key

Then all you need to do to connect to your new Shadowsocks server is to hit “Connect.”

Outline client

You should now be able to access the internet through your new server. If you want to connect any other devices—including mobile devices, as Outline will work on Android and iOS as well—you should install the Outline Client on that device and enter the secure key. You can also create new secure keys if you want to spread security credentials around among friends and family, it’s up to you. Either way, you should now be able to browse the free internet.

[mai mult...]

Cum automatizăm în cazul GDPR oferirea de detalii suficiente persoanelor fizice în vederea înțelegerii algoritmului a luarea deciziilor?

Regulamentul General privind Protecția Datelor (GDPR) prevede că persoanele fizice au dreptul de a fi informate cu privire la prelucrarea datelor lor cu caracter personal și de a primi detalii suficiente pentru a putea înțelege algoritmul de luare a deciziilor care le afectează. În cazul în care o organizație utilizează un astfel de algoritm, trebuie să se asigure că persoanele vizate sunt informate cu privire la acesta și că au acces la informații suficiente pentru a putea înțelege cum funcționează algoritmul și cum sunt luate deciziile care le afectează.

Pentru a automatiza oferirea de detalii suficiente persoanelor fizice în vederea înțelegerii algoritmului de luare a deciziilor, organizația poate utiliza diverse metode și tehnologii. Iată câteva dintre acestea:

[mai mult...]

Cum verificăm tranzacțiile on-line înainte și după plată? Extrasele bancare și chitanțele prin homebank

Ne putem lua rămas bun de la clasicele chitanțe pe hârtie, acum din aplicația homebank pentru aproape orice banca putem află rapid și sigur tranzacțiile on-line precum și extrasele de cont. În exemplu am ales o anumită banca, dar principiul este asemănător si cu restul băncilor.

Prin urmare dacă nu mai știi ce plăți ai făcut cu Credit Card-ul tău acum o lună sau în oricare altă zi, nu trebuie să scotocești prin colecția de chitanțe. Verifică simplu și rapid în extrasul tău lunar de cont.

[mai mult...]

Utilizare cmdleturi PowerShell pentru Powerapps

Cmdleturi sunt funcții scrise în limbajul de script PowerShell care execută comenzi în mediul Windows PowerShell. Rularea acestor cmdleturi Power Apps vă va permite să interacționați cu platforma dvs. de aplicații de afaceri, fără a fi necesar să parcurgeți portalul de administrare într-un browser web.

Puteți combina aceste cmdleturi cu alte funcții PowerShell pentru a scrie scripturi complexe care vă pot optimiza fluxul de lucru. Rețineți că puteți folosi în continuare cmdlet-urile dacă nu sunteți administrator pe entitatea găzduită, dar veți fi limitat la resursele pe care le dețineți. Cmdlet-urile care încep cu cuvântul „Administrator” sunt concepute pentru a fi utilizate de un cont de utilizator administrativ.

Cmdlet-urile sunt disponibile în galeria PowerShell ca două module separate:

Pentru informații despre modulul de administrare Power Apps, consultați Începeți utilizând modulul de administrare Power Apps și Microsoft.PowerApps .Administration.PowerShell.

Notă! În ceea ce privește asistență Dynamics 365 Government Community Cloud (GCC), nivelul 2:

Punctul final implicit este „prod”. Dacă un utilizator dorește să ruleze un script PowerShell care vizează un mediu GCC, parametrul -Endpoint trebuie schimbat în „usgov” pentru GCC Moderate sau „usgovhigh” pentru GCC High sau „dod” pentru GCC DOD.

PowerShell
Add-PowerAppsAccount -Endpoint "usgov" 

PowerShell în acest subiect necesită versiunea PowerShell 5.x. Pentru a verifica versiunea de PowerShell care rulează pe aparatul dvs., executați următoarea comandă:

PowerShell
$PSVersionTable.PSVersion

Dacă aveți o versiune depășită, consultați Actualizați Windows PowerShell existent.

Important! Modulele descrise în acest document utilizează .NET Framework. Acest lucru îl face incompatibil cu PowerShell 6.0 și versiunile ulterioare, care utilizează .NET Core.

Pentru a rula cmdleturile PowerShell pentru creatorii de aplicații, efectuați următoarele:

  1. Executați PowerShell ca administrator.

    Executați PowerShell ca administrator.

  2. Importați modulele necesare folosind următoarele comenzi:
    PowerShell
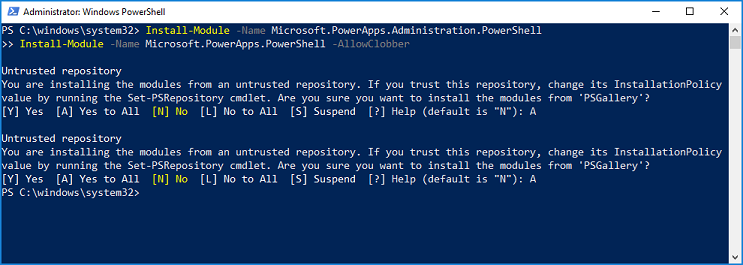
Install-Module -Name Microsoft.PowerApps.Administration.PowerShell
Install-Module -Name Microsoft.PowerApps.PowerShell -AllowClobber

Alternativ, dacă nu aveți drepturi de administrator pe computer, puteți utiliza următoarele pentru a utiliza aceste module:

PowerShell
  • Save-Module -Name Microsoft.PowerApps.Administration.PowerShell -Path
    Import-Module -Name Microsoft.PowerApps.Administration.PowerShell
    Save-Module -Name Microsoft.PowerApps.PowerShell -Path
    Import-Module -Name Microsoft.PowerApps.PowerShell
    
  • Dacă vi se solicită să acceptați modificarea la valoarea InstallationPolicy depozitului, acceptați [A] Da la toate modulele tastând „A” și apăsând Enter pentru fiecare modul.Acceptați valoarea InstallationPolicy.
  • Înainte de a accesa oricare dintre comenzi, aveți opțiunea de a vă furniza datele de acreditare folosind următoarea comandă. Aceste date de acreditare sunt reîmprospătate pentru până la ~ 8 ore înainte de a vi se cere să vă conectați din nou pentru a continua utilizarea cmdlet-urilor.
    PowerShell
# This call opens prompt to collect credentials (Azure Active Directory account and password) used by the commands 
Add-PowerAppsAccount
PowerShell
  1. # Here is how you can pass in credentials (avoiding opening a prompt)
    $pass = ConvertTo-SecureString "password" -AsPlainText -Force
    Add-PowerAppsAccount -Username user@contoso.com -Password $pass.
Scop Cmdleturi
Adăugați o aplicație pânză la o soluție Microsoft Dataverse Set-PowerAppAsSolutionAware
Citiți medii Get-PowerAppEnvironment (anterior Get-PowerAppsEnvironment)
Get-FlowEnvironment
Citiți, actualizați și ștergeți o aplicație pânză Get-PowerApp (anterior Get-App)
Remove-PowerApp (anterior Remove-App)
Publish-PowerApp (anterior Publish-App)
Set-PowerAppDisplayName (anterior Set-AppDisplayName)
Get-PowerAppVersion (anterior Get-AppVersion)
Restore-PowerAppEnvironment (anterior Restore-AppVersion)
Citiți, actualizați și ștergeți aplicația pânză Get-AdminPowerAppRoleAssignment (anterior Get-AppRoleAssignment)
Remove-AdminPowerAppRoleAssignment (anterior Remove-AppRoleAssignment)
Citiți, actualizați și ștergeți un flux Get-AdminFlow
Activați-AdminFlow
Dezactivați-AdminFlow
Remove-AdminFlow
Citiți, actualizați și ștergeți permisiuni flux Get-AdminFlowOwnerRole
Set-AdminFlowOwnerRole
Remove-AdminFlowOwnerRole
Citiți și răspundeți la aprobările de flux Get-AdminFlowApprovalRequest
Remove-AdminFlowApprovals
Citiți și ștergeți conexiunile Get-AdminPowerAppConnection (anterior Get-Connection)
Remove-AdminPowerAppConnection (anterior Remove-Connection)
Citiți, actualizați și ștergeți permisiunile de conexiune Get-AdminPowerAppConnectionRoleAssignment (anterior Get-ConnectionRoleAssignment)
Set-AdminPowerAppConnectionRoleAssignment (anterior Set-ConnectionRoleAssignment)
Remove-AdminPowerAppConnectionRoleAssignment (anterior Remove-ConnectionRoleAssignment)
Citiți și ștergeți conectorii Get-AdminPowerAppConnector (anterior Get-Connector)
Remove-AdminPowerAppConnector (anterior Remove-Connector)
Adăugați, citiți, actualizați și ștergeți permisiunile personalizate ale conectorilor Get-AdminPowerAppConnectorRoleAssignment (anterior Get-ConnectorRoleAssignment)
Get-PowerAppConnectorRoleAssignment (anterior Set-ConnectorRoleAssignment)
Remove-PowerAppConnectorRoleAssignment (anterior Remove-ConnectorRoleAssignment)
Citiți, adăugați și eliminați modelele URL-urilor de politici Obțineți-PowerAppPolicyUrlPatterns
Nou-PowerAppPolicyUrlPatterns
Eliminare-PowerAppPolicyUrlPatterns
Citiți, înregistrați și eliminați aplicațiile de gestionare Get-PowerAppManagementApp
Get-PowerAppManagementApps
New-PowerAppManagementApp
Remove-PowerAppManagementApp
Citiți, creați, actualizați și importați cheile de protecție Get-PowerAppRetrieveAvailableTenantProtectionKeys
Get-PowerAppGenerateProtectionKey
Get-PowerAppRetrieveTenantProtectionKey
New-PowerAppImportProtectionKey
Set-PowerAppTenantProtectionKey

Power Apps cmdleturi pentru administratori

Pentru mai multe informații despre cmdleturi Power Apps pentru administratori consultați Începeți cu PowerShell pentru administratori Power Platform

Sfaturi

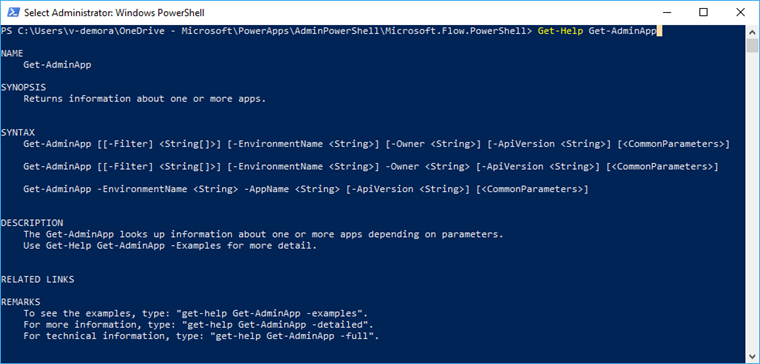
  • Folosiți Get-Help „CmdletName” pentru a obține o listă de exemple.comanda Get-Help.
  • Pentru a parcurge opțiunile posibile pentru etichetele de intrare, faceți clic pe tasta tab după ce introduceți caracterul liniu (-), după numele cmdlet.

Exemple de comenzi:

PowerShell
Get-Help Get-AdminPowerAppEnvironment
Get-Help Get-AdminPowerAppEnvironment -Examples
Get-Help Get-AdminPowerAppEnvironment -Detailed
Exemple de operare

Mai jos sunt câteva scenarii comune care arată cum să utilizați cmdleturi Power Apps noi și existente.

Afișați o listă a tuturor mediilor.

PowerShell
Get-AdminPowerAppEnvironment

Returnează o listă a fiecărui mediu din entitatea dvs. găzduită, cu detalii despre fiecare (de exemplu, numele mediului (guid), numele afișat, locația, creatorul, etc).

PowerShell
Get-AdminPowerAppEnvironment –Default

Returnează detaliile numai pentru mediul implicit al entității dvs. găzduite.

Afișați detaliile unui mediu specific
PowerShell
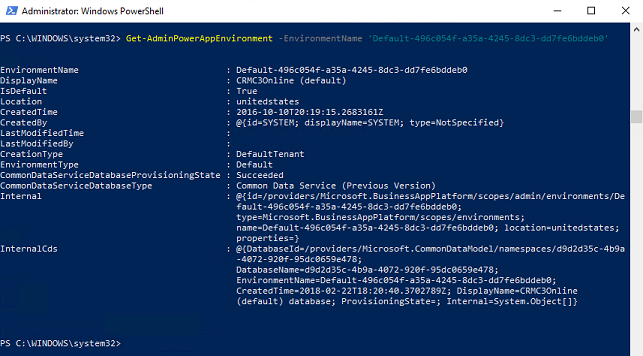
Get-AdminPowerAppEnvironment –EnvironmentName 'EnvironmentName'

Notă: câmpul EnvironmentName este un identificator unic, care este diferit de DisplayName (a se vedea primul și al doilea câmp din ieșire din imaginea următoare).

Comanda Get-AdminEnvironment.

[mai mult...]