
Aplicații
E-mail 996 Solutii
Mac OS Backup Machine
Sitemul de operare MAC OS este insotit de solutia cea mai optima pentru backup, numita time machine.
Ce face asta?
- backup la intreaga configuratie a calculatorului
- backup al fisierelor stocate pe hard disk-ul intern al sistemului
- respecta cu strictete politicile de securitate criptand copia rezervelor facute, printr-un algoritm unic. Backup ce poate fi folosit in 99% din cazuri doar de administratorul respectivului calculator.
Cum foloseste?
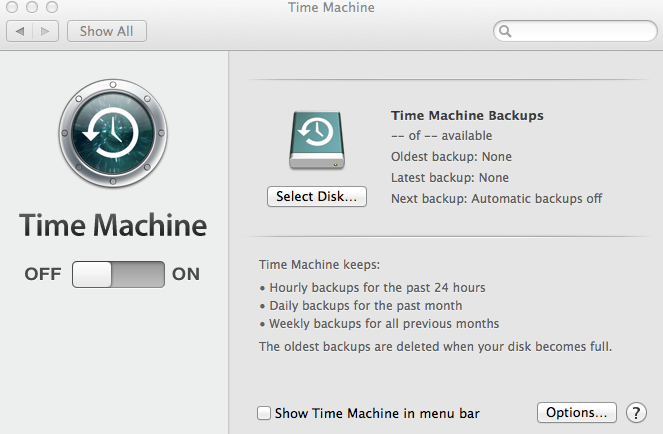
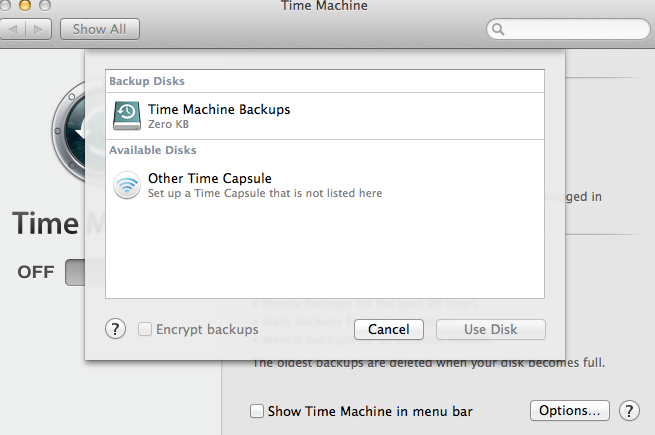
In momentul deschiderii avem butonul de on/off. In momentul in care am selectat on vom putea alege destiantia backup-ului. De preferat un hard disk extern, sau cea de-a doua solutie a lor, Time Capsule.
Dupa ce a fost aleasa locatia, backup-ul incepe automat.
Acesta poate fi configurat in asa fel incat sa se faca automat, la un interval de timp specificat de utilizator (zilnic / saptamanal / lunar).
[mai mult...]Utilizarea terminalului TMUX in Linux
In urmatorii pasi am sa va arat functiile de baza ale terminalului TMUX in sistemul de operare Linux.
[mai mult...]How to Blur an Image in PowerPoint
If your background image is drawing unnecessary attention, or you need to blur part of an image that contains sensitive information, you can do so directly in PowerPoint. We’ll show you how.
Blur an Entire Image

First, open PowerPoint and navigate to the slide containing the image you want to blur. Select the image, and that automatically opens the “Picture Format” tab.

Next, select “Artistic Effects” from the “Adjust” group.

In the drop-down menu that appears, click the Blur option.

Your image in its entirety is now blurred. If it’s not as blurry as you’d like, you can adjust it manually. Back in the “Artistic Effects” drop-down menu, select “Artistic Effects Options.”

The “Format Picture” pane appears on the right side of the window. Under “Artistic Effects,” find the bar next to “Radius” and drag the setting to the right to increase the blurriness of the image until you’re happy with it.

What if you only want to blur a specific part of an image instead of the entire picture? While it’s not a straightforward process, there is a way you can do it.
Blur Part of an Image
As Office states, there’s not a blur tool explicitly designed to blur part of an image. This trick requires a little manipulation of the other tools.
The first thing you need to do is insert a shape that covers the area of the photo you want to blur. You can use one of the default shapes from the “Illustrations” group on the “Insert” tab, or you can draw a freeform shape.
Once you have your shape, adjust it to cover the part of the image you want to blur.
RELATED: How to Change a Shape Using Edit Points in Microsoft PowerPoint

After you insert the shape, you’re moved to the “Shape Format” tab. In the “Shape Styles” group, select “Shape Fill,” and then select “Eyedropper” from the drop-down menu.

This allows you to choose a part of the image that is close to the color you want to make the shape.

Next, head back over to the “Shape Styles” group of the “Shape Format” tab. Click “Shape Effects,” and then select “Soft Edges” from the drop-down menu that appears.

A sub-menu appears showcasing several different soft edge variations. Choose one that works best for you. For this example, we selected the 25-point variation.

That specific part of the image should now appear blurred without drawing unnecessary attention.

Now, we need to group the image and shape so they stay together if you need to adjust something else later. To do this, hold the ctrl key and click both objects.
RELATED: How to Anchor Pictures to Text in PowerPoint

Now, in the “Picture Format” tab, select “Group” from the “Arrange” section. In the drop-down menu, click “Group.”

The two objects are now joined together. This allows you to adjust the background while the blurry shape stays in the correct location.
[mai mult...]Nvidia aduce serviciul pentru streaming de jocuri GeForce Now pe platforma Android
Timp de mulţi ani, pasionaţii de jocuri au avut de ales între două mari platforme, PC şi consolă, fiecare venind cu propriul set de avantaje şi dezavantaje. Între timp, avansul tehnologic a permis apariţia platformelor pentru streaming de jocuri la care te poţi abona şi savura titlurile preferate chiar dacă nu deţii un dispozitiv dedicat pentru gaming
[mai mult...]How to Enable Ultra-Low Latency Mode for NVIDIA Graphics

NVIDIA’s graphics drivers now offer a “Ultra-Low Latency mode” intended for competitive gamers and anyone else who wants the fastest input response times in their games. This feature is available for all NVIDIA GeForce GPUs in the NVIDIA Control Panel.
What Is Ultra-Low Latency Mode?

Graphics engines queue frames to be rendered by the GPU, the GPU renders them, and then they’re displayed on your PC. As NVIDIA explains, this feature builds on the “Maximum Pre-Rendered Frames” feature that’s been found in the NVIDIA Control Panel for over a decade. That allowed you to keep the number of frames in the render queue down.
With “Ultra-Low Latency” mode, frames are submitted into the render queue just before the GPU needs them. This is “just in time frame scheduling,” as NVIDIA calls it. NVIDIA says it will “further [reduce] latency by up to 33%” over just using the Maximum Pre-Rendered Frames option.

This works with all GPUs. However, it only works with DirectX 9 and DirectX 11 games. In DirectX 12 and Vulkan games, “the game decides when to queue the frame” and the NVIDIA graphics drivers have no control over this.
Here’s when NVIDIA says you might want to use this setting:
“Low Latency modes have the most impact when your game is GPU bound, and framerates are between 60 and 100 FPS, enabling you to get the responsiveness of high-framerate gaming without having to decrease graphical fidelity. “
In other words, if a game is CPU bound (limited by your CPU resources instead of your GPU) or you have very high or very low FPS, this won’t help too much. If you have input latency in games—mouse lag, for example—that’s often simply a result of low frames per second (FPS) and this setting won’t solve that problem.
Warning: This will potentially reduce your FPS. This mode is off by default, which NVIDIA says leads to “maximum render throughput.” For most people most of the time, that’s a better option. But, for competitive multiplayer gaming, you’ll want all the tiny edges you can get—and that includes lower latency.
How to Enable Ultra-Low Latency Mode
You’ll need version 436.02 or newer of the NVIDIA graphics driver to take advantage of this. You can update your graphics driver through the GeForce Experience application or download the latest graphics driver directly from NVIDIA’s website.
Once you have, launch the NVIDIA Control Panel. To do so, right-click your Windows desktop and select “NVIDIA Control Panel.”

Click “Manage 3D Settings” under 3D Settings in the left sidebar.
Select how you want to enable Ultra-Low Latency Mode. To enable it for all games on your system, select “Global Settings.” To enable it for one or more specific games, select “Program Settings” and choose the game you want to enable it for.

Locate “Low Latency Mode” in the list of settings. Click the setting box to the right of the setting and select “Ultra” in the list.
With the default settings of “Off,” the game’s engine will queue one to three frames at a time. The “On” setting will force the game to only queue a single frame, which is the same as setting Max_Prerendered_Frames to 1 in older NVIDIA drivers. The Ultra setting submits the frame “just in time” for the GPU to pick it up—there will be no frame sitting in the queue and waiting.

Click the “Apply” button to save your settings. You can now close the NVIDIA Control Panel.

Remember, as we pointed out above, this option can actually hurt performance in many situations! We recommend enabling it only for specific games and testing your settings to see how well it actually works.
If you want to undo your changes and use the NVIDIA graphics driver’s default settings, return here and click the “Restore” button.
[mai mult...]