Instalare si configurare aplicatii specifice

How to optimize (overclock/undervolt) your amd sapphire gpu using SAPPHIRE TriXX app

Download & Install Sapphire TriXX

  1. Go to the official Sapphire site:
    https://www.sapphiretech.com/en/software
  2. Scroll to SAPPHIRE TriXX and click Download (make sure it’s the latest version).
  3. Open the downloaded .exe file and follow the on-screen instructions:
    • Accept the license agreement
    • Choose installation folder (default is fine)
    • Let it install required drivers/components if prompted
  4. Once installed, launch TriXX from your desktop or Start Menu
  5. First Launch Setup
  • Allow permissions: Windows may ask for admin permission — click Yes
  • Select your GPU (if you have multiple)
  • Familiarize yourself with the tabs:
    • Hardware Monitor / Info → Real-time GPU stats (temps, usage, fan RPM, clocks)
    • Overclocking → Adjust core/memory clock, voltage, and power limit
    • Fan Control → Set auto, fixed, or custom fan curves
    • TriXX Boost → Resolution scaling + Radeon Image Sharpening
    • Profiles → Save and load settings.
  1. Using TriXX to Optimize
  2. Monitor Your GPU
  • Go to Info tab → watch temperatures, fan speed, and clock speeds while gaming or running a benchmark
  • This baseline helps you know how much headroom you have for overclocking
  1. Overclock for Performance
  1. Go to Overclocking tab
  2. Increase Core Clock in small increments (+25–50 MHz)
  3. Do the same with Memory Clock
  4. Optionally increase Board Power Limit (+10–20%)
  5. Apply settings, then test with a benchmark or a demanding game
  6. If stable, repeat; if unstable (crashes/artifacts), lower settings slightly.

Tip: Keep GPU temps below 80–85 °C for long-term safety.

  1. Undervolt for Efficiency (Optional)
  • In Overclocking tab, lower VDDC (Voltage) slightly while keeping clocks stable
  • This reduces heat and noise, but may require trial and error
  1. Control Fans
  1. Go to Fan Control tab.
  2. Choose:
    • Automatic → GPU manages fans
    • Fixed → Constant speed (louder, but stable temps)
    • Custom Curve → Your own temperature-to-RPM mapping
  3. Test by running a game to check noise vs. temperature balance.
  1. Boost FPS with TriXX Boost
  1. Go to TriXX Boost tab
  2. Enable TriXX Boost
  3. Choose a slightly lower resolution (e.g., 85–90% of native) with Radeon Image Sharpening ON
  4. Launch your game — you should see a noticeable FPS bump.
  1. Save Profiles
  • In Profiles tab, save different setups:
    • Max OC → For gaming sessions
    • Quiet Mode → Lower fan noise for everyday use
    • Default → Stock settings.
  1. Testing & Stability Checks
  • Use tools like FurMark, 3DMark, or demanding games to stress-test.
  • Watch for:
    • Screen artifacts (weird lines/shapes)
    • Crashes
    • Overheating
  • If problems occur, lower your OC or voltage changes.
  1. Maintenance
  • Keep TriXX updated from the official site.
  • Clean your GPU fans every few months to maintain cooling efficiency.
[mai mult...]

How to install ADUC (Active Directory users and computers) in Windows 11

In Windows 11 RSAT is installed online as a “feature on demand”. To install the Active Directory RSAT on Windows 11, go to Settings -> Apps -> Optional Features -> Add an optional feature (View features).

Type ‘Active Directory’ in the search bar and select:

RSAT: Active Directory Domain Services and Lightweight Directory Services Tool.

Click Next-> Install to start the installation. Then Windows connects to Microsoft servers, downloads and installs the Active Directory Remote Server Administration Tools (including Active Directory graphical consoles, command prompt tools, and Active Directory PowerShell module).

If this method doesn’t work (how it was on my work laptop) you can also install AD administration tools using Powershell:

Open Powershell with Administrator privileges and type:

Add WindowsCapability -online -Name Rsat.ActiveDirectory.DS-LDS.Tools~~~~0.0.1.0

If you get an error while installing, you can also type the following and retry:

PS-EnableRemoting 

If you prefer Command Prompt more than the PowerShell or the GUI route, this method will suit you the best.

  • To enable the Active Directory this way, first, head to the Start Menu and type cmd to perform a search. Then, right-click on the ‘Command Prompt’ tile and click to select the ‘Run as administrator’ option.
  • Now, a UAC screen will appear on your screen. If you are not logged in with an administrator account, enter the credentials for one. Otherwise, click on the ‘Yes’ button to proceed.
  • After that, on the Command Prompt window, type or copy/paste the below-mentioned command and hit Enter on your keyboard to execute the command and install the ADUC on your system.
DISM.exe /Online /Get-CapabilityInfo /CapabilityName:Rsat.ActiveDirectory.DS-LDS.Tools~~~~0.0.1.0
  • Once installed successfully, head to the Start Menu and type Windows Tools in the menu to perform a search. Then, from the search results, click on the ‘Windows Tools’ tile to open it.
  • Now, on the ‘Windows Tools’ window, locate and double-click on the ‘Active Directory Users and Computers’ tile to open it.
  • After you succesfully installed the feature you need to log-in with your Administrator account or to ‘Run as administrator’ when you launch it.

There you go. You can enable the Active Directory on your Windows 11 PC using the above-mentioned methods and manage all the users centrally.

[mai mult...]

Clonare iphone ( iOS 12.5 >=)

Astazi ne-am propus sa clonam un iPhone (adica transferul tuturor datelor 1:1 de pe un iphone dat, pe unul nou).

Mai intai trebuie indeplinite cateva conditii:

  • ambele iphone-uri ruleaza iOS versiunea 12.4 sau mai noua
  • vom folosi acelasi cont Apple ID pe ambele device-uri
  • nu am configurat inca pentru utilizare iPhone-ul tinta (cel pe care vrem sa ajunga datele)

Pasul 1.  Activam bluetooth-ul pe iphone-ul de pe care dorim sa clonam si pornim iphone-ul tinta (cel pe care vom clona)

Pasul 2. Asezam device-urile unul langa celalalt. Cand vedem  “Quick Start” pe ecranul iphone-ului tinta, selectam “Continue”

Pasul 3. Apoi vom vedea o animatie pe iPhone-ul nou. Tinem iPhone-ul vechi deasupra celui nou, centram animatia si apoi dam click pe: “Finish on New iPhone”

Pasul  4. Introducem passcode-ul iPhone-ului vechi pe cel nou

Pasul 5. Urmam instructiunile pentru AppleID si faceID (acelasi cont pe ambele)

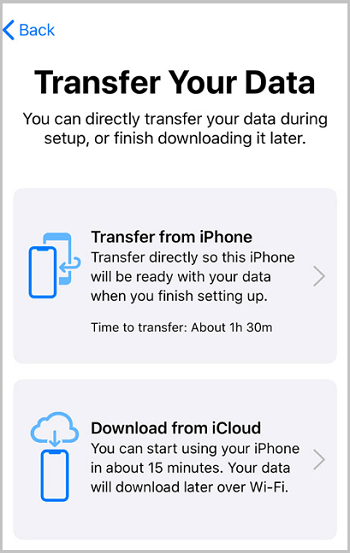
Step 6. Acum click pe “Transfer from iPhone”  pentru a se clona integral datele. Cand este gata procesul putem spune ca a avut succes clonarea. * in functie de volumul de date, procesul poate dura.

[mai mult...]