Cum reducem numarul de utilizatori cu privilegii si acces la informatii sensibile din organizatie?
Organizațiile au adesea de două până la trei ori mai multe conturi de utilizator privilegiate decât angajații individuali. Securizarea acestor conturi speciale este vitală pentru a proteja informațiile sensibile și sistemele critice împotriva atacurilor cibernetice. Pentru a ajuta oamenii să rămână productivi, trebuie să oferiți acces adecvat pentru utilizatorii privilegiați, minimizând totodată riscul.
Utilizatorii privilegiați necesită manipulare, instruire și supraveghere speciale.
Trebuie sa acordam atentie speciala urmatoarelor elemente:
-Cum diferă utilizatorii privilegiați de alte tipuri de utilizatori.
-Riscuri asociate cu compromisul și utilizarea greșită a conturilor de utilizator privilegiate.
-Modul în care gestionarea privilegiilor face organizația dvs. mai puțin vulnerabilă la amenințările tot mai mari care cauzează daune monetare și reputaționale.
Veți obține o înțelegere practică a diferitelor tipuri de utilizatori, cu accent pe utilizatorii privilegiați și gestionarea utilizatorilor privilegiați, inclusiv ce sunt utilizatorii privilegiați, unde se află aceștia în mediul dumneavoastră IT și modul în care funcționează. Cel mai important, veți înțelege riscurile asociate cu utilizatorii privilegiați și cum să protejați cel mai bine sistemele IT și datele sensibile de amenințările externe și interne.
Definiții cheie ale contului de utilizator privilegiat
Există două categorii de conturi IT, asociate cu diferite tipuri de utilizatori:
Conturi de utilizator standard: un cont de utilizator reprezintă de obicei o identitate umană (cum ar fi un cont de utilizator Active Directory) și are o parolă asociată pentru a proteja informațiile și pentru a preveni accesul oricui altcineva fără permisiune. De obicei, există o singură parolă de cont pentru fiecare utilizator care trebuie memorată de o persoană.
Utilizatori standard: utilizatorii standard sunt de obicei utilizatori de afaceri care nu au nevoie de sisteme sau informații speciale pentru a-și face treaba. Majoritatea angajaților organizațiilor mari sunt utilizatori standard. Ei pot accesa aplicații de pe propriile computere și sisteme interne, cum ar fi aplicațiile de e-mail și de afaceri. Utilizatorii standard au o capacitate limitată de a face modificări la stațiile de lucru furnizate de companie și nu au acces direct la sisteme sau date sensibile.
Conturi de utilizator privilegiate: Conturile de utilizator privilegiate oferă niveluri administrative sau specializate de acces la sistemele întreprinderii și la date sensibile, pe baza nivelurilor ridicate de permisiuni.
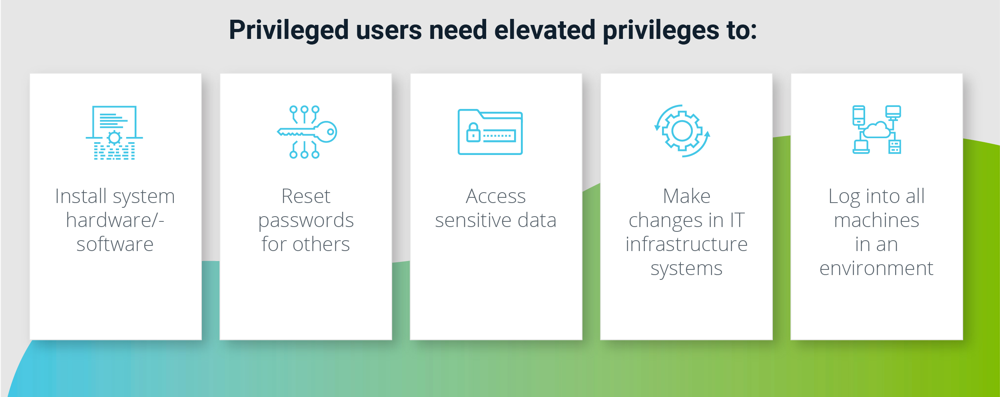
Utilizatori privilegiați: acești utilizatori sunt adesea membri ai echipei IT, dar nu trebuie să fie. Utilizatorul privilegiat tipic este un administrator de sistem responsabil cu gestionarea unui mediu sau un administrator IT al unui anumit software sau hardware. Au nevoie de privilegii ridicate pentru a:
-Instalați hardware/software de sistem
-Resetați parolele pentru alții
-Accesați date sensibile
-Faceți modificări în sistemele de infrastructură IT
-Conectați-vă la toate mașinile dintr-un mediu
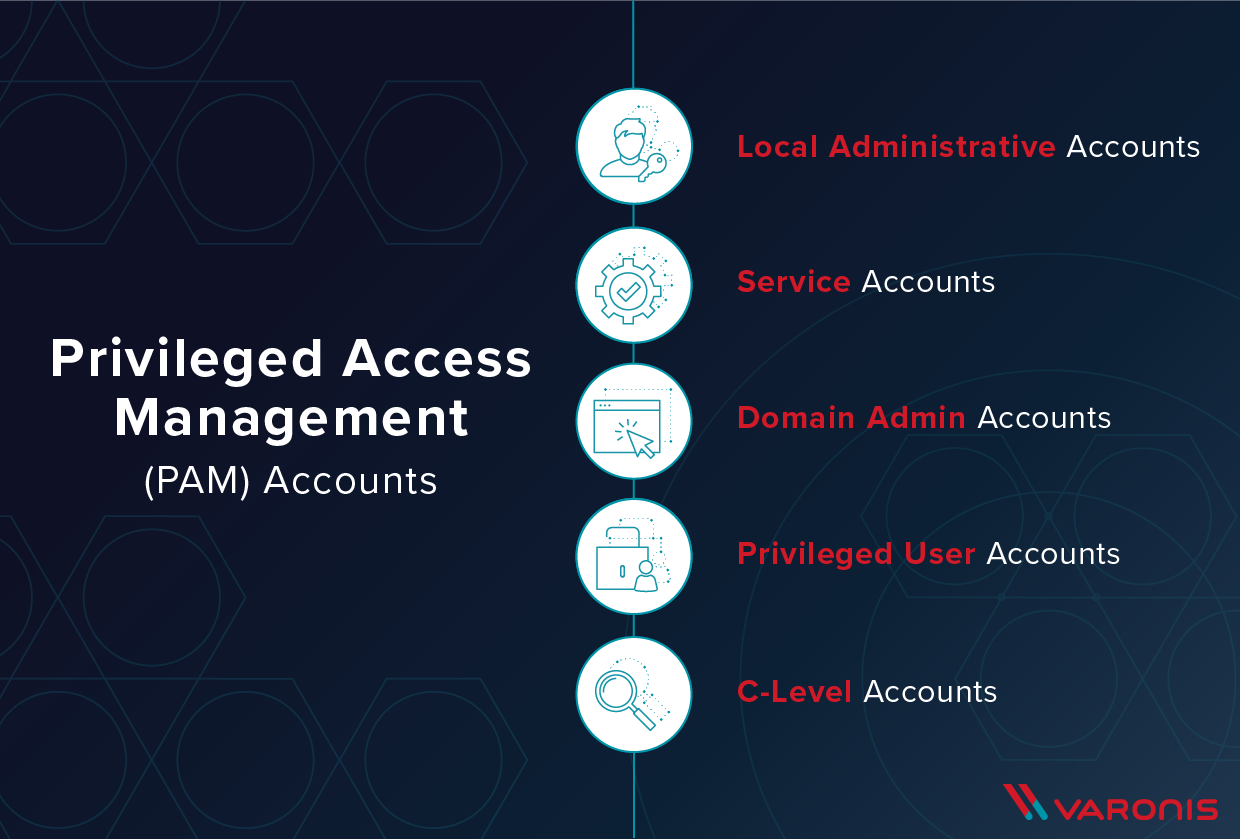
Pași pentru a securiza diferite tipuri de conturi de utilizator privilegiate
Conturi de administrator local
Ce este? Fiecare stație de lucru are un cont de administrator. Contul implicit de administrator local este primul cont creat. Acest cont oferă utilizatorului acces și control complet asupra fișierelor, directoarelor, serviciilor, aplicațiilor și altor resurse din serverul local. De asemenea, poate fi folosit pentru a crea noi utilizatori locali și pentru a atribui sau modifica permisiuni pe computerul local.
Care este riscul: acesta este unul dintre principalii vinovați ai angajaților care sunt supraprivilegiați, deoarece este adesea oferit angajaților în mod implicit și le oferă acces în exces de care nu au neapărat nevoie.
Ce trebuie să faceți: eliminați accesul implicit la acest cont sau redenumiți-l sau dezactivați-l pentru a preveni utilizarea neautorizată. Aplicați drepturile de utilizator cu cel mai mic privilegiu pe toate computerele și serverele.
Conturi de administrator de domeniu
Ce este? Contul Domain Admin are acces deplin la aproape toate resursele, inclusiv controlerul Active Directory (AD).
Care este riscul: Deoarece aceasta este implicită pentru controlerele de domeniu, stațiile de lucru și serverele membre, dacă este compromisă sau utilizată greșit, are acces larg în rețea.
Ce trebuie să faceți: Numai un număr limitat de utilizatori ar trebui să aibă acces la acest tip de cont și toată activitatea trebuie monitorizată activ și auditată în mod curent. Stabiliți un proces formal de aprobare pentru a atribui acces „la cerere” acestor conturi.
Conturi privilegiate de utilizator de date
Ce este? Acesta este un cont de utilizator standard care are acces la date sensibile sau privilegiate: un broker cu acces la înregistrările financiare, un contabil cu acces la documentele fiscale, un medic cu acces la datele pacientului, un avocat cu acces la informațiile sensibile ale clienților.
Care este riscul: deoarece acestea sunt adesea conturi obișnuite, care se întâmplă să aibă acces extraordinar, este posibil să nu fie monitorizate sau auditate, iar politica privind parolele poate să nu reflecte natura sensibilă a conturilor.
Ce trebuie să faceți: Efectuați o evaluare a riscului de date pentru a identifica conturile privilegiate și utilizatorii care au acces la acestea, apoi luați măsuri pentru nu numai a consolida aplicația care găzduiește datele, ci și pentru a limita accesul pentru conturile obișnuite. Asigurați-vă că aceste conturi sunt supuse unui control și protocoale de securitate mai ridicate.
Urgență / Spargerea conturi de sticlă
Ce este? În cazul unui incident critic, anumiți utilizatori pot avea nevoie de acces la sisteme sau conturi privilegiate. În aceste cazuri, un cont de urgență, care este dezactivat implicit, poate servi ca o modalitate alternativă de accesare a sistemelor importante. Aceste tipuri de conturi sunt rezervate pentru situații de urgență, cum ar fi un atac cibernetic, care limitează accesul la conturile de administrator obișnuite.
Care este riscul: deoarece aceste conturi au acces la sisteme sensibile atunci când sunt activate, dacă sunt comandate de un atacator, ar putea fi folosite ca ușă din spate.
Ce trebuie să faceți: Limitați accesul la aceste conturi, monitorizați în mod activ și asigurați-vă că sunt disponibile numai în caz de urgență și nu ca o ușă din spate către date sau sisteme sensibile.